


With Django, you can use Python to launch an application within hours. While the use of a Django TextField, takes away most of the hassle of developing your own rich text editor within your app. So, using the right combination of Django integrations and components, your focus can solely rest on your app and its end users. That saves time!
When you’re aiming to squarely focus on your users and their experience, make sure that focus includes when they’re entering text, data, messages, images, emojis...all the types of content used to communicate.
The TinyMCE rich text editor caters for a wide variety of use cases, is highly customizable, and has integrations available for many frameworks such as React, Angular, and Vue. TinyMCE also works with wider communities to support integrations, like a Django TextField.
Thanks to Remy, Ivan, Aljosa, and the rest of this community, developers can enhance their Django apps with the power and flexibility that comes with the TinyMCE rich text editor with django-tinymce.
“We wanted a way to add a WYSIWYG editor so users could edit HTML descriptions in text areas in the Django Admin and other Django forms. A lot of people were considering using Django with TinyMCE and it was great to be able to collaborate on a piece of code that could help ease integration.
TinyMCE is a clean editor that is highly customizable and comes with a handful of plugins that can help integrate images and links. Using django-tinymce with django-filebrowser is really nice, with a neat, smooth experience.”
Remy Hubscher, TinyMCE-Django integration engineer, and Engineering Manager
This post explores the TinyMCE Django integration. It shows the essential steps when setting a Django TextField in a demo app within a project, and then demonstrates the benefits of using TinyMCE as your Django TextField.
A plain Django TextField
Starting off with an example Django app, the procedure in the following paragraphs makes a demo Django web page that acts like a basic CMS (become an admin, log in, create a page, save and publish).
Prerequisite before Django TextField building
- Django installed on your developer environment
- A database option installed (SQLite works for a small example)
- A text editor like VS code or similar you can work in
- Command line access
Here’s how to get the plain Django TextField built:
-
Create a new project folder in your developer environment, and change into it`:
mkdir newProject

cd newProject-
Make the Django project, and then change into the new project directory.
django-admin startproject newEditor

cd newEditor
-
After you change into the project directory, you can create the actual text editor app with the
startappcommand:
django-admin startapp writingApp- Confirm that you have the following directory structure (approximately):
newProject/
manage.py

cd newProject/

__init__.py
asgi.py
settings.py
urls.py
writingApp
wsgi.py

cd writingApp/

admin.py
apps.py
migrations
models.py
tests.py
views.py-
To continue modifying the project, locate the settings.py file in the newProject. Make the following changes:
INSTALLED_APPS = [
    'django.contrib.admin',
    'django.contrib.auth',
    'django.contrib.contenttypes',
    'django.contrib.sessions',
    'django.contrib.messages',
    'django.contrib.staticfiles',
    'writingApp' #This is the new app that has the plain TextField
]With that done, the Django demo CMS is off the ground, but not flying yet. For that, the next part is setting up the Plain Django Textfield.
-
Change into the writingApp directory, and open the models.py file. This model file tells Django what you’re looking for – a basic textarea for the website:
…

from django.db import models

# Create your models here.
class textEditor(models.Model):
    content = models.TextField()
-
Save the changes, and change directory to return to the newProject directory and run these commands to get the TextField registered with the Django example app’s database:
 ..
python manage.py makemigrations
python manage.py migrate
-
Change back into the writingApp directory, and then open the admin.py file – add the following:
from .models import textEditor
from django.forms import forms, Textarea
from django.db import models

# Register your models here.
class textEditorAdmin(admin.ModelAdmin):
    formfield_overrides = {
    models.TextField: {'widget': Textarea()} #optional, set Textarea attributes `attrs={'rows':2, 'cols':8}`
    }

admin.site.register(textEditor, textEditorAdmin)

#Establish a textarea, a plain textarea, as a the TextField in Django-
Save the changes, and then make a new directory called “templates” (this will get a reference later, it’s a part of the CMS-like behavior of this example):
mkdir templates/-
Change into the templates directory, and create a homepage HTML file with the following contents:
cd templates/
touch homepage.html
…

<head>
    {% load static %}
</head>
<body>
    {% for txt in text %}
    <p> {{txt.content|safe}} </p>

    {% endfor %}
</body> #load static tag loads options for static files.-
Save the changes, and then change out of the writingApp directory and back up into the project directory.
With the plain Django TextField complete, the project needs some more configuration, but with the following steps done, you can switch on and try out the Django demo.
Testing the text field in Django
-
Create a new Python file called “urls.py” and add the following content. This sets up the Django demo for behaving a bit like a CMS and links back to the homepage file set up down at the app level of the example:
from django.urls import path
from .import views


urlpatterns = [
    path('', views.homepage),
]-
Save the changes, and open up the views.py file. Make the following changes:
from .models import textEditor
# Create your views here.
def homepage(request):
    text = textEditor.objects.all()
    context = {
        'text':text
    }
return render(request, "homepage.html",context)-
Save the changes, and then on the command line, run the following command to set up a superuser admin account so you can log into your Django demo, and try out the plain TextField (remember, a secure password is important, even in a demo). For example:
python manage.py createsuperuser
Username (leave blank to use 'your.name'): your.username2
Email address: youremail2@address.com
Password: ############
Password (again): ##########
Superuser created successfully.-
Start the Django example using the “runserver” command, and then head to the <local-host>/admin/ address available on the command line to log in:
python manage.py runserver
…
Starting development server at http://XXX.0.0.X:X000/-
Log in to the Django example app at http://XXX.0.0.X:X000/admin, and select the “Add” button under the WritingApp heading.
-
In the new screen that opens, you can start writing in your TextField:
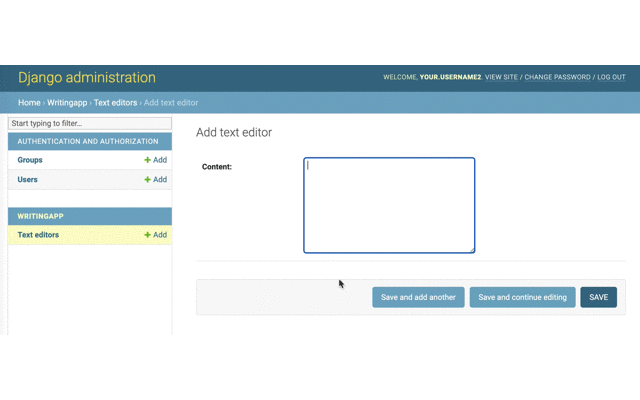
After saving the plain TextField, navigate to http://XXX.0.0.X:X000/homepage/ to see the text content.
Django TextField max length
When importing different widgets from the Django.forms library, each of the widgets have their own attributes you can set up. The TextField max_length attribute is configured in the models.py file. While this restricts the number of characters anyone can enter into the plain TextField, it won’t be reflected in the database. The CharField attribute is required for this.
Django TextField vs CharField
While the Django example in the previous section used the TextField widget, the CharField widget is also available for text entry. They are both string-based fields, but the key difference between these two is length. CharField is designed and intended for small segments of texts, so only use it if your requirements ask for small text entry fields, like a form.
What is the limit of TextField in Django?
As you can see, when creating content with a TextField, the content is limited to unstyled text. You can add CSS or JS to change its appearance, but it’s at the point of style that the plain TextField reaches its limit.
For any form of styled text, you’ll need to look into a WYSIWYG that can provide an enriched TextField for reliable content creation. This is where the Django and TinyMCE integration can help.
Getting started with django-tinymce
The next section jumps directly into reconfiguring the Django example into a TinyMCE with Django demo. For more information on the integration, you can check out the docs to get the full context – django integration. More information is available here:
- Documentation – https://django-tinymce.readthedocs.io/en/latest/
- Project on PyPI – https://pypi.org/project/django-tinymce/
- Project on GitHub – https://github.com/aljosa/django-tinymce
How to set up the django-tinymce integration
Adding the django-tinymce integration is a matter of adjusting the TextField in the model, and making some configuration adjustments to the example settings.py and homepage.html files.
-
Stop the Django demo running with the CTRL + C keys, and then install the django-tinymce integration with the pip command:
pip install django-tinymce-
In the project directory, open the settings.py file again, and add TinyMCE to the list of installed apps:
INSTALLED_APPS = [
  "django.contrib.admin",
  "django.contrib.auth",
  "django.contrib.contenttypes",
  "django.contrib.sessions",
  "django.contrib.messages",
  "django.contrib.staticfiles",
  "writingApp",
  "tinymce",
];
-
To access premium plugins, you’ll need an API key. When you sign up for a TinyMCE API key (which is free, and can be done with a Google or GitHub account) you get 14 days FREE access to TinyMCE’s Premium features. Use the TinyMCE JS URL key along with the TinyMCE CDN link as a value to connect to TinyMCE.
Also include the TinyMCE compressor key and set it to “false”:
TINYMCE_JS_URL = "https://cdn.tiny.cloud/1/no-api-key/tinymce/6/tinymce.min.js";

TINYMCE_COMPRESSOR = False;
-
To configure TinyMCE, add the following configuration content to the settings.py file:
TINYMCE_DEFAULT_CONFIG = {
  theme: "silver",
  resize: "false",
  menubar: "file edit view insert format tools table help",
  toolbar:
    "undo redo | bold italic underline strikethrough | fontselect fontsizeselect formatselect | alignleft aligncenter alignright alignjustify | outdent indent |  numlist bullist checklist | forecolor backcolor casechange permanentpen formatpainter removeformat | pagebreak | charmap emoticons | fullscreen  preview save print | insertfile image media pageembed template link anchor codesample | a11ycheck ltr rtl | showcomments addcomment code typography",
  plugins:
    "advlist autolink lists link image charmap print preview anchor searchreplace visualblocks code fullscreen insertdatetime media table powerpaste advcode help wordcount spellchecker typography",
  selector: "textarea",
};
-
Save the changes, and then open the urls.py file – adjust the url patterns to include TinyMCE:
   path('tinymce/',include('tinymce.urls')), # new

] -
Save the changes, and with that done, it’s time to adjust the plain TextField model to use TinyMCE instead of a TextField – change into the writingApp directory, and open the admin.py file.
-
Change the imported content (comment out the Textarea and forms import), and adjust the class to reference TinyMCE:
#from django.forms import forms, Textarea
from tinymce.widgets import TinyMCE

formfield_overrides = {
  models.TextField: {'widget': TinyMCE()}
}-
Save the changes and then access the homepage.html file in the templates folder. Modify the HTML to match the following content:
<head>
    {% load static %}
  <link href="{% static 'tinymce/css/prism.css' %}" rel="stylesheet">

</head>

<body>
    {% for txt in text %}
    <p> {{txt.content|safe}} </p>
    {% endfor %}
</body>
<script src="{% static 'tinymce/js/prism.js' %}"></script>-
Save these changes, and the change back up into the project directory. You can now restart the Django demo, and create a new page using TinyMCE’s features:
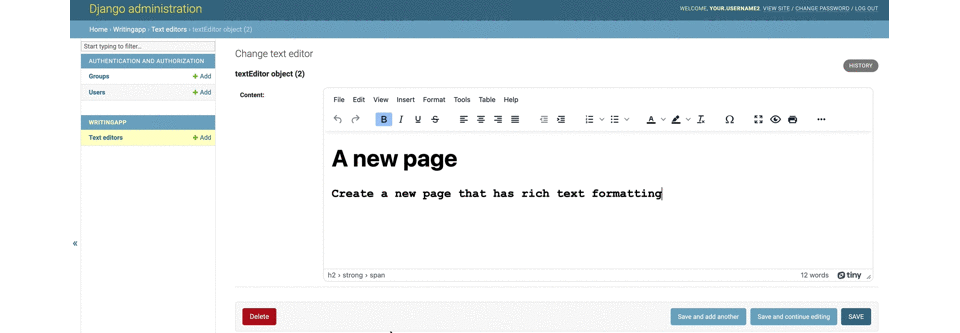
How to resize Django textarea
To resize the text area, configure the TinyMCE editor width and height options in settings.py directly. No need for adjusting the model. Use the TinyMCE height and width adjustment options. This example changes the text area to become a 400 by 400 pixel square:
TINYMCE_DEFAULT_CONFIG = {
    "height": "400",
    "width": "400",

…

}How to disable textarea resize in Django
To do this, use the Tinymce option “resize: false” in settings.py. Add this key and value to the TinyMCE default config array and the text area will not change its size.
How to count characters in a Django TextField
The TinyMCE wordcount plugin automatically provides a word count in the lower right of the text area. This plugin also comes with options to retrieve a character count, and switch from word to character count. Check on the article about character count limits for more information.
Support for django-tinymce
For difficulties integrating TinyMCE with Django: create an issue against the django-tinymce project on GitHub here – django-tinymce issues.
For issues with the open source TinyMCE editor itself: create an issue for the TinyMCE project on GitHub – tinymce issues. We’ll respond as soon as we can.
Make the most of TinyMCE in your apps
A lot of developers don’t realize just how powerful and flexible TinyMCE is – check out:
- Some of the ways you can customize the TinyMCE toolbar to fit in with your desired UX.
- Simplify TinyMCE image upload with Tiny Drive.
- See the plugins directory for a full list of core and premium features, including our hugely popular PowerPaste plugin.
- Or, consider running TinyMCE from the cloud, if you’re not already, so you’re always up to date with the latest build and newest features. Get a free API Key and try it out (you’ll also get a free trial of our Premium plugins!)
Interested how get rich text editing opportunities for the textarea of a different framework? We have guides to help you with this: learn how to configure and work with enriched
Contact us if you have any further questions about building your app with TinyMCE.


