


Blazor lets you know when there’s an error with clear command line responses, but that doesn’t reduce the frustration when you've got 16 to 32 tabs open… all searches with Blazor textbox errors pasted in them. No, a great framework integration for a Blazor TextBox shouldn’t take up all your research (or spike) time if you’re working in a sprint. Instead, use a Blazor TextBox integration that fits right into your .razor files and doesn't waste any time on reading console errors.
That’s why there’s an official TinyMCE rich text editor Blazor integration. This article explains, as part of Tiny’s commitment to expanding and supporting our dev community, how to get a TextBox started in Blazor, and then integrate TinyMCE with Blazor (as a basic, Blazor TextBox replacement). Here’s how it works…
What is Blazor?
Blazor is an open-source web framework, developed by Microsoft. It enables developers to create web applications using C# and HTML within the .NET developer platform. Blazor replaces JavaScript as the main language for building interactive web UIs (it uses C# instead).
Blazor apps are made of reusable components implemented using C#, HTML, and CSS. This assists in easier, faster coding (and no need to fall back on older JavaScript patterns). Another drawcard for many developer communities, is that both the client and server are coded in C#, which helps with easier library sharing.
Why use Blazor
Blazor is relatively new (released in May of 2020), and since its introduction, it’s been getting quite a lot of buzz within the developer community. To borrow a line from Chris Sainty at StackOverflow:
So, it’s rapidly becoming a popular framework: more and more developers are using it to develop modern-day apps – especially to include useful components like a Blazor TextBox. Some devs have even made bold claims that Blazor is replacing Javascript, and is becoming the ‘framework of choice’ for frontend apps.
With TinyMCE retaining its position at the forefront of rich text editing technology (including content and text area configurations), it’s important to invest, integrate, and support popular emerging technologies. Doing so ensures that both developers and end-users can access modern up-to-date code that enables them to build ‘the next big thing’.
A plain Blazor TextBox
Here are the steps and code needed to get a basic, Blazor TextBox running:
-
Create a new directory on your developer workstation
-
In the new directory, run the following command to get a Blazor application started. This example names the application “BlazorTextbox”:
dotnet new blazorserver -o BlazorTextbox --no-https-
Change into the BlazorTextbox directory. At the top level, you can see a folder called “pages/”. Modifying the .razor format files in this folder is an essential step.
-
Create a new C# file to hold the Blazor TextBox model. This example restricts the number of characters that can be added to the Blazor TextBox. Add the following to the file:
Touch TextBoxModel.cs

...

using System.ComponentModel.DataAnnotations;
public class TextBoxModel

{
    [Required]
    [StringLength(15, ErrorMessage = "That's too long.")]
    public string? Name { get; set; }
}-
Save the changes
-
Change into the pages directory
-
Create a new .razor file for the TextBox (This one is called “TextBoxExample”), and add the following content to set up the TextBox:
@page "/text-box-example"

@using Microsoft.Extensions.Logging

@inject ILogger<TextBox> Logger

<EditForm Model="@TextBoxModel" OnValidSubmit="@HandleValidSubmit">
    <DataAnnotationsValidator />
    <ValidationSummary />
<InputText id="name" @bind-Value="TextBoxModel.Name" placeholder="Your text here"/>
<button type="submit" >Submit</button>
</EditForm>

@code {
    private TextBoxModel TextBoxModel = new();
    protected bool isDisabled {get; set;}
    private void HandleValidSubmit()
    {
        Logger.LogInformation("HandleValidSubmit called");
        // Process the form
    }
}-
Save the changes
-
Start the Blazor app with the X command, and check on the Text-Box-Example page when your Blazor app loads to see the plain Blazor TextBox:
How to get started with TinyMCE in Blazor
These instructions can also be found on the TinyMCE for Blazor readme on GitHub.
Step 1: Get the Blazor component and start your new project
To get started with our Blazor integration, first of all, you need to add the TinyMCE.Blazor Nuget package to your project.
-
Install the TinyMCE Blazor integration:
dotnet add package TinyMCE.Blazor-
Verify the integration by checking the ItemGroup references in BlazorApp.csproj
cat BlazorTextBox.csproj
<Project Sdk="Microsoft.NET.Sdk.Web">
  <PropertyGroup>
    <TargetFramework>net7.0</TargetFramework>
    <Nullable>enable</Nullable>
    <ImplicitUsings>enable</ImplicitUsings>
  </PropertyGroup>
  <ItemGroup>
    <PackageReference Include="TinyMCE.Blazor" Version="1.0.4" />
  </ItemGroup>
</Project>-
Add the tinymce-blazor.js script to your Pages/_Host.cshtml scripts before the closing tag:
    </div>
    <script src="_framework/blazor.server.js"></script>
    <script src="_content/TinymceBlazor/tinymce-blazor.js"></script>
</body>
</html>|
Note: In Visual Studio, select New Project and Blazor Server App template. Use the NuGet package manager console, and install the TinyMCE.Blazor package using Install-Package TinyMCE.Blazor |
Step 2: Set-up the TinyMCE component
In order to set-up and begin using TinyMCE, you need to set it up on your page. To do so:
-
Create a new .razor file in the pages directory, and add the following content (remember that .razor files cannot start with a lowercase letter):
Touch EnrichTextbox.razor

...

@page "/enriched"
@using TinyMCE.Blazor
<Editor />The @page attribute in this example is a URL or slug to host the enriched Blazor TextBox. In production, it would be the page that you intend the TextBox to reside on.
-
Save the changes, and check on the new page to see TinyMCE working in Blazor:

Our engineering team has gone ahead and created a sample Blazor project using the TinyMCE Blazor integration, to show what this should look like.
From this step on, the integration has been fully set-up within Blazor and is ready for use.
Optional step: Configure the TinyMCE toolbar
One of the most popular configurations within TinyMCE is the toolbar. Many developers and Product Managers know exactly what their users need and don’t need. Customizing the toolbar within TinyMCE is a simple, and straightforward process.
We’ve previously written about how to customize the TinyMCE toolbar. However, for the purposes of this blog post, we’ve picked one of our most popular configurations. In this example, we’re going to configure the TinyMCE toolbar to have the most popular features, such as bold and alignment.
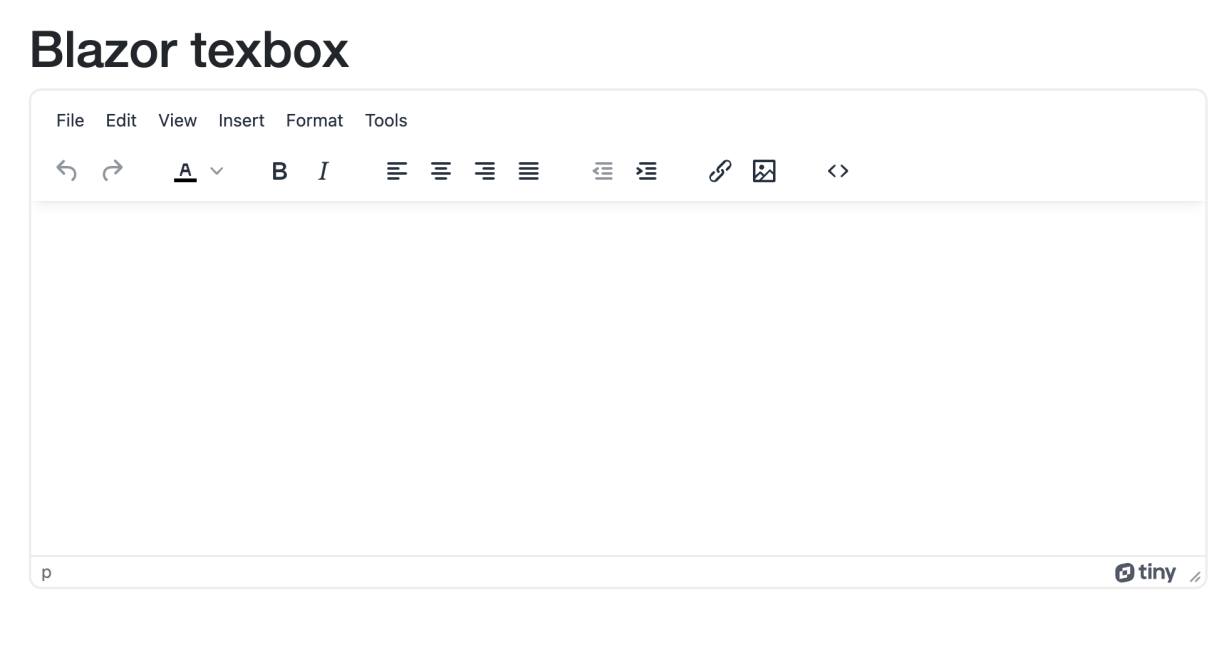
To replicate the above look, modify the contents of the EnrichTextbox.razor demo file to introduce the following configuration:
@page "/enriched"
@using TinyMCE.Blazor

<h1>Blazor TextBox</h1>
<Editor
 APIKey = "no-api-key"
 CloudChannel="6"
 Conf="@editorConf"
/>

@code {
private Dictionary<string, object> editorConf = new Dictionary<string, object> {
   { "menubar", true },
   { "plugins", "link image code advcode" },
   { "toolbar", "undo redo | styleselect | forecolor | bold italic | alignleft aligncenter alignright alignjustify | outdent indent | link image | code" }
 };
}And you should get the following results:
Note that the configuration syntax is different from the standard JavaScript configuration in TinyMCE, in order to match the Blazor framework. If you're going from a TinyMCE Fiddle example to Blazor, you need to change from a tinymce.init(...) JavaScript call to the syntax above.
There are thousands of different combinations to create your own customized toolbar in TinyMCE. Make sure to check out our toolbar documentation for more information on how to customize, group, and personalize the TinyMCE Toolbar to fit seamlessly into your product.
How to bind input values in Blazor
When using TinyMCE to enrich your Blazor TextBoxes, there’s a directive you can use to bind input values. Specify the @bind-value directive in the TinyMCE Blazor demo to set up two-way binding:
-
Include the directive - add the @bind-value directive to the TinyMCE editor:
<Editor
 APIKey = "no-api-key"
 CloudChannel="6"
 Conf="@editorConf"
 @bind-Value=content
/>-
Create a button to test out the input value binding
<Editor
 APIKey = "no-api-key"
 CloudChannel="6"
 Conf="@editorConf"
 @bind-Value=content
/><button @onclick="ClearContent">Clear</button>-
Set up the string and the voice to add contents, and clear contents
@code
…
 private string content = "<p>Binding</p>";
 private void ClearContent()
 {
    content = "";
 }
}-
Save the changes, and then test out the input binding:
How to get a changed value in Blazor text input
The main method to get a changed value is using the @onChange directive. If you’ve set up two way binding for a value property, Blazor automatically changes the value into the value property. Some examples of @onChange are available on how this can work.
How to set focus on a TextBox in Blazor
With TinyMCE integrated into Blazor, you can set focus on the rich text editor using the Id= attribute for the TinyMCE integration, combined with the autofocus option set up in the rich text editor @code settings. For example:
<Editor
 APIKey = "no-api-key"
 CloudChannel="6"
 Conf="@editorConf"
 Id="myTextarea"
/>

 @code {
private Dictionary<string, object> editorConf = new Dictionary<string, object> {
   { "menubar", true },
   { "plugins", "link image code advcode" },
   { "toolbar", "undo redo | styleselect | forecolor | bold italic | alignleft aligncenter alignright alignjustify | outdent indent | link image | code" },
   { "auto_focus", "myTextarea"}
 };
}How to disable text input in Blazor
The directive that prevents text input in Blazor is called @isDisabled. In one Stack Overflow question, Chris Sainty notes that the directive acts like the disabled HTML attribute, as well as some ideas on best practice.
Next steps for Blazor TextBoxes
As our newest integration in the TinyMCE family, we’re always seeking feedback on how to improve and refine it better.
If you have a suggestion for improving tinymce-blazor or have a feature request, just open an issue on Github to let us know or submit a pull request.
Interested how get rich text editing opportunities for the textarea of a different framework? We have guides to help you with this: learn how to configure and work with enriched
Contact us if you have any further questions about building your app with TinyMCE.


