The HTML text
editor used by
1.5M+ developers
Develop faster. Innovate faster.
Succeed faster.
View our Documentation1<!DOCTYPE html>2<html>3<head>4 <script src="https://cdn.tiny.cloud/1/no-api-key/tinymce/8/tinymce.min.js" referrerpolicy="origin"></script>5 <script>tinymce.init({selector:'textarea'});</script>6</head>7<body>8 <textarea></textarea>9</body>10</html>What developers are saying
about TinyMCE

Wow. @tinymce @joinTiny is a game changer. The inline editing mode is fantastic!
Here I was struggling with "prettifying" my boring input fields without it. 😂🤣
Setting it up ended up not being too bad, the hardest part is deciding what options, buttons, and menus to offer. :)

Looking at wysiwyg editors and @tinymce seems to have come a long way from the last time I used it, really slick onboarding! 👌 Looks great!

I did a deep dive on this not long ago, TinyMCE is really the only one worth building with.

TinyMCE is a gem

Just like that... @joinTiny is upgraded to v6 in my current project. Smooth process, although the toolbar spacing needed seriously re-grouping to keep everything on one line, and had to drop a few buttons for space reasons. It fits so well with the rest of the app's UI.

There's quite a few different ones out there, but I've always found TinyMCE to be nice to work with. It's pretty simple to get up and running and you can extend it quite a lot to add new functionality. Do you think this'd work for your project? 😄

Thanks! I tried many other tools - all open-source and came to the conclusion that many people may disagree with.
I decided to go with TinyMCE not because it's open-source but because they have a commercial license what may mean they will fix bugs and add great features faster.

We went from a completely custom DraftJS (now Lexical) implementation to TinyMCE and did not lose any sleep over it.

✨ I found out ~50% of my support tickets on remoteok.com were about Markdown issues:
- non-tech people don't understand it
- format is inconsistent
- buggy if complex like * a list with **bold text**
So I now switched to TinyMCE which is HTML: tiny.cloud

There are a lot of #WYSIWYG editors available on the internet, some are paid and some are free. After exploring and experimenting with various editors I found tinymce, one of the best WYSIWYG editors.
Build or extend your project
using our rich text editor
The basic editing experience every CMS should start with: includes all the familiar editing controls your users expect plus PowerPaste, Accessibility Checker, Image Editing and more.
1<!--
2The best way to create a templated web page editor in TinymCE is using
3Multi-Root Editing. This allows you to load your entire page template
4into the editor, make it read-only, then specify which regions you want
5editable using a custom CSS class.
6
7This example loads Google Fonts and Bootstrap CSS into the editor, to
8mimic what the web page will look like when it's published, eliminating
9the need to preview.
10-->
11<!doctype html>
12<html lang="en">
13<head>
14<meta charset="utf-8">
15<title>TinyMCE Landing Page Example</title>
16<meta name="viewport" content="width=device-width, initial-scale=1">
17<!-- Load Google fonts -->
18<link rel="preconnect" href="https://fonts.googleapis.com">
19<link rel="preconnect" href="https://fonts.gstatic.com" crossorigin>
20<link href="https://fonts.googleapis.com/css2?family=Inter:wght@400;700;900&display=swap" rel="stylesheet">
21<script src="https://cdn.tiny.cloud/1/no-api-key/tinymce/8/tinymce.min.js" referrerpolicy="origin"></script>
22
23<script>
24 // TinyMCE CMS Starter Config
25
26 // Initialize TinyMCE
27 tinymce.init({
28
29 // Select the element(s) to add TinyMCE to using any valid CSS selector
30 selector: '#editor',
31
32 // To make TinyMCE leaner, only include the plugins you need
33 plugins: 'ai a11ychecker advcode advtemplate advlist advtable anchor autocorrect autosave editimage image link linkchecker lists markdown media mediaembed pageembed powerpaste searchreplace table template tinymcespellchecker typography visualblocks wordcount',
34
35 // Define the toolbar
36 // https://www.tiny.cloud/docs/tinymce/latest/toolbar-configuration-options/#basic-toolbar-options
37 toolbar: 'undo redo | aidialog aishortcuts | styles fontsizeinput | bold italic | align bullist numlist | table link image media pageembed | spellcheckdialog a11ycheck code | inserttemplate',
38
39 // Make the toolbar sticky so it's visible as users scroll through the email
40 // https://www.tiny.cloud/docs/tinymce/latest/menus-configuration-options/#toolbar_sticky
41 toolbar_sticky: true,
42
43 toolbar_mode: 'wrap',
44
45 // Set editor height
46 height: 620,
47
48 // Enable Multi-Root Editing by setting editable_root to false. This makes the
49 // entire contents of the editor non-editable by default
50 // https://www.tiny.cloud/docs/tinymce/latest/content-behavior-options/#editable_root
51 editable_root: false,
52
53 // Specify which class to use to identify the regions that are editable
54 // https://www.tiny.cloud/docs/tinymce/latest/content-behavior-options/#editable_class
55 editable_class: 'tiny-editable',
56
57 // Disable the element path in the status bar to avoid user confusion while
58 // navigating the multiple editable regions inside the editor
59 elementpath: false,
60
61 // We don't want users to be able to resize images by using
62 // drag and drop because it can break layout templates.
63 // https://www.tiny.cloud/docs/tinymce/latest/content-behavior-options/#object_resizing
64 object_resizing: false,
65
66 // Disable editor resizing
67 // https://www.tiny.cloud/docs/tinymce/latest/editor-size-options/#resize
68 resize: false,
69
70 // Enable captions for images
71 // https://www.tiny.cloud/docs/tinymce/latest/image/#image_caption
72 image_caption: true,
73
74 // Only allow certain image types to be added to emails
75 // https://www.tiny.cloud/docs/tinymce/latest/file-image-upload/#images_file_types
76 images_file_types: "jpeg,jpg,png,gif",
77
78 // The style_formats option controls the styleformat toolbar button menu
79 // https://www.tiny.cloud/docs/tinymce/latest/user-formatting-options/#style_formats
80 style_formats: [
81 {title: 'Heading 1', block: 'h1'},
82 {title: 'Heading 2', block: 'h2'},
83 {title: 'Heading 3', block: 'h3'},
84 {title: 'Paragraph', block: 'p'},
85 {title: 'Blockquote', block: 'blockquote'},
86 {title: 'Fancy list', selector: 'ul', classes: 'fancy'},
87 ],
88
89 // Enable inline mode for Enhanced Code Editor
90 // https://www.tiny.cloud/docs/tinymce/latest/advcode/
91 advcode_inline: true,
92
93 // Basic setup guide for AI plugin: https://www.tiny.cloud/docs/tinymce/latest/ai/#basic-setup
94 //
95 // List of AI Assistant shortcuts available in the AI Shortcuts toolbar button and menu item
96 // https://www.tiny.cloud/docs/tinymce/latest/ai/#ai_shortcuts
97 ai_shortcuts: [
98 { title: 'Summarize content', prompt: 'Provide the key points and concepts in this content in a succinct summary.' },
99 { title: 'Improve writing', prompt: 'Rewrite this content with no spelling mistakes, proper grammar, and with more descriptive language, using best writing practices without losing the original meaning.' }
100 ],
101
102 // You can add your own words (e.g. brand names) to the spell checker dictionary
103 // https://www.tiny.cloud/docs/tinymce/latest/introduction-to-tiny-spellchecker/
104 spellchecker_ignore_list: [ 'CMS', 'devs' ],
105
106 // Specify which WCAG level for the Accessibility Checker to check against
107 // https://www.tiny.cloud/docs/tinymce/latest/a11ychecker/
108 a11ychecker_level: 'aaa',
109
110 // Templates lets users create, modify and organize content snippets
111 // inside the editor. This example uses a basic configuration, where you
112 // specify the content snippets in the config. Check out the docs for how to
113 // enable users to create their own snippets.
114 // https://www.tiny.cloud/docs/tinymce/latest/templates/
115 advtemplate_templates: [
116 {
117 title: "About us",
118 content:
119 '<h2>About our company</h2>\n<p><a href="https://tiny.cloud">XYZ Inc.</a> is a global leader in providing innovative solutions to businesses. We provide our clients with the latest technology, state-of-the-art equipment, and experienced professionals to help them stay ahead of their competition. Our comprehensive suite of services, from cloud computing and big data analytics to mobile and e-commerce solutions, ensures that all of our clients have the resources they need to stay competitive in an ever-changing business landscape. Our commitment to customer service and satisfaction is second to none, and we strive to be a reliable and trusted partner for our clients.</p>',
120 },
121 ],
122
123 // Load bootstrap CSS inside the editor
124 content_css: 'https://cdn.jsdelivr.net/npm/bootstrap@5.3.0/dist/css/bootstrap.min.css',
125
126 // Apply CSS styles within the editor to style the content and apply styles
127 // to editable regions
128 content_style: `
129 :root {
130 --bs-primary-rgb: 62, 92, 210;
131 --bs-border-radius: 0;
132 --bs-border-radius-lg: 0;
133 }
134
135 html {
136 font-size: 16px;
137 }
138
139 .tiny-logo {
140 position: absolute;
141 top: 2rem;
142 left: 2rem;
143 }
144
145 h1 {
146 font-size: 2.75rem;
147 }
148
149 h1,
150 h2,
151 h3 {
152 margin-bottom: .5em;
153 }
154
155 ul.fancy li {
156 margin-bottom: .5em;
157 }
158
159 ul.fancy li::marker {
160 content: '✅ ';
161 }
162
163 .tiny-hero {
164 background-image: url(images/sbc-cms-template-cover.png);
165 background-size: cover;
166 background-position: center center;
167 }
168
169 /* Form styling */
170 @media screen and (min-width: 768px) {
171 .register-form {
172 margin-bottom: -200px;
173 }
174 }
175
176 /* Prevent users clicking in the form */
177 form {
178 pointer-events: none;
179 }
180
181 /* Edit area functional css */
182 .tiny-editable {
183 position: relative;
184 }
185 .tiny-editable:hover:not(:focus),
186 .tiny-editable:focus {
187 outline: 3px solid #b4d7ff;
188 outline-offset: 4px;
189 }
190
191 /* Edit placeholder */
192 .tiny-editable:empty::before,
193 .tiny-editable:has(> br[data-mce-bogus]:first-child)::before {
194 content: "Write here...";
195 position: absolute;
196 top: 0;
197 left: 0;
198 color: #999;
199 }
200 `
201 });
202</script>
203<style>
204 body {
205 margin: 2rem;
206 }
207
208 main {
209 max-width: 1100px;
210 margin: auto;
211 }
212</style>
213</head>
214
215<body>
216<main>
217 <textarea id="editor">
218 <div class="container-fluid text-bg-dark pt-5 tiny-hero">
219 <img src="images/sbc-cms-template-logo.png" alt="The Tiny Technologies logo" class="tiny-logo" width="120">
220 <div class="container-lg">
221 <div class="row gx-5 py-5">
222 <div class="offset-xl-1 col-xl-6 col-lg-7 col-md-7 col-sm-12 pt-5">
223 <div class="tiny-editable">
224 <p>This is a sample landing page built using TinyMCE</p>
225 <h1>Adding rich text editing to your CMS</h1>
226 <p><span style="font-size: 22px;">Wednesday, December 16, 2023</span><br><span style="font-size: 22px;">5:00 - 7:00 PM</span></p>
227 </div>
228 </div>
229 <div class="col-xl-4 col-lg-5 col-md-5 col-sm-12 register-form">
230 <div class="bg-primary p-3">
231 <h2 class="text-center my-3">Register now</h2>
232 <form>
233 <div class="mb-2">
234 <label for="first-name" class="form-label">First name</label>
235 <input type="text" class="form-control" id="first-name">
236 </div>
237 <div class="mb-2">
238 <label for="last-name" class="form-label">Last name</label>
239 <input type="text" class="form-control" id="last-name">
240 </div>
241 <div class="mb-2">
242 <label for="email" class="form-label">Email address</label>
243 <input type="email" class="form-control" id="email">
244 </div>
245 <div class="text-center my-3">
246 <button type="submit" class="btn btn-info btn-lg text-white px-5 py-2">Register</button>
247 </div>
248 </form>
249 </div>
250 </div>
251 </div>
252 </div>
253 </div>
254
255 <div class="container-fluid">
256 <div class="container-lg">
257 <div class="row gx-5 py-5">
258 <div class="offset-xl-1 col-xl-6 col-lg-7 col-md-7 col-sm-12">
259 <div class="tiny-editable">
260 <h2>Are you:</h2>
261 <ul class="fancy">
262 <li style="font-size: 20px;"><span style="font-size: 20px;">Building a new CMS and need rich text editor functionality?</span></li>
263 <li style="font-size: 20px;"><span style="font-size: 20px;">Extending an existing CMS and need to add more rich text editor functionality, or enhance the default editor?</span></li>
264 </ul>
265 <p><span style="font-size: 20px;">Then use the only WYSIWYG editor that’s trusted by 1.5M devs.</span></p>
266 </div>
267 </div>
268 </div>
269 </div>
270 </div>
271
272 <div class="container-fluid bg-primary text-white">
273 <div class="container-lg">
274 <div class="row gx-5 py-5 justify-content-center">
275 <div class="col-md-10 col-lg-8 col-xl-6 text-center">
276 <div class="tiny-editable">
277 <h2>How it works</h2>
278 <p>This landing page was built using TinyMCE.</p>
279 <p>All you have to do is define your page structure, which regions are editable, and then which TinyMCE features you want enabled.</p>
280 <p>Play around with this demo to see how TinyMCE works as a CMS WYSIWYG editor!</p>
281 </div>
282 </div>
283 </div>
284 </div>
285
286 <div class="container-lg">
287 <div class="row gx-5 pb-5">
288 <div class="col text-center">
289 <div class="tiny-editable"><img src="images/sbc-cms-template-face-1.png" alt="Portrait of Andrew Mitchell" width="200px">
290 <h3><span style="font-size: 20px;">Andrew Mitchell</span></h3>
291 <p>Chief Technology Officer (CTO)<br>Syntech Solutions</p>
292 </div>
293 </div>
294 <div class="col text-center">
295 <div class="tiny-editable"><img src="images/sbc-cms-template-face-2.png" alt="Portrait of Jennifer Lee" width="200"
296 height="200">
297 <h3><span style="font-size: 20px;">Jennifer Lee</span></h3>
298 <p>Director of Product Development<br>Stellar Innovations</p>
299 </div>
300 </div>
301 <div class="col text-center">
302 <div class="tiny-editable"><img src="images/sbc-cms-template-face-3.png" alt="Portrait of David Faraguay" width="200"
303 height="200">
304 <h3><span style="font-size: 20px;">David Faraguay</span></h3>
305 <p>Senior Data Scientist<br>QuantumTech Labs</p>
306 </div>
307 </div>
308 </div>
309 </div>
310 </div>
311
312 <div class="container-fluid">
313 <div class="container-lg">
314 <div class="row gx-5 py-4">
315 <div class="col offset-xl-1">
316 <p>Tiny Technologies, Inc. 2023</p>
317 </div>
318 </div>
319 </div>
320 </div>
321
322 </textarea>
323</main>
324</body>
325</html>The basic editing experience every email software should start with: includes all the familiar editing controls your users expect plus Link Checker, Emojis, Image Editing and more.
1<!--
2The best way to create emails using TinyMCE is using Multi-Root Editing.
3This allows you to load your entire email into the editor, make it
4read-only, then specify which regions you want editable using a custom
5CSS class.
6-->
7<!doctype html>
8<html>
9<head>
10<meta charset="utf-8">
11<title>Marketing email editor using Multi-Root Editing</title>
12<meta name="viewport" content="width=device-width, initial-scale=1">
13<script src="https://cdn.tiny.cloud/1/no-api-key/tinymce/8/tinymce.min.js" referrerpolicy="origin"></script>
14<script>
15 // TinyMCE Email & Messaging Starter Config
16
17 tinymce.init({
18 // Select the element(s) to add TinyMCE to using any valid CSS selector
19 selector: '#editor',
20
21 // To make TinyMCE leaner, only include the plugins you need
22 plugins: 'ai advcode advtemplate a11ychecker autocorrect autolink emoticons image inlinecss link linkchecker lists markdown mergetags powerpaste tinymcespellchecker help',
23
24 // Define the toolbar
25 // https://www.tiny.cloud/docs/tinymce/latest/toolbar-configuration-options/#basic-toolbar-options
26 toolbar: 'undo redo | aidialog aishortcuts | styles | bold italic forecolor | link image emoticons | align | mergetags inserttemplate | spellcheckdialog a11ycheck | code removeformat | markdown',
27
28 // Make the toolbar sticky so it's visible as users scroll through the email
29 // https://www.tiny.cloud/docs/tinymce/latest/menus-configuration-options/#toolbar_sticky
30 toolbar_sticky: true,
31
32 // Toggle the menubar off to get a leaner visual experience
33 // https://www.tiny.cloud/docs/tinymce/latest/menus-configuration-options/
34 menubar: false,
35
36 // Set editor height
37 height: 1020,
38
39 // Enable Multi-Root Editing by setting editable_root to false. This makes the
40 // entire contents of the editor non-editable by default
41 // https://www.tiny.cloud/docs/tinymce/latest/content-behavior-options/#editable_root
42 editable_root: false,
43
44 // Specify which class to use to identify the regions that are editable
45 // https://www.tiny.cloud/docs/tinymce/latest/content-behavior-options/#editable_class
46 editable_class: 'tiny-editable',
47
48 // Disable the element path in the status bar to avoid user confusion while
49 // navigating the multiple editable regions inside the editor
50 elementpath: false,
51
52 // Disable the default "dotted line" visual aid for table borders, since this
53 // email is a series of tables inside tables and the visual aid would be
54 // distracting
55 visual: false,
56
57 // In emails we don't use targets for links so we hide the
58 // target drop down in the link dialog
59 // https://www.tiny.cloud/docs/tinymce/latest/link/#link_target_list
60 link_target_list: false,
61
62 // A common feature for email marketing tools is to provide a prepopulated
63 // list of links to choose. Here we define that list.
64 // https://www.tiny.cloud/docs/tinymce/latest/link/#link_list
65 link_list: [
66 { title: "Features", value: 'https://www.tiny.cloud/tinymce/features/' },
67 { title: "Docs", value: 'https://www.tiny.cloud/pricing/' },
68 { title: "Pricing", value: 'https://www.tiny.cloud/docs/tinymce/latest/' }
69 ],
70
71 // We don't want users to be able to resize images by using
72 // drag and drop because it can break layout templates.
73 // https://www.tiny.cloud/docs/tinymce/latest/content-behavior-options/#object_resizing
74 object_resizing: false,
75
76 // The formats option is where custom formatting options are defined.
77 // In this case we define a couple of headings and a button appearance
78 // for links. HTML Emails require inlining the CSS. Fortunately the
79 // styles property makes that easy.
80 // https://www.tiny.cloud/docs/tinymce/latest/content-formatting/
81 formats: {
82 h1: { block: 'h1', styles: { fontSize: '24px', color: '#335dff' } },
83 h2: { block: 'h2', styles: { fontSize: '20px' } },
84 largetext: { block: 'p', styles: { fontSize: '20px' } },
85 calltoaction: { selector: 'a', styles: { backgroundColor: '#335dff', padding: '12px 16px', color: '#ffffff', borderRadius: '4px', textDecoration: 'none', display: 'inline-block' } }
86 },
87
88 // The style_formats option controls the styleformat toolbar button menu
89 // https://www.tiny.cloud/docs/tinymce/latest/user-formatting-options/#style_formats
90 style_formats: [
91 { title: 'Paragraph', format: 'p' },
92 { title: 'Heading 1', format: 'h1' },
93 { title: 'Heading 2', format: 'h2' },
94 { title: 'Large text', format: 'largetext' },
95 { title: 'Button styles' },
96 { title: 'Call-to-action', format: 'calltoaction' },
97 ],
98
99 // Basic setup guide for AI plugin: https://www.tiny.cloud/docs/tinymce/latest/ai/#basic-setup
100 //
101 // List of AI Assistant shortcuts available in the AI Shortcuts toolbar button and menu item
102 // https://www.tiny.cloud/docs/tinymce/latest/ai/#ai_shortcuts
103 ai_shortcuts: [
104 { title: 'Format as marketing email', prompt: 'Turn this content into an HTML-formatted marketing email in fixed-width and mobile-friendly table form, following screen width best practices' },
105 { title: 'Generate call to action', prompt: 'Generate an appropriate and short call to action for this email, in the form a button.' }
106 ],
107
108 // Only allow certain image types to be added to emails
109 // https://www.tiny.cloud/docs/tinymce/latest/file-image-upload/#images_file_types
110 images_file_types: "jpeg,jpg,png,gif",
111
112 // You can add your own words (e.g. brand names) to the spell checker dictionary
113 // https://www.tiny.cloud/docs/tinymce/latest/introduction-to-tiny-spellchecker/
114 spellchecker_ignore_list: [ 'i.e', 'Mailchimp', 'CSS-inlined' ],
115
116 // Merge Tags lets users add non-editable personalization tokens to your content, so
117 // your app can then merge the personalized content into emails before sending
118 // https://www.tiny.cloud/docs/tinymce/latest/mergetags/
119 mergetags_list: [
120 {
121 title: "Contact",
122 menu: [{
123 value: 'Contact.FirstName',
124 title: 'Contact First Name'
125 },
126 {
127 value: 'Contact.LastName',
128 title: 'Contact Last Name'
129 },
130 {
131 value: 'Contact.Email',
132 title: 'Contact Email'
133 }
134 ]
135 },
136 {
137 title: "Sender",
138 menu: [{
139 value: 'Sender.FirstName',
140 title: 'Sender First Name'
141 },
142 {
143 value: 'Sender.LastName',
144 title: 'Sender Last name'
145 },
146 {
147 value: 'Sender.Email',
148 title: 'Sender Email'
149 }
150 ]
151 },
152 {
153 title: 'Subscription',
154 menu: [{
155 value: 'Subscription.UnsubscribeLink',
156 title: 'Unsubscribe Link'
157 },
158 {
159 value: 'Subscription.Preferences',
160 title: 'Subscription Preferences'
161 }
162 ]
163 }
164 ],
165
166
167 // Templates lets users create, modify and organize content snippets
168 // inside the editor. This example uses a basic configuration, where you
169 // specify the content snippets in the config. Check out the docs for how to
170 // enable users to create their own snippets.
171 // https://www.tiny.cloud/docs/tinymce/latest/templates/
172 advtemplate_templates: [
173 {
174 title: "Newsletter intro",
175 content:
176 '<h1 style="font-size: 24px; color: rgb(51, 93, 255); font-family:Arial;">TinyMCE Newsletter</h1>\n<p style="font-family:Arial;">Welcome to your monthly digest of all things TinyMCE, where you"ll find helpful tips, how-tos, and stories of how people are using rich text editing to bring their apps to new heights!</p>',
177 },
178 {
179 title: "CTA Button",
180 content:
181 '<p><a style="background-color: rgb(51, 93, 255); padding: 12px 16px; color: rgb(255, 255, 255); border-radius: 4px; text-decoration: none; display: inline-block; font-family:Arial;" href="https://tiny.cloud/pricing">Get started with your 14-day free trial</a></p>',
182 },
183 {
184 title: "Footer",
185 content:
186 '<p style="text-align: center; font-size: 10px; font-family:Arial;">You received this email at because you previously subscribed.</p>\n<p style="text-align: center; font-size: 10px; font-family:Arial;">{{Subscription.Preferences}} | {{Subscription.UnsubscribeLink}}</p>',
187 },
188 ],
189
190 // Apply CSS styles within the editor to style the content and apply styles
191 // to editable regions
192 content_style: `
193 body {
194 background-color: #f9f9fb;
195 }
196
197 /* Edit area functional css */
198 .tiny-editable {
199 position: relative;
200 }
201 .tiny-editable:hover:not(:focus),
202 .tiny-editable:focus {
203 outline: 3px solid #b4d7ff;
204 outline-offset: 4px;
205 }
206
207 /* Create an edit placeholder */
208 .tiny-editable:empty::before,
209 .tiny-editable:has(> br[data-mce-bogus]:first-child)::before {
210 content: "Write here...";
211 position: absolute;
212 top: 0;
213 left: 0;
214 color: #999;
215 }
216 `
217 });
218</script>
219<style>
220 body {
221 margin: 1rem 2rem;
222 font-family:Arial, sans-serif;
223 }
224
225 main {
226 max-width: 980px;
227 margin: auto;
228 }
229</style>
230</head>
231
232<body>
233<main>
234 <textarea id="editor">
235
236 <table style="background-color: #f9f9fb; width: 100%;" border="0">
237 <tr>
238 <td align="center">
239
240 <table border="0" width="100%" style="max-width: 660px; width: 100%; background-color: #0b132c; border: 2px solid #eee; border-radius: 8px 8px 0 0; overflow: hidden" cellpadding="0" cellspacing="0">
241 <tr>
242
243 <td style="padding: 32px 8px 16px 64px;" width="50%">
244 <img src="images/sbc-cms-template-logo.png" alt="The Tiny Technologies logo" class="tiny-logo" width="120" data-mce-src="images/sbc-cms-template-logo.png">
245 <div class="tiny-editable" style="font-family: 'helvetica', sans-serif; color: #fff; font-size: 16px; line-height: 1.5;">
246 <h1>Email creation made simple!</h1>
247 </div>
248 </td>
249 <td style="padding: 16px 64px 16px 8px;" width="50%">
250 <img src="images/sbc-email-cover.png" width="256" height="256" alt="">
251 </td>
252 </tr>
253 </table>
254
255 <table border="0" width="100%" style="max-width: 660px; width: 100%; background-color: #ffffff; border: 2px solid #eee; border-radius: 8px; overflow: hidden" cellpadding="0" cellspacing="0">
256 <tr>
257 <td style="padding: 16px 64px 0;" colspan="2">
258 <div class="tiny-editable" style="font-family: 'helvetica', sans-serif; color: #243376;">
259 <p style="font-size: 20px; text-align: center;">Hey {{First.Name}},</p>
260 <p style="font-size: 20px; text-align: center;">What are you building?</p>
261 </div>
262 </td>
263 </tr>
264 <tr>
265 <td style="padding: 0 8px 16px 64px;" width="50%">
266 <div class="tiny-editable" style="font-family: 'helvetica', sans-serif; color: #243376;">
267 <p style="text-align: center;"><img src="images/sbc-email-webmail.png" alt="Illustration of an email" width="256" height="186"></p>
268 <p style="text-align: center;">An email client?<br><span style="color: rgb(149, 165, 166);"><em>i.e. the next Gmail</em></span></p>
269 </div>
270 </td>
271 <td style="padding: 0 64px 16px 8px;" width="50%">
272 <div class="tiny-editable" style="font-family: 'helvetica', sans-serif; color: #243376;">
273 <p style="text-align: center;"><img src="images/sbc-email-marketingemail.png" alt="Illustration of a marketing email" width="256" height="186"></p>
274 <p style="text-align: center;">Email marketing software?<em><br></em><span style="color: rgb(149, 165, 166);"><em>i.e. the next Mailchimp</em>
275 </div>
276 </td>
277 </tr>
278 <tr>
279 <td style="padding: 0 64px 16px;" colspan="2">
280 <div class="tiny-editable" style="font-family: 'helvetica', sans-serif; color: #243376;">
281 <h2 style="text-align: center; font-size: 20px;">Then use the only WYSIWYG editor <br>trusted by 1.5M developers.</h2>
282 <p style="text-align: center;"><a style="background-color: rgb(51, 93, 255); padding: 12px 16px; color: rgb(255, 255, 255); border-radius: 4px; text-decoration: none; display: inline-block;" href="https://tiny.cloud">Try TinyMCE free for 14 days</a></p>
283 <p style="text-align: center;">💙 This email was built with TinyMCE 💙</p>
284 <p style="text-align: center;">First, import your layout, and then specify editable regions. Next, define your merge tags and content snippets.</p>
285 <p style="text-align: center;">When it’s time to hit send, generate CSS-inlined HTML that’s ready for the inbox with one simple API call.</p>
286 </div>
287 </td>
288 </tr>
289 <tr>
290 <td style="background-color: #eff0f6; padding: 24px 64px;" colspan="2">
291 <p style="margin: 0; font-family: 'helvetica'; font-size: 12px; color: #a0a9c5;"><a href="#" style="color: #a0a9c5;">Update your email preferences</a> or <a href="#" style="color: #a0a9c5;">unsubscribe</a>.</p>
292 <p style="margin: 0; font-family: 'helvetica'; font-size: 12px; color: #a0a9c5;">Tiny Technologies | 2100 Geng Road, Palo Alto, CA 94303 USA</p>
293 </td>
294 </tr>
295 </table>
296 </td>
297 </tr>
298 </table>
299
300 </textarea>
301
302 <p>💡 TinyMCE's <a href="https://www.tiny.cloud/docs/tinymce/latest/inline-css/">Inline CSS</a> plugin can be used to process the editor contents and apply all CSS styles inline, helping to make content ready for the inbox. Open up dev tools and click the button below to see the CSS-inlined editor contents in the console.</p>
303 <button onclick="tinymce.get('editor').plugins.inlinecss.getContent().then((value) => { console.log(value.html); });">Get Inlined CSS</button>
304</main>
305
306</body>
307</html> What’s your document management editing project?
The basic editing experience every DMS should start with: includes all the editing controls your users expect plus PowerPaste, Comments, Image Editing and more.
1<!DOCTYPE html>
2<html>
3<head>
4 <meta charset="utf-8">
5 <title>TinyMCE DMS Starter Config</title>
6 <meta name="viewport" content="width=device-width, initial-scale=1">
7 <script src="https://cdn.tiny.cloud/1/no-api-key/tinymce/8/tinymce.min.js" referrerpolicy="origin"></script>
8
9 <script>
10 // TinyMCE Document Management System (DMS) Starter Config
11 // Quick start video - https://www.youtube.com/watch?v=_Pp1xnhQqec
12
13 tinymce.init({
14 // Select the element(s) to add TinyMCE to using any valid CSS selector
15 selector: "#editor",
16
17 // Tip - To keep TinyMCE lean, only include the plugins you need.
18 plugins: "ai advcode advlist advtable advtemplate anchor autocorrect autolink autosave casechange charmap checklist codesample directionality editimage emoticons footnotes formatpainter help image insertdatetime link linkchecker lists markdown media mediaembed mergetags nonbreaking pagebreak permanentpen powerpaste searchreplace table tableofcontents tinycomments tinymcespellchecker typography visualblocks visualchars wordcount",
19
20 // Configure the toolbar so it fits your app. There are many
21 // different configuration options available:
22 // https://www.tiny.cloud/docs/tinymce/latest/toolbar-configuration-options/
23 toolbar: "undo redo spellcheckdialog | aidialog aishortcuts | blocks fontfamily fontsizeinput | bold italic underline forecolor backcolor | link image addcomment showcomments | align lineheight checklist bullist numlist | indent outdent | inserttemplate | removeformat typography",
24
25 // Enable Multi-Root Editing by setting the editable_root option to false
26 // This sets everything in the editor to be non-editable. Specify editable
27 // regions by adding contenteditable="true" to elements.
28 // TODO: Link to docs article (to publish end of June)
29 editable_root: false,
30
31 // The height option accepts any valid CSS for height
32 // If your editor is expected to get larger than the viewport,
33 // the sticky toolbar is useful for keeping the controls
34 // always visible
35 // https://www.tiny.cloud/docs/tinymce/latest/editor-size-options/
36 // https://www.tiny.cloud/docs/tinymce/latest/menus-configuration-options/#toolbar_sticky
37 height: '700px',
38 toolbar_sticky: true,
39
40 // You can customize the look and feel of the UI using skins and icons.
41 // In this demo we are using the premium 'thin' icon pack, which matches popular
42 // document editing experiences.
43 // https://www.tiny.cloud/docs/tinymce/latest/editor-icons/
44 //
45 // The icons option is disabled by default in this config, but can be enabled
46 // by uncommenting the lines below. In order for it to load properly, you must
47 // be on a premium plan or trial, and load TinyMCE from the cloud or be
48 // running a fully self-hosted deployment.
49 //
50 // icons: 'thin',
51
52 // The autosave plugin helps prevent data loss if the end-user accidentally
53 // closes the browser by storing the content in the browser's local storage
54 // There are many configuration options to control things like save interval
55 // and retention. The below option loads any unsaved content from local
56 // storage into TinyMCE
57 // https://www.tiny.cloud/docs/tinymce/latest/autosave/#autosave_restore_when_empty
58 autosave_restore_when_empty: true,
59
60 // Enable Spell Checker and specify the default and available languages
61 // https://www.tiny.cloud/docs/tinymce/latest/introduction-to-tiny-spellchecker/
62 spellchecker_active: true,
63 spellchecker_language: 'en_US',
64 spellchecker_languages: 'English (United States)=en_US,English (United Kingdom)=en_GB,Danish=da,French=fr,German=de,Italian=it,Polish=pl,Spanish=es,Swedish=sv',
65
66 // Advanced Typography allows users to apply 25+ typographic conventions to their content.
67 // Specify the language(s) you want the plugin to use. In this case we are just allowing
68 // English, but an array of languages can also be specified.
69 // https://www.tiny.cloud/docs/tinymce/latest/advanced-typography/
70 typography_langs: [ 'en-US' ],
71 typography_default_lang: 'en-US',
72
73 // The Tiny Comments plugin enables you to quickly get collaboration up and
74 // running. There are a lot of options, but here are the most basic
75 // ones to get you started
76 // https://www.tiny.cloud/docs/tinymce/latest/introduction-to-tiny-comments/
77 tinycomments_mode: 'embedded',
78 tinycomments_author: 'rmartel',
79 tinycomments_author_name: 'Rosalina Martel',
80 tinycomments_author_avatar: 'https://www.tiny.cloud/images/avatars/avatar-RosalinaMartel.jpg',
81
82 // Show the comments sidebar by default to encourage collaboration and discovery
83 // https://www.tiny.cloud/docs/tinymce/latest/customsidebar/#sidebar_show
84 sidebar_show: 'showcomments',
85
86 // Merge Tags lets users add non-editable merge tags to your content, so your
87 // app can then populate dynamic content into rendered documents
88 // https://www.tiny.cloud/docs/tinymce/latest/mergetags/
89 mergetags_list: [
90 {
91 value: 'Document.Title',
92 title: 'Document Title'
93 },
94 {
95 value: 'Publish.Date',
96 title: 'Publish Date'
97 },
98 {
99 value: 'Author.Name',
100 title: 'Author Name'
101 }
102 ],
103
104 // Templates lets users create and reuse content snippets
105 // This configuration makes use of the advtemplate_template option,
106 // which allows you to specify pre-defined content snippets inside
107 // the config. You can also connect Templates to your database
108 // and allow users to create their own snippets.
109 // https://www.tiny.cloud/docs/tinymce/latest/templates/
110 advtemplate_templates: [
111 {
112 title: 'Non-compete clause',
113 content: '<h3>NON-COMPETE</h3>\n<p>This agreement contains a non-compete clause, which prohibits the {{Employee.Name}} from directly or indirectly engaging in similar activities to those performed in their employment with the Company, within {{Distance.Miles}} miles of the Company’s business premises, for a period of {{Noncompete.Years}} years after the termination of their employment. This clause shall apply regardless of whether the Employee is employed by a competitor or any other third party.</p>'
114 },
115 {
116 title: 'Corporate hierarchy diagram',
117 content: '<p><img style="display: block; margin-left: auto; margin-right: auto;" src="https://i.postimg.cc/tJ82QN1H/corporate-hierarchy.png" width="282" height="248"></p>'
118 },
119 {
120 title: 'More reusable document content',
121 content: '<p>Insert any HTML content as a template!</p>'
122 }
123 ],
124
125 // Basic setup guide for AI plugin: https://www.tiny.cloud/docs/tinymce/latest/ai/#basic-setup
126 //
127 // List of AI Assistant shortcuts available in the AI Shortcuts toolbar button and menu item
128 // https://www.tiny.cloud/docs/tinymce/latest/ai/#ai_shortcuts
129 ai_shortcuts: [
130 { title: 'Summarize content', prompt: 'Provide the key points and concepts in this content in a succinct summary.' },
131 { title: 'Improve writing', prompt: 'Rewrite this content with no spelling mistakes, proper grammar, and with more descriptive language, using best writing practices without losing the original meaning.' }
132 ],
133
134 // The following CSS will be injected into the editor, extending
135 // the default styles.
136 // In a real world scenario, it's recommended to use the content_css
137 // option to load a separate CSS file. This makes editing easier too.
138 // https://www.tiny.cloud/docs/tinymce/latest/add-css-options/
139 content_style: `
140 body {
141 background: #fff;
142 }
143
144 /* Disable the blue "focus" border for the editable region */
145 .editable-section:focus-visible {
146 outline: none !important;
147 }
148
149 .header,
150 .footer {
151 font-size: 0.8rem;
152 color: #ddd;
153 }
154
155 .header {
156 display: flex;
157 justify-content: space-between;
158 padding: 0 0 1rem 0;
159 }
160
161 .header .right-text {
162 text-align: right;
163 }
164
165 .footer {
166 padding:2rem 0 0 0;
167 text-align: center;
168 }
169
170 /* Apply page-like styling */
171 @media (min-width: 840px) {
172 html {
173 background: #eceef4;
174 min-height: 100%;
175 padding: 0.5rem;
176 }
177
178 body {
179 background-color: #fff;
180 box-shadow: 0 0 4px rgba(0, 0, 0, .15);
181 box-sizing: border-box;
182 margin: 1rem auto 0;
183 max-width: 820px;
184 min-height: calc(100vh - 1rem);
185 padding: 2rem 6rem 2rem 6rem;
186 }
187 }
188 `,
189 });
190 </script>
191 <style>
192 body {
193 margin: 4rem auto;
194 padding: 0 2rem;
195 background-color: #f9f9fb;
196 }
197
198 main {
199 width: 100%;
200 }
201 </style>
202</head>
203<body>
204 <main>
205 <textarea id="editor">
206 <div class="header">
207 <span class="left-text">This is a non-editable header</span>
208 <span class="right-text">August 12, 2023</span>
209 </div>
210 <div class="editable-section" contenteditable="true">
211 <h1 style="text-align: center;"><span class="mce-annotation tox-comment" data-mce-annotation-uid="mce-conversation_95621585221662750341026" data-mce-annotation="tinycomments">What’s</span> your Document Management editing project? </h1>
212 <p style="text-align: center;">Are you:</p>
213 <table style="border-collapse: collapse; width: 100%;" border="1"><colgroup> <col style="width: 50%;"> <col style="width: 50%;"> </colgroup>
214 <tbody>
215 <tr>
216 <td style="text-align: center;"><strong><span style="font-size: 36pt;">📝</span><br><br>Building a next-generation document creation solution</strong> and want to offer the best rich text editing experience to your content creators?</td>
217 <td>
218 <p style="text-align: center;"><span style="font-size: 36pt;"><strong>🗂️</strong></span></p>
219 <p style="text-align: center;"><strong>Developing an innovative documentation system</strong> to organize, track, store, and share documents, and you want to add editing capabilities?</p>
220 </td>
221 </tr>
222 </tbody>
223 </table>
224 <p style="text-align: center;">Or perhaps it’s both? Then use the only WYSIWYG editor that’s trusted by <a href="https://tiny.cloud" target="_blank" rel="noopener">1.5M developers</a>.</p>
225 <h3>Curious about TinyMCE?</h3>
226 <p>Play with this demo to see how TinyMCE works! Try out these popular document creation functions:</p>
227 <ul>
228 <li>Copy complex rich content from another app into the editor</li>
229 <li>Add or resolve a comment</li>
230 <li>Drag-and-drop an image from your computer, then edit it within TinyMCE</li>
231 <li>Insert {{dynamic.content}} into the document using Merge Tags (start typing "{{")</li>
232 <li>Any other functionality that you would expect in a document editor!</li>
233 </ul>
234 <p>Watch the video below to see how easy it is to get started (embedded in one click using <em>Enhanced Media Embed</em>):</p>
235 <div style="left: 0px; width: 100%; height: 0px; position: relative; padding-bottom: 56.25%; max-width: 650px;" data-ephox-embed-iri="https://www.youtube.com/watch?v=_Pp1xnhQqec"><iframe style="top: 0px; left: 0px; width: 100%; height: 100%; position: absolute; border: 0px;" src="https://www.youtube.com/embed/_Pp1xnhQqec?rel=0&controls=0" scrolling="no" allowfullscreen="allowfullscreen"></iframe></div>
236 </div>
237 <div class="footer">
238 Copyright 2023 ACME Document Solutions
239 </div>
240 <!--tinycomments|2.1|data:application/json;base64,eyJtY2UtY29udmVyc2F0aW9uXzk1NjIxNTg1MjIxNjYyNzUwMzQxMDI2Ijp7InVpZCI6Im1jZS1jb252ZXJzYXRpb25fOTU2MjE1ODUyMjE2NjI3NTAzNDEwMjYiLCJjb21tZW50cyI6W3sidWlkIjoibWNlLWNvbnZlcnNhdGlvbl85NTYyMTU4NTIyMTY2Mjc1MDM0MTAyNiIsImF1dGhvciI6InJtYXJ0ZWwiLCJhdXRob3JOYW1lIjoiUm9zYWxpbmEgTWFydGVsIiwiYXV0aG9yQXZhdGFyIjoiaHR0cHM6Ly93d3cudGlueS5jbG91ZC9pbWFnZXMvYXZhdGFycy9hdmF0YXItUm9zYWxpbmFNYXJ0ZWwuanBnIiwiY29udGVudCI6IkNhbiB3ZSBpbmNyZWFzZSB0aGUgc2l6ZSBvZiB0aGUgaGVhZGluZz8iLCJjcmVhdGVkQXQiOiIyMDIyLTA5LTA5VDE5OjA1OjQxLjAyNVoiLCJtb2RpZmllZEF0IjoiMjAyMi0wOS0wOVQxOTowNTo0MS4wMjVaIn0seyJ1aWQiOiJtY2UtcmVwbHlfNzk5MTUxODA5MjE2NjI3NTA1NTM5MjYiLCJhdXRob3IiOiJhdmlzbWFyYSIsImF1dGhvck5hbWUiOiJBbmdlbCBWaXNtYXJhIiwiYXV0aG9yQXZhdGFyIjoiaHR0cHM6Ly93d3cudGlueS5jbG91ZC9pbWFnZXMvYXZhdGFycy9hdmF0YXItQW5nZWxWaXNtYXJhLmpwZyIsImNvbnRlbnQiOiJTdXJlIHRoaW5nIOKAkyBob3cncyB0aGlzPyIsImNyZWF0ZWRBdCI6IjIwMjItMDktMDlUMTk6MDk6MTMuOTI2WiIsIm1vZGlmaWVkQXQiOiIyMDIyLTA5LTA5VDE5OjA5OjEzLjkyNloifV19fQ==-->
241 </textarea>
242 </main>
243</body>
244</html>The basic editing experience every CRM should start with. Includes all the editing controls your users expect, plus PowerPaste, Spell Checker Pro, Templates and more.
1<!--
2This is an example of how you can use TinyMCE for the email capability
3within your CRM. The config can be adapted to other use cases like logging
4calls, writing opportunity descriptions, creating events, and more.
5-->
6
7<!doctype html>
8<html>
9<head>
10<meta charset="utf-8">
11<title>TinyMCE CRM Starter Config (Email Functionality)</title>
12<meta name="viewport" content="width=device-width, initial-scale=1">
13<script src="https://cdn.tiny.cloud/1/no-api-key/tinymce/8/tinymce.min.js" referrerpolicy="origin"></script>
14<script>
15 // TinyMCE CRM Starter Config
16 // Quick start video - https://www.youtube.com/watch?v=XK2fKzou_s0
17
18 tinymce.init({
19 // Select the element(s) to add TinyMCE to using any valid CSS selector
20 selector: '#editor',
21
22 // Tip - To keep TinyMCE lean, only include the plugins you need.
23 plugins: 'ai advcode advtemplate autocorrect autoresize editimage emoticons image inlinecss link linkchecker lists markdown importword mergetags powerpaste tinymcespellchecker',
24
25 // To minimize our editor's impact on a busy CRM screen, hide the menubar and statusbar
26 // https://www.tiny.cloud/docs/tinymce/latest/menus-configuration-options/#main-editor-menubar-behavior
27 // https://www.tiny.cloud/docs/tinymce/latest/statusbar-configuration-options/
28 menubar: false,
29 statusbar: false,
30
31 // The autoresize plugin adjusts the height of the editor as content
32 // expands, up to a max height.
33 // https://www.tiny.cloud/docs/tinymce/latest/autoresize/
34 min_height: 300,
35 max_height: 500,
36 autoresize_bottom_margin: 20,
37
38 // This option allows you to specify the buttons and the order that they
39 // will appear on TinyMCE's toolbar.
40 // https://www.tiny.cloud/docs/tinymce/latest/toolbar-configuration-options/
41 toolbar: 'undo redo | importword | spellchecker | formatgroup | aidialog aishortcuts | link emoticons image inserttemplate mergetags | code',
42
43 // Toolbar groups is a useful concept for organizing the toolbar into
44 // sub toolbars that show up as a floating toolbar.
45 // This particular toolbar config is inspired by Gmail.
46 // https://www.tiny.cloud/docs/tinymce/latest/toolbar-configuration-options/#toolbar_groups
47 toolbar_groups: {
48 formatgroup: {
49 icon: 'format',
50 tooltip: 'Formatting',
51 items: 'blocks fontfamily fontsize | bold italic underline strikethrough forecolor | align bullist numlist outdent indent blockquote'
52 }
53 },
54
55 // Move the toolbar below the editable area instead of on top
56 // https://www.tiny.cloud/docs/tinymce/latest/menus-configuration-options/#toolbar_location
57 toolbar_location: 'bottom',
58
59 // Enhanced Code Editor lets power users edit the editor's underlying HTML in real time,
60 // with indents and color coding. Enable inline view for a more seamless code editing
61 // experience.
62 // https://www.tiny.cloud/docs/tinymce/latest/advcode/
63 advcode_inline: true,
64
65 // You can customize the font size and units using font_size_formats
66 // Use pixels when sending email according to best practices
67 // https://www.tiny.cloud/docs/tinymce/latest/user-formatting-options/#font_size_formats
68 font_size_formats: "8px 10px 12px 14px 18px 24px 36px",
69
70 //
71 importword_service_url:
72 "https://importdocx.converter.tiny.cloud/v2/convert/docx-html",
73
74 // The formats option is where custom formatting options are defined.
75 // In this case we define a couple of headings and text formats.
76 // The p is configured to match against multiple formats to make sure
77 // the styleselect toolbar menu button shows paragraphs as enabled on
78 // p tags that lacks style attribute. The first item in the array will
79 // be the one applied when choosing the format via the styleselect
80 // toolbar button.
81 // https://www.tiny.cloud/docs/tinymce/latest/content-formatting/#formats
82 formats: {
83 h1: {block: 'h1'},
84 h2: {block: 'h2'},
85 p: [
86 {block: 'p'},
87 {selector: 'p'}
88 ],
89 small: {block: 'small', styles: {fontSize: '12px', color: '#aaaaaa'}}
90 },
91
92 // Basic setup guide for AI plugin: https://www.tiny.cloud/docs/tinymce/latest/ai/#basic-setup
93 //
94 // List of AI Assistant shortcuts available in the AI Shortcuts toolbar button and menu item
95 // https://www.tiny.cloud/docs/tinymce/latest/ai/#ai_shortcuts
96 ai_shortcuts: [
97 { title: 'Summarize content', prompt: 'Provide the key points and concepts in this content in a succinct summary.' },
98 { title: 'Improve writing', prompt: 'Rewrite this content with no spelling mistakes, proper grammar, and with more descriptive language, using best writing practices without losing the original meaning.' }
99 ],
100
101 // An alternative to the styleselect toolbar button is the formatselect button
102 // which is a simpler version of the styleselect button. It is configured
103 // using the block_formats option.
104 // https://www.tiny.cloud/docs/tinymce/latest/user-formatting-options/#block_formats
105 block_formats: 'Normal=p; Heading=h1; Sub heading=h2; Small=small',
106
107 // In order to force TinyMCE to apply inline styles to the default paragraph
108 // text (required by email), we can use forced_root_block together with
109 // forced_root_block_attrs.
110 // https://www.tiny.cloud/docs/tinymce/latest/content-filtering/#forced_root_block
111 forced_root_block: 'p',
112 forced_root_block_attrs: {'style': 'font-size: 14px; font-family: helvetica, arial, sans-serif;'},
113
114 // Only allow certain image types to be uploaded to your CRM or sent via emails
115 // https://www.tiny.cloud/docs/tinymce/latest/file-image-upload/#images_file_types
116 images_file_types: "jpeg,jpg,png,gif",
117
118 // In some cases, you may want to disable the spell checker by default as red squiggly
119 // underlines may become a distraction on a busy CRM screen
120 // Spell Checker can still be toggle on/off by the user, using the toolbar or menubar
121 // https://www.tiny.cloud/docs/tinymce/latest/introduction-to-tiny-spellchecker/
122 spellchecker_active: false,
123
124 // To increase productivity and minimize extra formatting from other apps, disable
125 // the PowerPaste dialog box and paste over cleaned HTML only
126 // https://www.tiny.cloud/docs/tinymce/latest/powerpaste-options/
127 powerpaste_word_import: 'clean',
128 powerpaste_googledocs_import: 'clean',
129 powerpaste_html_import: 'clean',
130
131 // In emails we don't use targets for links so we hide the target drop down in the link
132 // dialog. If using this config for another CRM use case, for example knowledge base
133 // page creation, you can remove this setting.
134 // https://www.tiny.cloud/docs/tinymce/latest/link/#link_target_list
135 link_target_list: false,
136
137 // A common feature for email marketing tools is to provide a prepopulated
138 // list of links to choose. Here we define that list.
139 // https://www.tiny.cloud/docs/tinymce/latest/link/#link_list
140 link_list: [
141 { title: "Product demo", value: "https://www.tiny.cloud/" },
142 { title: "Pricing", value: "https://www.tiny.cloud/pricing/" },
143 { title: "Sign up", value: "https://www.tiny.cloud/signup/" },
144 {
145 title: "Case studies",
146 value: "https://www.tiny.cloud/solutions/",
147 menu: [
148 { title: "Thomson Reuters", value: "https://assets.ctfassets.net/sn6g75ou164i/529dmerPtej8eu8wxRFSIQ/9eeeacaf7c7f45b43db991a7064c354d/tiny-case-study-thomson-reuters.pdf" },
149 { title: "Morning Brew", value: "https://assets.ctfassets.net/sn6g75ou164i/5Y5ETFsqsbxrn8KrfxxuSn/eba8bdd4be3b378b167bc9e9016f9206/tiny-case-study-morning-brew_1_.pdf" },
150 { title: "Accelo", value: "https://assets.ctfassets.net/sn6g75ou164i/4Zg8kQr3vcRpwWCcjwuwTy/0363c30c76032d69d25b68a6a625126b/tiny-case-study-accelo.pdf" }
151 ]
152 }
153 ],
154
155 // Merge Tags lets users add non-editable personalization tokens to your content, so your
156 // app can then merge the personalized content into emails before sending
157 // https://www.tiny.cloud/docs/tinymce/latest/mergetags/
158 mergetags_list: [
159 {
160 title: "Lead",
161 menu: [{
162 value: 'Lead.FirstName',
163 title: 'Lead First Name'
164 },
165 {
166 value: 'Lead.LastName',
167 title: 'Lead Last Name'
168 },
169 {
170 value: 'Lead.Organization',
171 title: 'Lead Organization'
172 },
173 {
174 value: 'Lead.Email',
175 title: 'Lead Email'
176 }
177 ]
178 },
179 {
180 title: "Sender",
181 menu: [{
182 value: 'Sender.FirstName',
183 title: 'Sender First Name'
184 },
185 {
186 value: 'Sender.LastName',
187 title: 'Sender Last Name'
188 },
189 {
190 value: 'Sender.Organization',
191 title: 'Sender Organization'
192 },
193 {
194 value: 'Sender.Email',
195 title: 'Sender Email'
196 }
197 ]
198 },
199 {
200 title: 'Subscription',
201 menu: [{
202 value: 'Subscription.UnsubscribeLink',
203 title: 'Unsubscribe Link'
204 },
205 {
206 value: 'Subscription.Preferences',
207 title: 'Subscription Preferences'
208 }
209 ]
210 }
211 ],
212
213 // Templates lets users create, modify and organize content snippets
214 // inside the editor. This example uses a basic configuration, where you
215 // specify the content snippets in the config. Check out the docs for how to
216 // enable users to create their own snippets.
217 // https://www.tiny.cloud/docs/tinymce/latest/templates/
218 advtemplate_templates: [
219 {
220 title: 'Outbound email',
221 content: '<p style="font-size: 14px; font-family: helvetica, arial, sans-serif;">Hi {{Lead.FirstName}},</p><p style="font-size: 14px; font-family: helvetica, arial, sans-serif;">My name is {{Sender.FirstName}} with {{Sender.Organization}}.</p><p style="font-size: 14px; font-family: helvetica, arial, sans-serif;">We help companies just like yours securely store data in the cloud. I wanted to learn how you handle data storage at {{Lead.Organization}} and show you some of the exciting technology we"re working on.</p><p style="font-size: 14px; font-family: helvetica, arial, sans-serif;">Are you available for a quick call tomorrow afternoon?</p><p style="font-size: 14px; font-family: helvetica, arial, sans-serif;">{{Sender.FirstName}}</p>'
222 },
223 {
224 title: 'Follow-up email',
225 content: '<p style="font-size: 14px; font-family: helvetica, arial, sans-serif;">Hi {{Lead.FirstName}},</p><p style="font-size: 14px; font-family: helvetica, arial, sans-serif;">Thank you for taking the time to explore a potential partnership today! It felt like our product could help you solve some of the issues that you’re having within {{Lead.Organization}}, especially in these areas:</p><ul><li style="font-size: 14px; font-family: helvetica, arial, sans-serif;">The offsite data warehouse will allow you to guarantee business continuity</li><li style="font-size: 14px; font-family: helvetica, arial, sans-serif;">Metered usage will ensure you only pay for what you consume</li><li style="font-size: 14px; font-family: helvetica, arial, sans-serif;">Level III security protocols will mean you will meet security requirements for your jurisdiction</li></ul><p style="font-size: 14px; font-family: helvetica, arial, sans-serif;">I understand that now you will discuss and agree internally on the next step. Please let me know if you have any questions or if there is anything I can do to help. If not, I’ll talk to you next week.</p><p style="font-size: 14px; font-family: helvetica, arial, sans-serif;">Best,<br>{{Sender.FirstName}}</p>'
226 }
227 ],
228
229 // The following css will be injected into the editor, extending
230 // the default styles.
231 // In a real world scenario, with much more custom styles for headings
232 // links, tables, images etc, it's recommended to use the content_css
233 // option to load a separate CSS file. This makes editing easier too.
234 // https://www.tiny.cloud/docs/tinymce/latest/add-css-options/
235 content_style: `
236 body {
237 font-family: -apple-system, 'Segoe UI', Roboto, 'Helvetica Neue', Helvetica, Arial, sans-serif;
238 font-size: 14px;
239 line-height: 1.5rem;
240 }
241
242 h1 {
243 font-size: 24px;
244 }
245
246 h2 {
247 font-size: 18px;
248 }
249 `
250
251 // Next step: Check out Tiny Drive for easy cloud storage of your users'
252 // images and media. Integrates seamlessly with TinyMCE.
253 // https://www.tiny.cloud/drive/
254
255 });
256</script>
257<style>
258 body {
259 font-family: -apple-system, 'Segoe UI', Roboto, 'Helvetica Neue', Helvetica, Arial, sans-serif;
260 font-size: 14px;
261 margin: 2rem;
262 }
263
264 main {
265 max-width: 800px;
266 margin: auto;
267 }
268</style>
269</head>
270<body>
271<main>
272<textarea id="editor">
273 <p>Hi {{Lead.FirstName}},</p>
274 <h2>What's your CRM editor project?</h2>
275 <p>Are you:</p>
276 <ul>
277 <li>Building a new CRM and need to add rich text editing capabilities?</li>
278 <li>Extending your existing CRM and need a more extensive rich text editor?</li>
279 </ul>
280 <p>Then use the only WYSIWYG CRM editor that’s trusted by 1.5M devs.</p>
281 <p><strong>Curious about TinyMCE? </strong>Play with this demo to see how our CRM editor works 😊</p>
282 <p>Press <img src="https://tiny.cloud/images/solutions/crm-editor/demo/i_formatting.png" width="18" height="18" alt="Formatting"> to see how a toolbar group works, and click on <img src="https://tiny.cloud/images/solutions/crm-editor/demo/i_insert_template.png" width="18" height="18" alt="Insert Template"> and <img src="https://tiny.cloud/images/solutions/crm-editor/demo/i_insert_token.png" width="18" height="18" alt="Insert Token"> for inspiration to include pre-defined and user defined templates, as well as merge tags.</p>
283</textarea>
284<p>💡 TinyMCE's <a href="https://www.tiny.cloud/docs/tinymce/latest/inline-css/">Inline CSS</a> plugin can be used to process the editor contents and apply all CSS styles inline, helping to make content ready for the inbox. Open up dev tools and click the button below to see the CSS-inlined editor contents in the console.</p>
285<button onclick="tinymce.activeEditor.plugins.inlinecss.getContent().then((value) => { console.log(value.html); });">Get Inlined CSS</button>
286</main>
287</body>
288</html>[DEMO] Show TinyMCE in action


Comments
Add a comment ...
Great job! 👍
Mike Smith
Reporter
Tiny
Status
Ready
Labels
TinyMCE7
Team
Tiny
The basic editing experience every workflow application should start with: includes all the editing controls your users expect, plus PowerPaste, Accessibility Checker, Image Editing and more.
1<!--
2This demo showcases two minimalist editors that expand on focus.
3It uses the TinyMCE inline mode to allow for greater control
4over the toolbar position and behavior.
5
6As part of your app development, you will need to build the
7functionality that runs when the Save and Cancel buttons are clicked.
8-->
9
10<!DOCTYPE html>
11<html>
12<head>
13<meta charset="utf-8">
14<title>Workflow style demo</title>
15<meta name="viewport" content="width=device-width, initial-scale=1">
16<script src="https://cdn.tiny.cloud/1/no-api-key/tinymce/8/tinymce.min.js" referrerpolicy="origin"></script>
17
18<script>
19// TinyMCE Workflow & Collaboration Starter Config
20// Quick start video - https://www.youtube.com/watch?v=ApN8R43PKvA
21
22// Since we are using more than one editor, we can create common config
23// options to be shared between both editor instances
24let commonConfig = {
25
26 // Tip - To keep TinyMCE lean, only include the plugins you need
27 plugins: "ai advcode advtable autocorrect autolink checklist codesample editimage emoticons image link linkchecker lists markdown media mediaembed powerpaste table tinymcespellchecker",
28
29 // Hide the menubar
30 // https://www.tiny.cloud/docs/tinymce/latest/menus-configuration-options/#menubar
31 menubar: false,
32
33 // Customize the look and feel of the UI using premium skins and icons.
34 // https://www.tiny.cloud/docs/tinymce/latest/editor-icons/
35 // https://www.tiny.cloud/docs/tinymce/latest/editor-skin/
36 //
37 // The icons and skin options are disabled by default in this config, but can
38 // be enabled by uncommenting the lines below. In order for them to load properly,
39 // you must be on a premium plan or trial, and load TinyMCE from the cloud or be
40 // running a fully self-hosted deployment.
41 //
42 // icons: 'thin',
43 // skin: 'naked',
44
45 // Enable inline mode
46 // https://www.tiny.cloud/docs/tinymce/latest/use-tinymce-inline/
47 inline: true,
48
49 // Make the inline toolbar not disappear when the editor blurs
50 // https://www.tiny.cloud/docs/tinymce/latest/menus-configuration-options/#toolbar_persist
51 toolbar_persist: true,
52
53 // Remove the manual image resizing as we're using percentage widths
54 // https://www.tiny.cloud/docs/tinymce/latest/menus-configuration-options/#toolbar_persist
55 object_resizing: false,
56
57 // On mobile, toolbar_mode is sliding by default which is not compatible
58 // with toolbar_groups. Therefore we explicitly set toolbar_mode to floating
59 // on mobile and touch devices.
60 // https://www.tiny.cloud/docs/tinymce/latest/toolbar-configuration-options/#toolbar_mode
61 // https://www.tiny.cloud/docs/tinymce/latest/tinymce-for-mobile/#themobileoption
62 mobile: {
63 toolbar_mode: 'floating'
64 },
65
66 // Basic setup guide for AI plugin: https://www.tiny.cloud/docs/tinymce/latest/ai/#basic-setup
67 //
68 // List of AI Assistant shortcuts available in the AI Shortcuts toolbar button and menu item
69 // https://www.tiny.cloud/docs/tinymce/latest/ai/#ai_shortcuts
70 ai_shortcuts: [
71 { title: 'Summarize content', prompt: 'Provide the key points and concepts in this content in a succinct summary.' },
72 { title: 'Improve writing', prompt: 'Rewrite this content with no spelling mistakes, proper grammar, and with more descriptive language, using best writing practices without losing the original meaning.' }
73 ],
74
75 // Set the spellchecker language and make it active on load
76 // https://www.tiny.cloud/docs/tinymce/latest/introduction-to-tiny-spellchecker/#spellchecker_active
77 spellchecker_language: 'en',
78 spellchecker_active: true
79
80}
81
82// Here is the init function for the first "Description" editor
83tinymce.init({
84
85 // Select the element(s) to add TinyMCE to using any valid CSS selector
86 selector: "#editor-description-content",
87
88 // This option allows you to specify the buttons and the order that they
89 // will appear on TinyMCE's toolbar
90 // https://www.tiny.cloud/docs/tinymce/latest/toolbar-configuration-options/
91 toolbar: "blocks | aidialog aishortcuts | bold italic forecolor backcolor | numlist bullist checklist | link image emoticons table codesample hr blockquote | code | math",
92
93 // Render the toolbar in this container
94 // https://www.tiny.cloud/docs/tinymce/latest/menus-configuration-options/#fixed_toolbar_container
95 fixed_toolbar_container: '#editor-description-toolbar',
96
97 // Set a placeholder to be shown when there is no content in the editor
98 // https://www.tiny.cloud/docs/tinymce/latest/editor-important-options/#placeholder
99 placeholder: "Add a description",
100
101 setup: (editor) => {
102 // Apply a custom class to the wrapper element when the editor gets focus
103 // https://www.tiny.cloud/docs/advanced/events/
104 editor.on('focus', () => {
105 document.getElementById('editor-description-wrap').classList.add('enabled');
106 });
107 },
108
109 // Load the common configuration options specified earlier
110 ...commonConfig,
111});
112
113// Here is the init function for the second "Comment" editor
114tinymce.init({
115
116 // Select the element(s) to add TinyMCE to using any valid CSS selector
117 selector: "#editor-comment-content",
118
119 // This option allows you to specify the buttons and the order that they
120 // will appear on TinyMCE's toolbar.
121 // https://www.tiny.cloud/docs/tinymce/latest/toolbar-configuration-options/
122 toolbar: "bold italic forecolor backcolor | aidialog aishortcuts | numlist bullist | link image emoticons codesample blockquote math",
123
124 // Set a placeholder to display a text when there are no content in the editor
125 // https://www.tiny.cloud/docs/tinymce/latest/editor-important-options/#placeholder
126 placeholder: "Add a comment...",
127
128 // Render the toolbar in this container.
129 // https://www.tiny.cloud/docs/tinymce/latest/menus-configuration-options/#fixed_toolbar_container
130 fixed_toolbar_container: '#editor-comment-toolbar',
131
132 setup: (editor) => {
133 // Apply a custom class to the wrapper element when the editor gets focus
134 // https://www.tiny.cloud/docs/advanced/events/
135 editor.on('focus', () => {
136 document.getElementById('editor-comment-wrap').classList.add('enabled');
137 });
138 },
139
140 // Load the common configuration options specified earlier
141 ...commonConfig,
142});
143
144// Save button behavior to disable the editor
145function save(id) {
146 document.getElementById(id).classList.remove('enabled');
147}
148
149// Next step: Check out Tiny Drive for easy cloud storage of your users'
150// images and media. Integrates seamlessly with TinyMCE.
151// https://www.tiny.cloud/drive/
152
153</script>
154<style>
155/* Page styles - modify these or replace them to suit your app */
156
157body {
158 margin: 2rem .5rem;
159 font-family: -apple-system, BlinkMacSystemFont, 'Segoe UI', Roboto, Oxygen-Sans, Ubuntu, Cantarell, 'Helvetica Neue', Helvetica, Arial, sans-serif;
160}
161
162main {
163 max-width: 720px;
164 margin: auto;
165}
166
167.editor-wrap.enabled {
168 border-radius: 3px;
169 border: 1px solid #ccc;
170}
171
172.editor-content {
173 transition: min-height .25s, padding-bottom .25s;
174 min-height: 0;
175 outline: none;
176 border-radius: 1px;
177 transition: box-shadow .15s, background-color .15s;
178}
179
180.editor-content > *:first-child {
181 margin-top: 0;
182}
183
184.editor-content > *:last-child {
185 margin-bottom: 0;
186}
187
188.editor-wrap#editor-description-wrap:hover:not(.enabled) .editor-content {
189 background-color: #efefef;
190 box-shadow: 0 0 0 6px #efefef;
191}
192
193.editor-wrap.enabled .editor-content {
194 min-height: 140px;
195 padding: 1rem;
196}
197
198.editor-toolbar {
199 padding: 3px;
200 display: none;
201 border-bottom: 1px solid #ccc;
202 z-index: 1;
203}
204
205.editor-wrap.enabled .editor-toolbar {
206 display: block;
207}
208
209.editor-footer {
210 margin: 1rem;
211 display: none;
212 padding-top: .5rem;
213}
214
215.editor-wrap.enabled .editor-footer {
216 display: block;
217}
218
219.editor-save-btn {
220 background: #207ab7;
221 font-size: 16px;
222 font-weight: bold;
223 color: #fff;
224 border: none;
225 outline: none;
226 height: 34px;
227 line-height-step: 34px;
228 padding: 0 16px;
229 border-radius: 4px;
230 margin: 0;
231 -webkit-tap-highlight-color: rgba(0,0,0,0);
232 -webkit-user-select: none;
233}
234
235.editor-cancel-btn {
236 background: #dfe3ec;
237 font-size: 16px;
238 font-weight: bold;
239 color: #17224f;
240 border: none;
241 outline: none;
242 height: 34px;
243 line-height-step: 34px;
244 padding: 0 16px;
245 border-radius: 4px;
246 margin: 0;
247 -webkit-tap-highlight-color: rgba(0,0,0,0);
248 -webkit-user-select: none;
249}
250
251.editor-label {
252 font-size: 19px;
253 margin: 2rem 0 1rem;
254 display: block;
255}
256
257.comment {
258 display: flex;
259}
260
261.avatar {
262 background-color: #ff9999;
263 color: #17224f;
264 font-size: 18px;
265 font-weight: bold;
266 border-radius: 100px;
267 width: 42px;
268 height: 42px;
269 line-height: 42px;
270 text-align: center;
271 margin-right: 1rem;
272}
273
274.editor-wrap#editor-comment-wrap {
275 border: 1px solid #ccc;
276 border-radius: 3px;
277 flex-grow: 1;
278}
279
280.editor-wrap#editor-comment-wrap .editor-content {
281 padding: 1rem;
282}
283
284/* Below are the content styles, in this case they are global */
285/* and not namespaced to `.editor-content` */
286a,
287a:link {
288 color: blue;
289}
290a:visited {
291 color: purple;
292}
293a:hover {
294 color: green;
295}
296a:active {
297 color: red;
298}
299
300h1 {
301 font-size: 1.75rem;
302 font-weight: strong;
303}
304
305h2 {
306 font-size: 1.5rem;
307 font-weight: strong;
308}
309
310h3 {
311 font-size: 1rem;
312 font-weight: strong;
313}
314
315hr {
316 margin: 1.5rem 0;
317 padding: .5rem 0;
318 border: 0;
319}
320
321hr::after {
322 content: '';
323 display: block;
324 border-width: 0 0 1px 0;
325 border-color: #ccc;
326 border-style: solid;
327}
328
329img {
330 max-width: 100%;
331 height: auto;
332}
333
334/* Set overflow floating toolbar to have solid background */
335.tox.tox-tinymce-aux .tox-toolbar__overflow {
336 background-color: #fff !important;
337}
338
339/* Indent placeholder in custom-styled comment editor */
340#editor-comment-wrap .mce-content-body:not([dir=rtl])[data-mce-placeholder]:not(.mce-visualblocks)::before {
341 left:inherit;
342}
343</style>
344</head>
345<body>
346<main>
347<label class="editor-label">Description</label>
348<div class="editor-wrap" id="editor-description-wrap">
349 <div class="editor-toolbar" id="editor-description-toolbar"></div>
350 <div class="editor-content" id="editor-description-content">
351 <h2><strong>What’s your rich text editor </strong><strong>workflow</strong><strong> project? </strong></h2>
352 <p>Are you…</p>
353 <ul>
354 <li><strong>Building a new workflow or project management platform</strong> and need to add rich text editing functionality?</li>
355 <li><strong>Extending your existing workflow or project management app</strong> and need to enhance your default editor?</li>
356 </ul>
357 <p>Then use the only WYSIWYG editor that’s trusted by 1.5M developers.</p>
358 <h3><strong>Curious about TinyMCE?</strong></h3>
359 <p>Click inside this box to activate the editor and see how it works!</p>
360 </div>
361 <footer class="editor-footer">
362 <button type="button" id="save-description-btn" onclick="save('editor-description-wrap')" class="editor-save-btn">Save</button>
363 <button type="button" onclick="alert('Your own custom save function')" class="editor-cancel-btn">Cancel</button>
364 </footer>
365</div>
366
367<label class="editor-label">Comments</label>
368<div class="comment">
369 <div class="avatar">FD</div>
370 <div class="editor-wrap" id="editor-comment-wrap">
371 <div class="editor-toolbar" id="editor-comment-toolbar"></div>
372 <div class="editor-content" id="editor-comment-content"></div>
373 <footer class="editor-footer">
374 <button type="button" id="save-description-btn" onclick="alert('Your own custom save function')" class="editor-save-btn">Save</button>
375 <button type="button" onclick="alert('Your own custom cancel function')" class="editor-cancel-btn">Cancel</button>
376 </footer>
377 </div>
378</div>
379</main>
380</body>
381</html>
382
383
The basic editing experience every LMS should start with: includes all the editing controls your users expect, plus PowerPaste, Accessibility Checker, Image Editing and more.
1<!-- This is an example of how you can use TinyMCE for course creation
2within your LMS. You can also adapt this starter config to suit the needs of
3students - for example to enable them to create assignments or collaborate on
4groupwork. -->
5<!DOCTYPE html>
6<html>
7<head>
8<meta charset="utf-8">
9<title>LMS use-case demo</title>
10<meta name="viewport" content="width=device-width, initial-scale=1">
11<script src="https://cdn.tiny.cloud/1/no-api-key/tinymce/8/tinymce.min.js" referrerpolicy="origin"></script>
12<script>
13 // TinyMCE Learning Management System (LMS) Starter Config
14 // Quick start video - https://www.youtube.com/watch?v=uNuevm_ZzqQ
15
16 tinymce.init({
17 // Select the element(s) to add TinyMCE to using any valid CSS selector
18 selector: "#editor",
19
20 // Tip - To make TinyMCE leaner, only include the plugins you need
21 plugins: "ai a11ychecker advcode autocorrect autolink autoresize autosave charmap checklist code editimage emoticons footnotes fullscreen image link linkchecker lists markdown media mediaembed mergetags powerpaste preview table tableofcontents tinycomments tinymcespellchecker typography wordcount",
22
23 // Specify the toolbar buttons
24 // We have put our custom insert token button last
25 // https://www.tiny.cloud/docs/tinymce/latest/toolbar-configuration-options/
26 toolbar: "undo redo | aidialog aishortcuts | blocks | bold italic underline strikethrough forecolor backcolor | align checklist bullist numlist | link image media footnotes mergetags table | subscript superscript charmap blockquote | tokens | spellchecker typography a11ycheck wordcount | addcomment showcomments | fullscreen preview",
27
28 // Disable the status bar
29 // https://www.tiny.cloud/docs/tinymce/latest/statusbar-configuration-options/#statusbar
30 statusbar: false,
31
32 // Enable sticky toolbar
33 // https://www.tiny.cloud/docs/tinymce/latest/menus-configuration-options/#toolbar_sticky
34 toolbar_sticky: true,
35
36 // Set Enhanced Media Embed's max width
37 // https://www.tiny.cloud/docs/tinymce/latest/introduction-to-mediaembed/
38 mediaembed_max_width: 800,
39
40 // You can assign each item in the Blocks menu a user-friendly name
41 // https://www.tiny.cloud/docs/tinymce/latest/user-formatting-options/#block_formats
42 block_formats: 'Title=h1; Heading=h2; Sub heading=h3; Blockquote=blockquote; Paragraph=p',
43
44 // Use font_css to load custom fonts from an external source
45 // https://www.tiny.cloud/docs/tinymce/latest/add-css-options/#font_css
46 font_css: ['https://fonts.googleapis.com/css2?family=Asap:ital,wght@0,400;0,550;1,400&display=swap'], // URLs containing commas and such have to be wrapped in an array to work
47
48 // Set options for Accessibility Checker
49 // https://www.tiny.cloud/docs/tinymce/latest/a11ychecker/
50 a11y_advanced_options: true,
51 a11ychecker_html_version: 'html5',
52 a11ychecker_level: 'aa',
53
54 // Advanced Typography allows users to apply 25+ typographic conventions to their content.
55 // Specify the language(s) you want the plugin to use. In this case we are allowing all
56 // languages, but we must specify the default language.
57 // https://www.tiny.cloud/docs/tinymce/latest/advanced-typography/
58 typography_default_lang: 'en-US',
59
60 // Merge Tags lets users add non-editable personalization tokens to your content, so your
61 // app can then populate the dynamic content into what is rendered for users
62 // https://www.tiny.cloud/docs/tinymce/latest/mergetags/
63 mergetags_list: [
64 {
65 title: "Course",
66 menu: [{
67 value: 'Course.Name',
68 title: 'Course Name'
69 },
70 {
71 value: 'Course.Teacher.Name',
72 title: 'Teacher Name'
73 },
74 {
75 value: 'Course.Department.Head',
76 title: 'Department Head'
77 }
78 ]
79 },
80 {
81 title: "Assignment",
82 menu: [{
83 value: 'Assignment.Name',
84 title: 'Assignment Name'
85 },
86 {
87 value: 'Assignment.DueDate',
88 title: 'Assignment Due Date'
89 }
90 ]
91 },
92 {
93 title: "Student",
94 menu: [{
95 value: 'Student.Name',
96 title: 'Student Name'
97 },
98 {
99 value: 'Student.ID',
100 title: 'Student ID'
101 },
102 {
103 value: 'Student.Email',
104 title: 'Student Email'
105 }
106 ]
107 }
108 ],
109
110 // Basic setup guide for AI plugin: https://www.tiny.cloud/docs/tinymce/latest/ai/#basic-setup
111 //
112 // List of AI Assistant shortcuts available in the AI Shortcuts toolbar button and menu item
113 // https://www.tiny.cloud/docs/tinymce/latest/ai/#ai_shortcuts
114 ai_shortcuts: [
115 { title: 'Summarize content', prompt: 'Provide the key points and concepts in this content in a succinct summary.' },
116 { title: 'Improve writing', prompt: 'Rewrite this content with no spelling mistakes, proper grammar, and with more descriptive language, using best writing practices without losing the original meaning.' }
117 ],
118
119 // The Tiny Comments plugin enables you to quickly get collaboration up and
120 // running. There are a lot of options, but here are the most basic
121 // ones to get you started
122 // https://www.tiny.cloud/docs/tinymce/latest/introduction-to-tiny-comments/
123 tinycomments_mode: 'embedded',
124 tinycomments_author: 'rmartel',
125 tinycomments_author_name: 'Rosalina Martel (Instructor)',
126 tinycomments_author_avatar: 'https://www.tiny.cloud/images/avatars/avatar-RosalinaMartel.jpg',
127
128 // Show the comments sidebar by default to encourage collaboration and discovery
129 // https://www.tiny.cloud/docs/tinymce/latest/customsidebar/#sidebar_show
130 sidebar_show: 'showcomments',
131
132 // The following css will be injected into the editor, extending
133 // the default styles.
134 // In a real world scenario, with much more custom styles for headings
135 // links, tables, images etc, it's recommended to use the content_css
136 // option to load a separate CSS file. Makes editing easier too.
137 // https://www.tiny.cloud/docs/tinymce/latest/add-css-options/
138 content_style: `
139 body {
140 max-width: 800px;
141 margin: auto;
142 font-family: 'Asap', serif;
143 font-size: 17px;
144 color: #222f3e;
145 }
146
147 h1, h2, h3, strong {
148 font-weight: 550;
149 }
150
151 table th,
152 table thead td {
153 background-color: #ecf0f1;
154 font-weight: 550;
155 text-align: left;
156 }
157
158 table caption {
159 display: none;
160 }
161
162 table[data-mce-selected="1"] caption {
163 display: table-caption;
164 }
165
166 .mce-footnotes {
167 font-size:12px;
168 }
169 `
170
171 // Next step: Check out Tiny Drive for easy cloud storage of your users'
172 // images and media. Integrates seamlessly with TinyMCE.
173 // https://www.tiny.cloud/drive/
174
175 });
176</script>
177<style>
178 body {
179 margin: 60px 16px;
180 background-color: #fafafc;
181 color: #222f3e;
182 }
183 .editor-wrap {
184 max-width: 1200px;
185 margin: auto;
186 }
187</style>
188</head>
189<body>
190<div class="editor-wrap">
191 <textarea id="editor">
192 <h1><span class="mce-annotation tox-comment" data-mce-annotation-uid="mce-conversation_39124539331662741473397" data-mce-annotation="tinycomments">Assignment</span> #3: Color Theory</h1>
193 <p>Hello {{Student.Name}},</p>
194 <p>For this week's assignment, you will learn the basics of color theory.</p>
195 <p>Select one of the following topics, and write a research essay. Ensure you answer the questions in full, and provide references for any primary or secondary sources<sup id="footnote_83179098411662742784603" class="mce-footnote"><a href="#footnotes_entry_83179098411662742784603">1</a></sup> consulted. Contact {{Course.Teacher.Name}} or {{Course.Department.Head}} if you have any questions about the assignment.</p>
196 <div style="left: 0px; width: 100%; height: 0px; position: relative; padding-bottom: 56.25%; max-width: 800px;" data-ephox-embed-iri="https://www.youtube.com/watch?v=Qj1FK8n7WgY"><iframe style="border: 0; top: 0; left: 0; width: 100%; height: 100%; position: absolute;" src="https://www.youtube.com/embed/Qj1FK8n7WgY?rel=0" scrolling="no" allowfullscreen="allowfullscreen"></iframe></div>
197 <h2>This week's tasks</h2>
198 <p>Begin by watching the video above then proceed to the assignment questionnaire by pressing continue below.</p>
199 <h3>Topic List</h3>
200 <ul>
201 <li>The origin of Color theory and its effect on emotion and mood is contentious.<sup id="footnote_98446634721662742994322" class="mce-footnote"><a href="#footnotes_entry_98446634721662742994322">2</a></sup> Identify your understanding of the originators of Color theory. Argue for the effectiveness of certain color palettes over others to create different moods.</li>
202 <li>While some experts argue there are no new color palettes, others argue innovation is a constant process. Choose one side, and build an argument: There are no new color palette innovations. New color palette innovations are happening all the time.</li>
203 <li>Select three examples of color theory in practice that are all part of one medium (e.g. film, magazine, television). Explain why these three examples are effective. Contrast and argue why one of these examples is more effective in its use of color theory concepts compared to the others.</li>
204 <li>Wassily Kandinsky states “Color is a power which directly influences the soul.”<sup id="footnote_34341905131662743043554" class="mce-footnote"><a href="#footnotes_entry_34341905131662743043554">3</a></sup> Explain what Kandinsky meant, and provide an argument explaining what Kandinsky means using color theory principles.</li>
205 </ul>
206 <h3>Also...</h3>
207 <ul>
208 <li>Think about the difference between mixing colors using colored lights vs using paint.</li>
209 <li>Pay extra attention to the different complementary color models.</li>
210 </ul>
211 <blockquote>
212 <p>“Color is a power which directly influences the soul.”<br><span style="color: #95a5a6;"><em>– Wassily Kandinsky </em></span></p>
213 </blockquote>
214 <h2>Deadlines</h2>
215 <p>Please submit your tasks before {{Assignment.DueDate}}</p>
216 <h2>Grading Criteria</h2>
217 <table style="border-collapse: collapse; width: 99.8698%; height: 157px;" border="1">
218 <thead>
219 <tr>
220 <th style="width: 18.0915%;" scope="col"> </th>
221 <td style="width: 18.0915%;" scope="col">High Achievement</td>
222 <td style="width: 18.2224%;" scope="col">Good Achievement</td>
223 <td style="width: 18.2224%;" scope="col">Pass</td>
224 <td style="width: 18.2224%;" scope="col">Fail</td>
225 </tr>
226 </thead>
227 <tbody>
228 <tr>
229 <th style="width: 18.0915%;" scope="col">Demonstrated knowledge of color theory</th>
230 <td style="width: 18.0915%;">The student shows an outstanding knowledge and command of color theory concepts</td>
231 <td style="width: 18.2224%;">The student shows good knowledge and understanding of color theory concepts</td>
232 <td style="width: 18.2224%;">The student shows some knowledge of color theory and a basic understanding of color theory concepts</td>
233 <td style="width: 18.2224%;">The student has not demonstrated knowledge of color theory, or the concepts of color theory.</td>
234 </tr>
235 <tr>
236 <th style="width: 18.0915%;" scope="col">Argument composition skills</th>
237 <td style="width: 18.0915%;">The student shows an outstanding argument composition skills</td>
238 <td style="width: 18.2224%;">The student shows good argument composition skills</td>
239 <td style="width: 18.2224%;">The student shows some argument composition skills.</td>
240 <td style="width: 18.2224%;">The student does not show clear argument composition skills</td>
241 </tr>
242 <tr>
243 <th style="width: 18.0915%;" scope="col">Consulted resources</th>
244 <td style="width: 18.0915%;">The student shows they have consulted excellent resources</td>
245 <td style="width: 18.2224%;">The student has consulted good resources</td>
246 <td style="width: 18.2224%;">The student has consulted some resources required for the assignment</td>
247 <td style="width: 18.2224%;">The student has not consulted adequate resources</td>
248 </tr>
249 <tr>
250 <th style="width: 18.0915%;" scope="col">Writing, Grammar, and Clarity</th>
251 <td style="width: 18.0915%;">The student shows a command of the language in their work</td>
252 <td style="width: 18.2224%;">The student shows effective writing skills</td>
253 <td style="width: 18.2224%;">The student shows clear writing skills</td>
254 <td style="width: 18.2224%;">The student shows unclear writing skills</td>
255 </tr>
256 </tbody>
257 </table>
258 <p> </p>
259 <div class="mce-footnotes">
260 <hr>
261 <ol>
262 <li id="footnotes_entry_83179098411662742784603"><a class="mce-footnotes-backlink" href="#footnote_83179098411662742784603">^ </a><span class="mce-footnotes-note">AMA Style Guide. <a href="https://owl.purdue.edu/owl/research_and_citation/ama_style/index.html">https://owl.purdue.edu/owl/research_and_citation/ama_style/index.html</a>. Accessed September 9, 2022. </span></li>
263 <li id="footnotes_entry_98446634721662742994322"><a class="mce-footnotes-backlink" href="#footnote_98446634721662742994322">^ </a><span class="mce-footnotes-note">Color theory. Wikipedia. <a href="https://en.wikipedia.org/wiki/Color_theory">https://en.wikipedia.org/wiki/Color_theory</a>. Published September 3, 2022. Accessed September 24, 2022. </span></li>
264 <li id="footnotes_entry_34341905131662743043554"><a class="mce-footnotes-backlink" href="#footnote_34341905131662743043554">^ </a><span class="mce-footnotes-note">Kandinsky W. A quote from concerning the spiritual in art. Goodreads. <a href="https://www.goodreads.com/quotes/90420-colour-is-a-power-which-directly-influences-the-soul">https://www.goodreads.com/quotes/90420-colour-is-a-power-which-directly-influences-the-soul</a>. Accessed September 14, 2022. </span></li>
265 </ol>
266 </div><!--tinycomments|2.1|data:application/json;base64,eyJtY2UtY29udmVyc2F0aW9uXzM5MTI0NTM5MzMxNjYyNzQxNDczMzk3Ijp7InVpZCI6Im1jZS1jb252ZXJzYXRpb25fMzkxMjQ1MzkzMzE2NjI3NDE0NzMzOTciLCJjb21tZW50cyI6W3sidWlkIjoibWNlLWNvbnZlcnNhdGlvbl8zOTEyNDUzOTMzMTY2Mjc0MTQ3MzM5NyIsImF1dGhvciI6ImF2aXNtYXJhIiwiYXV0aG9yTmFtZSI6IkFuZ2VsIFZpc21hcmEgKFN0dWRlbnQpIiwiYXV0aG9yQXZhdGFyIjoiaHR0cHM6Ly93d3cudGlueS5jbG91ZC9pbWFnZXMvYXZhdGFycy9hdmF0YXItQW5nZWxWaXNtYXJhLmpwZyIsImNvbnRlbnQiOiJIb3cgd291bGQgeW91IGxpa2UgdXMgdG8gY2l0ZSBvdXIgcmVmZXJlbmNlcz8iLCJjcmVhdGVkQXQiOiIyMDIyLTA5LTA5VDE2OjM3OjUzLjM5N1oiLCJtb2RpZmllZEF0IjoiMjAyMi0wOS0wOVQxNjozNzo1My4zOTdaIn0seyJ1aWQiOiJtY2UtcmVwbHlfNzYwNTE3MDY2MjE2NjI3NDE1Njg0NzEiLCJhdXRob3IiOiJybWFydGVsIiwiYXV0aG9yTmFtZSI6IlJvc2FsaW5hIE1hcnRlbCAoSW5zdHJ1Y3RvcikiLCJhdXRob3JBdmF0YXIiOiJodHRwczovL3d3dy50aW55LmNsb3VkL2ltYWdlcy9hdmF0YXJzL2F2YXRhci1Sb3NhbGluYU1hcnRlbC5qcGciLCJjb250ZW50IjoiUGxlYXNlIHVzZSB0aGUgYnVpbHQtaW4gZm9vdG5vdGVzIGZ1bmN0aW9uYWxpdHkgYW5kIGZvbGxvdyBBTUEgc3R5bGUuIiwiY3JlYXRlZEF0IjoiMjAyMi0wOS0wOVQxNjozOToyOC40NzFaIiwibW9kaWZpZWRBdCI6IjIwMjItMDktMDlUMTY6Mzk6MjguNDcxWiJ9XX19-->
267 </textarea>
268</div>
269</body>
270</html>Ready to use TinyMCE for your project?
Get a quoteCreate your next app using all
the WYSIWYG features you expect
Content Creation

Enable users to create content using features they know and love:
- An intuitive and familiar editing experience inspired by popular document creation tools
- Error-free clean copy-paste from Word, Excel and Google Docs with PowerPaste
- Word Count and Search and replace functionality that enhances a wide range of document creation projects
- Range of content formatting tools like Checklists, Enhanced Tables and Page Break
- Image Editing let users apply 10 powerful transformations to their images – crop, rotate, resize and other filters
- Inline editing to Preview how content looks before publishing
- Generates clean SEO-friendly HTML ready to be indexed by search engines
- Optimized for desktop and mobile
- Content can be output as PDF using the PDF Export feature
Editor Control

Give users either unrestricted creative freedom, or just enough to create what they need:
- Only enable the functionality needed and use Quick Toolbar and keyboard shortcuts to speed up content creation
- Control the output with a variety of options around HTML and CSS
- Customize the UI with pre-made Skins and Icons or build your own
- Prevent the editing of brand or regulatory content using the Noneditable plugin
- Allow users to insert predefined, dynamic content using the Templates plugin
- Autosave avoids the risk of losing content
- Autoresize allows the editor to resize to fit its contents as it expands
Compliance

Ensure user-generated content is aligned with corporate and regulatory standards:
- Maintain regulatory standards and avoid potential fines and lawsuits with Accessibility Checker (WCAG)
- Build custom dictionaries to ensure content is on-brand with Spell Checker
- Globally consistent spelling with simultaneous checking of up to 13 languages (plus medical terminology)
- Fix obvious (and not-so-obvious) mistakes before they see the light of day with Autocorrect
- Eliminate embarrassing broken links with Link Checker
- Mentions can be used to autocomplete predefined tags, categories or assignees
Collaboration

Produce better outcomes with collaborative editing tools:
- Let users collaboratively work on content with secure end-to-end encrypted Real-time Collaboration
- Enhance peer-to-peer collaboration with Comments and threaded conversations
- Kickstart conversations with @mentions
Media Management

Manage your files or images in the cloud with Tiny Drive:
- Upload and browse files, and insert images inside TinyMCE
- Import existing assets from any connected Google Drive or Dropbox account
- Minimal configuration, integrates seamlessly
- Secure – uses utilizes JSON Web Tokens (JWT)
- Scalable – uses Amazon S3 cloud storage
- Note: Tiny Drive is an add-on to TinyMCE
Internationalization

Provide a consistent and reliable editing experience, from Bogotá to Istanbul:
- 38 fully-vetted, professional UI translations
- 37 community-contributed UI translations
- 13 languages supported with Spell Checker
See full demo | Discover integrations | Explore 60+ features
Worried about
dependency hell
for your editor?
Semantic versioning helps you predict the work involved in updating a dependency to a newer version. TinyMCE uses semantic versioning for its updates. The first release of a product is given the version 1.0.0, and each update after that increments the relevant numbers, depending on the kind of release.
Major
Includes some changes that are NOT backward-compatible (e.g., 2.0.0)
Introduces changes that may break existing functionality, so be prepared to invest some effort to make certain parts of your editor work again (release notes and migration guides are important).
Minor
Backward-compatible new features (e.g., 2.1.0)
Adds some improvements, but shouldn't break your current functionality, and in many cases you can choose whetherto adopt the new improvement.
Patch
Backward-compatible bug fixes (e.g., 2.1.1)
Fixes a bug/problem, but no new functionality involved, and shouldn't break any existing functionality. Patch regularly for optimal benefits - is safe to deploy without changes.
What type of HTML text
editor do you need?
All five of the most popular rich text editors fall within these three types, with TinyMCE being the most popular within the enterprise-grade, ready-to-use editor space. Not all editors are built to support all complex use cases, so compare and understand which one serves your project and business needs – both now and in the future.
Ready-to-use editors
Fully customizable solution which, if open source, comes with core features plus advanced features such as tables, full image support, etc.
Come with full UIs, some providing custom mobile editing experience.
Professional grade support if you have a paid subscription, or community support if open source.
Editor options:
Editor framework plus
Similar to the headless frameworks, these usually sit within open source and provide the same basic functionality, but are paired with a simple UI out-of-the-box.
These solutions again tend to offer limited community-driven support.
Editor options:
Headless frameworks
These provide a foundation devoid of any UI, and usually also any features over and above the simple bold, italic, underline style features.
The current players within this space are entirely open source with limited community-driven support available.
Editor options:
Editor-build learning curve

Editor UI included
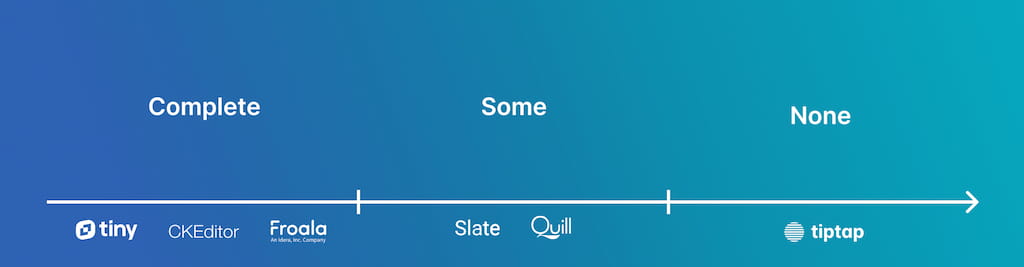
Editor support provided
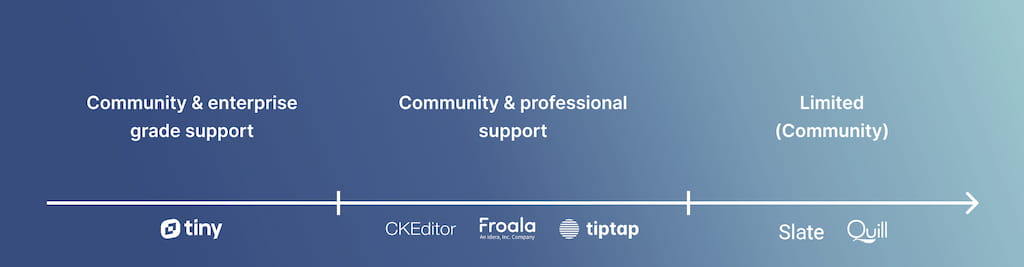
Open source, commercial, or
somewhere in between?
Neither a commercial or open source editor may
suit your business and product – a hybrid
structure may work better.
Core editor FREE with PAID offerings
Open Source + Commercial
An open source core, containing basic and some advanced features. Is maintained by a professional development team. Carries a more restrictive commercial license for developers looking to create and sell products.
Everything FREE
(including core editor)
Full open source
This model is something a lot of developers look for, but they’re also often the more lightweight headless framework options. These are solid basic solutions, but there’s no frills or support, which may cause problems for more advanced use cases.
Everything PAID (incl core editor)
Full commercial offerings
A fully commercialized solution that contains everything you need, but you’ll need to pay for access to everything, including the basic editor.
350M+
Downloads every single year100M+
Products powered by TinyMCE35M+
Hits on our CDN per day23,000+
Commits on GitHub194
Contributors on GitHubGet Started

Integrate TinyMCE
From TinyMCE 7.0 onward, the editor is open source under a GPL2+ license and easily integrates in your tech stack with 12+ integrations and 400+ flexible APIs that make development easier.
Integrate TinyMCE →
Try Tiny Cloud
We support self-hosted and cloud- based deployment. All our core features from the open source version are available in the cloud product for free.
Try Tiny Cloud →
Join our community
TinyMCE is an open core product and our community is incredibly important. Thousands of Q&As are updated daily on Stack Overflow and Github.
Ask us anything on Github →Back To Top ↑