


Despite the significant passage of time since Angular’s release, it’s still a relevant framework for building your enterprise-grade application. Its maturity as a framework makes it reliable. And when combined with the right components, your application delivers an enriching experience.
For instance, by incorporating TinyMCE into your application – using the dedicated Angular WYSIWYG editor integration, you can be confident the rich text editor component works out-of-the-box. You get a reliable rich text editor that’s effortlessly customizable to the solution you’re either using or creating.
This article explains: how to get a Angular textarea going, and then how to enhance that textarea with TinyMCE.
How to create a simple Angular textarea
The following demo makes use of a CMS interface with a simple Angular textarea. Follow the steps outlined to get started, and try out Angular, or check the next section to see how TinyMCE enhances the Angular textarea experience.
There are some prerequisites:
- Familiarity with HTML, CSS, and JavaScript
- Access to the command line with a shell such as Bash
- A text editor for modifying .ts or .html files.
-
Create a new Angular app in your development environment:
ng new --defaults --skip-git enrich-angular-demo-
Change into the new project directory:
cd enrich-angular-demo-
Install the Angular Forms Module, which is useful for textareas:
npm install --save @angular/forms-
Change into the enrich-angular-demo/src/app/ directory, and open the app.module.ts file, and modify the contents to reference the forms module:
import { NgModule } from "@angular/core";
import { BrowserModule } from "@angular/platform-browser";
import { FormsModule } from "@angular/forms";

import { AppComponent } from "./app.component";

@NgModule({
  declarations: [AppComponent],

  imports: [BrowserModule, FormsModule],

  providers: [],
  bootstrap: [AppComponent],
})
export class AppModule {}
-
Modify the app.component.ts file, including a name attribute that contains the following string and Angular major version, and import the version property from the Angular core module, and then save the change:
import { Component, VERSION } from '@angular/core';

@Component({
  selector: 'app-root',
  templateUrl: './app.component.html',
  styleUrls: ['./app.component.css']
})

export class AppComponent {
  public name = 'Angular' + VERSION.major;
  title = 'enrich-angular-demo';
}-
Add the following HTML content to the app.component.html file to display the Angular textarea. Save the change:
<div class="content" role="main">

  <!--Angular Form and Textarea-->
  <form>
    <div>
      <textarea ng-model="string" required="string" [value]="name" ></textarea>
    </div>
</form>-
Open the app.component.css file, and include the following CSS content to style the Angular textarea element:
textarea {
    width: 400px;
    height: 250px;
    padding: 12px 20px;
    font-family:'Courier New', Courier, monospace;
    font-size: 16px;
    background-color: #f8f8f8;
}-
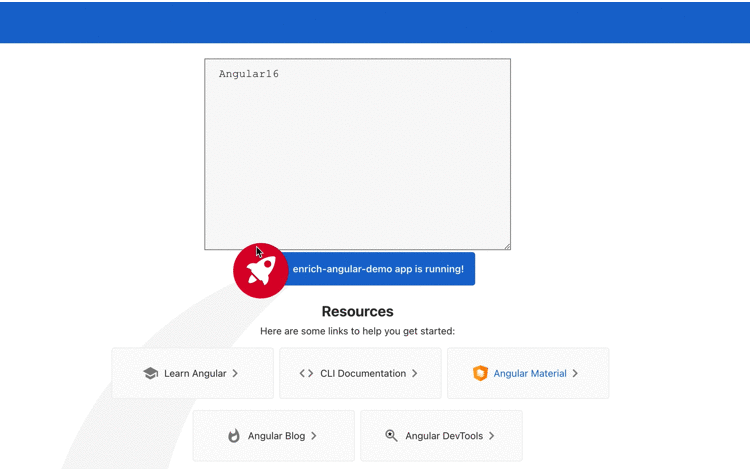
Run the Angular textarea demo with the following command:
ng serve --openWhich loads the demo in the browser:
How to set up enriched Angular textarea
Enhance the Angular textarea by installing TinyMCE with npm. TinyMCE’s dedicated framework integration saves time as the configuration and customization is easier than configuring a textarea element.
-
Install TinyMCE through npm. You may need to open a new tab with your command line shell to make these modifications to the Angular textarea:
npm install --save tinymce @tinymce/tinymce-angular-
Navigate to the top level directory of the Angular demo, and open the angular.json file located there:
cd ..

.
..
.angular
.editorconfig
.gitignore
.vscode
README.md
angular.json //open this file
node_modules
package-lock.json
package.json
src
tsconfig.app.json
tsconfig.json
sconfig.spec.json-
Modify the angular.js file to include the following:
-
Add TinyMCE to the assets properties:
-
     "assets": [
       "src/favicon.ico",
       "src/assets",
       { "glob": "**/*", "input" "node_modules/tinymce", "output": "/tinymce/" }
],-
Add TinyMCE to the scripts tag found within the projects list:
     "scripts": [
        "node_modules/tinymce/tinymce.min.js"
]-
Open the app.module.ts file, and add TinyMCE to the contents, importing the EditorModule from TinyMCE, and save the changes:
import { NgModule } from '@angular/core';
import { BrowserModule } from '@angular/platform-browser';
import { FormsModule } from '@angular/forms';
import { EditorModule } from '@tinymce/tinymce-angular';
…
  imports: [
    BrowserModule,
    FormsModule,
    EditorModule
],-
Open the app.component.html file and include the <editor> tag. You can replace the <textarea> tag, or place TinyMCE alongside it as a comparison if needed:
  <!--Angular Form and TinyMCE -->
  <form>
    <div>
      <editor
          apiKey="no-api-key"
          [disabled]="false"
          id="editor"
          [init]="{ plugins: 'code help image lists link powerpaste table wordcount',
                    base_url: '/tinymce',
                    suffix: '.min'
                  }"
          [inline]="false"
          toolbar="bold italic underline | formatpainter | aligncenter alignleft alignright alignjustify | selectall | ltr rtl | code | help"
          >
      </editor>
    </div>
</form>-
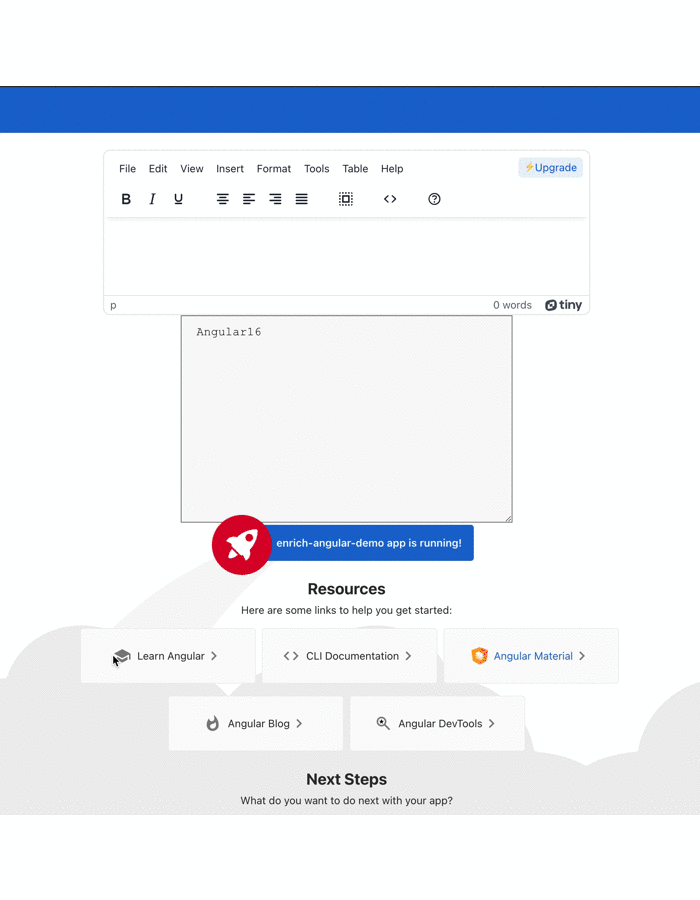
Save the changes, and then restart the Angular app. TinyMCE is now available, and is enriching the Angular application:
How to disable Angular textareas
Disable the TinyMCE editor by removing the <Editor> tag, and putting the <textarea> tag in its place. Since the TinyMCE Angular integration does not require a component file, with all the configuration done at the HTML level in the app.component.html file, there’s no further changes to make if you want to disable the TinyMCE textarea.
How to resize the Angular textarea
You can make use of CSS to adjust textarea size since textarea elements don't have any out-of-the-box attribute for automatically resizing dynamically based on content in Angular. With TinyMCE enriching your Angular app, there are more options available that are easy to set up.
You can make use of the height and width TinyMCE options, or use the Autoresize plugin provides options to configure to what size the editor should change to when content is added to it with the maximum height and minimum height options.
For example, with the following configuration in Angular:
[init]="{ plugins: 'autoresize code help image lists link powerpaste table wordcount',
                    height: 600,
                    width: 650,
                    max_height: 750,
                    max_width: 700,
                    base_url: '/tinymce',
                    suffix: '.min'
}"The result is an enriched Angular textarea that changes size with content added to the specified dimensions:
NOTE: for copying and pasting content into the editor, the Premium PowerPaste plugin can ensure clean copy and paste into your Angular App. You can try out PowerPaste, and TinyMCE’s other Premium plugins, when you sign up for a FREE rich text editor API key. The key gives you 14 days free access.
How to enable text compression in Angular
Text compression reduces the file size of text-based resources. Reduced text resources means that files arrive in the browser faster. This is possible with Angular, by using Brotli and Gzip Text compression packages. Install these packages and extend the build process used when setting up Angular for production.
How to set character count within Angular textarea
You can configure the Angular textarea element to make use of the maxChars variable, and then add event listeners and other methods to count and publish the number of characters.
TinyMCE provides an alternative. With the TinyMCE Wordcount plugin enabled (provided in the enriched textarea demo in the previous section) you can see the number of words and characters in the text area in the lower right. Click on the displayed “wordcount” number in the lower right of the editor to toggle between the current character count, and the current word count.
How to insert text in cursor position in Angular?
Running a setup function that gets the textarea by its id, and then uses the selectionStart and selectionEnd methods is one way to get the cursor position to insert in text. You can also do this more directly with TinyMCE’s APIs. You can get and set the cursor position and then insert content into the editor with the dom.selection API methods.
How to detect a text-input change event in Angular
In Angular, change detection is done with the @input property. It’s also combined with the ngOnChanges() method. There are a number of methods to use for handling text-input change events inside an Angular textarea. When you use TinyMCE, you can make use of dedicated properties to connect to ngModelEvents, specifically the modelevents property to specify ‘change’ as an event that triggers the ngModelChange to emit.
How to bind the value in Angular textarea
Binding two or more element's content together helps you set values for different HTML elements all at once. Binding elements in your Angular textarea involves designating the target with "[ ]" brackets and then setting up the source. Angular changes behavior when the brackets wrap the target, and it evaluates the element attribute as a dynamic expression, and not a static value. There are value binding demos available that show how a textarea can have value binding in an Angular app
Moving forward with the Angular textarea
The main resource to look through for more information on setting up and optimizing an enriched Angular textarea with TinyMCE is the TinyMCE Angular technical reference. It contains a complete list of methods and useful content for enriching your Angular app with TinyMCE.
Other useful resources available on the TinyMCE blog are:
- How to create Angular forms with TinyMCE as your rich text editor
- A comparison of best rich text editors for Angular
Interested how get rich text editing opportunities for the textarea of a different framework? We have guides to help you with this: learn how to configure and work with enriched
Contact us if you have any further questions about building your app with TinyMCE.


