


For almost every app and website, easy image upload needs to be a priority. But, React image upload has some challenges, like the time it can take to troubleshoot and debug the server-side scripts. And that’s time that you often don’t have. Let’s explore a way around that…
There’s methods available to master React image upload, and expedite it. Particularly if your WYSIWYG editor lends a hand. When you add TinyMCE to your React project, as your WYSIWYG, you’re adding a component that speeds content creation, and makes the React image upload process clearer and more direct.
This post explains the steps needed to get React image upload going smoothly, from end-to-end, with TinyMCE.
The basics of image handling in React
Image handling in React needs the following basic requirements to be met:
- A script to connect the Graphical interface to a server for handling React image upload
- A server side script that:
- Checks the origin of the header request sent by the rich text editor
- Performs sanitization
- Uploads the image to folders or a database
- A good UX design throughout the process, to help guide your customers.
The next section unpacks the basic requirements in more detail. Or you can skip directly to the steps on getting React image upload running with TinyMCE.
Understanding React image upload
Here’s how the React image upload process works in more detail.
1. React image upload and the front-end
The script that connects the front-end to the back-end in a React app, is best placed within a specific component file. Isolating the script in this way takes advantage of React’s modular design. It makes debugging a little easier when the JavaScript is contained in a specific location, for example, in a components folder added to the React app source directory (/src/components/Editor.js).
The main requirements of the front-end scripting for React image upload are:
- The script needs to listen for events related to image upload
- Open a dialog window to help the customer choose an image file
- Potentially create a new file name or preserve the existing name
- Filter the file type, and send all the information on to the server side script.
For the next steps, TinyMCE helps speed up React image uploads by holding the image data in BLOB (Binary Large Object) form, which you can access by referencing blobInfo in a Promise. You can access and import bloginfo using xhr or a similar HTML request object language combined with the TinyMCE option the image_upload_handler: an option designed to expedite image upload.
2. React image upload and the server-side
React is flexible, and this means you can use PHP at the root level of your React application to control the server-side behavior. The server-side script, which may or may not be PHP depending on your requirements, needs (at a minimum) to be able to sanitize any images uploaded. You can use different methods to do this, and regex with the PHP preg_match property is a common method.
The server-side script also specifies the storage location for images uploaded to the server. The dirname PHP property can support this process as it returns a directory pathway.
✏️ NOTE: for the TinyMCE implementation, the PHP script also needs to return a JSON object that specifies the address that the server is serving the image file. The documentation on image upload handling has more information.
3. Dialogs, and other UX concerns
Feedback to the customer through a clear dialog and clearly displayed errors are absolutely vital. Your React application needs to provide a visual guide through the process in its dialogs. One reason to install a reliable WYSIWYG like TinyMCE, is its dedicated React integration, and familiar UX, which is available out-of-the-box when you integrate TinyMCE as your React rich text editor. It’s another way that TinyMCE’s familiar design adds speed to your React app development.
How to import images in React
The next sections explain the steps to get TinyMCE integrated into your React app, as well as provide demo client-side and server-side scripts to demonstrate React image upload and image import with TinyMCE.
Getting started with React
Before you begin, there are a few prerequisites that the following demo calls for:
- React and JavaScript experience
- Essential PHP experience
- A text editor for creating and modifying React components
- Command line access through your environment command line shell
- Node.js and npm installed in your environment
When you’re ready, start by creating a new React project on the command line. For example, the demo is built within a React app called cms-project-0a.
-
Create a new React project:
npx create-react-app cms-project-0a-
Change into the new project:
cd cms-project-0a-
Install TinyMCE at this stage, which is referenced later:
npm install --save @tinymce/tinymce-react-
Create a new folder at the base level called 'PHP' to store the server-side image upload handler and images:
mkdir PHP-
Change into the new PHP/ directory, and create a .php file to handle the image uploads:
cd PHP touch server.php-
Create a new folder within the PHP/ directory for holding the uploaded images:
mkdir images/-
Add the following PHP to the server.php file:
<?php
    //Adpated from the postAcceptor.php file example from the documentation https://www.tiny.cloud/docs/tinymce/6/php-upload-handler/
	$accepted_origins = array('http://localhost:3000', 'http://192.168.1.1');

	$imageFolder = dirname(__FILE__).'/' . 'images/';

    //handle same-origin requests, which won't set or be valid unliess configured to allow origins
    if (isset($_SERVER['HTTP_ORIGIN'])) {
        if (in_array($_SERVER['HTTP_ORIGIN'], $accepted_origins)) {
            header('Access-Control-Allow-Origin: ' . $_SERVER['HTTP_ORIGIN']);
     } else {
        header("HTTP/1.1 403 Origin Denied");
      return;
     }
    }
    //Prevent uploads on an OPTIONS request
    if ($_SERVER['REQUEST_METHOD'] == 'OPTIONS') {
        header("Access-Control-Allow-Methods: POST, OPTIONS");
    return;
    }
    //sanitize and verify images before they arrive on the server
    reset ($_FILES);
        $temp = current($_FILES);
    if (is_uploaded_file($temp['tmp_name'])){
        if (preg_match("/([^\w\s\d\-_~,;:\[\]\(\).])|([\.]{2,})/", $temp['name'])) {
            header("HTTP/1.1 400 Invalid file name.");
        return;
        }

    if (!in_array(strtolower(pathinfo($temp['name'], PATHINFO_EXTENSION)), array("gif", "jpg", "png"))) {
            header("HTTP/1.1 400 Invalid extension.");
        return;
      }
    //Configure the script to accept an image upload if there is an accepted origin, or if there was no origin
        $filetowrite = $imageFolder . $temp['name'];
        move_uploaded_file($temp['tmp_name'], $filetowrite);

        $protocol = isset($_SERVER['HTTPS']) && $_SERVER['HTTPS'] == 'on' ? "https://" : "http://";
        $localAddress = 'localhost:8000/images/';
        $baseurl = $protocol . $localAddress; //$_SERVER["HTTP_HOST"] . rtrim(dirname($_SERVER['REQUEST_URI']), "/") . "/";

    //Send the required JSON object that has 'location' as a property back to TinyMCE
	echo json_encode(array('location' => $baseurl . $temp['name'])); //was $filetowrite
        } else {
    header("HTTP/1.1 500 Server Error");
  }
?>-
Save the change
-
Change back to the base level directory, and then change into the src/ directory:
cd ..cd src-
Create a new folder called components:
mkdir components-
Change into the components folder and then create a new file to configure TinyMCE:
cd componentstouch TinyMCE.js-
Copy the following JavaScript into the new TinyMCE.js file:
import { Editor } from "@tinymce/tinymce-react";

export default function TinyMCE() {
  const handleImageUpload = (blobInfo, progress, failure) => {
    return new Promise((resolve, reject) => {
      const xhr = new XMLHttpRequest();
      xhr.open("POST", "http://localhost:8000/server.php", true);

      const formData = new FormData();
      formData.append("file", blobInfo.blob(), blobInfo.filename());
      //console.log(blobInfo.filename())

      xhr.upload.onprogress = (e) => {
        progress((e.loaded / e.total) * 100);
        if (progress && typeof progress === "function") {
          const percent = 0;
          progress(percent);
        }
      };

      xhr.onload = () => {
        if (xhr.status === 403) {
          reject({ message: "HTTP Error: " + xhr.status, remove: true });
          return;
        }

        if (xhr.status < 200 || xhr.status >= 300) {
          reject("HTTP Error: " + xhr.status);
          return;
        }

        const json = JSON.parse(xhr.responseText);

        if (!json || typeof json.location != "string") {
          reject("Invalid JSON: " + xhr.responseText);
          return;
        }

        resolve(json.location);
      };

      xhr.onerror = () => {
        reject({ message: "Image upload failed", remove: true });
        if (failure && typeof failure === "function") {
          failure("Image upload failed");
        }
      };

      xhr.send(formData);
    });
  };

  return (
    <>
      <Editor
        apiKey="no-api-key"
        initialValue="<p>Try adding an image with image upload!</p>"
        init={{
          height: 500,
          plugins: [
            "advlist",
            "autolink",
            "lists",
            "link",
            "image",
            "charmap",
            "preview",
            "anchor",
            "searchreplace",
            "visualblocks",
            "code",
            "fullscreen",
            "insertdatetime",
            "media",
            "table",
            "code",
            "help",
            "wordcount",
          ],
          toolbar:
            "undo redo | styles | bold italic underline strikethrough | alignleft aligncenter alignright alignjustify | bullist numlist outdent indent | link image",
          images_upload_url: "http://localhost:8000/server.php",
          automatic_uploads: true,
          images_reuse_filename: true,
          images_upload_handler: handleImageUpload,
        }}
      />
    </>
  );
}
-
Save the change
-
Change back into the src directory, and open the App.js file
-
Adjust the content to reference the TinyMCE component:
import "./App.css";
import TinyMCE from "./components/TinyMCE.js";

function App() {
  return (
    <div className="App">
      <header className="App-header">
        <p>
          Edit <code>src/App.js</code> and save to reload.
        </p>
        <a
          className="App-link"
          href="https://reactjs.org"
          target="_blank"
          rel="noopener noreferrer"
        >
          Learn React
        </a>
      </header>
      <TinyMCE />
    </div>
  );
}

export default App;
-
Save the file contents
-
Change into the PHP directory and start the PHP server on local host to test out the image import into the server-side images/ folder:
php -S localhost:8000-
In another terminal window, change back into the base level directory, and start the demo React app:
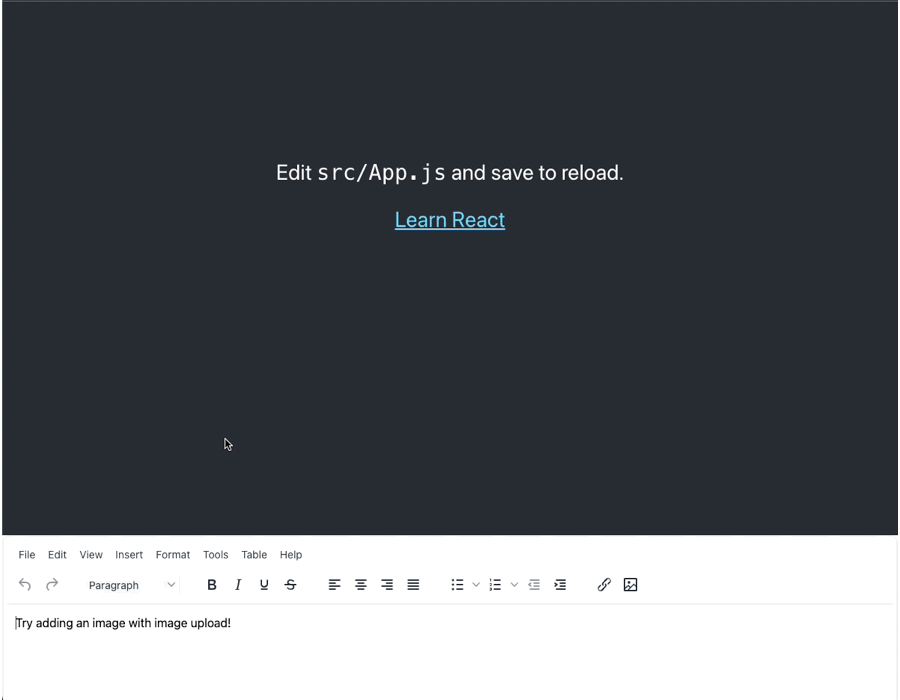
npm run startNow that image upload is configured, you can test out uploading an image, importing the image through to the demo server folder, all through the TinyMCE interface integrated into React:
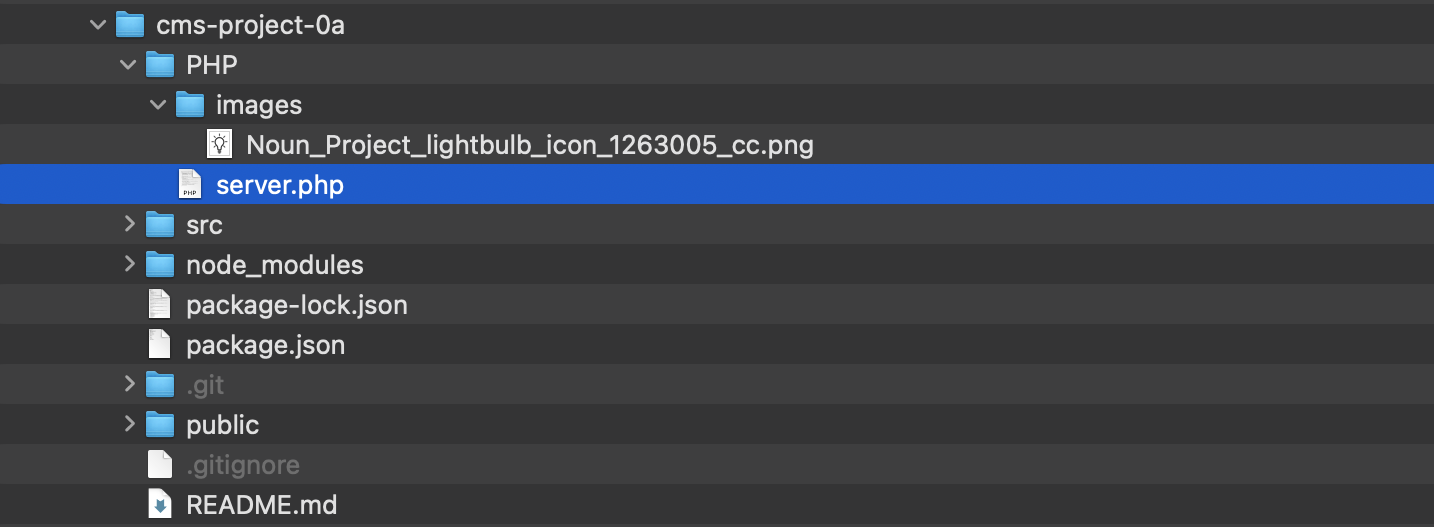
And you can confirm that the image file has saved in the designated folder, which should look like the following:
More on TinyMCE and integrations with libraries and frameworks
You can also make use of TinyMCE’s other image options to make sanitization easier by limiting what kinds of images you can upload. Find out more in the tutorial on designing and building a Word Processor with TinyMCE.
There are more integrations available for you to try with TinyMCE beyond React image uploads. For instance, why not put TinyMCE to the test in one of these examples:
- Getting started with the TinyMCE and Vue integration, and find out how to enrich a Vue textarea with TinyMCE
- Test out the TinyMCE and Blazor integration (in a CMS) for a non-JavaScript framework How to enrich Blazor textbox with TinyMCE
- Build a CMS using React and TinyMCE
For more information on how TinyMCE can best support you and your React applications, contact us today!


