


Essentially, Content Management Systems (CMSs) get information in front of an audience. But without a reliable CMS – no matter how strong or engaging the message – your app's customers won't be able to publish their content. But building a reliable CMS doesn't need to cost you excess time and resources if you have the right supporting components, tools, and libraries that all work together.
TinyMCE is a reliable and easy-to-configure rich text editor that can act as a powerful component for your CMS. TinyMCE's flexibility as a rich text editor means that it works well for solutions like CMS. It can also integrate into a variety of different frameworks for a faster iteration and release process.
In this article, you'll find a guide on how to use Blazor WYSIWYG editor integration. It covers how to set up a demo Blazor CMS project, and how to configure features for your customers to use, with TinyMCE as the Blazor CMS rich text editor for handling Blazor component content.
Advantages of a Blazor CMS
The main advantage of using Blazor for your CMS is the ability to write front-end and back-end configuration files in C# instead of JavaScript. Blazor is supported by the open source .NET development platform. This means access to a broad range of .NET libraries available for building your CMS:
- CMS specific libraries such as Piranha CMS, Squidex, and Umbraco
- API integrations for various gateways or cross-platform data management
- Libraries designed to enhance Blazor such as adding enterprise-class UI components
The depth of .NET resources is a key reason why setting up Blazor as a framework for a CMS offers reliability – there’s support for every niche. It helps you build a CMS that gets content to the audience, every time.
Setting up a Blazor project for your CMS
The following steps explain how to get started with Blazor, by setting up an initial CMS project using the Blazor demo. For the demo, you’ll need a few prerequisites:
- A text editor for editing the HTML, CSS, and razor code
- The dotnet command line packages installed in your development environment
How to initialize your Blazor CMS project
-
In your development environment, make a new Blazor app for the CMS demo with the dotnet new command:
dotnet new blazorserver -o BlazorCMS-
Change into the new BlazorCMS/ directory.
cd BlazorCMS/-
Install the TinyMCE Blazor integration using the dotnet add command:
dotnet add package TinyMCE.Blazor-
Verify the installation by checking the ItemGroup references in BlazorCMS.csproj. It should resemble the following:
<Project Sdk="Microsoft.NET.Sdk.Web">

  <PropertyGroup>
       <TargetFramework>net7.0</TargetFramework>
       <Nullable>enable</Nullable>
       <ImplicitUsings>enable</ImplicitUsings>
  </PropertyGroup>

  <ItemGroup>

    <PackageReference Include="TinyMCE.Blazor" Version="1.0.4" />
  </ItemGroup>
</Project>;
How to integrate TinyMCE into Blazor CMS
-
Change into the Pages/ folder and add TinyMCE into the _Hosts.cshtml file after the _framework reference, which is important for properly integrating TinyMCE for handling Blazor component content:
@page "/"

@using Microsoft.AspNetCore.Components.Web

@namespace BlazorCMS.Pages

@addTagHelper *, Microsoft.AspNetCore.Mvc.TagHelpers

<!DOCTYPE html>
<html lang="en">

<!-- Place the script at the end of the file, after the _framework reference -->

    <script src="_framework/blazor.server.js"></script>
<script src="_content/TinyMCE.Blazor/tinymce-blazor.js"></script>-
Create a new Blazor page to house the CMS app using the dotnet new command to create a razor component:
dotnet new razorcomponent -n Articles-
Open the new Articles.razor file in your text editor
-
Include the Articles page in the demo CMS Navigation menu by adding @page to the top of the file:
@page "/Articles"

<h3>Articles</h3>

@code {

}-
Include @using tinymce.blazor at the top of the Articles.razor file, and add the Editor element:
@page "/Articles"

@using tinymce.blazor

<h3>Articles</h3>

<Editor />

@code {

}-
Add your TinyMCE API key to the element with the TinyMCE Blazor ApiKey property and save the file to finish integrating TinyMCE into the Blazor CMS demo:
@page "/Articles"


@using tinymce.blazor


<h3>Articles</h3>

<Editor

  ApiKey="your-api-key"

/>

@code {

<strong>}</strong>NOTE: when you sign up for a FREE TinyMCE API key, you receive a 14-day free trial of TinyMCE’s Premium plugins to enhance your Blazor CMS. Using your TinyMCE API key also prevents messages about domain names appearing in your text editor.
Configuring Blazor CMS navigation
The CMS page is now configured, but it needs a basic route to be able to reach the Article page from the Blazor CMS demo Home page. The following steps reconfigures the navigation menu to bring the demo closer to a working Blazor CMS:
-
Change back into the home directory of the Blazor CMS demo.
-
Change into the Shared/ folder, and open the NavMenu.razor file in your text editor.
-
Add the following HTML to finish integrating the Blazor CMS article page into the demo. This adjusts the icons of the navigation menu, and includes the Articles page:
      <div class="nav-item px-3">
           <NavLink class="nav-link" href="fetchdata">
               <span class="oi oi-book" aria-hidden="true"></span> Fetch data
           </NavLink>
       </div>

       <div class="nav-item px-3">
           <NavLinkclass="nav-link" href="articles">
               <spanclass="oi oi-list-rich" aria-hidden="true"></span> Articles
           </NavLink>
</div>NOTE: The icons you can set in Blazor for components like the navigation bar are from the Open Iconic set of designs. You can adjust which ones Blazor elements use with the oi classes.
-
Change back into the home directory of the Blazor CMS, and test the Blazor app with the dotnet watch command:
dotnet watch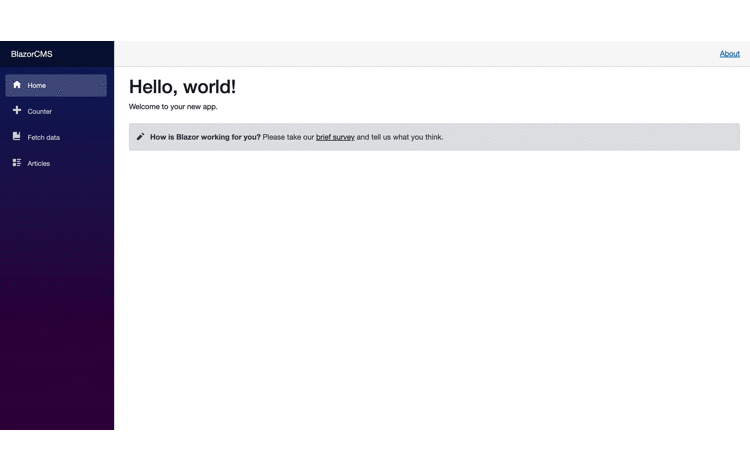
Building central features of your Blazor CMS with TinyMCE
With TinyMCE now configured as a key component of the Blazor CMS demo, the following steps set up the features of the Blazor CMS with TinyMCE:
- A collection of powerful plugins for content editing, such as Accessibility Checker, Power Paste, and Advanced Templates
- Non-editable regions for multi-root editing
- Flexible CSS style configuration to fit different content
These features are drawn directly from the TinyMCE CMS solution demo.
Creating a content editor in Blazor CMS
-
In the Articles.razor file, add the Conf="@editorConf" property directly after the ApiKey property in the Editor tag:
<Editor ApiKey="your-api-key" Conf="@editorConf" />;
-
Add the Value property:
<Editor

  ApiKey="your-api-key"

  Conf="@editorConf"

  Value=

/>-
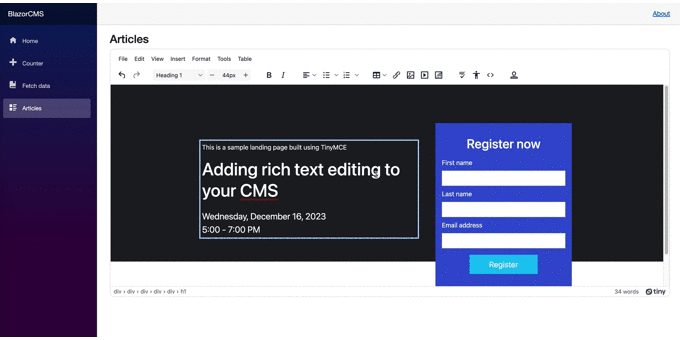
Copy and paste the following CMS content for the Value property to help support a demonstration of the key features:
'<div class="container-fluid text-bg-dark pt-5 tiny-hero">
         <div class="container-lg">
         <div class="row gx-5 py-5">
          <div class="offset-xl-1 col-xl-6 col-lg-7 col-md-7 col-sm-12 pt-5">
            <div class="tiny-editable">
              <p>This is a sample landing page built using TinyMCE</p>
              <h1>Adding rich text editing to your CMS</h1>
              <p><span style="font-size:22px;">Wednesday, December 16, 2023</span><br><span style="font-size: 22px;">5:00 - 7:00 PM</span></p>
            </div>
          </div>

          <div class="col-xl-4 col-lg-5 col-md-5 col-sm-12 register-form">
            <div class="bg-primary p-3">
              <h2 class="text-center my-3">Register now</h2>
              <form>
                <div class="mb-2">
                  <label for="first-name" class="form-label">First name</label>
                  <input type="text" class="form-control" id="first-name">
                </div>

                <div class="mb-2">
                  <label for="last-name" class="form-label">Last name</label>
                  <input type="text" class="form-control" id="last-name">
                </div>

                <div class="mb-2">
                  <label for="email" class="form-label">Email address</label>
                  <input type="email" <class="form-control" id="email">
                </div>

                <div class="text-center my-3">
                  <button type="submit" class="btn btn-info btn-lg text-white px-5 py-2">Register</button>
                </div>

              </form>
            </div>
          </div>
        </div>
      </div>
</div>'-
In the @code section of the Articles.razor file, Set up the plugins and configuration by copying the following razor contents:
@code {

    private Dictionary<string, object> editorConf = new Dictionary<string, object>{
      {"plugins", "a11ychecker advcode advtemplate advlist advtable anchor autocorrect autosave editimage image link linkchecker lists media mediaembed pageembed powerpaste searchreplace table template tinymcespellchecker typography visualblocks wordcount"},
    };

}-
Add the additional TinyMCE configuration options needed for the CMS functions:
      {"toolbar", "undo redo | styles fontsizeinput | bold italic | align bullist numlist | table link image media pageembed | spellcheckdialog a11ycheck code | inserttemplate"},

      {"height", 620},

      {"resize", false},

      };

}-
Set the editable class for TinyMCE, and configure the editable_root option as false. This sets up the editor as non-editable by default for creating document templates, and allows for editable regions with the tiny-editable class:
    {"editable_class", "tiny-editable"},

    {"editable_root", false},

    };

}-
Set up the content_css option.
    {"editable_class", "tiny-editable"},

    {"editable_root", false},

    {"content_css", ""},

    };

}-
Add the following style sheets to the content_css option. The demo makes use of bootstrap CSS through the CDN, and references a stylesheet created in the next step:
{"content_css", "https://cdn.jsdelivr.net/npm/bootstrap@5.3.0/dist/css/bootstrap.min.css, css/style.css, css/style.css"},-
Save the changes, and then change out of the Pages/ folder, and into the wwwroot/css folder:
-
In the wwwroot/css folder, create a style.css file, and add the following CSS content:
:root {
      --bs-primary-rgb: 62, 92, 210;
      --bs-border-radius: 0;
      --bs-border-radius-lg: 0;
    }

    html {
      font-size: 16px;
    }

    .tiny-logo {
      position: absolute;
      top: 2rem;
      left: 2rem;
    }

    h1 {
      font-size: 2.75rem;
    }

    h1,
    h2,
    h3 {
      margin-bottom: .5em;
    }

    ul.fancy li {
      margin-bottom: .5em;
    }

    ul.fancy li::marker {
      content: '✅';
    }

    .tiny-hero {
      background-image: url(images/sbc-cms-template-cover.png);
      background-size: cover;
      background-position: center center;
    }

    @media screen and (min-width: 768px) {
      .register-form {
        margin-bottom: -200px;
      }
    }

    form {
      pointer-events: none;
    }

    .tiny-editable {
      position: relative;
    }

    .tiny-editable:hover:not(:focus),
    .tiny-editable:focus {
      outline: 3px solid #b4d7ff;
      outline-offset: 4px;
    }

    .tiny-editable:empty::before,
    .tiny-editable:has(> br[data-mce-bogus]:first-child)::before {
      content: "Write here...";
      position: absolute;
      top: 0;
      left: 0;
      color: #999;
}-
Save the changes, and then change back into the home directory of the Blazor CMS demo. Since Blazor is able to hot reload changes to the configuration, you should see the updated Articles page with the key features of the Blazor CMS working. You may need to reload the Blazor CMS app to see the changes however:
Next steps for your Blazor CMS
With the essential items of the Blazor CMS demo established, you can start to adapt the CMS configuration to your Blazor app project, such as changing the CSS stylesheets, or setting up a database for administration role for the CMS.
There's more you can find on Content Management Systems and TinyMCE in how-to guides and useful resources:
- How to set up a CMS to rival Wix and Wordpress with TinyMCE
- Important CMS trends to watch, or you'll be left behind
You can also contact the TinyMCE Sales team for support on finding the best collection of plugins and pricing plan for your project.


