


If you want to provide the best email marketing tool on the market, consider using TinyMCE as your HTML inline editor.
TinyMCE is used as the content creation component in over 100M+ products worldwide (see 9 products you can build with TinyMCE), including several email marketing tools.
We have surveyed over 30 email marketing tools recently - some using TinyMCE, and others using alternative editors.
We won’t say which ones we found to be best - we’ll let you be the judge of that 😁 - however, we thought it might be helpful to provide some key tips on how to get started with building TinyMCE into your email marketing tool so you too can take advantage of the power, flexibility, and reliability that comes with our editor.
Of course, there are always many different approaches you can take to achieve the desired result, but here are a few snippets that we think will be most helpful to get you started with TinyMCE in your product.
Layouts and content blocks
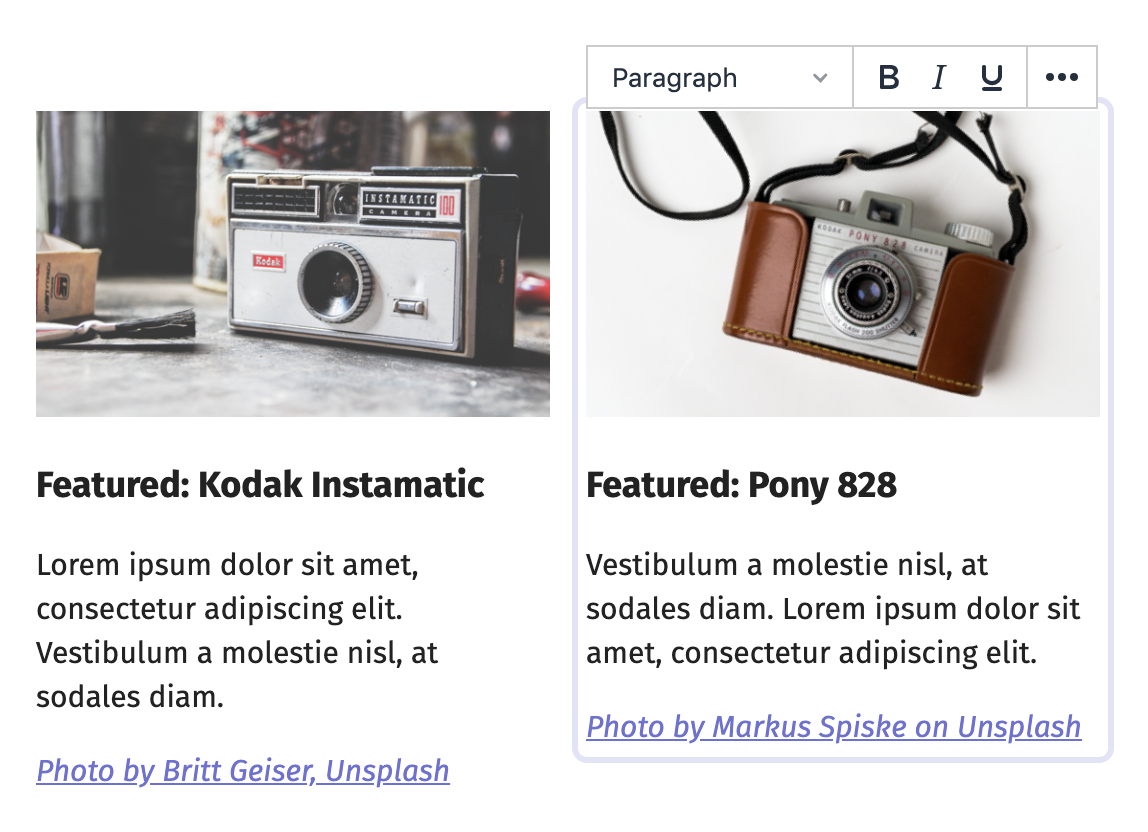
Modern email marketing tools are typically built in a way where the layout of the content is separated from the content itself. The user chooses a layout, or builds a layout using content blocks, then enters their desired content into those blocks.
When editing these blocks, the user has rich text formatting and functionality available to them. For example, when the user clicks an editable area, the toolbar appears with all your content creation needs (as shown in the image below).
How to build and manage email layouts is out of scope for this article - we’re assuming you’re going to handle that side of things. We are, however, going to talk about how to get started with TinyMCE as the editor for those content blocks within it.
See this example on CodePen.
Inline editing
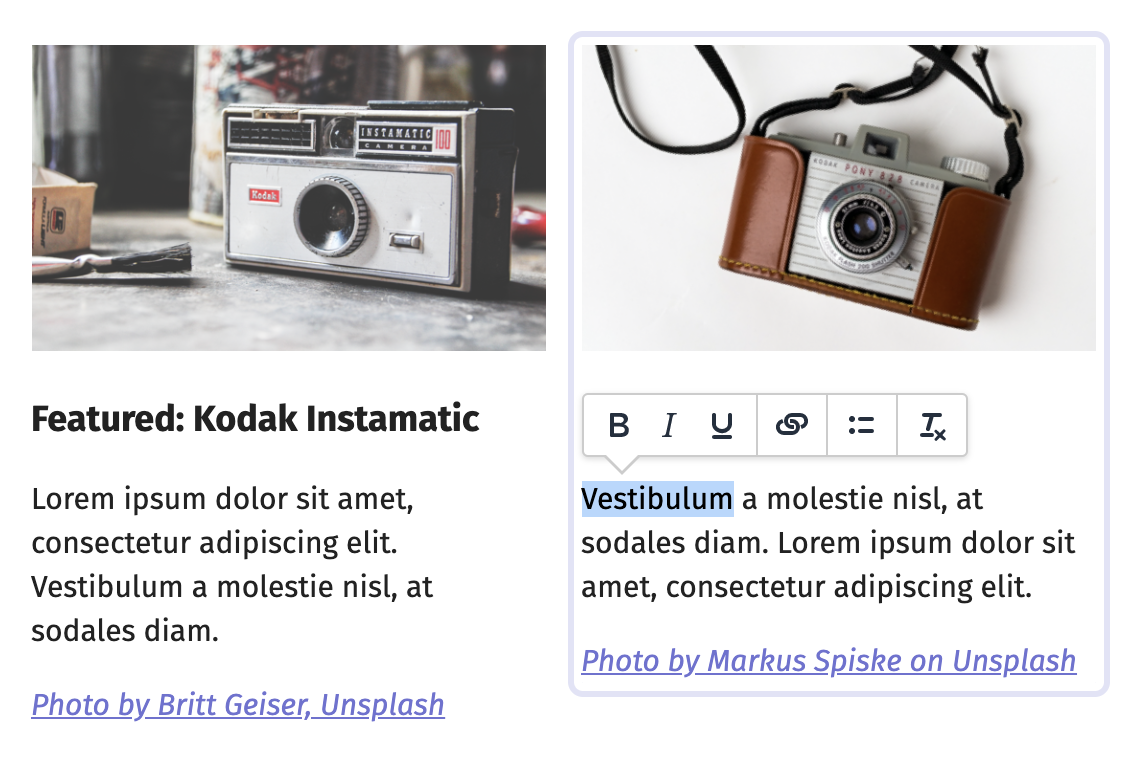
When it comes to writing the actual content, most email marketing tools make use of inline editing, where the content is editable within the desired layout. We, at Tiny, also recommend inline editing because we love things to be WYSIWYG (what you see is what you get) - the closer you get to editing the real thing, the better.
Here's an example of inline editing:
Furthermore, depending on the experience you want to provide, you could use context toolbars that appear when users highlight text (instead of, or as well as, the inline toolbar).
A few tools, like Mailchimp, make use of an iFrame editor in a separate panel with the content mirrored onto the email preview. If this is the way you want to go, you can do that with Tiny too, but for the purpose of this article, we’re going to work through some examples using the inline option.
Setting up a simple project
If this is your first time using TinyMCE, let’s just take a moment to set up a simple project so you can follow along. If you’re already familiar with TinyMCE, you can jump ahead to the next section.
Create an HTML file using the following code from the TinyMCE quickstart guide, replacing no-api-key with your own Tiny API key. If you haven’t yet got an API key, you can start with a 14 day free trial now, cloud or self-hosted.
<!doctype html>
<html>
<head>
  <meta charset="utf-8">
  <title>Marketing email editor using inline mode</title>
  <meta name="viewport" content="width=device-width, initial-scale=1">
  <script src="https://cdn.tiny.cloud/1/your-api-key/tinymce/6/tinymce.min.js" referrerpolicy="origin"></script>
  <script>
    tinymce.init({
      selector: '#editable',
      )};
  </script>
</head>
  <body>
  </body>
<html>Open the HTML file in a browser and the default TinyMCE editor will be displayed, initialized on the element with the same id as that specified by the selector option.
NOTE: If, at this point, you see a warning message, make sure you have registered your domain as an approved domain in your account (unless you’re running it on localhost which is already an approved domain by default), and that you have replaced no-api-key with your own API Key in the above code. The message will remain if you’re opening the file locally.
Getting started with inline editing in email layouts
At the end of the day, most email marketing tools generate a layout using tables or divs. For example:
<table>
  <tr>
    <td>
      <h1>Hello!</h1>
      <p>Are you interested in a pair of...</p>
    </td>
  </tr>
</table>Once the layout is chosen, either from a template or by the user arranging content blocks, you need to provide a way for the user to edit the content blocks without editing the layout.
One way to do this is to initialize the editor on an element surrounding the editable content. TinyMCE cannot be initialized directly on a <td> element, so we wrap it around a <div>. For example:
<table>
  <tr>
    <td>
      <div id="editable">
        <h1>Hello!</h1>
        <p>Are you interested in a pair of...</p>
      </div>
    </td>
  </tr>
</table>Inline mode is configured by initializing TinyMCE with the inline option:
tinymce.init({
  selector: "#editable",
  inline: true,
  toolbar: "styleselect | bold italic forecolor | removeformat",
  menubar: false,
});
If you’re continuing with the simple project created earlier, remove the existing HTML within the <body> tags and replace it with the table above, and update the tinymce.init function accordingly.
Here’s the example on CodePen:
Context toolbars
If you prefer to use context toolbars that appear once text is highlighted, you can do that using what we call the quickbars plugin. (You could have both the regular toolbar and quickbars available to users too!)
tinymce.init({
  selector: "#editable",
  inline: true,
  plugins: "quickbars",
  quickbars_selection_toolbar:
    "styleselect | bold italic forecolor | removeformat",
  quickbars_insert_toolbar: false,
  menubar: false,
  toolbar: false,
});
Using multiple instances of email editor
When you’re building an email marketing tool, you’ll most likely want to have more than one instance of TinyMCE on the page - one for each content block.
In the examples above, TinyMCE is configured to initialize on the element with id="editable", indicated by configuring the selector option with the same id - selector: "#editable". Alternatively, you can configure TinyMCE to initialize on, say, every div by configuring TinyMCE with selector: "div", or every div with class="editable" by configuring TinyMCE with selector: ".editable".
Taking this further, in some cases, you might want a simple configuration on some content blocks and a more advanced configuration on other content blocks. In this case, you can define multiple instances of TinyMCE with different configurations; for example:
tinymce.init({
  selector: ".editable-simple",
  inline: true,
  toolbar: "styleselect | bold italic forecolor | removeformat",
  menubar: false,
});

tinymce.init({
  selector: ".editable-advanced",
  inline: true,
  plugins: "advlist lists link image",
  toolbar:
    "styleselect | bold italic forecolor | bullist numlist | link image| removeformat",
  menubar: false,
});
Applying styles
A common requirement in email markup is to inline CSS styles with the HTML because emails don’t come with external stylesheets.
However, throwing inline styles all over your content can get very messy very quickly.
We recommend using a stylesheet, and then using a CSS inlining tool right before you send the email. This way, you also have the usual bonus that comes with CSS - if any of your styles change due to a change of branding or otherwise, you don’t have to go back and change all of your content - you only need to make the changes in the one stylesheet.
To apply styles in this way, we recommend using a class on the div you’re initializing the editor on and styling elements within that class.
For example:
Merge tags and personalization tokens
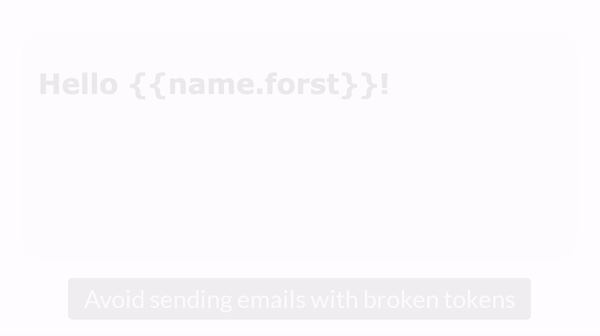
Most email marketing tools offer the ability to use merge atokens (or mail merge tags). These allow email authors to add personalization to emails like this - Hello {{first_name}} - where the token is being replaced with the real data upon sending the email.
Almost all email marketing tools make use of text-based tokens - variants of {{first_name}}, [[first_name]] or *|first_name|*.
One potential issue with such tokens is that it’s easy for users to mess them up by accidentally adding or removing one or more characters in the token.
Some services deal with this by validating them before exiting the editor. However, TinyMCE's Merge Tag plugin renders the merge tags as non-editable. This prevents the content of the merge tag changing.
Example on CodePen: https://codepen.io/tinymce/pen/BajggLV
Configuring call-to-action buttons
Although TinyMCE is flexible enough to create CTA buttons in all kinds of ways, we like the idea of creating a CTA button by applying a button style to a link.
Example on CodePen: https://codepen.io/tinymce/pen/eYJwqdv
In this example, the formats option is used to define the available formats, including a cta format (which only operates on hyperlinks - selector: "a"). Then style_formats is used to configure the styleselect dropdown with the defined styles.
Alternatively, you could provide users with a set of classes to choose from when inserting a link using the link dialog, configured with the link_class_list option. Note that you can apply multiple styles to an element, but it can only have one link class applied. This is useful if you want stricter control over the styles that users can apply to links.
What next?
Here we have covered the key tips and features to help you get started with TinyMCE as the inline editor in your email marketing software.
Here’s some extra information about TinyMCE, more generally, to help you continue your integration.
Customizing the TinyMCE toolbar
TinyMCE is extremely flexible and can be configured to create almost any UX within any UI. For more information on how to customize TinyMCE, we recommend starting with our guide on how to customize the TinyMCE toolbar. There’s also our extensive suite of Tiny documentation.
TinyMCE options and features
The TinyMCE core editor includes all your standard text formatting options plus 41 plugins that you can add or remove as needed to further enhance the editing experience. Scroll down to the Core Plugins on our Plugins Directory page to view the full list and read more about each one.
Premium features
There’s also a range of premium plugins that provide additional value when it comes to enhancing productivity, compliance, and collaboration for the users (and companies) using your product.
For example, by configuring TinyMCE with Link Checker, Spell Checker Pro, and Accessibility Checker, you are providing users of your product the ability to:
- Check for broken URLs before their emails go out to thousands or millions of customers
- Check for spelling mistakes (in up to 13 languages simultaneously)
- Check that their content is accessible and complies with WCAG standards
This kind of advanced functionality adds significant value to your product offering.
The Link Checker, Spell Checker Pro, and Accessibility Checker plugins are all available with our Professional plan. Start with a 14 day trial, cloud or self-hosted.
Integrating TinyMCE with your frameworks
It’s easy to integrate TinyMCE with any of your favorite frameworks. Here are some guides to get started with the most popular ones:
- Enhance Bootstrap forms with WYSIWYG editing
- How to add TinyMCE 5 to a simple React project
- Create an Angular reactive form with a rich text editor
- Add a rich text editor to a simple Vue project
Contact us
We’re always keen to hear about the new and innovative products people are building with Tiny. Contact us any time for more information about TinyMCE and how we can help you create the best user experience.


