


Getting started with TinyMCE is super easy – it’s just a few lines of code. But after setting it up for the first time, you may think:
“There aren’t enough options for my customers!”
“There are too many options for the end-user, they’ll become lost.”
“This just doesn’t really fit the UX I’m going for…”
But the good news is TinyMCE is built to be flexible. The editor can change to fit all kinds of solutions. Yes, there is a default set of toolbar options to get you started, but you can configure it to suit just about any UX.
This article covers a few of the most common customizations, including adding and removing toolbar buttons, moving the toolbar, and hiding it. More advanced topics also covered are floating toolbars, size adjustment, icon adjustments, and color changes.
The TinyMCE default toolbar – an example
DEMO: Try these configurations by modifying the init script in your own instance of TinyMCE or by modifying the demo:
This demo has all the plugins added in, but no toolbar configured. Without the toolbar option, TinyMCE's default toolbar is the following:
- History with Undo and Redo
- Styles
- Formatting with Bold and Italic
- Alignment with left, center, right, and justified
- Increase indent
- Decrease indent
✏️NOTE: The Permanent Pen toolbar button also appears because the plugin is included in the plugin list. Otherwise, it wouldn’t appear.
6 toolbar customization tips
- Tip 1: Override the default toolbar by adding toolbar to the init script and specifying the options you want.
- Tip 2: For a complete list of valid toolbar options see our documentation about toolbar controls.
- Tip 3: This toolbar config is equivalent to what you get with the default settings:
toolbar: "undo redo | blocks | bold italic | alignleft aligncenter alignright alignjustify | outdent indent";
- Tip 4: Pipes '|' add a separator between related options on the toolbar.
- Tip 5: Some toolbar options depend on particular plugins. In that case, you’ll need to load the plugin too. Corresponding plugins are indicated in this table of toolbar controls (where “core” means it’s part of the core functionality, so you don’t need to load it).
- Tip 6: Much like the menu bar, you can also remove the toolbar if needed with “toolbar: false” in the TinyMCE init script.
How to add buttons to the toolbar
To add more buttons to the toolbar, you can use the demo in the preceding section, or create your own TinyMCE demo:
Setting up TinyMCE for a custom toolbar
First, you need an API key. This key gives you free access to TinyMCE Premium plugins for 14 days. Since many of the Premium plugins have a toolbar button, it’s worth trying out the Premium plugins to get the complete toolbar experience.
Navigate to the Get-tiny sign up page to get your FREE API key.
-
Create an index.html file in your environment, and add the starter HTML:
<!DOCTYPE html>
<html lang="en">
    <head>
        <meta charset="UTF-8">
        <meta http-equiv="X-UA-Compatible" content="IE=edge">
        <meta name="viewport" content="width=device-width, initial-scale=1.0">
        <title>Toolbar Customization</title>
    <head>
        <body>
        </body>
</html>-
With your file open, in the head section, add script tags, and reference TinyMCE Cloud through a CDN link within the script tags. This is what the link looks like:
<script
  src="https://cdn.tiny.cloud/1/your-api-key/tinymce/6/tinymce.min.js"
  referrerpolicy="origin"
></script>;
✏️NOTE: For the Tiny Cloud connection, creating an account with TinyMCE gets you a FREE API key. When you use this key, you get access to Premium TinyMCE plugins for 14 days, as well as no warning messages concerning API keys in the text area.
-
Add another pair of script tags, add the following JavaScript. It’s the tinymce.init method, and it’s how you control TinyMCE:
<script>
   tinymce.init({
   selector: '#editor',
   plugins: "a11ychecker advcode advlist advtable anchor autocorrect autolink autoresize autosave casechange charmap checklist code codesample directionality editimage emoticons export footnotes formatpainter fullscreen help image importcss inlinecss insertdatetime link linkchecker lists media mediaembed mentions mergetags nonbreaking pagebreak pageembed permanentpen powerpaste preview quickbars save searchreplace table tableofcontents template tinycomments tinydrive tinymcespellchecker typography visualblocks visualchars wordcount",
       });
</script>-
Add initial HTML content, and the CSS selector class to some textarea tags. The selector is set as an id with the value “editor” in the TinyMCE init script:
<body>
     <textarea id="editor"></textarea>
</body>;
You can test run the index.html file by opening it in your browser, or use a local server command with Python or with the PHP command.
Adding buttons to the TinyMCE toolbar
-
Add the toolbar option to the TinyMCE init script:
        <script>
            tinymce.init({
                selector: "textarea#editor",
                plugins: "a11ychecker advcode advlist advtable anchor autocorrect autolink autoresize autosave casechange charmap checklist code codesample directionality editimage emoticons export footnotes formatpainter fullscreen help image importcss inlinecss insertdatetime link linkchecker lists media mediaembed mentions mergetags nonbreaking pagebreak pageembed permanentpen powerpaste preview quickbars save searchreplace table tableofcontents template tinycomments tinydrive tinymcespellchecker typography visualblocks visualchars wordcount",
toolbar:-
Include the names of the toolbar options you’d like to include. For example, to recreate the default toolbar, add the following list of plugin names mentioned in the preceding section:
toolbar: 'undo redo | blocks | bold italic | alignleft aligncenter alignright alignjustify | indent outdent',-
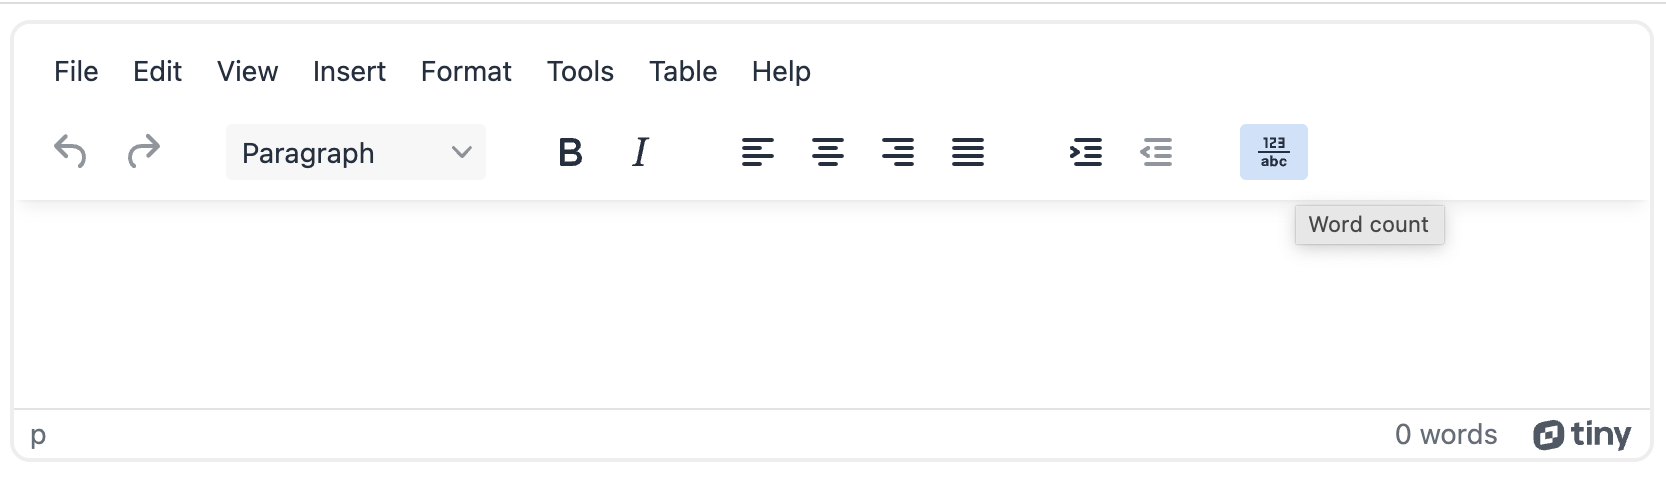
Save the changes, and you should see the same toolbar appear as when there was no toolbar option configured (this configuration matches the default). To change it, add in the “wordcount” plugin:
toolbar: 'undo redo | blocks | bold italic | alignleft aligncenter alignright alignjustify | indent outdent | wordcount',-
Save the changes, and the Wordcount plugin now appears at the end of the toolbar:
For a complete list of toolbar button options available, the TinyMCE documentation provides a list with descriptions of each toolbar button properties.
How to remove buttons from the TinyMCE toolbar
To remove any toolbar buttons, you can edit them out of the toolbar list of items:
-
The “blocks” toolbar button is not, in fact, found in the default toolbar – it’s actually “styles” that appears in the default bar. Remove the toolbar button to take it away:
toolbar: 'undo redo | bold italic | alignleft aligncenter alignright alignjustify | indent outdent | wordcount',-
Save the change to complete removing the button.
TinyMCE toolbar position options
While you can configure the toolbar with more buttons, or fewer buttons, another customization option is changing the toolbar position around the editor.
How to hide the TinyMCE toolbar
-
Add the ‘toolbar: hide’ option to the TinyMCE.init script to conceal the toolbar:
tinymce.init({
    selector: "textarea#editor",
    plugins: "a11ychecker advcode advlist advtable anchor autocorrect autolink autoresize autosave casechange charmap checklist code codesample directionality editimage emoticons export footnotes formatpainter fullscreen help image importcss inlinecss insertdatetime link linkchecker lists media mediaembed mentions mergetags nonbreaking pagebreak pageembed permanentpen powerpaste preview quickbars save searchreplace table tableofcontents template tinycomments tinydrive tinymcespellchecker typography visualblocks visualchars wordcount",
    toolbar: 'undo redo | bold italic | alignleft aligncenter alignright alignjustify | indent outdent | wordcount'
toolbar: false,-
Save the changes, and the toolbar will be hidden, even if you have the toolbar option setup:
How to move the TinyMCE toolbar to the bottom of the editor
Move the toolbar to the bottom of the frame by adding “toolbar_location: bottom”, for example:
tinymce.init({
    selector: "textarea#editor",
    plugins: "a11ychecker advcode advlist advtable anchor autocorrect autolink autoresize autosave casechange charmap checklist code codesample directionality editimage emoticons export footnotes formatpainter fullscreen help image importcss inlinecss insertdatetime link linkchecker lists media mediaembed mentions mergetags nonbreaking pagebreak pageembed permanentpen powerpaste preview quickbars save searchreplace table tableofcontents template tinycomments tinydrive tinymcespellchecker typography visualblocks visualchars wordcount",
    toolbar: 'undo redo | styles | bold italic | alignleft aligncenter alignright alignjustify | indent outdent | wordcount',
toolbar_location: 'bottom',How to set up a floating TinyMCE toolbar
A floating toolbar is configured using the “toolbar_mode: floating” option. This option allows for any toolbar options that don’t fit into the toolbar, based on the editor size, to appear as a floating selection of buttons when the three dot icon is clicked.
tinymce.init({
    selector: "textarea#editor",
    plugins: "a11ychecker advcode advlist advtable anchor autocorrect autolink autoresize autosave casechange charmap checklist code codesample directionality editimage emoticons export footnotes formatpainter fullscreen help image importcss inlinecss insertdatetime link linkchecker lists media mediaembed mentions mergetags nonbreaking pagebreak pageembed permanentpen powerpaste preview quickbars save searchreplace table tableofcontents template tinycomments tinydrive tinymcespellchecker typography visualblocks visualchars wordcount",
    toolbar: 'undo redo | styles | bold italic | alignleft aligncenter alignright alignjustify | indent outdent | wordcount',
toolbar_mode: 'floating',How to adjust the TinyMCE toolbar size
If you need to change the number of rows, height of the toolbar, the icon sizes, or the toolbar color, there are several configuration options you can set up.
How to adjust the number of toolbar rows
You can change the number of toolbar rows with two methods. The first is to adjust the toolbar mode option, and the second is to configure more than one toolbar:
-
Add the toolbar_mode option, and set it to “sliding”
-
Save the change, and you can see that after clicking the three dots button on the edge of the toolbar, the toolbar expands into new rows. The toolbar options documentation shows this in action.
To configure multiple toolbars for more than one row:
-
Include a second toolbar option, for example:
tinymce.init({
    selector: "textarea#editor",
    plugins: "a11ychecker advcode advlist advtable anchor autocorrect autolink autoresize autosave casechange charmap checklist code codesample directionality editimage emoticons export footnotes formatpainter fullscreen help image importcss inlinecss insertdatetime link linkchecker lists media mediaembed mentions mergetags nonbreaking pagebreak pageembed permanentpen powerpaste preview quickbars save searchreplace table tableofcontents template tinycomments tinydrive tinymcespellchecker typography visualblocks visualchars wordcount",
    toolbar: 'undo redo | styles | bold italic | alignleft aligncenter alignright alignjustify | indent outdent | wordcount',
toolbar: -
Add numbers to the two toolbar options so that TinyMCE can identify them as different toolbars:
 tinymce.init({
    selector: "textarea#editor",
    plugins: "a11ychecker advcode advlist advtable anchor autocorrect autolink autoresize autosave casechange charmap checklist code codesample directionality editimage emoticons export footnotes formatpainter fullscreen help image importcss inlinecss insertdatetime link linkchecker lists media mediaembed mentions mergetags nonbreaking pagebreak pageembed permanentpen powerpaste preview quickbars save searchreplace table tableofcontents template tinycomments tinydrive tinymcespellchecker typography visualblocks visualchars wordcount",
    toolbar1: 'undo redo | styles | bold italic | alignleft aligncenter alignright alignjustify | indent outdent | wordcount',
toolbar2: '',-
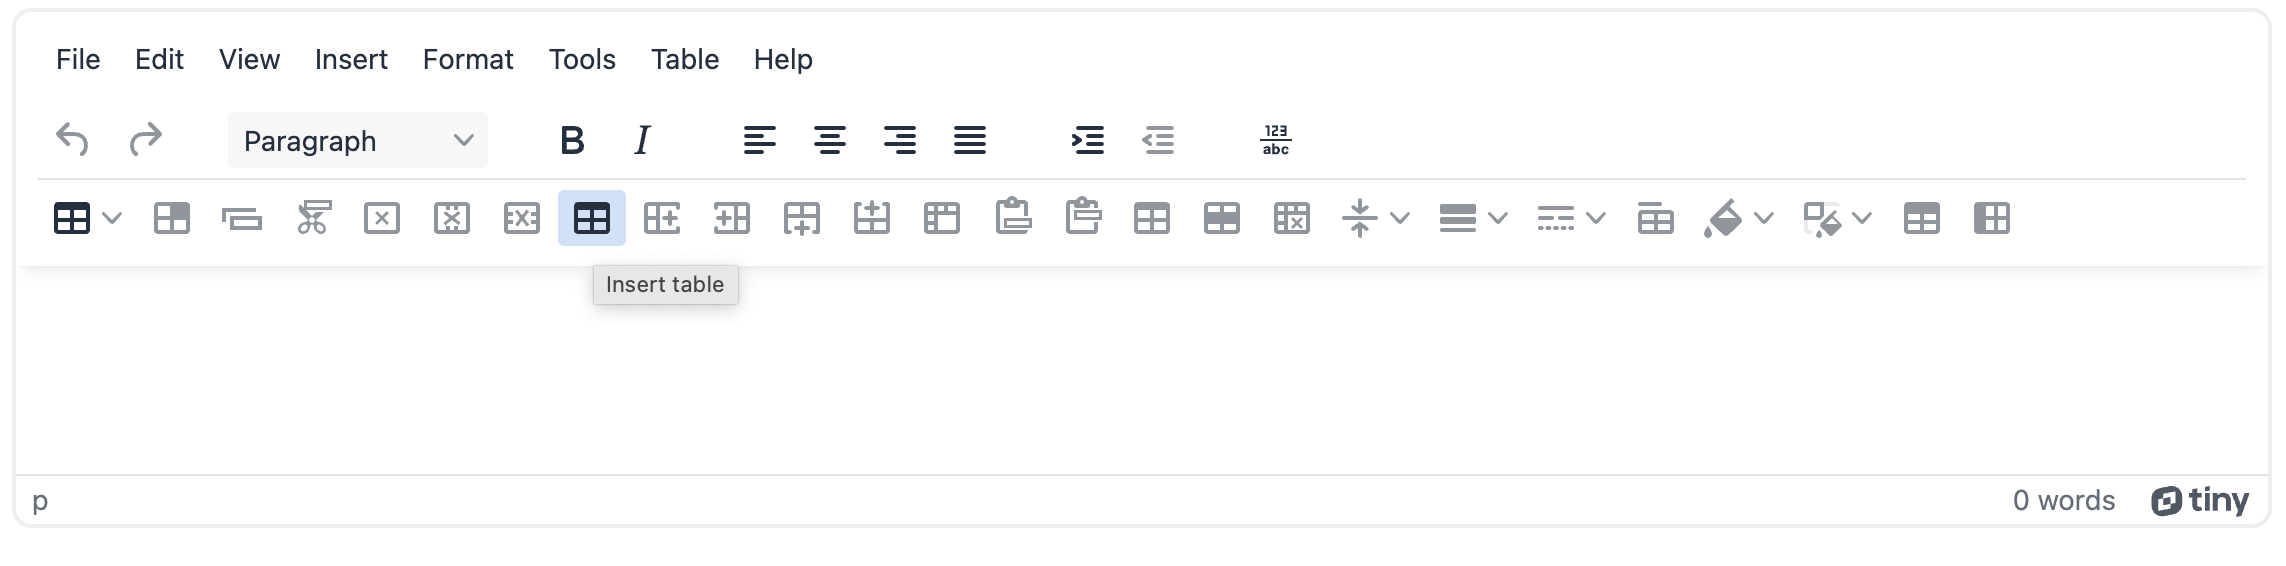
Add additional toolbar buttons to the second toolbar, for example, all of the table plugin toolbar buttons:
 tinymce.init({
    selector: "textarea#editor",
    plugins: "a11ychecker advcode advlist advtable anchor autocorrect autolink autoresize autosave casechange charmap checklist code codesample directionality editimage emoticons export footnotes formatpainter fullscreen help image importcss inlinecss insertdatetime link linkchecker lists media mediaembed mentions mergetags nonbreaking pagebreak pageembed permanentpen powerpaste preview quickbars save searchreplace table tableofcontents template tinycomments tinydrive tinymcespellchecker typography visualblocks visualchars wordcount",
    toolbar1: 'undo redo | styles | bold italic | alignleft aligncenter alignright alignjustify | indent outdent | wordcount',
toolbar2: 'table tablecellprops tablecopyrow tablecutrow tabledelete tabledeletecol tabledeleterow tableinsertdialog tableinsertcolafter tableinsertcolbefore tableinsertrowafter tableinsertrowbefore tablemergecells tablepasterowafter tablepasterowbefore tableprops tablerowprops tablesplitcells tableclass tablecellclass tablecellvalign tablecellborderwidth tablecellborderstyle tablecaption tablecellbackgroundcolor tablecellbordercolor tablerowheader tablecolheader',-
Save the changes, and then check the new toolbars:
How to adjust toolbar height, color, and size
To change the appearance of the toolbar, specifically features such as the height, color, and size, the best option is to create a custom skin that targets the toolbar design. Setting up a skin to change the toolbar appearance is beyond the scope here.
The TinyMCE documentation has a guide on creating a custom skin. The blog post on customizing skin and icon packs also contains an example of an adjustment to the toolbar background color.
The TinyMCE toolbar is not showing
If the toolbar is not appearing, the problem is most likely in the configuration of the toolbar option. For example, the toolbar button list must be enclosed in quotes. Also confirm that the toolbar option itself is not set to “false”, which conceals the toolbar.
How to show all the toolbar buttons in TinyMCE
It’s possible to show all the available toolbar options at once in the editor. The result can be quite lengthy, however. To see all of the toolbar buttons in action:
-
Open the codepen demo for the TinyMCE default toolbar.
-
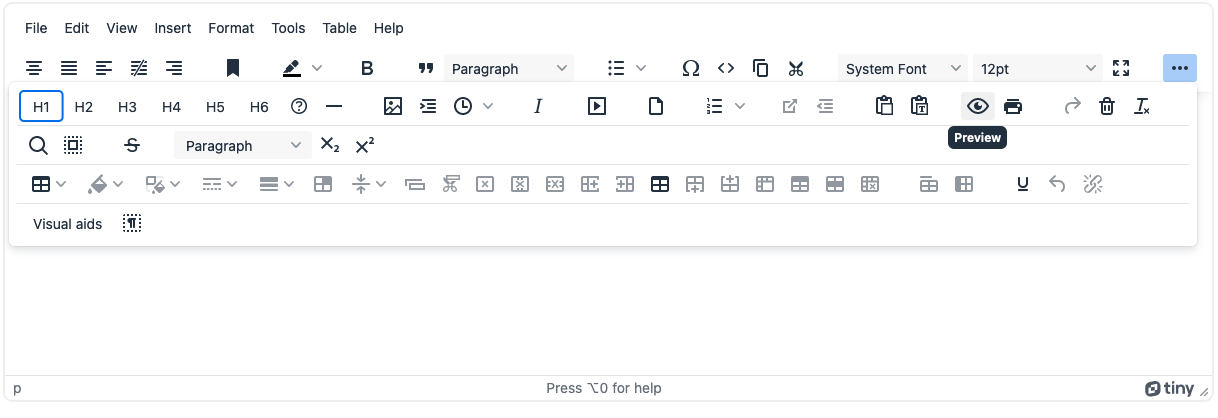
Add the following list of toolbar items to the TinyMCE init script in the demo. This is all TinyMCE toolbar buttons listed in alphabetical order:
toolbar: "accordion addcomment aidialog aishortcuts aligncenter alignjustify alignleft alignnone alignright | anchor | blockquote blocks | backcolor | bold | casechange checklist copy cut | fontfamily fontsize forecolor h1 h2 h3 h4 h5 h6 hr indent | italic | language | lineheight | newdocument | outdent | paste pastetext | print exportpdf exportword importword | redo | remove removeformat | selectall | strikethrough | styles | subscript superscript underline | undo | visualaid | a11ycheck advtablerownumbering revisionhistory typopgraphy anchor restoredraft casechange charmap checklist code codesample addcomment showcomments ltr rtl editimage fliph flipv imageoptions rotateleft rotateright emoticons export footnotes footnotesupdate formatpainter fullscreen help image insertdatetime link openlink unlink bullist numlist media mergetags mergetags_list nonbreaking pagebreak pageembed permanentpen preview quickimage quicklink quicktable cancel save searchreplace showcomments spellcheckdialog spellchecker | table tablecellprops tablecopyrow tablecutrow tabledelete tabledeletecol tabledeleterow tableinsertdialog tableinsertcolafter tableinsertcolbefore tableinsertrowafter tableinsertrowbefore tablemergecells tablepasterowafter tablepasterowbefore tableprops tablerowprops tablesplitcells tableclass tablecellclass tablecellvalign tablecellborderwidth tablecellborderstyle tablecaption tablecellbackgroundcolor tablecellbordercolor tablerowheader tablecolheader | tableofcontents tableofcontentsupdate | template typography | insertfile inserttemplate addtemplate | visualblocks visualchars | wordcount",-
Check on the result that loads up with all of the toolbar options configured:
How to hide TinyMCE toolbar dynamically
To hide the toolbar dynamically, you can make use of TinyMCE APIs. For example, you can toggle specific toolbar buttons on and off with the setEnabled and setActive API methods. Using the TinyMCE execCommand API in a script, it’s also possible to configure a toolbar that can dynamically appear and disappear.
What else needs attention for the TinyMCE toolbar?
Some other essential options to be aware of for customizing the TinyMCE API are:
- multiple toolbars – mentioned in the preceding sections, the documentation on managing multiple toolbars is a key resource
- toolbar mode – floating, sliding, scrolling, or wrap, these are important customization options to know
- toolbar sticky – docks the toolbar and the menu to the top of the screen when scrolling down a web page
You can contact us if you need any further information or support on customizing your TinyMCE toolbar.


