


The first thing that a customer usually notices when they open any web page or app is the background. So regardless of your situation, it’s crucial to be able to control how your app’s background looks. That’s all well and good, but what about when you have third party components that won’t cooperate with the theme of the page?
The last thing you need when there’s a major deadline looming, is a third party text box, carousel, social media display, or textarea that has its own, individual way of doing colors and backgrounds that don’t line up with what you need.
Unless you choose a reliable WYSIWYG editor for your app that’s flexible enough to accommodate your design, you may end up with inconsistent design.
TinyMCE lets you change the background of the text area to fit whatever use case, brand style guideline or situation you might be facing. You can:
- Change the text area background color
- Allow users to change the text area background color
- Make the background change dynamically
- Make the background transparent
- Or even add an image as the background.
This article explains the steps involved in this process. Let’s start with the background color in TinyMCE.
How to change the text area background color in TinyMCE
To get started, it can help to see these changes play out in a demo. To build a demo, there are a few short steps to follow.
First, you need an API key to gain free access to TinyMCE premium plugins for 14 days, and to prevent any API key or domain errors appearing in the text area as you change the background color.
-
Navigate to the Get-tiny sign up page to get your FREE API key, where you can use Google or GitHub sign in information to access your API key.
-
On your workstation, create an index.html file.
-
With your file open, in the head section, add script tags, and reference TinyMCE Cloud through a CDN link within the script tags. This is what the link looks like:
<script
  src="https://cdn.tiny.cloud/1/your-api-key/tinymce/6/tinymce.min.js"
  referrerpolicy="origin"
></script>;
Note: When you use the API key, you get access to Premium TinyMCE plugins for 14 days, as well as no warning messages concerning API keys in the text area.
-
Add another pair of script tags, add the following JavaScript. It’s the tinymce.init method, and it’s how you control TinyMCE:
<script>
   tinymce.init({
   selector: '#editor',
   plugins: 'powerpaste casechange searchreplace autolink directionality advcode visualblocks visualchars image link media mediaembed codesample table charmap pagebreak nonbreaking anchor tableofcontents insertdatetime advlist lists checklist wordcount tinymcespellchecker editimage help formatpainter permanentpen charmap linkchecker emoticons advtable export autosave',
   toolbar: 'undo redo print spellcheckdialog formatpainter | blocks fontfamily fontsize | bold italic underline forecolor backcolor | link image | alignleft aligncenter alignright alignjustify lineheight | checklist bullist numlist indent outdent | removeformat',
   height: '700px'
       });
</script>
-
Add initial HTML content, and the CSS selector class to some textarea tags. The selector is set as an id with the value “editor” in the TinyMCE init script:
<body>
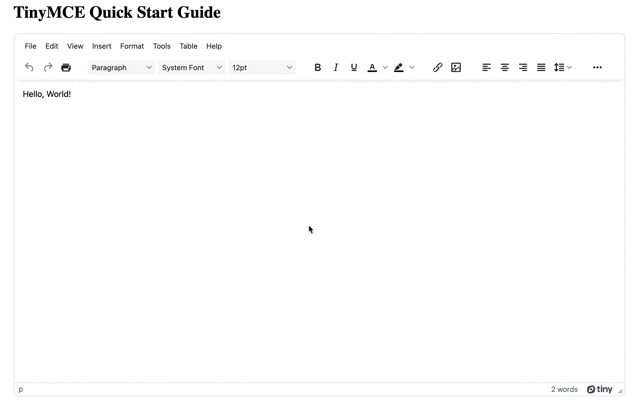
<h1>TinyMCE Quick Start Guide</h1>
<form id="post">
<textarea id="editor">Hello, World!</textarea>
</form>
</body>;
-
Test run the index.html file by opening it in your browser, or use a local server command with Python or with the PHP command:
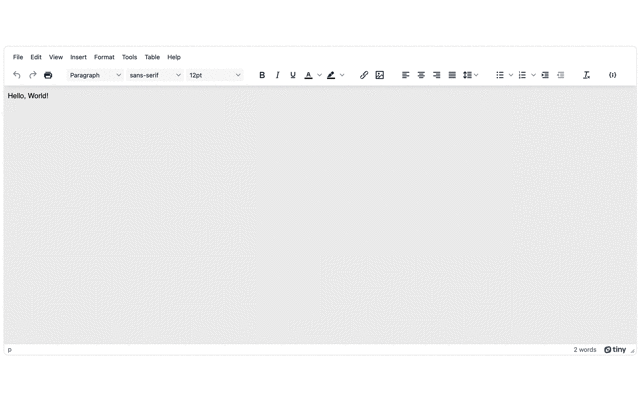
- With the demo up and running, you can change the text area background color by creating a new CSS file on your workstation called ‘styles.css’. Add the following to the new CSS file:
.mce-content-body {
    background: #eeeeee
}-
Add the content CSS option to your TinyMCE init script, and reference the newly created styles file:
content_css: "style.css";
-
Save the changes, and refresh the demo in your browser, you should see the background color of the text area change:
How to change TinyMCE’s background dynamically
There are two methods to set the text area background color dynamically:
Change text area background color with the Setup function
To configure the dynamic change, start with setup option. This option allows you to make a change to the editor as the browser interprets the init script, but before rendering. To dynamically change the color, the following JavaScript sets up a new style element, adds it to the document head section, and then adds the background color targeting the TinyMCE iframe id.
Warning: While these steps use the TinyMCE iframe id, it is a better option to plan and set a custom TinyMCE skin. This is the best option for future-proofing your site or app. It is not recommended to target ids outside of a demo or example.
Using a custom skin protects you from experiencing a style break when upgrading to new versions of TinyMCE.
-
Comment out the Content CSS option:
//content_css: 'style.css'
-
Add the setup option to the TinyMCE init script:
setup: (editor) => {};
-
Set up a variable to create the a new style HTML element:
setup: (editor) => {
  var newColor = document.createElement("style");
};
-
Append the variable to the HTML document head:
setup: (editor) => {
  var newColor = document.createElement("style");
  document.head.appendChild(newColor);
};
-
Create a new CSS rule that changes the background color:
setup: (editor) => {
  var newColor = document.createElement("style");
  document.head.appendChild(newColor);
  newColor.sheet.insertRule("#editor_ifr {background: blue}");
};
-
Save the changes, and reload the editor demo in your browser to see the color change:
2. Change text area background color with Window onload
If you need to change the background color dynamically after the editor has rendered, you can set up a script tag with the “defer” argument combined with the Window onload event. Here’s how to do it:
-
Create a new pair of script tags to the end of the HTML demo after the closing body tag.
</body>
<script>
</script>-
Add the defer attribute to the script tag:
</body>
<script defer>
</script>-
Set the window onload event along with a function:
<script defer> window.onload = function() {}</script>;
-
Create a function that gets the editor’s iframe, and styles the background to a different color:
<script defer>
     window.onload = function() {
        document.getElementById('editor_ifr').style.background = 'orange';
     };
</script>-
Save the changes, and then reload the demo to see the dynamic color change:

How to make the text area transparent
While you can make the text area transparent by working with the classes TinyMCE introduces into the page Document Object Model (DOM), there are better options available. You can set the background color of the TinyMCE text area to match the background color of the parent page. This makes the text area consistent with the theme of the page or app.
Another option is to switch TinyMCE to inline mode. Inline editor mode gives better control over the style of the text area when it renders. This inline editing tutorial offers some more introductory information.
The best supported pathway, is to plan and set a custom TinyMCE skin that has a transparent background. This is the best option for future-proofing your site or app.
Custom skins also won’t break when upgrading to new versions of TinyMCE.
What else can you customize with TinyMCE?
TinyMCE’s flexibility unlocks a range of customization. For instance:
- Planning and adding more custom CSS styles
- Changing the toolbar and menu bar
- Customization for a headless CMS
- Plan and set custom skin and icon packs together
These tutorials are a starting point for changing TinyMCE’s style to better integrate into your web page or app for consistency. You can contact us for more information about consistent styles, and how TinyMCE can better fit your design plans.


