


Headless Content Management Systems (CMSs) are hugely popular. Why? They allow you to take a piece of content and distribute its message across a broad array of different channels. In addition they’re versatile, flexible, and they work to remove the inherent structural limitation of a traditional CMS.
Sounds like a great idea, but how can it work for you?
A headless CMS structure can be set up and customized to fit your specific needs. This article shows you how to set up a popular, headless CMS Strapi – with the world’s most popular WYSIWYG, TinyMCE. It then explains how to customize TinyMCE within the headless CMS, to fit your exact needs.
What is a headless CMS?
A headless CMS disconnects the content saved within the body of the system, from the head or presentation part of the system. (It’s similar to decapitation, where you separate the head from the body!) However, in a headless system, the presentation section refers to any app interface, web page, or other content that’s shown to an audience, through their device.
How does a headless CMS work?
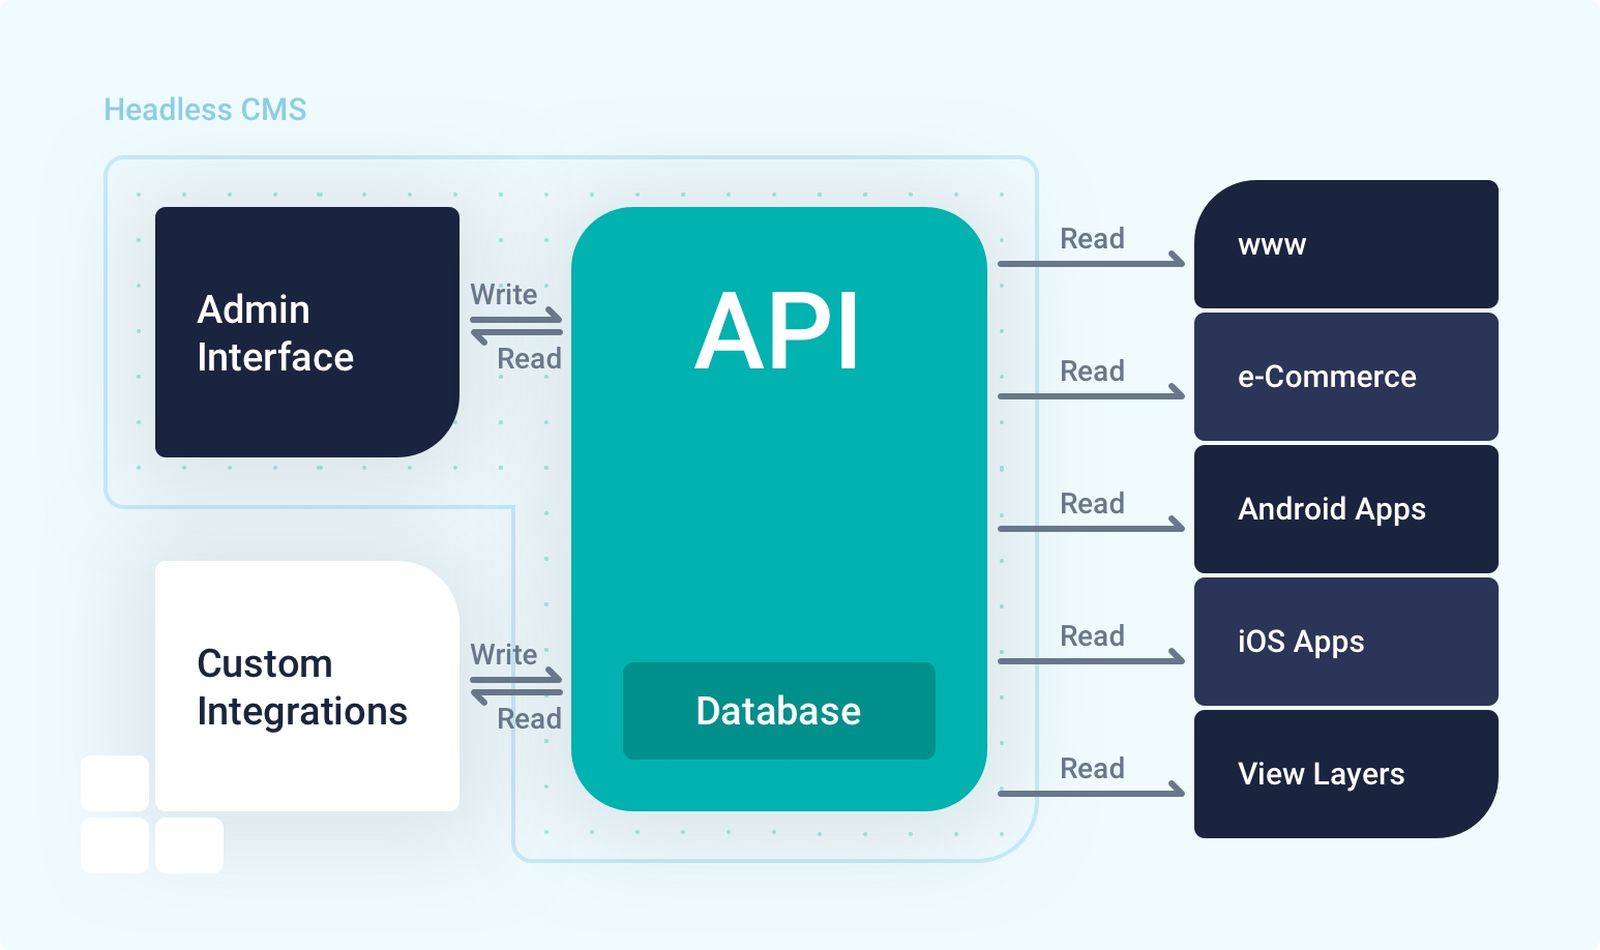
Content systems hold articles and content in a database. In every CMS, different content types have different tags – like title, body, image etc. A headless CMS takes those content types, and sends them to different places for presentation. This ‘splitting’ facilitates its hallmark omnichannel delivery capabilities.
By holding the different types of content in different presentation places within a headless CMS, it means there’s no need to produce multiple versions (or layouts) of the same piece of content. Why? Because it's already been broken down into its inherent parts, which can then be reassembled and distributed to suit the requirements of each channel or platform.
Often the word ‘decoupled’ attempts to explain how a CMS works, but it’s not quite the same as a ‘headless’ CMS. Decoupled CMSs are closer to the traditional, or monolithic, CMS and often publish to a set front end – which is a less elastic or variable connection. However in headless CMSs, there’s a complete disconnection.
Storyblok has a graphic that shows the API connections used in a headless CMS. As a general rule, a headless CMS allows developers to make their own connections with a front end using the APIs of their choice:
Why use a headless CMS?
When comparing a traditional CMS with a headless CMS, the biggest differentiator is the headless capability to feed content into almost unlimited digital channels – all from just one original piece. The additional pieces can be purpose-fit to suit many uses, channels, devices, and even customized to suit personalization initiatives.
A headless CMS offers two key advantages over a traditional CMS:
- Flexibility
- Omnichannel delivery capabilities
They can also save you valuable time:
- One content piece is proliferated and reshaped for a variety of audiences and platforms.
- Your inhouse developers can manage the content management back end, and easily outsource the web design work – an advantage if your team’s skill leans more toward administration than website development.
However as with any development decision, there are also challenges to consider with each content management system.
Traditional CMS challenges
There are two considerations to work through in the decision making process for traditional CMSs:
1. Code base size
A traditional CMS becomes a ‘monolith’ when it expands. The dependencies between front and back end, head and body, results in a large sized code base, thus creating a monolith.
By contrast, a headless CMS doesn’t experience the same problem – it’s designed to be composed of several, smaller components.
2. End-user experience
This affects how your team uses and interacts with your CMS. Are they comfortable constantly having to move between the headless-style distributed services, to manage content writing and appearance?
If they’re not comfortable (especially if they’re non-technical) a traditional CMS may be more suitable.
Headless CMS challenges
Headless CMSs present three challenges to work through in the decision making process.
1. Development speed
The speed of a headless CMS largely depends on the configuration. Asynchronous downloading can slow down the headless CMS even if the setup is designed to be lightweight. The number of customizations added to change how your headless CMS works, needs to be measured carefully to prevent the headless CMS growing too large to maintain.
2. Development frameworks
Depending on your choice of traditional or headless CMS, framework compatibility is another consideration. This may affect the speed of development mentioned in the previous paragraph. Choose the development framework to create the best outcome by looking at compatibility between the headless CMS and framework.
3. Hierarchy and organization
A headless CMS, especially older models, group content together. There’s not much organization of content into a hierarchy. This makes managing and updating the content more difficult. Be aware of how the headless CMS provides solutions to organizing your content.
How to add TinyMCE to a headless CMS
Customization comes up as a consideration and a challenge for your headless CMS. But customization doesn’t need to be a challenge for the WYSIWYG editor. That’s where TinyMCE can help.
The following procedure uses the Strapi headless CMS, with TinyMCE integrated into it, as the rich text editing component.
Configuring the Strapi headless CMS requires a few prerequisites:
- JavaScript experience
- Bash commands in a terminal
- Text editor experience
- React experience
You’ll also need a TinyMCE API key to get the most out of configuring TinyMCE with the Strapi headless CMS. There’s also a free enterprise Strapi trial (helpful if you’re using or plan to use Strapi, and need to add multiple users or get support). The following procedure makes use of the community edition ofStrapi (version 4) to create a functional demo quickly.
Sign up for an API key
- Navigate to the Get TinyMCE page, and register an account
- Once logged in, your API key appears at the top of the page
Registering for an API key prevents the “domain not registered” error appearing within the text area, and gives you 14 days FREE access to Premium Plugins, and support.
Set up Strapi headless CMS
-
On your developer workstation, open the command line terminal, and change into a new directory for the CMS:
mkdir strapiCMS/
cd strapiCMS/-
Run the commands to create a new Strapi app with the latest version, and change “my-app” to the name for your new headless CMS:
npx create-strapi-app@latest my-app --quickstart --no-run-
Change into the new headless CMS app directory. You’ll have the initial files you need to get started. Start the app with the npm run command:
npm run develop -- --watch-admin-
When the app opens on your workstation’s local host, create an administrator account. You’ll then be able to log into the Strapi interface.
Generate a WYSIWYG plugin
With a demo Strapi headless CMS working, it’s time to create a WYSIWYG plugin that’ll replace the standard rich text editor with TinyMCE.
-
Stop your app running with cmd+c or ctrl+c.
-
In the main directory for your app on the command line, run the strapi command to create a new plugin:
npm run strapi generate-
From the list of Strapi options, choose “plugin”, name the plugin “wysiwyg”, and select “JavaScript”.
-
Change into the config directory, and make a new file called plugins.js
-
Add the following content to the plugins.js file:
module.exports = {
  // ...
  wysiwyg: {
    enabled: true,
    resolve: "./src/plugins/wysiwyg", // path to plugin folder
  }, // ...
};
-
Change into the src/plugins/wysiwyg directory, and install the TinyMCE React integration. Since Strapi uses React as a framework, the react integration is required:
cd src/plugins/wysiwyg
npm i @tinymce/tinymce-react-
Change into the components directory by going through /wysiwyg/admin/src/components/:
cd /wysiwyg/admin/src/components/-
In the components directory, create three new directories:
mkdir Medialib/
mkdir Wysiwyg/
mkdir Tinymce/-
In each of these directories, create a new JavaScript index file:
cd Medialib/
touch index.js
cd ..
cd Wysiwyg/
touch index.js
cd ..
cd Editor/
touch index.js
cd ..With these preliminary steps complete, the next step is configuring the Media Library, WYSIWYG, and TinyMCE components for Strapi. TinyMCE is going to live in the Editor/ directory.
Configuring the WYSIWYG plugin
-
Starting with the Media Library (Media Lib), add the following code to the Medialib/index.js file:
import React from "react";
import PropTypes from "prop-types";
import styled from "styled-components";
import { Editor } from "@tinymce/tinymce-react";
import { Box } from "@strapi/design-system/Box";

const TinyEditor = ({ onChange, name, value }) => {
  return (
    <Editor
      apiKey="no-api-key"
      value={value}
      tagName={name}
      onEditorChange={(editorContent) => {
        onChange({ target: { name, value: editorContent } });
      }}
      outputFormat="html"
      init={{
        selector: "textarea",
        plugins: "fullscreen insertdatetime",
        toolbar: "code numlist bullist",
      }}
    />
  );
};

TinyEditor.defaultProps = {
  value: "",
  disabled: false,
};

TinyEditor.propTypes = {
  onChange: PropTypes.func.isRequired,
  name: PropTypes.string.isRequired,
  value: PropTypes.string,
};

export default TinyEditor;
-
Add the following code to the Wysiwyg/index.js file:
import React, { useState } from 'react';
import PropTypes from 'prop-types';
import { Stack } from '@strapi/design-system/Stack';
import { Box } from '@strapi/design-system/Box';
import { Button } from '@strapi/design-system/Button';
import { Typography } from '@strapi/design-system/Typography';
import Landscape from '@strapi/icons/Landscape';
import MediaLib from '../MediaLib';
import Editor from '../Editor';
import { useIntl } from 'react-intl';

  const Wysiwyg = ({ name, onChange, value, intlLabel, disabled, error, description, required }) => {
  const { formatMessage } = useIntl();
  const [mediaLibVisible, setMediaLibVisible] = useState(false);
  const handleToggleMediaLib = () => setMediaLibVisible(prev => !prev);

  const handleChangeAssets = assets => {
    let newValue = value ? value : '';

    assets.map(asset => {
      if (asset.mime.includes('image')) {
        const imgTag = `<p><img src="${asset.url}" alt="${asset.alt}"></img></p>`;
        newValue = `${newValue}${imgTag}`

      }
      // Handle videos and other type of files by adding some code
    });

    onChange({ target: { name, value: newValue } });
    handleToggleMediaLib();
  };

  return (
    <>
      <Stack size={1}>

        <Box>
          <Typography variant="pi" fontWeight="bold">
            {formatMessage(intlLabel)}
          </Typography>
          {required &&
            <Typography variant="pi" fontWeight="bold" textColor="danger600">*</Typography>
          }
        </Box>
        <Button startIcon={<Landscape />} variant='secondary' fullWidth onClick={handleToggleMediaLib}>Media library</Button>

        <Editor
          disabled={disabled}
          name={name}
          onChange={onChange}
          value={value}
        />
        {error &&
          <Typography variant="pi" textColor="danger600">
            {formatMessage({ id: error, defaultMessage: error })}
          </Typography>
        }

        {description &&
          <Typography variant="pi">
            {formatMessage(description)}
          </Typography>
        }
      </Stack>
      <MediaLib
        isOpen={mediaLibVisible}
        onChange={handleChangeAssets}
        onToggle={handleToggleMediaLib}
      />
    </>
  );
};

Wysiwyg.defaultProps = {
  description: '',
  disabled: false,
  error: undefined,
  intlLabel: '',
  required: false,
  value: '',
};

Wysiwyg.propTypes = {
  description: PropTypes.shape({
    id: PropTypes.string,
    defaultMessage: PropTypes.string,

  }),
  disabled: PropTypes.bool,
  error: PropTypes.string,
  intlLabel: PropTypes.shape({
    id: PropTypes.string,
    defaultMessage: PropTypes.string,
  }),
  name: PropTypes.string.isRequired,
  onChange: PropTypes.func.isRequired,
  required: PropTypes.bool
  value: PropTypes.string,
};


export default Wysiwyg;-
Configure TinyMCE in the headless CMS by adding the following code to the Editor/index.js:
import React from "react";
import PropTypes from "prop-types";
import { Editor } from "@tinymce/tinymce-react";

const TinyEditor = ({ onChange, name, value }) => {
  return (
    <Editor
      apiKey="no-api-key"
      value={value}
      tagName={name}
      onEditorChange={(editorContent) => {
        onChange({ target: { name, value: editorContent } });
      }}
      outputFormat="html"
      init={{
        selector: "textarea",
      }}
    />
  );
};

TinyEditor.defaultProps = {
  value: "",
  disabled: false,
};

TinyEditor.propTypes = {
  onChange: PropTypes.func.isRequired,
  name: PropTypes.string.isRequired,
  value: PropTypes.string,
};

export default TinyEditor;
-
Open the plugins/wysiwyg/admin/src/index.js file:
cd / plugins / wysiwyg / admin / src / index.js;
-
Replace the contents of the file with the following to register the new WYSIWYG:
import pluginPkg from "../../package.json";
import Wysiwyg from "./components/Wysiwyg";
import pluginId from "./pluginId";

const name = pluginPkg.strapi.name;

export default {
  register(app) {
    app.addFields({ type: "wysiwyg", Component: Wysiwyg });
    app.registerPlugin({
      id: pluginId,
      isReady: true,
      name,
    });
  },
  bootstrap() {},
};
-
Change back into the root directory of the headless CMS:
cd ../../../-
Rebuild the headless CMS:
npm run build --clean-
Then restart the headless CMS and log in with your administration credentials:
npm run develop -- --watch-admin-
Once logged in, click on Content-Types Builder > Create new component.
-
Name the new component “article”, and add a “Rich text” content type to the article component.
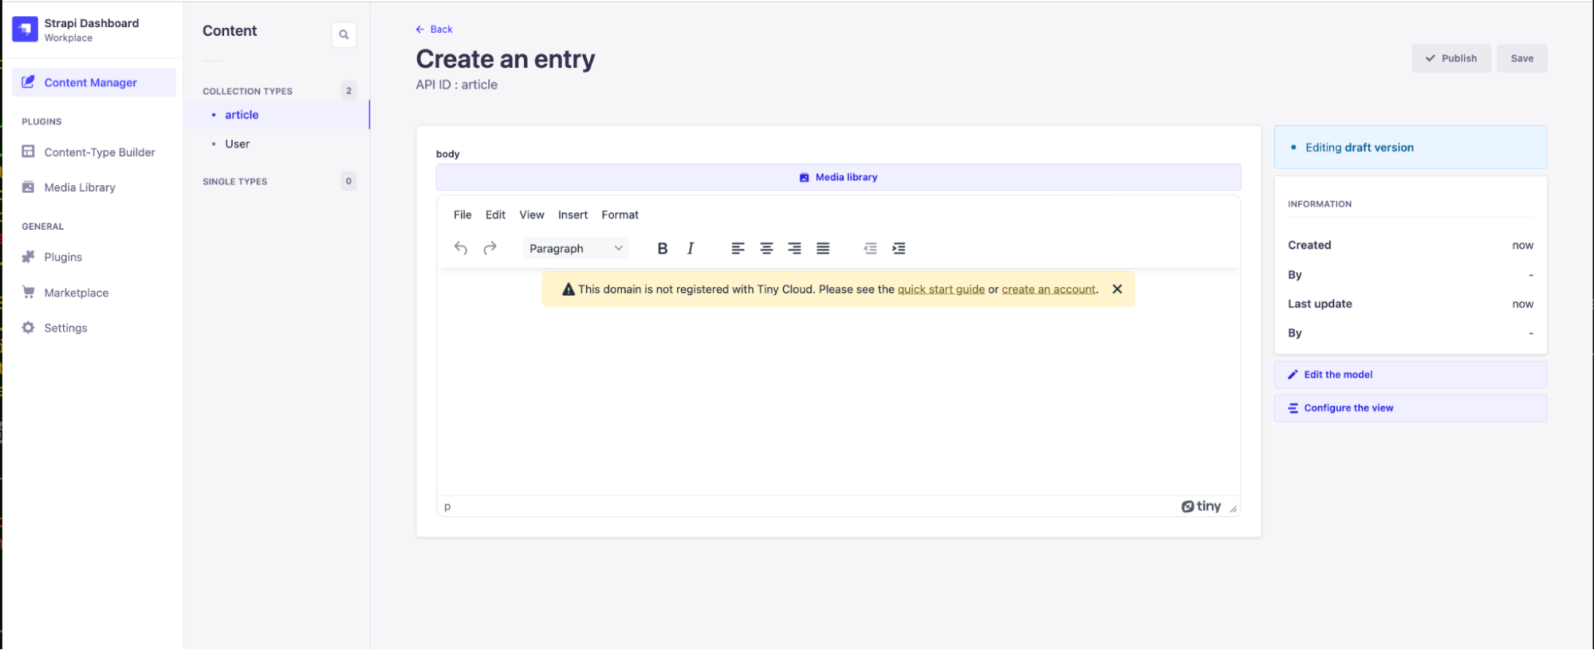
With the article component ready, go to Content Manager > article > Create new entry. The WYSIWYG component will now be TinyMCE:
Customizing TinyMCE within the headless CMS
With TinyMCE working, the next step is customization.
Customize the headless CMS with checking and format control
The first changes to make include configuring spell checking and accessibility checking functionality, as well as formatting control by changing the TinyMCE toolbar.
-
In the tinymce.init script, add the following plugins to the plugins list. The Spell Checker Pro and Accessibility Checker plugins help your customers check their content:
plugins: 'a11ychecker code link tinymcespellchecker’,-
Add some additional options to further customize Spell Checker Pro and the Accessibility Checker:
//spelling checking
spellchecker_language: 'en',
spellchecker_dialog: true,

//accessibility checking
a11ychecker_level: 'aaa',
a11y_advanced_options: true,-
Switch off the menubar with the menubar: false option
menubar: false,-
Configure the toolbar, categorizing the toolbar options into specific groups. This way you can control and present to the writer the exact styles that are compatible with your headless CMS database.
This configuration also changes the toolbar mode to wrap the toolbar icons, so they remain visible even when the text area resizes:
toolbar:
          [
           { name: 'checking', items: [ 'a11ycheck', 'spellchecker' ] },
           { name: 'history', items: [ 'undo', 'redo' ] },
           { name: 'formatting', items: [ 'bold', 'italic', 'underline' ] },
           { name: 'alignment', items: [ 'alignleft', 'aligncenter', 'alignright', 'alignjustify' ] },
           { name: 'indentation', items: [ 'outdent', 'indent' ] },
           { name: 'format', items: [ 'h1', 'h2', 'h3', 'h3', 'h4', 'blockquote', 'code' ] },
           { name: 'connect', items: ['link'] }
              ],
toolbar_mode: 'wrap',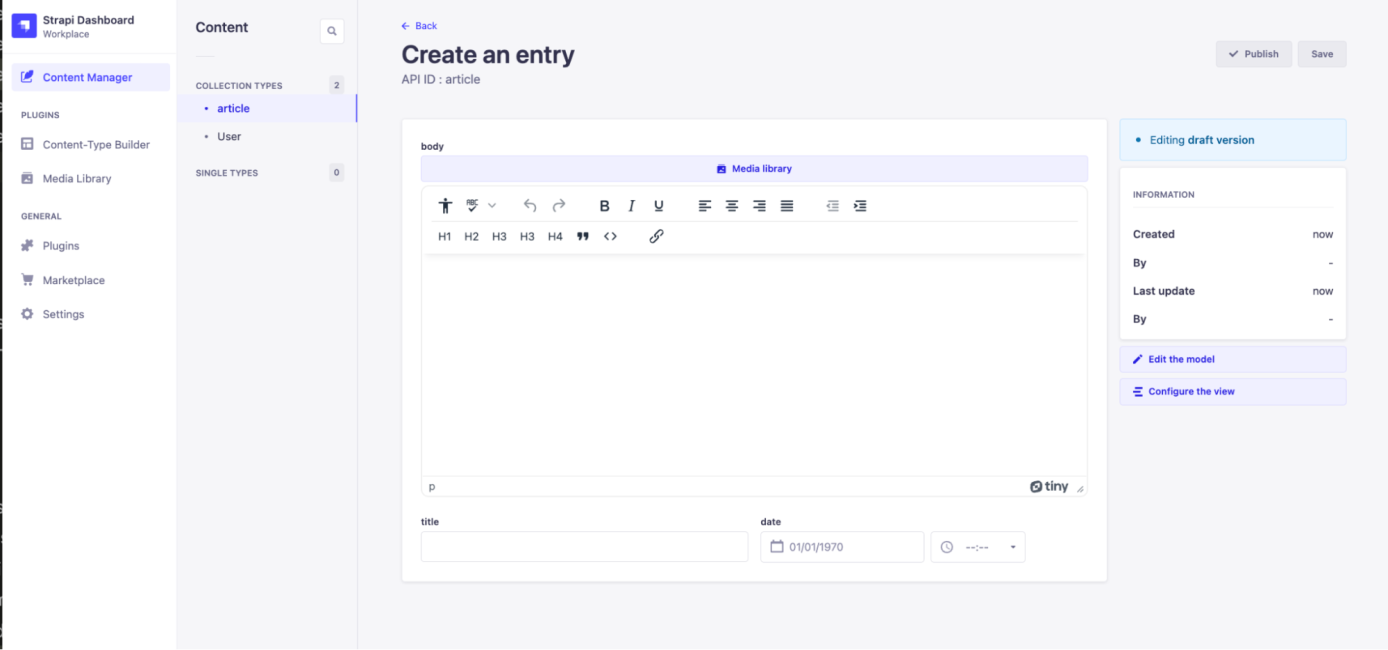
Customize the headless CMS with input control
TinyMCE allows you to customize what content can enter the WYSIWYG, therefore protecting your headless CMS database from unusual or unwanted data.
-
Add the Image plugin, and the PowerPaste plugin to the TinyMCE plugins list:
plugins: 'a11ychecker code link tinymcespellchecker image powerpaste ',-
Specify how TinyMCE handles image options with the following Image plugin options. These restrict the import of images to only the jpg and png file types, and block any image file types that do not match jpg or png:
//Image control
images_file_types: 'jpg,png',
block_unsupported_drop: true,Set up the following PowerPaste plugin options to clean any html content pasted into the textarea, and to guide the writer through preserving or removing style content from HTML and MS word sources
//Paste control
powerpaste_html_import: 'clean',
powerpaste_word_import: 'clean',Save the changes, and reload the browser. You can then test out adding an image or pasting text into the textarea:

Include image editing to your headless CMS |
|
It’s an essential feature for any CMS – the ability to edit images uploaded to the rich text area. To add this ability to TinyMCE, add the editimage option to the tinymce.init script: |
Further headless CMS customization
There are further directions you can take your CMS design and customization with TinyMCE. For instance, the next step when setting up your headless CMS for production could be to configure:
- How TinyMCE handles image upload
- How tinymce.html.styles() API parses CSS content
- Set up one of TinyMCE’s skin or icon options, or create a custom TinyMCE editor design
TinyMCE has a range of options to further customize the headless CMS, and if you need further support, contact us for more information about getting your headless CMS project started, customized, and connected with customers.


