


For any effective Learning Management System (LMS), a robust rich text editor (RTE) isn't an extra perk—it's the foundation that determines whether your platform frustrates or engages your users. In this guide, you’ll walk through how to build an LMS with TinyMCE and show you why a powerful and flexible RTE makes all the difference.
While TinyMCE works in any JavaScript framework, this LMS example is built in Vue, so you’ll need a basic understanding of working in a Vue.js project before you begin.
Part one: Set up TinyMCE in a Vue.js project
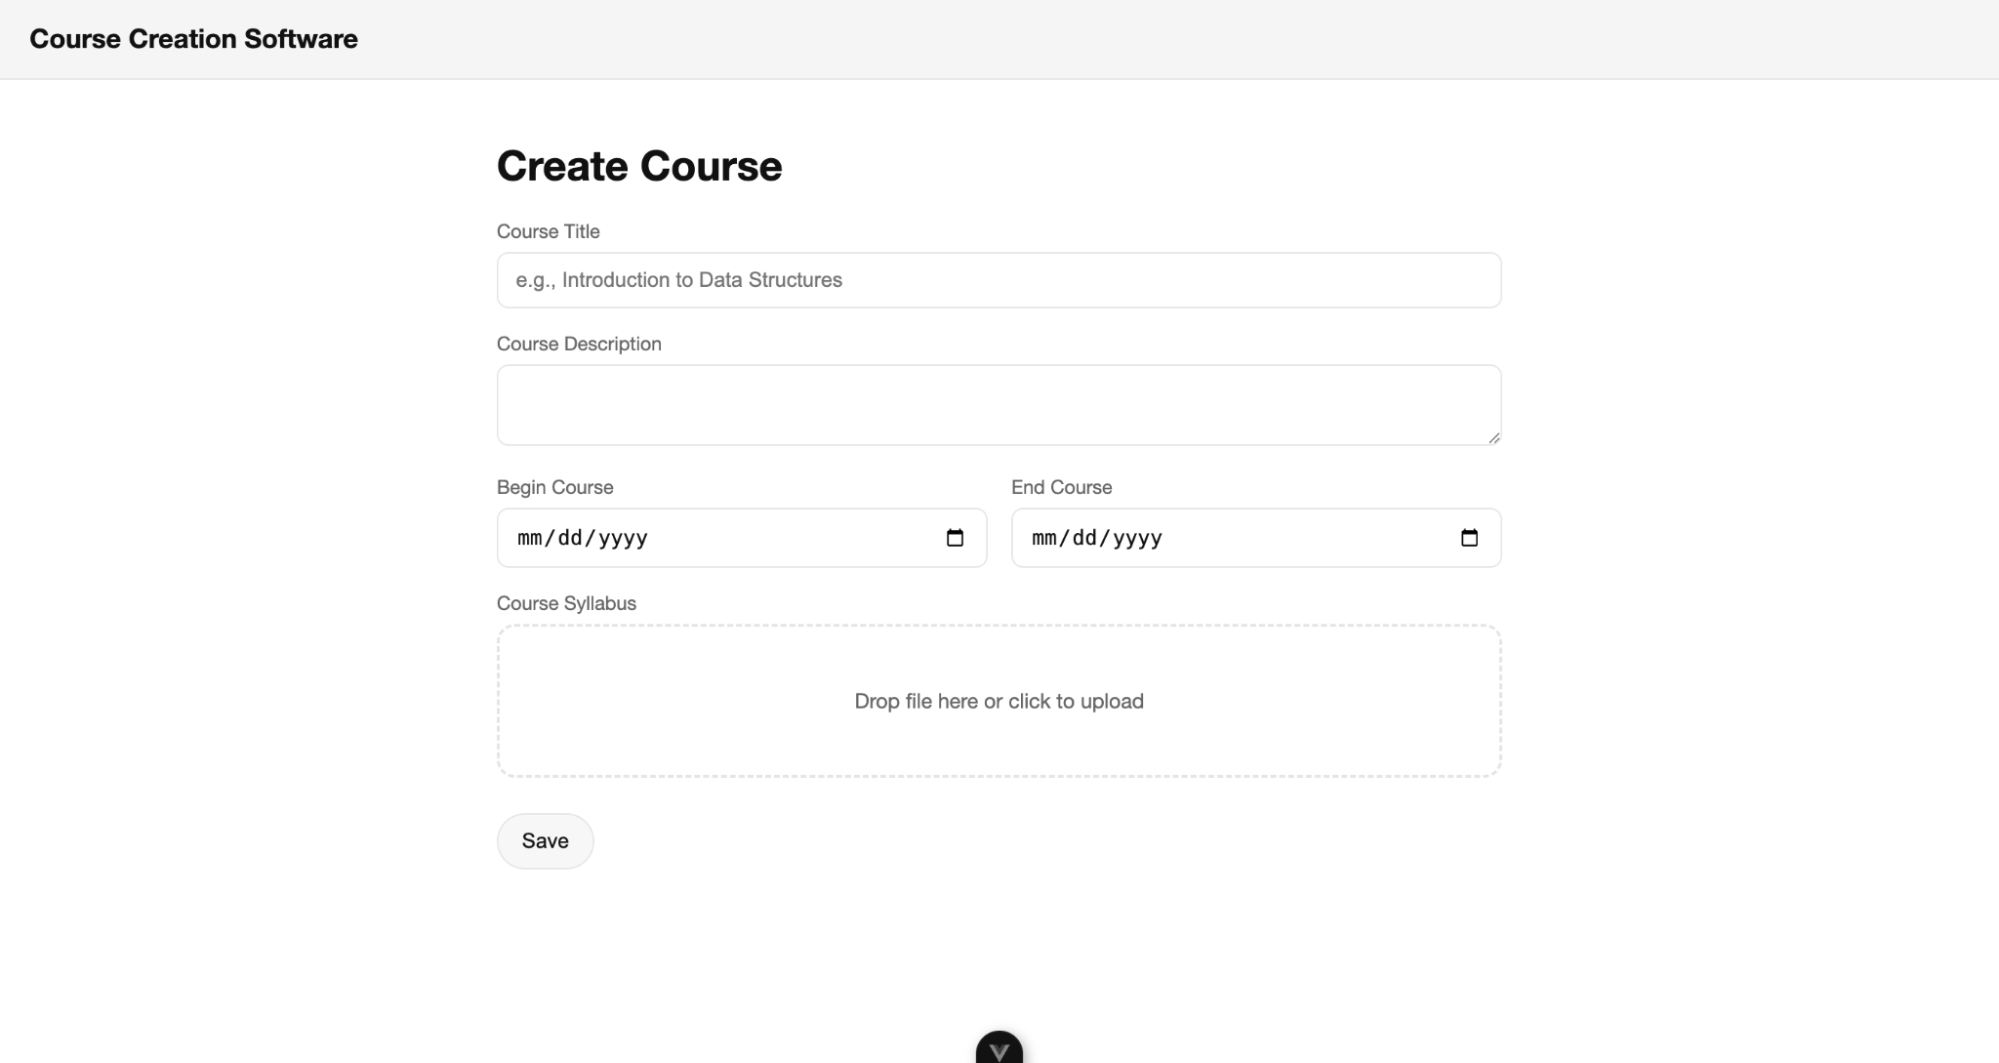
Building an LMS with TinyMCE starts with setting up the rich text editor. We’ve built a GitHub repository with a templated empty course creation page for an LMS. By the end of this guide, you’ll have a fully functional LMS course creation page complete with:
- Course templates.
- Ability to export to Word documents.
- Accessibility and spell checkers.
- Capability for handling complex math equations and code samples (From over a dozen languages!).
- Comments and user mentions.
- Suggested edits so users can change original content and still preserve the original.

Step one: Clone and run the demo Vue.js LMS project
To clone the TinyMCE LMS demo project from GitHub, you can either (a) visit the repository page and click the green Code button to clone it or (b) run the following GitHub CLI command on your machine:
gh repo clone tinymce/blog-lms-demoOnce you’ve got the code cloned, open the blog-lms-demo project in your favorite IDE. You’ll see the LMS Vue project, primarily in App.vue.
To run the project locally, you’ll need to run a couple of commands.
- Run
npm installto install all of the project’s dependencies locally. - Run
npm run devto launch your Vue app to http://localhost:5173/.
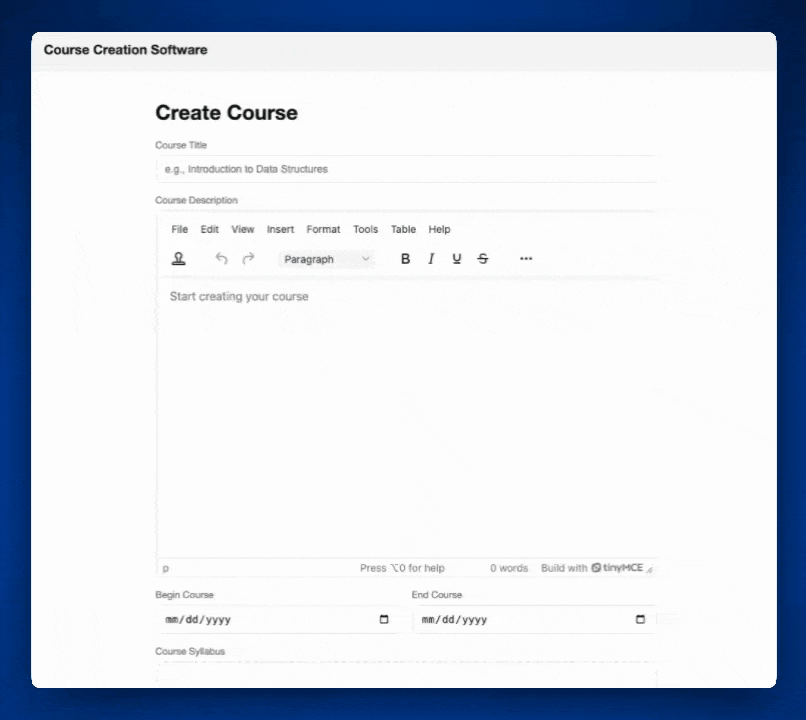
Once you do, you’ll see the Vue LMS app running on Vite in your browser on the localhost page, with a page and a plain textarea for the course description. It’s that easy to get started.
Step two: Add TinyMCE to your Vue.js project
The next step is to make the textarea into a robust rich text editor that can handle real course descriptions and include rich elements. To do this takes three steps.
-
Install TinyMCE’s native Vue package with one NPM command:
npm install @tinymce/tinymce-vue - Create a new TinyMCEEditor.vue file in the src folder and put this code in it:
⚠️ Note: You’ll need to replace no-api-key with a valid TinyMCE API key. If you don’t already have one, get your free TinyMCE API key today and try out the premium features in this guide.<script setup lang="ts"> import Editor from '@tinymce/tinymce-vue' </script> <template> <editor id="course-description" placeholder="Start creating your course" apiKey="no-api-key" :init="{ plugins: 'advlist anchor autolink charmap code fullscreen help image insertdatetime link lists media preview searchreplace table visualblocks wordcount', toolbar: 'undo redo | styles | bold italic underline strikethrough | alignleft aligncenter alignright alignjustify | bullist numlist outdent indent | link image', height: 500, }" /> </template> <style></style> -
Edit the App.vue file to include TinyMCE. Import the TinyMCE component at the top of the file:
import TinyMCEEditor from "./TinyMCEEditor.vue"; -
And then replace the
<textarea>with the new TinyMCE component you made:<TinyMCEEditor v-model="form.description"></TinyMCEEditor>;
And that’s it for getting TinyMCE into your Vue project! Now you’ll see that a basic version of TinyMCE has replaced the textarea and is ready for feature integration.
Part two: Add learning features to TinyMCE
Now it’s time to add editor features important to teaching and learning. In this section, you’ll integrate TinyMCE’s Templates, Math Equations, Export to Word, Accessibility Checker, Spell Checker, and Code Sample. These features allow instructors and course creators to write effective course descriptions that help learners choose the right courses to take.
Add Templates to TinyMCEEditor.vue
Templates give instructors and organizations ready-made, standardized structures for courses and content. This saves LMS users time, ensures consistency across classes and departments, and lowers the barrier to efficient course design.
To add Templates to TinyMCE, you will alter TinyMCEEditor.vue in the following ways:
- Add
advtemplateto the TinyMCEpluginsarray. - Add both
inserttemplateandaddtemplateto the toolbar. - Add a reference to
advtemplate_templatesto TinyMCE. Take a look at all three of these changes in the TinyMCEinit:
... :init="{ plugins: 'advtemplate advlist anchor autolink charmap code fullscreen help image insertdatetime link lists media preview searchreplace table visualblocks wordcount', toolbar: 'inserttemplate addtemplate | undo redo | styles | bold italic underline strikethrough | alignleft aligncenter alignright alignjustify | bullist numlist outdent indent | link image', height: 500, advtemplate_templates }" ... - In the real world, you’d use
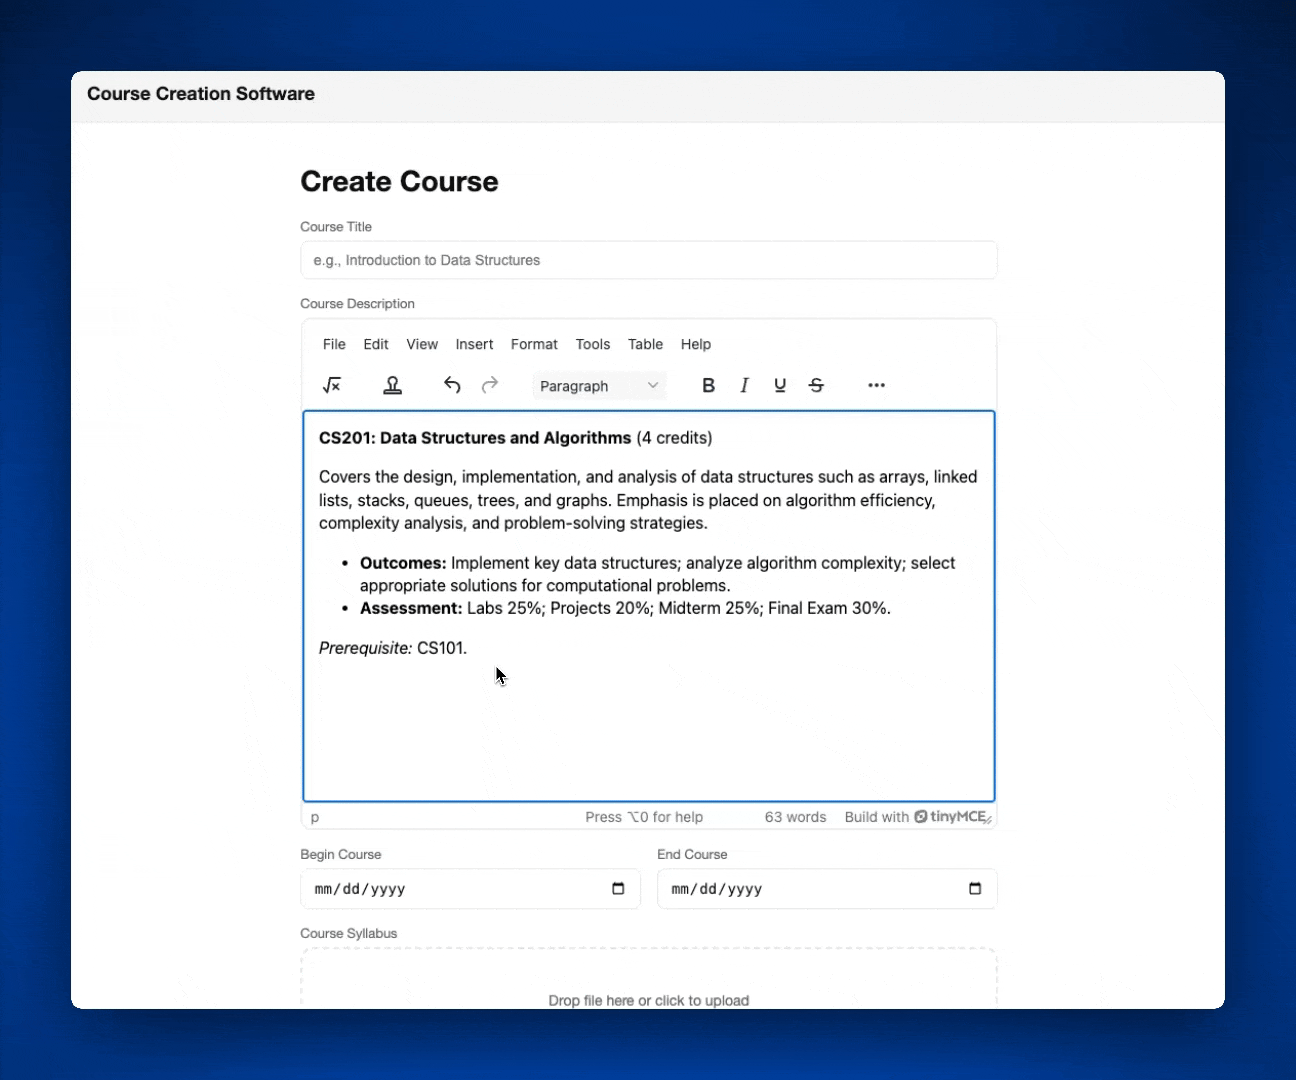
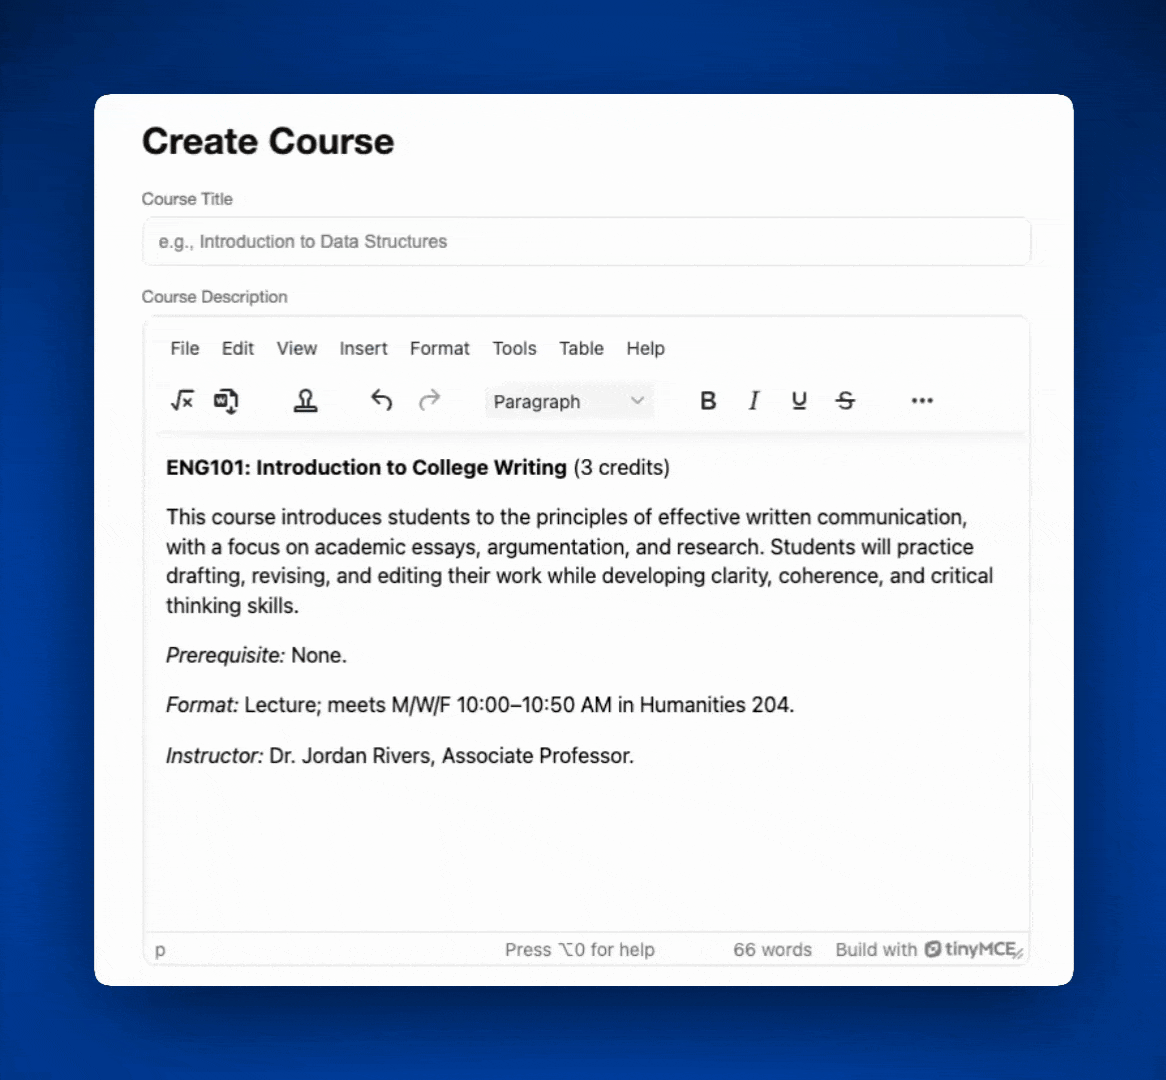
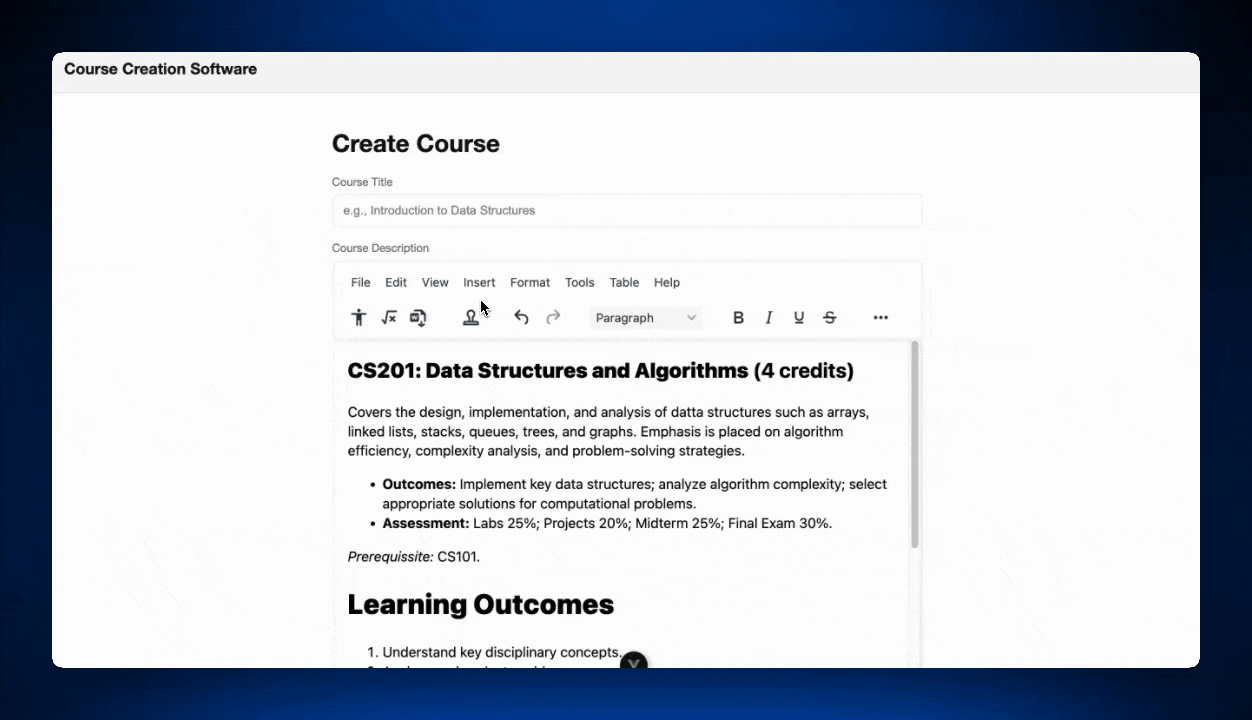
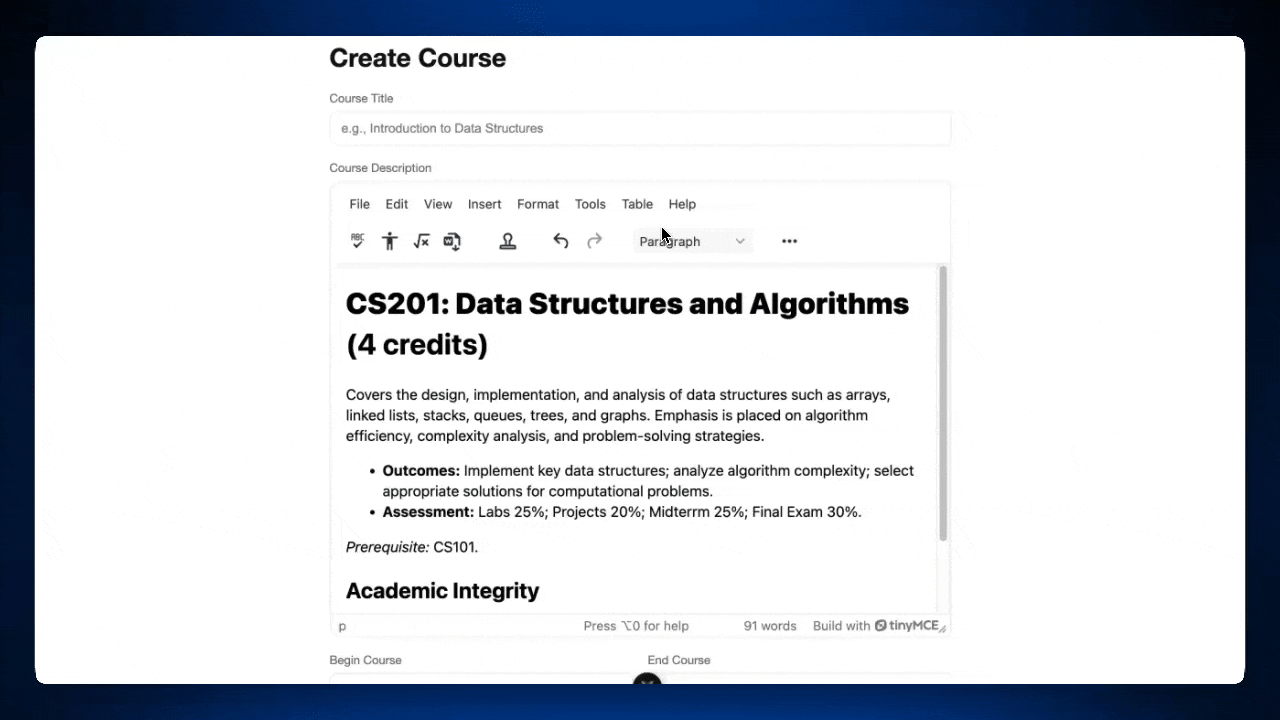
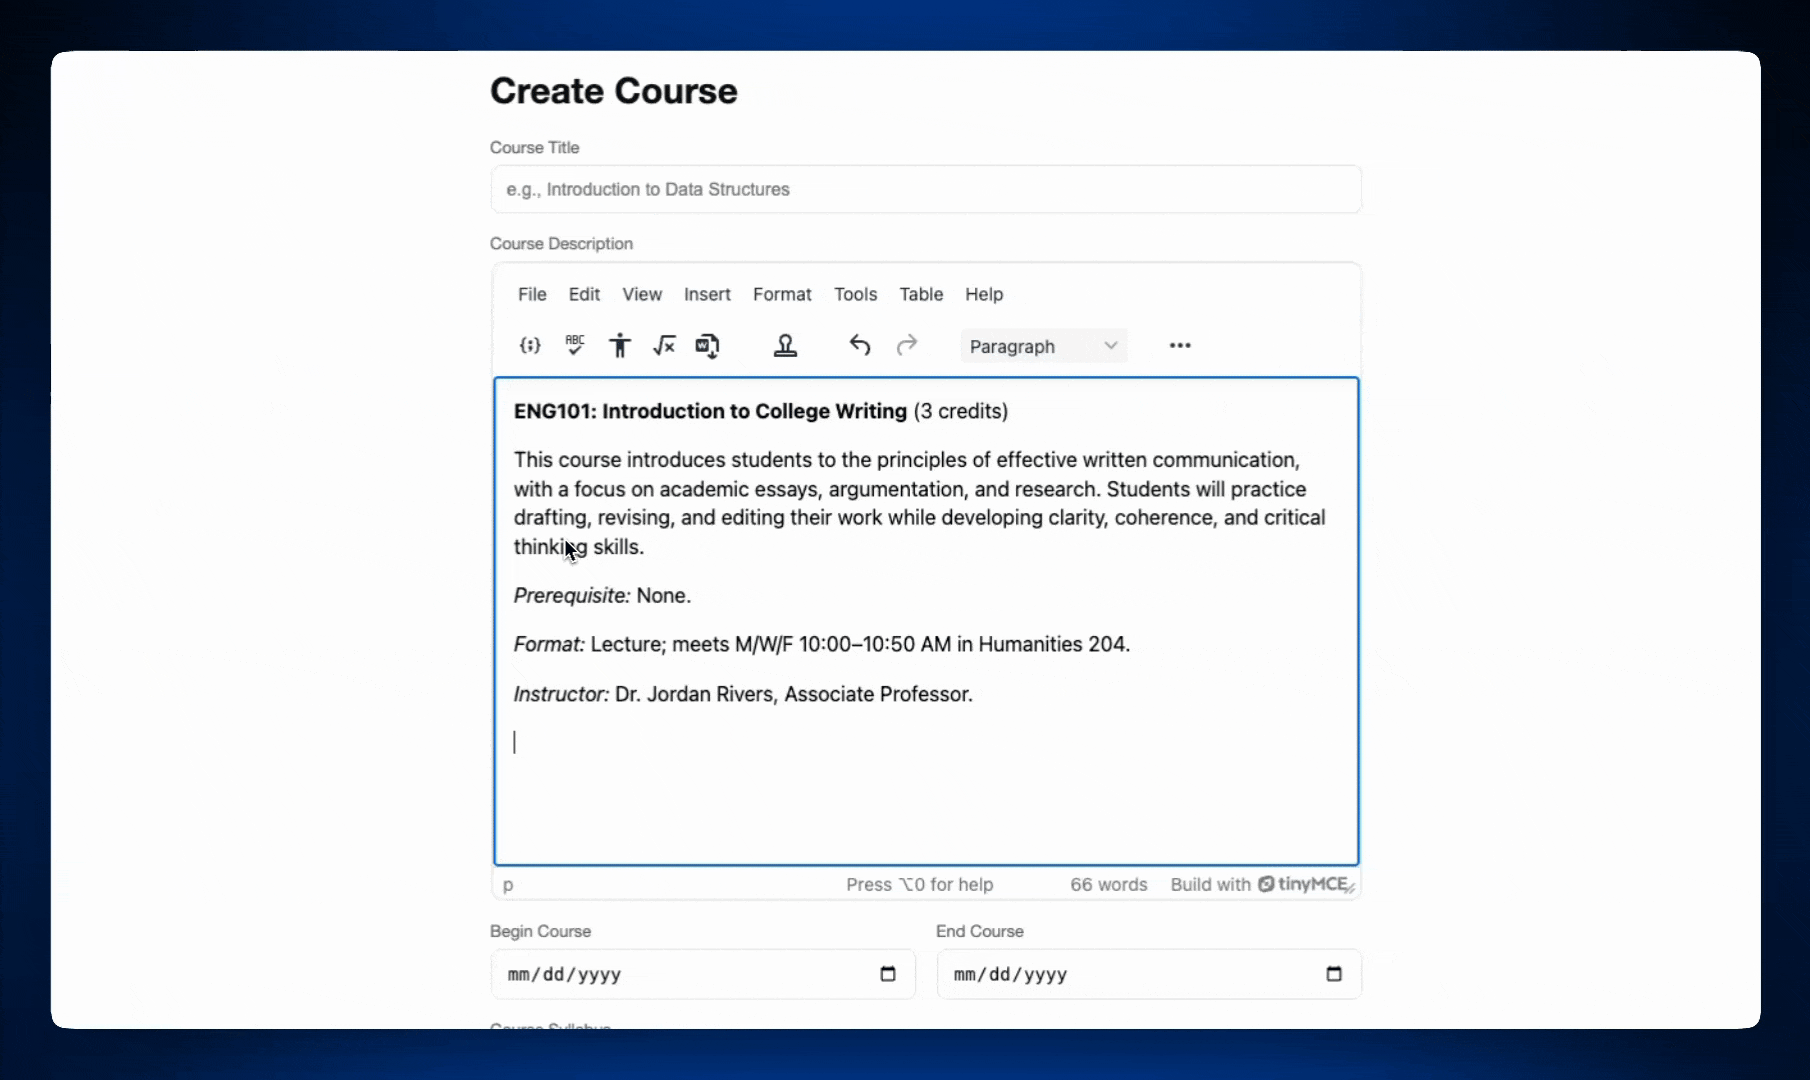
advtemplate_templatesto create a callback function that fetches templates from your data storage. For this demo, add these course templates as a democonstto<script setup>.
<script setup lang="ts">
import Editor from '@tinymce/tinymce-vue'

const advtemplate_templates = [
  {
    title: 'Undergraduate catalog blurbs',
    items: [
      {
        title: 'Standard catalog blurb',
        content:
          '<p dir="ltr"><strong>ENG101: Introduction to College Writing</strong> (3 credits)</p>\n<p dir="ltr">This course introduces students to the principles of effective written communication, with a focus on academic essays, argumentation, and research. Students will practice drafting, revising, and editing their work while developing clarity, coherence, and critical thinking skills.</p>\n<p dir="ltr"><em>Prerequisite:</em> None.</p>\n<p dir="ltr"><em>Format:</em> Lecture; meets M/W/F 10:00–10:50 AM in Humanities 204.</p>\n<p dir="ltr"><em>Instructor:</em> Dr. Jordan Rivers, Associate Professor.</p>',
      },
      {
        title: 'STEM catalog blurb',
        content:
          '<p dir="ltr"><strong>CS201: Data Structures and Algorithms</strong> (4 credits)</p>\n<p dir="ltr">Covers the design, implementation, and analysis of data structures such as arrays, linked lists, stacks, queues, trees, and graphs. Emphasis is placed on algorithm efficiency, complexity analysis, and problem-solving strategies.</p>\n<ul>\n<li dir="ltr"><strong>Outcomes:</strong> Implement key data structures; analyze algorithm complexity; select appropriate solutions for computational problems.</li>\n<li dir="ltr"><strong>Assessment:</strong> Labs 25%; Projects 20%; Midterm 25%; Final Exam 30%.</li>\n</ul>\n<p dir="ltr"><em>Prerequisite:</em> CS101.</p>',
      },
    ],
  },
  {
    title: 'Outcomes & assessment blocks',
    items: [
      {
        title: 'Learning outcomes (5-item)',
        content:
          '<p dir="ltr"><strong>Learning Outcomes</strong></p>\n<ol>\n<li dir="ltr">Understand key disciplinary concepts.</li>\n<li dir="ltr">Analyze and evaluate evidence.</li>\n<li dir="ltr">Communicate ideas effectively.</li>\n<li dir="ltr">Work collaboratively in teams.</li>\n<li dir="ltr">Demonstrate ethical decision-making.</li>\n</ol>',
      },
      {
        title: 'Assessment breakdown',
        content:
          '<p dir="ltr"><strong>Assessment</strong></p>\n<ul>\n<li dir="ltr">Quizzes: 20%</li>\n<li dir="ltr">Exams: 30%</li>\n<li dir="ltr">Projects: 30%</li>\n<li dir="ltr">Participation: 20%</li>\n</ul>',
      },
    ],
  },
  {
    title: 'Policy & boilerplate inserts',
    items: [
      {
        title: 'Academic integrity',
        content:
          '<p dir="ltr"><strong>Academic Integrity</strong></p>\n<p dir="ltr">You are expected to uphold the institution’s standards. Unauthorized collaboration, plagiarism, or AI-assisted work submitted as your own will result in sanctions per the university’s policy.</p>',
      },
      {
        title: 'Accessibility & accommodations',
        content:
          '<p dir="ltr"><strong>Accessibility</strong></p>\n<p dir="ltr">Students seeking accommodations should contact the Accessibility Office at accessibility@university.edu and notify the instructor during the first two weeks of class.</p>',
      },
      {
        title: 'Late work & extensions',
        content:
          '<p dir="ltr"><strong>Late Work</strong></p>\n<p dir="ltr">Work submitted up to 3 days late incurs a 10% deduction unless an extension is approved in advance. After one week, submissions are not accepted.</p>',
      },
    ],
  },
]
</script>
Visit localhost:5173 and refresh the page to see your Templates implementation. 🎉
TinyMCE Templates go further with many options, actions, and buttons for the Templates window. Check out the TinyMCE Templates documentation for more.
Add Math Equations to TinyMCEEditor.vue
Complex math equation support in an LMS enables instructors and learners to accurately create, share, and interact with complex formulas directly in the platform via LaTeX or MathML.
Add Math Equations to TinyMCE in two simple steps:
- Add
mathtopluginsarray. - Add
mathto thetoolbararray.
Your new TinyMCE init should look like this:
    :init="{
      plugins:
        'math advtemplate advlist anchor autolink charmap code fullscreen help image insertdatetime link lists media preview searchreplace table visualblocks wordcount',
      toolbar:
        'math | inserttemplate addtemplate | undo redo | styles | bold italic underline strikethrough | alignleft aligncenter alignright alignjustify | bullist numlist outdent indent | link image',
      height: 500,
      advtemplate_templates,
    }"
  />
</template>And that’s it! You can test out Math in the browser once you refresh the localhost page. If you don’t use LaTeX often, you can use this example for your test: “x^n + y^n = z^n”.
Add Export to Word to TinyMCEEditor.vue
LMS users need the ability to preserve content consistency across platforms, ensuring materials appear the same outside and inside the LMS. It’s important to include export to Microsoft Word and export to PDF in any LMS.
Add Export to Word to TinyMCE in just two simple steps:
- Add
exportwordto thepluginsarray. - Add
exportwordto thetoolbararray.
Your code should look like this when you’re done:
...
   :init="{
      plugins:
        'exportword math advtemplate advlist anchor autolink charmap code fullscreen help image insertdatetime link lists media preview searchreplace table visualblocks wordcount',
      toolbar:
        'exportword math | inserttemplate addtemplate | undo redo | styles | bold italic underline strikethrough | alignleft aligncenter alignright alignjustify | bullist numlist outdent indent | link image',
...And that’s all you need to do to install Export to Word. Head on over to your localhost instance to give it a try.
⚠️ Note: You should add a Promise called export_token_provider with a valid TinyMCE JWT to export to Word without any TinyMCE watermarks in a real world scenario.
Add Accessibility Checker and Spell Checker to TinyMCEEditor.vue
Compliance checking tools ensure that LMS content not only meets standards like WCAG or complies with ADA law, but also helps to ensure that all users can freely interact with the content. And just like most other TinyMCE features, it’s quick and easy to add compliance checkers to your RTE.
Accessibility Checker
To install Accessibility Checker in TinyMCE, you will:
- Add
a11ycheckerto thepluginsarray. - Add
a11ycheckto thetoolbararray.
This is how your TinyMCE init should look afterward:
   :init="{
      plugins:
        'a11ychecker exportword math advtemplate advlist anchor autolink charmap code fullscreen help image insertdatetime link lists media preview searchreplace table visualblocks wordcount',
      toolbar:
'a11ycheck math exportword | inserttemplate addtemplate | undo redo | styles | bold italic underline strikethrough | alignleft aligncenter alignright alignjustify | bullist numlist outdent indent | link image',And voila, that’s it! You can test Accessibility Checker after you refresh your localhost page.
Spellchecker
Add Spellchecker to TinyMCE in two steps:
- Add
tinymcespellcheckerto thepluginsarray. - Add
spellcheckdialogto thetoolbararray.
Your code will look like this:
...
   :init="{
      plugins:
        'tinymcespellchecker a11ychecker exportword math advtemplate advlist anchor autolink charmap code fullscreen help image insertdatetime link lists media preview searchreplace table visualblocks wordcount',
      toolbar:
        'spellcheckdialog a11ycheck math exportword | inserttemplate addtemplate | undo redo | styles | bold italic underline strikethrough | alignleft aligncenter alignright alignjustify | bullist numlist outdent indent | link image',
      height: 500,
      advtemplate_templates,
...Nice job! 🎉 Try out the Spell Checker at http://localhost:5173/ after a page refresh.
Add the Code Sample feature to TinyMCEEditor.vue
Many LMSs, especially in the enterprise space, need to support code samples in multiple programming languages so that learners can practice languages required for their field of study. TinyMCE’s open-source Code Sample feature supports over a half dozen programming languages like HTML, JavaScript, Python, CSS, Ruby, and Java.
To add Code Sample to TinyMCE:
- Add
codesampleto thepluginsarray. - Add
codesampleto thetoolbararray.
Your TinyMCE config looks like this now:
...
   :init="{
      plugins:
        'codesample tinymcespellchecker a11ychecker exportword math advtemplate advlist anchor autolink charmap code fullscreen help image insertdatetime link lists media preview searchreplace table visualblocks wordcount',
      toolbar:
        'codesample spellcheckdialog a11ycheck math exportword | inserttemplate addtemplate | undo redo | styles | bold italic underline strikethrough | alignleft aligncenter alignright alignjustify | bullist numlist outdent indent | link image',
      height: 500,
      advtemplate_templates,
      spellchecker_language: 'en-US',
...As usual, that’s it! Now TinyMCE is ready for you to refresh the page and test adding some code samples.
What’s next? Add collaboration features to your LMS
You want to build an LMS to give your users an intuitive and powerful way to learn, but you also want to get your app to production without too many headaches. While features like collaboration, accessibility, templates, and compliance are necessary, they don’t have to be a pain to manage. When you use TinyMCE, you’re choosing a feature-rich, drop-in RTE that has your app requirements built in. TinyMCE sets the stage for a better LMS.
In the second half of this series, you'll add advanced collaboration features like Revision History, Suggested Edits, Comments, and Mentions to your demo LMS Course Creation page, so stay tuned.
Want to do even more with the LMS you just built? You can take it further, and add more features when you follow TinyMCE tutorials:


