


When CSS styling makes design an uphill battle, you can take advantage of libraries like Bootstrap to make things easier. But what if Bootstrap isn't compatible with other components and libraries in your application? You can end up back to square one finding libraries that are compatible.
Thankfully, this isn't the case when connecting the TinyMCE WYSIWYG editor to Bootstrap. And in this article, you'll find a guide on enabling Bootstrap with TinyMCE. Read on to find out how to modify the TinyMCE WYSIWYG to include a demo Bootstrap form.
1. Start with the Bootstrap setup
There’s plenty of information on how to start using Bootstrap, so getting directly into the demo:
Create an index.html file, and include the following demo content to get started:
<!doctype html>
<html lang="en">
    <head>
        <!-- Required meta tags -->
        <meta charset="utf-8">
        <meta name="viewport" content="width=device-width, initial-scale=1, shrink-to-fit=no">

        <!-- Bootstrap CSS -->
        <link rel="stylesheet" href="https://cdn.jsdelivr.net/npm/bootstrap@5.0.2/dist/css/bootstrap.min.css" integrity="sha384-MCw98/SFnGE8fJT3GXwEOngsV7Zt27NXFoaoApmYm81iuXoPkFOJwJ8ERdknLPMO" crossorigin="anonymous">

        <title>TinyMCE WYSIWYG Bootstrap</title>

        <!-- TinyMCE CDN -->
        <script src="https://cdn.tiny.cloud/1/no-api-key/tinymce/6/tinymce.min.js" referrerpolicy="origin"></script>

        <script>
          tinymce.init({
            selector: 'textarea#editor',
          });
        </script>
    </head>

    <body>

    <h1>Hello, world!</h1>
      <textarea id="editor"></textarea>

    </body>

    <!-- jQuery first, then Popper.js, then Bootstrap JS -->

    <script src="https://cdn.jsdelivr.net/npm/bootstrap@5.2.3/dist/js/bootstrap.bundle.min.js" integrity="sha384-kenU1KFdBIe4zVF0s0G1M5b4hcpxyD9F7jL+jjXkk+Q2h455rYXK/7HAuoJl+0I4" crossorigin="anonymous"></script>

    <script src="https://cdnjs.cloudflare.com/ajax/libs/popper.js/2.9.2/umd/popper.min.js" integrity="sha512-2rNj2KJ+D8s1ceNasTIex6z4HWyOnEYLVC3FigGOmyQCZc2eBXKgOxQmo3oKLHyfcj53uz4QMsRCWNbLd32Q1g==" crossorigin="anonymous" referrerpolicy="no-referrer"></script>

    <script src="https://code.jquery.com/jquery-3.7.1.min.js" integrity="sha256-/JqT3SQfawRcv/BIHPThkBvs0OEvtFFmqPF/lYI/Cxo=" crossorigin="anonymous"></script>

</html>This starter template uses these versions:
- jquery-3.7.1
- popper-2.9.2
- bootstrap-5.2.3
TinyMCE has some configuration changes depending on if you’re using Bootstrap version 4 or 5 – the TinyMCE documentation has more information.
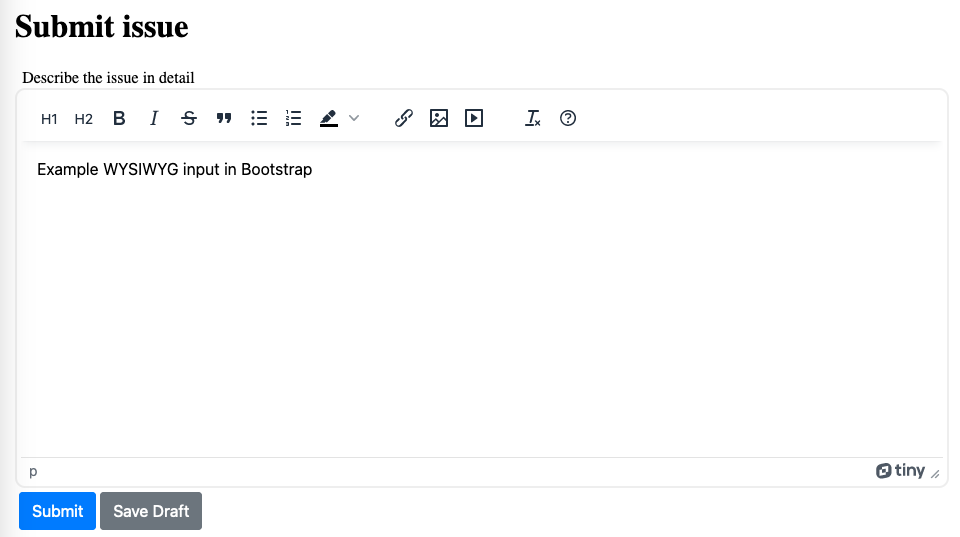
2. Modify the WYSIWYG editor with a Bootstrap form
The TinyMCE editor initializes on a textarea element. To set up a Bootstrap form, replace the “Hello, world!” and textarea content with the following code:
<div class="container mt-4 mb-4">
        <!--Bootstrap classes arrange web page components into columns and rows in a grid -->
        <div class="row justify-content-md-center">
            <div class="col-md-12 col-lg-8">
                <h1 class="h2 mb-4">Submit issue</h1>
                <label>Describe the issue in detail</label>
                <div class="form-group">
                    <textarea id="editor"></textarea>
                </div>
                <button type="submit" class="btn btn-primary">Submit</button>
            </div>
        </div>
</div>Modify the editor by adding this <script> content into the head tag section <head>...</head>:
<script src="https://cdn.tiny.cloud/1/no-api-key/tinymce/6/tinymce.min.js" referrerpolicy="origin"></script>

<script>
  tinymce.init({
    selector: 'textarea#editor',
    skin: 'bootstrap',
    plugins: 'lists, link, image, media',
    toolbar: 'h1 h2 bold italic strikethrough blockquote bullist numlist backcolor | link image media | removeformat help',
    menubar: false,
  });
</script>If you have not already, sign up for a FREE API Key, which comes with a 14-day free trail and insert it in the URL above to replace no-api-key. This is the quickest and easiest way to get TinyMCE running in your project.
To keep things simple for now, set the menubar option to false. After you’ve made these changes, open the HTML file in a browser, or run it on a local host with an http.server with python or similar.
✏️NOTE: If, at this point, you see a warning message, make sure:
- You have added your domain against the API Key in the Tiny account dashboard.
- You have replaced
no-api-keywith your own API Key in the above code.
If you haven’t got one yet — it’s all good — you can get a free API Key now. (The message will remain if you’re opening the file in a browser without running it through a local host.)
3. Add focus to the Bootstrap form
TinyMCE is designed for flexibility and effortless customization, and the Bootstrap integration and focus options are one more example of TinyMCE's flexibility. For configuring focus options, there are different choices you can make to create the best interface for your customers:
- Add the highlight_on_focus option: When added to your TinyMCE init script and set to true, the TinyMCE text area gains a contrasting border when it has focus
- Use a setup option with Bootstrap skins and icons: If you've configured the TinyMCE Bootstrap skin and icon package alongside the Bootstrap integration, you can make use of the TinyMCE setup option with focus and blur event listeners to give the TinyMCE editor contrast
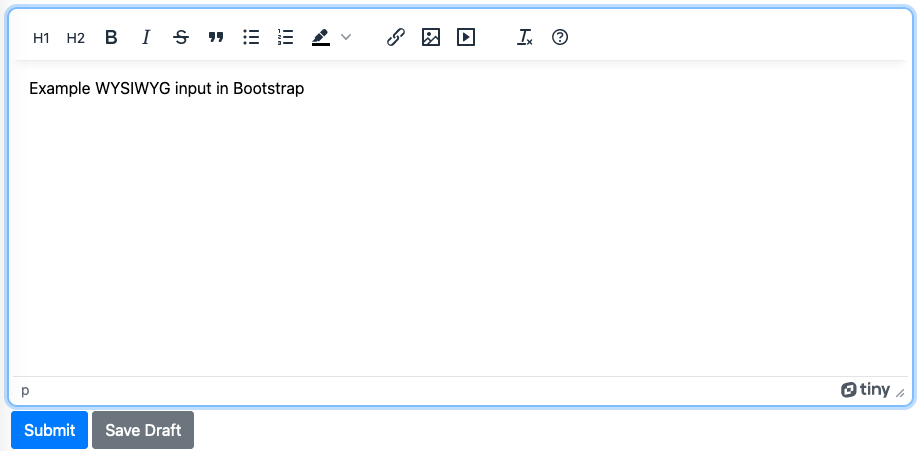
For instance, you can set up the Bootstrap demo with the highlight_on_focus option, to highlight the editor:
✏️NOTE: As of the TinyMCE 7 release, the highlight_on_focus option is enabled by default.
As an example, add the following code to change the tinymce.init script to activate the setup option in the demo:
<script>
  tinymce.init({
  selector: 'textarea#editor',
  plugins: 'lists, link, image, media',
  toolbar: 'h1 h2 bold italic strikethrough blockquote bullist numlist backcolor | link image media | removeformat help',
  menubar: false,
  setup: (editor) => {
      // Apply the focus effect
      editor.on("init", () => {
      editor.getContainer().style.transition = "border-color 0.15s ease-in-out, box-shadow 0.15s ease-in-out";
        });
      editor.on("focus", () => { (editor.getContainer().style.boxShadow = "0 0 0 .2rem rgba(0, 123, 255, .25)"),
      (editor.getContainer().style.borderColor = "#80bdff");
        });
      editor.on("blur", () => {
      (editor.getContainer().style.boxShadow = ""),
      (editor.getContainer().style.borderColor = "");
       });
     },
  });
</script>4. Apply the Bootstrap skin to textarea editor
The Bootstrap skin is one of many customizations options available with premium Skins and Icons Pack.
When you sign up for an API key, you also receive 14 days free access to Premium Plugins, as well as premium skins and icons.
Modify the initialization script to include the Bootstrap skin option just after the selector option:
<script>
  tinymce.init({
    selector: 'textarea#editor',
    skin: 'bootstrap', //The TinyMCE Bootstrap skin
    plugins: 'lists, link, image, media',
    […]//Omitted lines are identical to step 2
  });
</script>Save and then, reload the demo in your browser to view the TinyMCE Bootstrap skin design:
![]()
Are there any other demos?
This tutorial was based on a live demo that Tiny’s principal designer, Fredrik Danielsson, put together to demonstrate how to configure the editor for the Bootstrap environment.
Check it out when you have a minute:
What next for Bootstrap?
You can configure the features and options are available on the toolbar as a start. Read more about the Tiny WYSIWYG HTML editor and what’s new in TinyMCE 6 — our best WYSIWYG editor yet.
If you’re keen to use TinyMCE in Bootstrap modals, read the guide – It's available right here – using TinyMCE within a modal dialog.


