


Angular is a framework that aims to cater to a developer’s every need, with the overall goal of becoming the go-to framework for large, single-page applications. To reach that goal, it incorporates many features that simplify the development process, including Angular reactive forms.
This article looks at how to integrate rich text editing into an Angular reactive form using TinyMCE. We’ve provided all the code necessary in this guide to create a fully functional Angular WYSIWYG editor with TinyMCE’s world-class rich text editing capabilities.
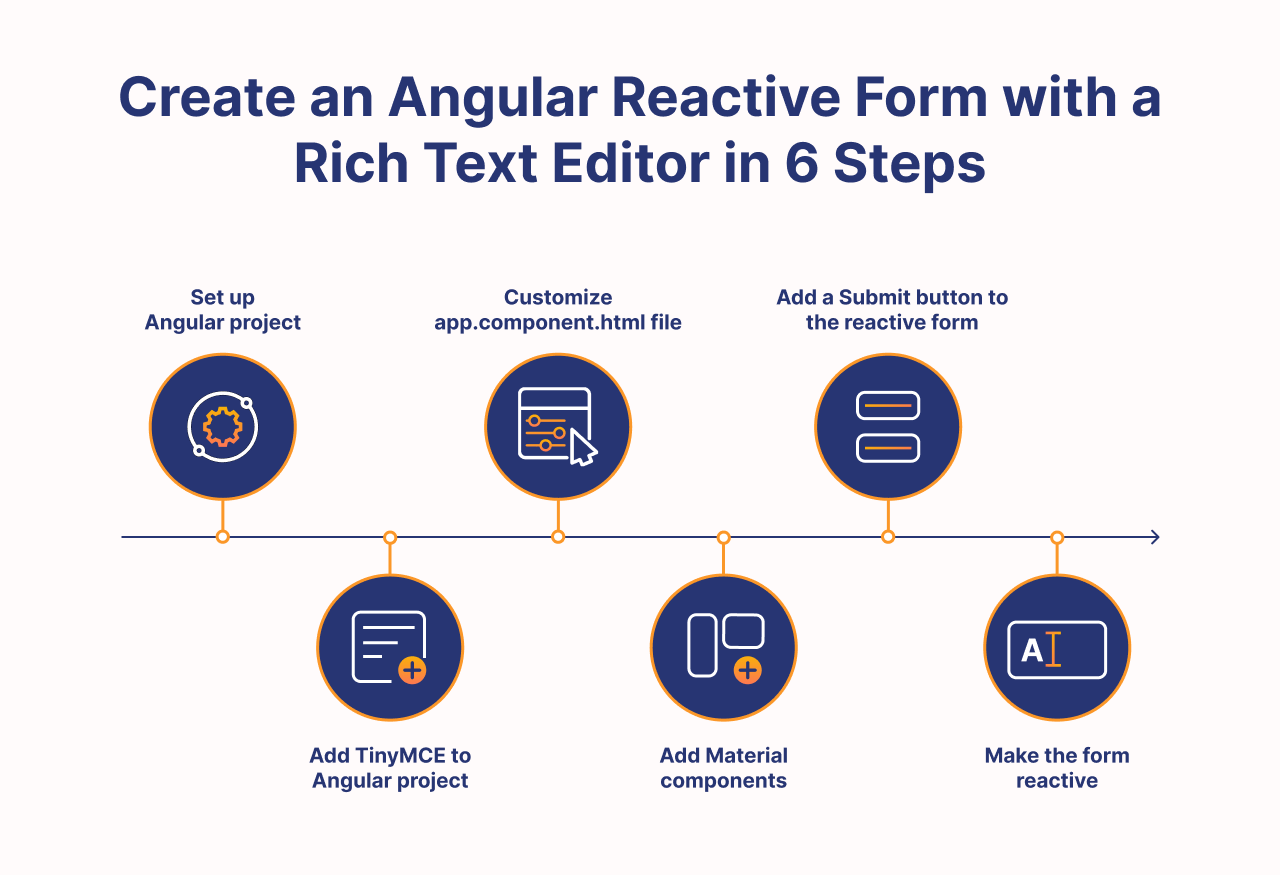
Angular reactive form prerequisites and setup
To complete this guide and create an Angular reactive form with TinyMCE, you’ll need:
- A demo Angular project: If you don’t already have a project for TinyMCE Angular integration, you can create a new one quickly for the purpose of this guide with the following shell command:
ng new --defaults --skip-git tinymce-angular-demo- A TinyMCE API key: Get your free TinyMCE API key today, or use one you already have.
Step one: Add TinyMCE to Angular project
The first thing you’ll do is navigate to your project directory in Terminal. For this guide, we’re navigating into the tinymce-angular-demo folder.
Install the TinyMCE Angular wrapper
After that, it’s time to install the TinyMCE Angular wrapper. This is just two shell commands.
cd tinymce-angular-demo
npm install @tinymce/tinymce-angularThe tinymce-angular component is a wrapper around the TinyMCE rich text editor. By default, the component will load TinyMCE from Tiny Cloud, which is the simplest and quickest way to get going.
Import EditorModule to app.component.ts
Now that our WYSIWYG editor is installed, we want to add it to our Angular app’s app.component.ts file. It’s as easy as importing EditorModule from the tinymce-angular package into our app Component. Your app.component.ts file will look like this after you’ve imported the EditorModule:
import { Component } from "@angular/core";
import { EditorModule } from "@tinymce/tinymce-angular";
import { RouterOutlet } from "@angular/router";

@Component({
  selector: "app-root",
  standalone: true,
  imports: [RouterOutlet, EditorModule],
  templateUrl: "./app.component.html",
  styleUrl: "./app.component.css",
})
export class AppComponent {
  title = "forms-angular-rte";
}
Step two: Customize app.component.html file
Now that the rich text editor is available inside the Angular project, we’ll customize the app.component.html file to include it. It’s quick and easy to do so; you can use the following code for a basic editor. Just remember to replace “no-api-key” with a valid TinyMCE API key.
Replace everything in app.component.html with the following:
<main class="main">
  <editor
    apiKey="no-api-key"
    [init]="{
      plugins: 'lists link image table code help wordcount',
      menubar: false,
      min_height: 150
     }"
  ></editor>
</main>

<router-outlet />The foundation is set up, so now it’s time to create a reactive form and add our rich text editor.
Step three: Add Material components
Now we’ll add Angular Material components to our project via a shell command.
ng add @angular/materialWhen you install Material, it will ask you three questions. For quick reference, you can answer:
- Choose a prebuilt theme name: Choose “Custom” so that none of the default Material styles conflict with our demo.
- Set up global Angular Material typography styles: No.
- Include the Angular animations module: Include and enable.
Import MatCardModule to app.component.ts
For this step, all you need to do is add MatCardModule to app.component.ts.
import { Component } from "@angular/core";
import { EditorModule } from "@tinymce/tinymce-angular";
import { RouterOutlet } from "@angular/router";
import { MatCardModule } from "@angular/material/card";

@Component({
  selector: "app-root",
  standalone: true,
  imports: [RouterOutlet, EditorModule, MatCardModule],
  templateUrl: "./app.component.html",
  styleUrl: "./app.component.css",
})
export class AppComponent {
  title = "forms-angular-rte";
}
Configure Material in app.component.html
Now that we have the MatCardModule library available to us, let’s wrap our text editor in a Material card in app.component.html.
Step four: Add a Submit button to the reactive form
We have a card and text editor, so let’s add a Submit button now.
Import MatButtonModule to app.component.ts
First we’ll bring in the MatButtonModule so we can make a button.
import { Component } from "@angular/core";
import { EditorModule } from "@tinymce/tinymce-angular";
import { RouterOutlet } from "@angular/router";
import { MatCardModule } from "@angular/material/card";
import { MatButtonModule } from "@angular/material/button";

@Component({
  selector: "app-root",
  standalone: true,
  imports: [RouterOutlet, EditorModule, MatCardModule, MatButtonModule],
  templateUrl: "./app.component.html",
  styleUrl: "./app.component.css",
})
export class AppComponent {
  title = "forms-angular-rte";
}
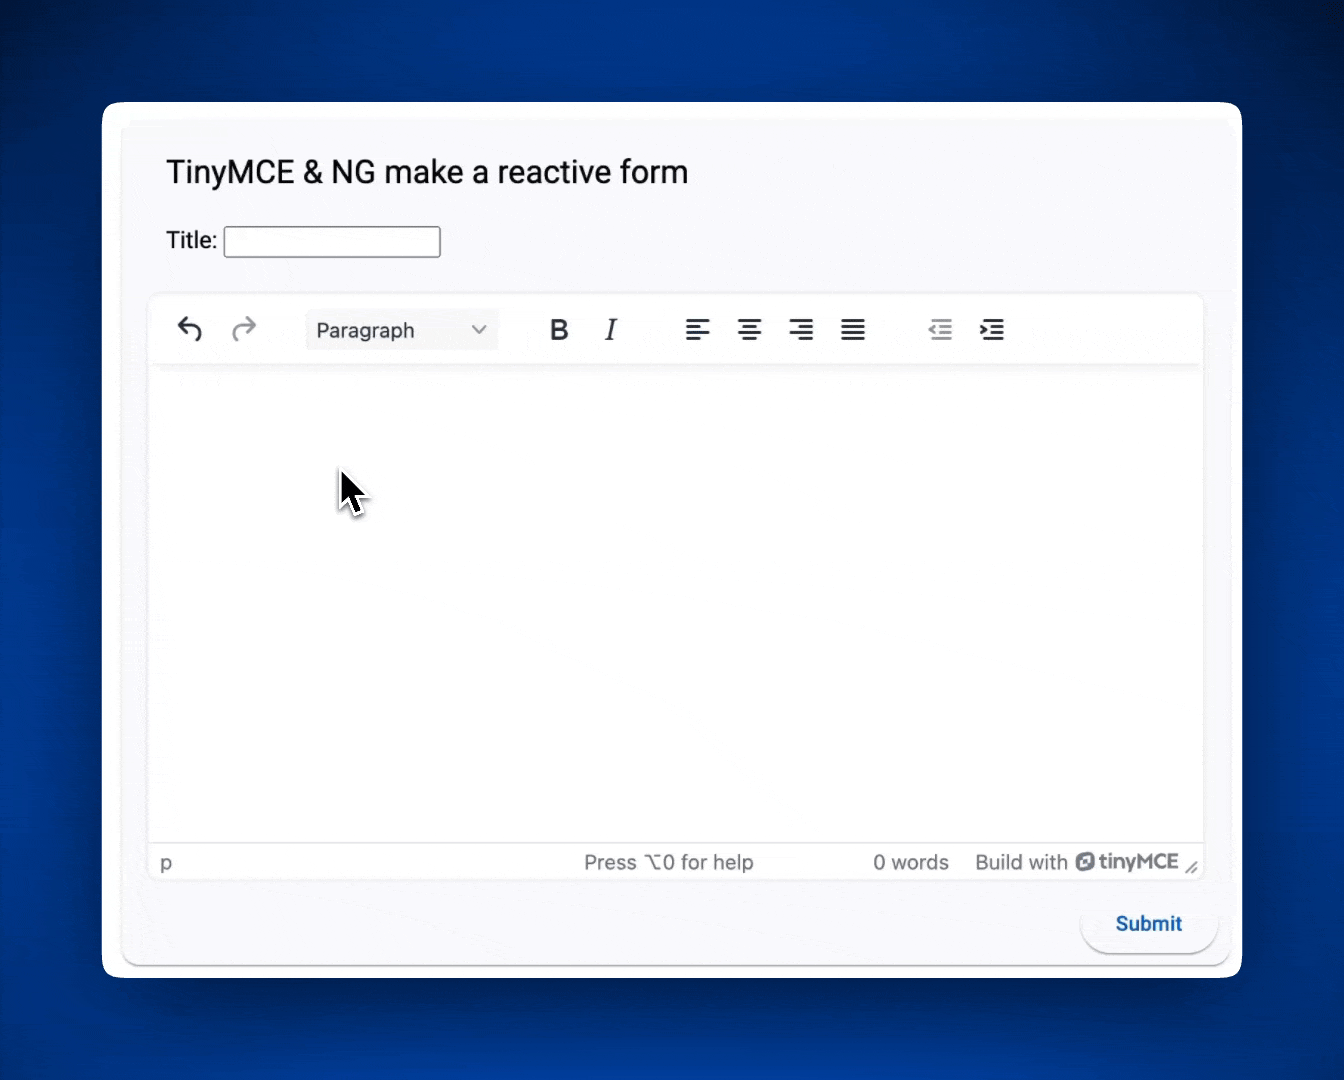
Add a button to app.component.html
Now that our button library is available to us, we can add it to our form. After we do, app.component.html looks like this:
<main class="main">
  <mat-card class="blog mat-elevation-z3">
    <mat-card-title>TinyMCE & NG make a reactive form</mat-card-title>
    <mat-card-content>
    <editor
      apiKey="no-api-key"
      [init]="{
        plugins: 'lists link image table code help wordcount',
        menubar: false,
        min_height: 150,
      }"
    ></editor>
  </mat-card-content>
  <mat-card-actions align="end">
    <button mat-raised-button>Submit</button>
  </mat-card-actions>
  </mat-card>
</main>

<router-outlet />Now we’ve successfully created a form and a submit button!
Step five: Make the form reactive
We have a form and a submit button, but neither does anything yet. Let’s make our Angular reactive form actually reactive.
Import ReactiveFormsModule and FormControl
As with all the other imports into app.component.ts, it’s easy to bring in FormControl and ReactiveFormsModule. These are the two necessary libraries we’ll need to complete our reactive form.
Then the Component export must be altered to use FormControl and update the title of our form. Now your app.component.ts file should be:
import { Component } from "@angular/core";
import { EditorModule } from "@tinymce/tinymce-angular";
import { RouterOutlet } from "@angular/router";
import { MatCardModule } from "@angular/material/card";
import { MatButtonModule } from "@angular/material/button";
import { FormControl, ReactiveFormsModule } from "@angular/forms";

@Component({
  selector: "app-root",
  standalone: true,
  imports: [
    RouterOutlet,
    EditorModule,
    MatCardModule,
    MatButtonModule,
    ReactiveFormsModule,
  ],
  templateUrl: "./app.component.html",
  styleUrl: "./app.component.css",
})
export class AppComponent {
  title = new FormControl("");
  updateTitle() {
    this.title.setValue("TinyMCE is awesome!");
  }
}
Add a reactive div to app.component.html
In app.component.html, between <mat-card-title> and <mat-card-content> you will:
- Create a
<div>that will hold a reactive Title field - Create an input field inside the
<div>that relates to theformControlactions
.....
<mat-card class="blog mat-elevation-z3">
      <mat-card-title>TinyMCE & NG make a reactive form</mat-card-title>
      <div id="title_container">
        <label for="title">Title: </label>
        <input id="title" type="text" formControlName="title">
      </div>
      <mat-card-content>
....Add the click action to the Submit button
To make sure that our Submit button corresponds to the code we wrote in app.component.ts, we need to bind it to updateTitle().
<mat-card-actions align="end">
    <button mat-raised-button (click)="updateTitle()">Submit</button>
</mat-card-actions>Now we know that the form can be reactive. Time to add TinyMCE to the form in step six.
Step six: Configure FormGroup
The next step is to change our form so that the TinyMCE editor’s input is part of the reactive form. To do this, we need to:
- Configure app.component.ts to create a new
FormGroupwith TinyMCE - Configure app.component.html to connect the
FormGroupactions to the form
Create a new FormGroup in app.component.ts
To create a new FormGroup and add our RTE to it, we’ll import FormGroup from @angular/forms and then alter AppComponent so that TinyMCE fits inside.
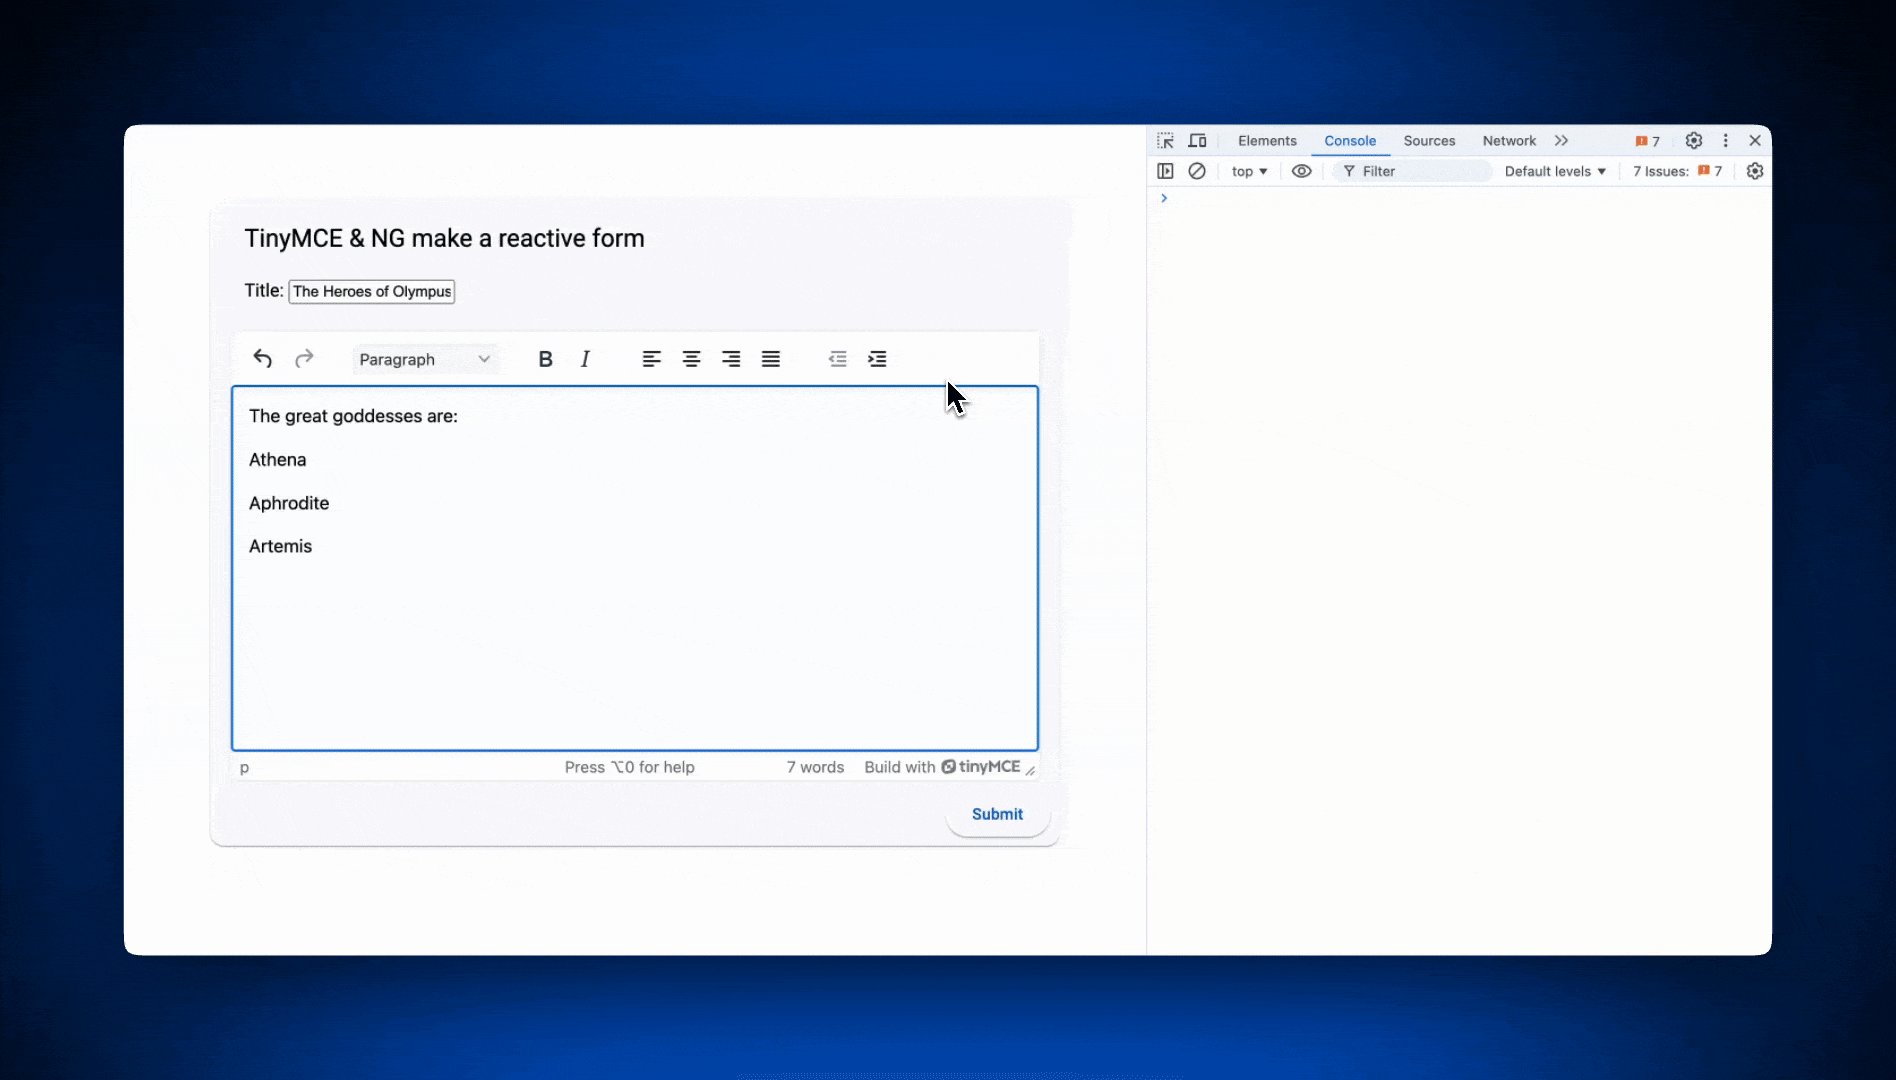
We also created an onSubmit() function that will record the form’s values for the title and body to the browser console when the Submit button is pressed. We’ll connect all of this in the app.component.html file next.
import { Component } from "@angular/core";
import { EditorModule } from "@tinymce/tinymce-angular";
import { RouterOutlet } from "@angular/router";
import { MatCardModule } from "@angular/material/card";
import { MatButtonModule } from "@angular/material/button";
import { FormGroup, FormControl, ReactiveFormsModule } from "@angular/forms";

@Component({
  selector: "app-root",
  standalone: true,
  imports: [
    RouterOutlet,
    EditorModule,
    MatCardModule,
    MatButtonModule,
    ReactiveFormsModule,
  ],
  templateUrl: "./app.component.html",
  styleUrl: "./app.component.css",
})
export class AppComponent {
  reactiveTinyForm = new FormGroup({
    title: new FormControl(""),
    body: new FormControl(""),
  });
  onSubmit() {
    console.warn(this.reactiveTinyForm.value);
  }
}
Alter app.component.html to accommodate the new form
First we need to create a FormGroup so that the title and body entered into our form will be logged in the console. That’s also where we point the ngSubmit action to our onSubmit() function.
[formControl]="title" becomes formControlName="title" in the input tag, and type="submit" is added to the Submit button at the bottom of the form. This is what it looks like:
<main class="main">
  <form [formGroup]="reactiveTinyForm" (ngSubmit)="onSubmit()">
    <mat-card class="blog mat-elevation-z3">
      <mat-card-title>TinyMCE & NG make a reactive form</mat-card-title>
      <div id="title_container">
        <label for="title">Title: </label>
        <input id="title" type="text" formControlName="title">
      </div>
      <mat-card-content>
        <editor
          apiKey="no-api-key"
          [init]="{
            plugins: 'lists link image table code help wordcount',
            menubar: false,
            min_height: 150,
            max_width: 650,
          }"
          formControlName="body"
        ></editor>
      </mat-card-content>
      <mat-card-actions align="end">
        <button mat-raised-button [disabled]="!reactiveTinyForm.valid">Submit</button>
      </mat-card-actions>
    </mat-card>
  </form>
</main>

<router-outlet></router-outlet>Now we have a form that logs input into the console.
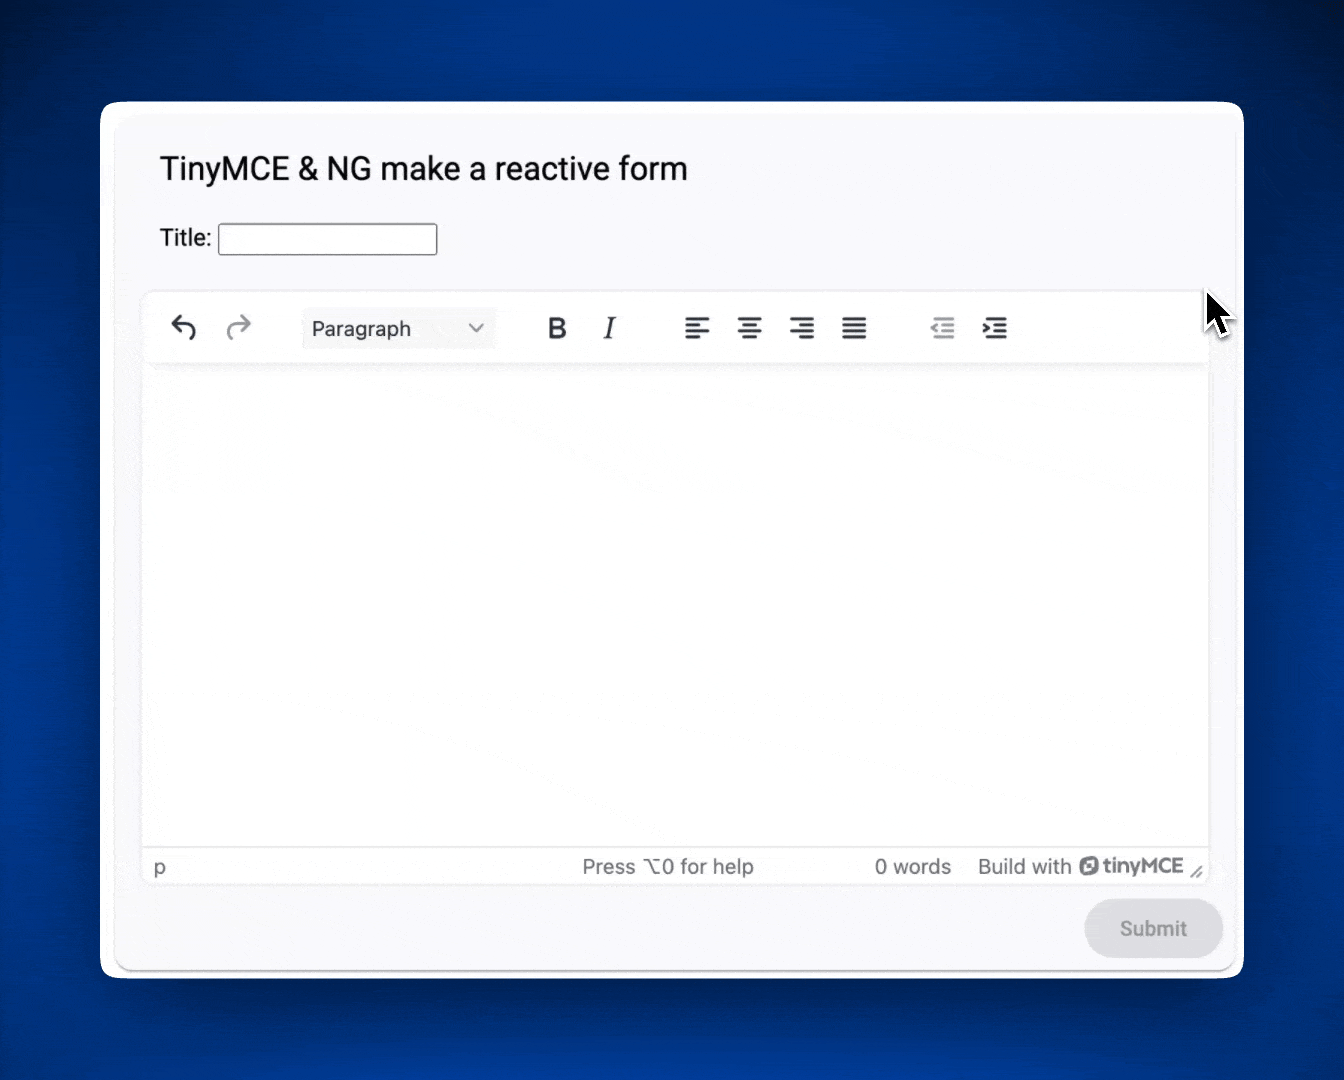
Final step: Validating reactive form input
Ideally, a user should not be able to submit an empty form. Right now, our reactive for will log an empty form into the console. We’ll add validation into the last step, which will fix that.
It’s easy to implement validation in an Angular reactive form in both app.component.ts and app.component.html. All you need to do is:
- Import the
Validatorsfrom@angular/formsto use in thetitleandbodyfields - Disable the Submit button in the form until there is content inside it
app.component.ts with added Validators
import { Component } from "@angular/core";
import { EditorModule } from "@tinymce/tinymce-angular";
import { RouterOutlet } from "@angular/router";
import { MatCardModule } from "@angular/material/card";
import { MatButtonModule } from "@angular/material/button";
import {
  Validators,
  FormGroup,
  FormControl,
  ReactiveFormsModule,
} from "@angular/forms";

@Component({
  selector: "app-root",
  standalone: true,
  imports: [
    RouterOutlet,
    EditorModule,
    MatCardModule,
    MatButtonModule,
    ReactiveFormsModule,
  ],
  templateUrl: "./app.component.html",
  styleUrl: "./app.component.css",
})
export class AppComponent {
  reactiveTinyForm = new FormGroup({
    title: new FormControl("", [Validators.required]),
    body: new FormControl("", [Validators.required]),
  });
  onSubmit() {
    console.warn(this.reactiveTinyForm.value);
  }
}
Configure the Submit button in app.component.html
You won’t need to change any other code in app.component.html besides the Submit button under mat-card-actions.
  <mat-card-actions align="end">
    <button mat-raised-button [disabled]="!reactiveTinyForm.valid">Submit</button>
</mat-card-actions>Now the Submit button will be disabled until both title and the body fields have been filled out.
Nice job! We have a beautiful Angular reactive form with powerful editing capabilities and rich text editing from TinyMCE.
What’s next with your Angular reactive form and TinyMCE?
You can now use your Angular reactive form with the world’s leading RTE together with a sleek Material look and custom input validation, anywhere you’d like. Customize your app.component.css file for any look you want. From here, the possibilities are endless.
If you haven’t already, check out the full range of TinyMCE rich text editor plugins and how they can help you provide the most productive editing experience for your users.
What are you doing with TinyMCE in Angular? Connect with TinyMCE on X (formerly Twitter) and let us know what you’re up to.


