


Attention to detail makes a workflow app better than your average Kanban board. It combines many small features and abilities – and adding up to something better, more useful, and productive.
If you’re building a workflow app, which features should be combined together to make that better, useful, and productive experience?
There’s the big three priorities: User Interface (UI), User Experience (UX), and Information Architecture. Following that, there’s knowing what framework to build on. Then there are the small components…
Don’t overlook the small components.
If they’re really contributing to the bigger picture, those small components help to carry the larger priorities. This is the exact role that TinyMCE plays – where it supports a larger tech stack, as a rich text editing component within the workflow app.
TinyMCE’s rich text editing capabilities have maintained the trust of more than 1.5 million developers worldwide. One reason for that is TinyMCE’s flexibility. You can combine different TinyMCE configurations to suit your workflow project. If you’re using TinyMCE Self-hosted, for instance, but you need access to TinyMCE’s premium plugins, you can combine self-hosting with TinyMCE Cloud.
That’s what this article explains – how to set up a combined TinyMCE Cloud and Self-hosted configuration, using the TinyMCE Workflow starter config, which contains all of the plugins and features common to a market-leading workflow platform.
Getting started with a workflow app
To get started, what you’ll need is a TinyMCE API key. To get your API key:
- Go directly to the sign up page to get your FREE API key
- Or check on the pricing plans for TinyMCE, and choose the plan that works for you.
For a workflow demo, this article adapts content from the TinyMCE workflow started config:
- Check on the workflow starter config for TinyMCE to find the code snippet you need to get started.
Adding your API key gives you a 14-day free trial (cloud or self-hosted) of TinyMCE plugins. If you're accessing TinyMCE through Tiny Cloud, your API key is also required to prevent the editor changing into read-only mode. Check on the API key documentation for further information.
Locating your FREE API key
Once you’ve navigated to the sign up page, you can create a TinyMCE account. The account page has a number of useful features, including a getting started config and the API key. The key is available within the top section of the account page.
Why use an API key? The key gives you 14 days FREE access to TinyMCE premium plugins, self-hosted or cloud. It's important for accessing Premium plugins in either deployment model.
The free trial begins when you use the key in your editor, and load it into a browser with Premium plugins configured in the tiny.init script. The key also prevents errors appearing in the textarea.
Be aware that if you change your configuration from self-hosted to Tiny Cloud, you'll need your API key added to your TinyMCE configuration to prevent the editor changing to read-only mode.
Getting the TinyMCE SDK for self-hosting
Self-hosting TinyMCE requires a copy of the SDK. You can download a copy, and reference the TinyMCE JavaScript file, by completing the following:
- Head to the Get TinyMCE page, and click on the Download TinyMCE SDK Now button
- Unzip the downloaded folder
- Set up a new folder inside your workstation environment, and place the TinyMCE unzipped file within the new folder.
Create your demo workflow project
In a workflow app, large tasks break into smaller tasks, which have their own specific screens. The demo workflow has a UI that matches a task screen
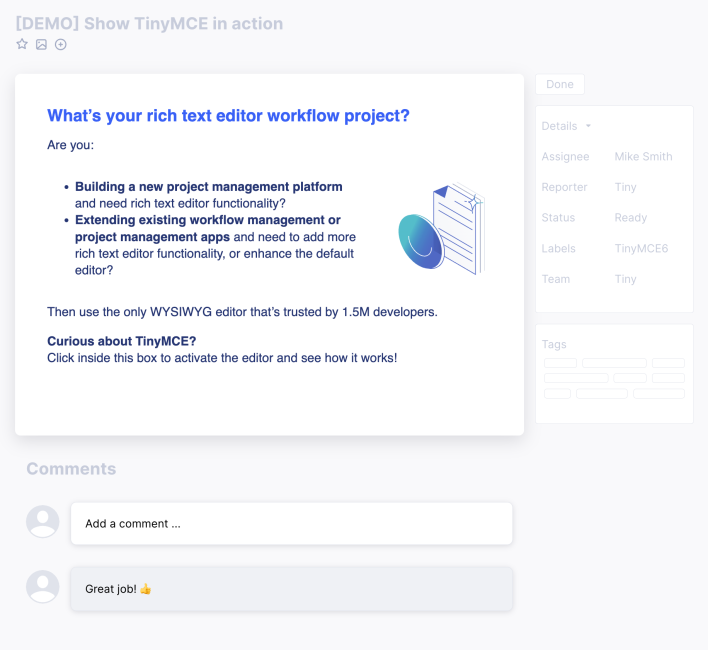
This would be something similar to what you would see in a Kanban board. There are two rich text editors in the config: a description text editor, and a comment box text editor.
The description editor has several functions included with TinyMCE’s premium plugins so your customers can express themselves. The comment editor has fewer toolbar options compared to the description editor to keep the experience minimal.
The button elements on the page are not connected to any functions. For an app in production, you would need to program save functionality that runs when customers press the button.
The demo project comes pre-configured with a combination of TinyMCE Cloud and Self-hosted premium plugins. And, if you have an existing workflow project, you can adapt these instructions to add-in TinyMCE, as a component to yout project
To get started:
- Create an index.html file inside the new folder you created on your workstation in the previous step on getting the TinyMCE SDK folder
- Copy the following workflow demo HTML into your index file. The content is drawn directly from the TinyMCE workflow and collaboration platform solution:
<!doctype html>
<html>
<head>
  <meta charset="utf-8">
  <title>TinyMCE Workflow Starter Config</title>
  <meta name="viewport" content="width=device-width, initial-scale=1">
  <script>
    let commonConfig = {
      plugins: "advcode advtable autocorrect autolink checklist codesample editimage emoticons image link linkchecker lists media mediaembed powerpaste table tinymcespellchecker",
      menubar: false,
    }
      toolbar: "blocks | bold italic forecolor backcolor | numlist bullist checklist | link image emoticons table codesample hr blockquote | code ",
      setup: (editor) => {
        editor.on('focus', () => {
          document.getElementById('editor-description-wrap').classList.add('enabled');
        });
      },

      ...commonConfig,
    });

    tinymce.init({
      selector: "#editor-comment-content",
      toolbar: "bold italic forecolor backcolor | numlist bullist | link image emoticons codesample blockquote ",

      setup: (editor) => {
          editor.on('focus', () => {
            document.getElementById('editor-comment-wrap').classList.add('enabled');
          });
        },
      ...commonConfig,
    });

    function save(id) {
      document.getElementById(id).classList.remove('enabled');
    }

  </script>
  </head>
<body>
  <main>
  </main>
</body>-
Reference the TinyMCE folder in a script tag inside the document head section
This tag will get the self-hosted config started:
<script src="/path/to/tinymce/tinymce.min.js"></script>
Configure the CDN link and API key
-
Copy the config script, and paste it into the head section of your index.html file directly after the path to the tinymce.min.js file reference:
  <script>
    let commonConfig = {
      plugins: "advcode advtable autocorrect autolink checklist codesample editimage emoticons image link linkchecker lists media mediaembed powerpaste table tinymcespellchecker",
      menubar: false,
      inline: true,
      toolbar_persist: true,
      object_resizing: false,
      spellchecker_language: 'en',
      spellchecker_active: true
    }
      toolbar: "blocks | bold italic forecolor backcolor | numlist bullist checklist | link image emoticons table codesample hr blockquote | code ",
      fixed_toolbar_container: '#editor-description-toolbar',
      placeholder: "Add a description",
      editimage_toolbar: "rotateleft rotateright",
      setup: (editor) => {
        editor.on('focus', () => {
          document.getElementById('editor-description-wrap').classList.add('enabled');
        });
      },

      ...commonConfig,
    });

    tinymce.init({
      selector: "#editor-comment-content",
      toolbar: "bold italic forecolor backcolor | numlist bullist | link image emoticons codesample blockquote ",
      placeholder: "Add a comment...",
      fixed_toolbar_container: '#editor-comment-toolbar',

      setup: (editor) => {
          editor.on('focus', () => {
            document.getElementById('editor-comment-wrap').classList.add('enabled');
          });
        },
      ...commonConfig,
    });

    function save(id) {
      document.getElementById(id).classList.remove('enabled');
    }

</script>This TinyMCE init script has more than one editor – the description editor and the comment editor. At the same time, there are plugin features that both editors need. Instead of repeating the same plugin features, the config contains a specific set of methods that allow plugin features needed for both elements to load across both editors.
This is what’s called a common config.
The “commonConfig” option specified at the end of each individual tinymce init for the description and editor code loads the plugin features needed for both elements.
-
Paste the CDN script before the tinymce.init script in your index.html file:
<script src="https://cdn.tiny.cloud/1/no-api-key/tinymce/6/plugins.min.js" referrerpolicy="origin"></script>
-
Change the “your-api-key”, replacing it with your own API key.
-
Save the changes.
Configure the workflow app interface
-
Copy the following style tag content, and paste it into your index.html file after the TinyMCE Self host CDN scripts:
<style>
        body {
            font-family: -apple-system, BlinkMacSystemFont, 'Segoe UI', Roboto, Oxygen-Sans, Ubuntu, Cantarell, 'Helvetica Neue', Helvetica, Arial, sans-serif;
        }

        main {
            max-width: 720px;
            margin: auto;
        }

        .editor-wrap.enabled {
            border-radius: 3px;
            border: 1px solid #ccc;
        }

        .editor-content {
            transition: min-height .25s, padding-bottom .25s;
            min-height: 0;
            outline: none;
            border-radius: 1px;
            transition: box-shadow .15s, background-color .15s;
        }

        .editor-content>*:first-child {
            margin-top: 0;
        }

        .editor-content>*:last-child {
            margin-bottom: 0;
        }

        .editor-wrap#editor-description-wrap:hover:not(.enabled) .editor-content {
            background-color: #efefef;
            box-shadow: 0 0 0 6px #efefef;
        }

        .editor-wrap.enabled .editor-content {
            min-height: 140px;
            padding: 1rem;
        }

        .editor-toolbar {
            padding: 3px;
            display: none;
            border-bottom: 1px solid #ccc;
            z-index: 1;
        }

        .editor-wrap.enabled .editor-toolbar {
            display: block;
        }

        .editor-footer {
            margin: 1rem;
            display: none;
            padding-top: .5rem;
        }

        .editor-wrap.enabled .editor-footer {
            display: block;
        }

        .editor-save-btn {
            background: #207ab7;
            font-size: 16px;
            font-weight: bold;
            color: #fff;
            border: none;
            outline: none;
            height: 34px;
            line-height-step: 34px;
            padding: 0 16px;
            border-radius: 4px;
            margin: 0;
            -webkit-tap-highlight-color: rgba(0, 0, 0, 0);
            -webkit-user-select: none;
        }

        .editor-cancel-btn {
            background: #dfe3ec;
            font-size: 16px;
            font-weight: bold;
            color: #17224f;
            border: none;
            outline: none;
            height: 34px;
            line-height-step: 34px;
            padding: 0 16px;
            border-radius: 4px;
            margin: 0;
            -webkit-tap-highlight-color: rgba(0, 0, 0, 0);
            -webkit-user-select: none;
        }

        .editor-label {
            font-size: 19px;
            margin: 2rem 0 1rem;
            display: block;
            border-bottom: 1px solid #dfe3ec;
        }

        .comment {
            display: flex;
        }

        .avatar {
            background-color: #ff9999;
            color: #17224f;
            font-size: 18px;
            font-weight: bold;
            border-radius: 100px;
            width: 42px;
            height: 42px;
            line-height: 42px;
            text-align: center;
            margin-right: 8px;
        }

        .editor-wrap#editor-comment-wrap {
            padding: 1rem;
        }

        .editor-wrap#editor-comment-wrap .editor-content {
            padding: 1rem;
        }
        /* and not namespaced to `.editor-content` */

        .componentBorder {
            border: 1px solid #ccc;
            border-radius: 3px;
            padding: 0.01rem;
            flex-grow: 1;
            position: relative;
            width: 900px;
        }

        a,
        a:link {
            color: blue;
        }

        a:visited {
            color: purple;
        }

        a:hover {
            color: green;
        }

        a:active {
            color: red;
        }

        h1 {
            font-size: 1.75rem;
            font-weight: strong;
        }

        h2 {
            font-size: 1.5rem;
            font-weight: strong;
        }

        h3 {
            font-size: 1rem;
            font-weight: strong;
        }

        hr {
            margin: 1.5rem 0;
            padding: .5rem 0;
            border: 0;
        }

        hr::after {
            content: '';
            display: block;
            border-width: 0 0 1px 0;
            border-color: #ccc;
            border-style: solid;
        }

        img {
            max-width: 100%;
            height: auto;
        }

        .tox.tox-tinymce-aux .tox-toolbar__overflow {
            background-color: #fff !important;
        }
</style>-
Update the HTML content by copying the following configuration into your demo file between the body tags:
<div class="componentBorder">
    <main>
        <label class="editor-label">Description</label>
        <div class="editor-wrap" id="editor-description-wrap">
            <div class="editor-toolbar" id="editor-description-toolbar"></div>
            <div class="editor-content" id="editor-description-content">
                <h2><strong>What’s your rich text editor </strong><strong>workflow</strong><strong> project? </strong></h2>
                <p>Are you…</p>
                <ul>
                    <li><strong>Building a new workflow or project management platform</strong> and need to add rich text editing functionality?</li>
                    <li><strong>Extending your existing workflow or project management app</strong> and need to enhance your default editor?</li>
                </ul>
                <p>Then use the only WYSIWYG editor that’s trusted by 1.5M developers.</p>
                <h3><strong>Curious about TinyMCE?</strong></h3>
                <p>Click inside this box to activate the editor and see how it works!</p>
            </div>
            <footer class="editor-footer">
                <button type="button" id="save-description-btn" onclick="save('editor-description-wrap')" class="editor-save-btn">Save</button>
                <button type="button" onclick="alert('Your own custom save function')" class="editor-cancel-btn">Cancel</button>
            </footer>
        </div>

        <label class="editor-label">Comments</label>
        <div class="comment">
            <div class="avatar">FD</div>
            <div class="editor-wrap" id="editor-comment-wrap">
                <div class="editor-toolbar" id="editor-comment-toolbar"></div>
                <div class="editor-content" id="editor-comment-content"></div>
                <footer class="editor-footer">
                    <button type="button" id="save-description-btn" onclick="save('editor-comment-wrap')" class="editor-save-btn">Save</button>
                    <button type="button" onclick="alert('Your own custom cancel function')" class="editor-cancel-btn">Cancel</button>
                </footer>
            </div>
        </div>
    </main>
   </div>
</body>Save the changes, and load the demo in your browser:
Need more workflow information?
To find more information, you can read through the workflow page sections. The workflow starter config comes with HTML comments, to explain what each aspect of the configuration does to support the larger workflow app.
Signing up for a FREE rich text editor API key gives you access to Premium plugin functionality for 14 days-in the cloud or on your own servers. After this time, you’ll need to consider which plan is suitable for your uses, and if your workflow application would benefit from the Premium plugin functionality. And, while you’re in your 14-day free trial period (or after you’ve signed up for a paid plan), you can contact support if you have any questions on adding TinyMCE to your workflow app.


