A basic textarea tag in a website is useful, up until the point when you need to vary and style text area content. Then, CSS comes to mind as a solution, but if you need something that can change dynamically as customers type into your app’s textarea, complex CSS rules are not the best practice, nor are they effective. Scale issues and time spent creating a solution with JavaScript, HTML, and CSS can impact your planning and budgets.
But there is an easier pathway to style text areas. Instead, adopt a component into your app that can stand in for a basic textarea, and replace it with a diverse collection of text style options. Sounds good? With TinyMCE as your editor component, it’s a straightforward process to integrate the editor and start experimenting with text area style. This article explains how to do it. Let’s begin.
Basic text styling
To try out the basic text styling in the following paragraphs, the following TinyMCE demo can be set up on your development workstation, and then run with a local server with Python or with the PHP command.
First, you need an API key. This key gives you free access to TinyMCE Premium plugins for 14 days. Navigate to the Get-tiny sign up page to get your FREE API key.
You can sign up for an API key, and access advanced typography options using premium plugins. Your API key comes with 14 days free access to Premium plugins, and all TinyMCE skin and icon packs so you can experiment with text area style and find what you need, much faster.
-
Create an index.html file.
-
With your file open, in the head section, add script tags, and reference TinyMCE Cloud through a CDN link within the script tags. This is what the link looks like:
<script
  src="https://cdn.tiny.cloud/1/your-api-key/tinymce/6/tinymce.min.js"
  referrerpolicy="origin"
></script>;
-
Add the following JavaScript and HTML to complete the demo:
<script>
   tinymce.init({
   selector: '#editor',
   plugins: 'powerpaste casechange searchreplace autolink directionality advcode visualblocks visualchars image link media mediaembed codesample table charmap pagebreak nonbreaking anchor tableofcontents insertdatetime advlist lists checklist wordcount tinymcespellchecker editimage help formatpainter permanentpen charmap linkchecker emoticons advtable export autosave',
   toolbar: 'undo redo formatpainter | blocks fontfamily fontsize | bold italic underline forecolor backcolor | alignleft aligncenter alignright alignjustify lineheight | removeformat',
   height: '700px'
       });
</script>

<body>
  <h1>TinyMCE Quick Start Guide</h1>
  <form id="post">
    <textarea id="editor">Hello, World!</textarea>
  </form>
</body>If you’d like to see something closer to how TinyMCE looks in production, check on the following demo:
With those three steps done, a good starting point to style text areas is fonts.
Style text areas with fonts
First include fonts in the TinyMCE menubar so you can access them easily:
-
Clear up the editor’s UI by switching off the menubar, and moving the toolbar to the base of the editor – this places emphasis on what you need to style text areas, and not the toolbar, as the text is the first thing visible:
        tinymce.init({
        selector: '#editor',
        plugins: 'powerpaste casechange searchreplace autolink directionality advcode visualblocks visualchars image link media mediaembed codesample table charmap pagebreak nonbreaking anchor tableofcontents insertdatetime advlist lists checklist wordcount tinymcespellchecker editimage help formatpainter permanentpen charmap linkchecker emoticons advtable export autosave',
        menubar: false,
        toolbar: 'undo redo formatpainter | blocks fontfamily fontsize | bold italic underline forecolor backcolor | alignleft aligncenter alignright alignjustify lineheight | removeformat',
        toolbar_location: 'bottom',
…-
Add some more options to the font sizes by including the following list in the configuration:
font_size_formats: "8pt 10pt 12pt 14pt 16pt 18pt 24pt 36pt 48pt";
-
To customize fonts, including adding your own selection of fonts, use the font_css and font_family_formats options together. The following example links to some Google fonts (You can access and import Google fonts from the fonts.google website – click “view selected families” to check on your collected fonts):
//Font Text Area Style
font_css: '@import url("https://fonts.googleapis.com/css2?family=Open+Sans&family=Roboto&display=swap");',
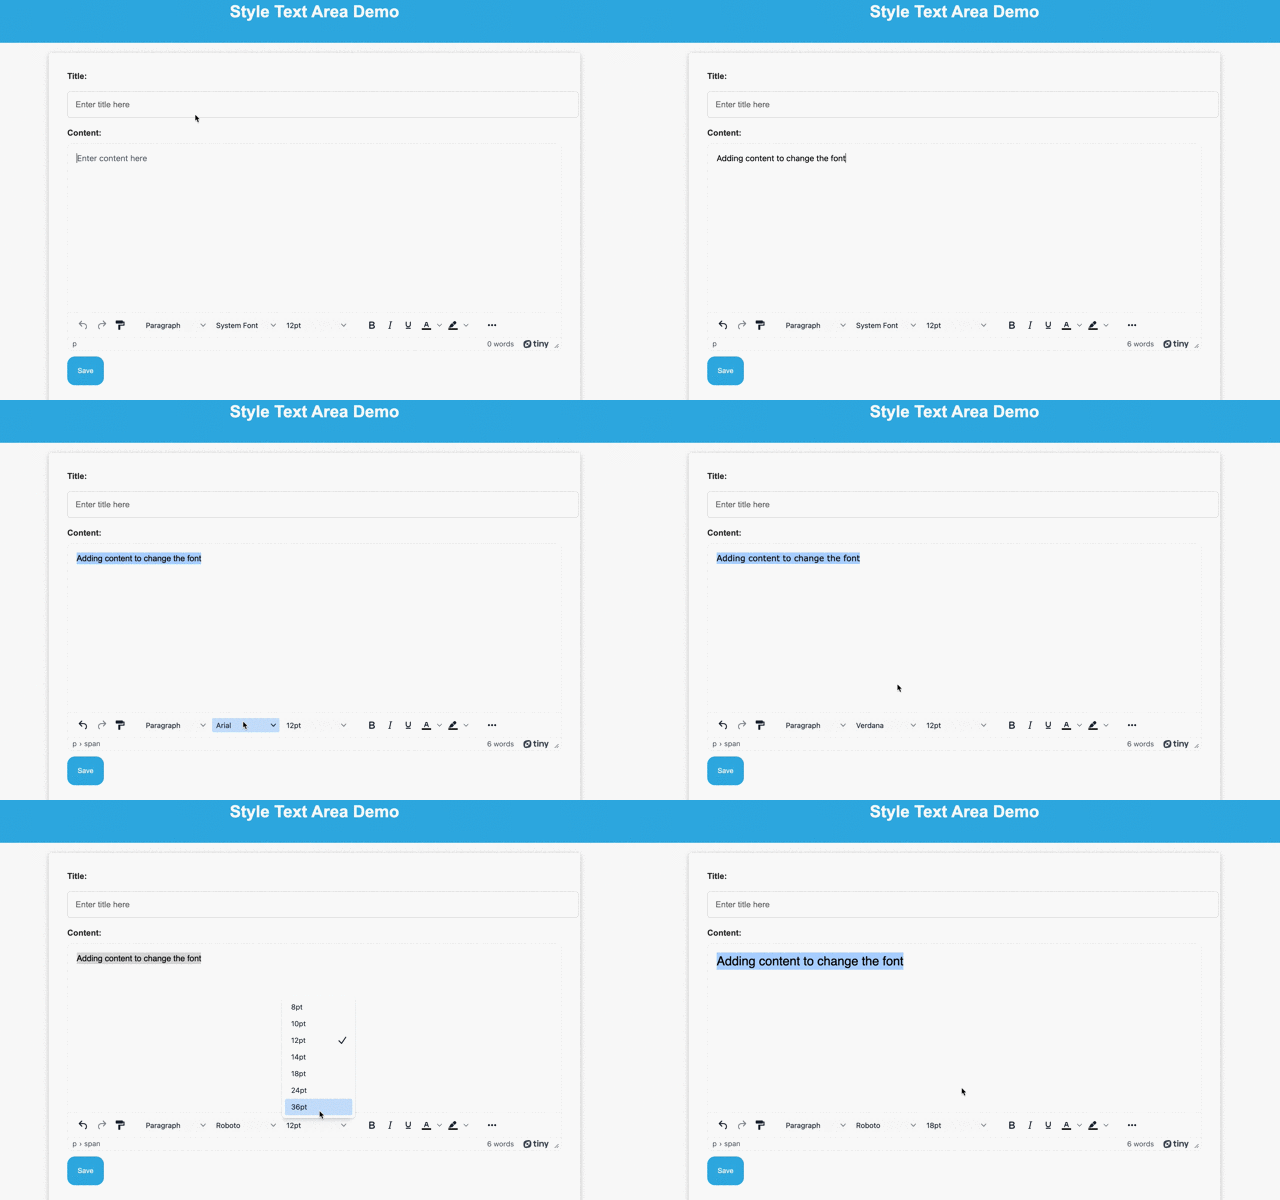
font_family_formats: 'Andale Mono=andale mono,times; Arial=arial,helvetica,sans-serif; Arial Black=arial black,avant garde; Book Antiqua=book antiqua,palatino; Courier New=courier new,courier; Georgia=georgia,palatino; Helvetica=helvetica; Impact=impact,chicago; Symbol=symbol; Tahoma=tahoma,arial,helvetica,sans-serif; Terminal=terminal,monaco; Times New Roman=times new roman,times; Trebuchet MS=trebuchet ms,geneva; Verdana=verdana,geneva; Open Sans=open sans,sans-serif; Roboto=roboto,regular,sans-serif;'After you save the changes, you can style text area content with different fonts in your demo with TinyMCE:

Style text area with color
To change the colors of the text you’re entering into the text area, there are several options you can configure:
- color_cols – An option used to adjust the number of columns displayed in the TinyMCE color picker
- color_map – used to configure the exact colors you’d like to appear in the color map
- hilitecolor – You can use this format option to set up a specific color for the text highlighter
- custom_colors – this is an option that accepts a true or false value to turn on or off the ability to make custom colors for the text.
Here’s how some of the options (namely color_cols and color_map) work in practice:
-
Add the color_cols and color_map options to the TinyMCE configuration:
//Color Text Area Style
        color_cols: ,
        color_map: [
],-
Configure the number of columns and the specific colors for your text area style. Here’s one example to try out:
//Color Text Area Style
        color_cols: 6,
        color_map: [
            '#F0F8FF', 'aliceblue',
            '#FAEBD7', 'antiquewhite',
            '#F0FFFF', 'azure',
            '#FFEBCD', 'blanchedalmond',
            '#DEB887', 'burlywood',
            '#7FFF00', 'chartreuse',
            '#DC143C', 'crimson',
],-
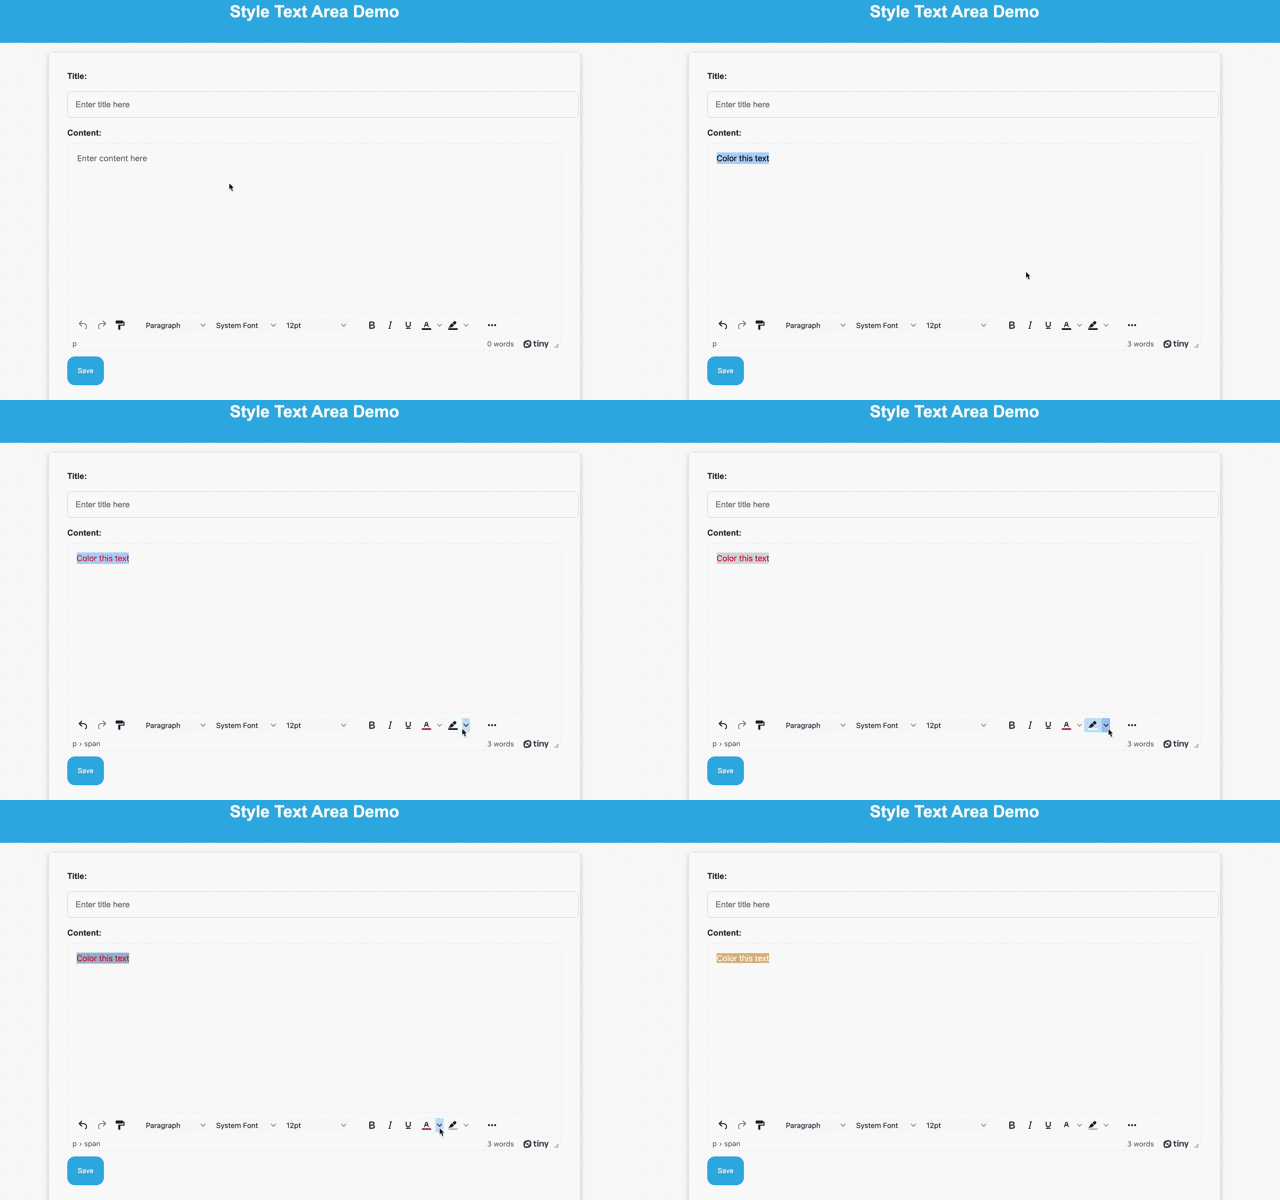
Save the changes and give the color options a test run:

Style text with alignment and text layout
In TinyMCE, styling text through alignment is made easier with the “align” options clearly placed on the default toolbar. You can create layouts by making use of blocks. The default blocks available include:
- Paragraph
- Headings
- Preformatted
Here’s how to make some adjustments to the Alignment and Text Layout options:
-
Move the alignment options to up the toolbar for easier viewing:
toolbar: 'undo redo formatpainter | alignleft aligncenter alignright alignjustify | blocks fontfamily fontsize | bold italic underline forecolor backcolor | lineheight | removeformat',-
Add the visual blocks plugin to the toolbar. This plugin helps with text area style by revealing the block layouts:
toolbar: 'undo redo formatpainter | visualblocks | alignleft aligncenter alignright alignjustify | blocks fontfamily fontsize | bold italic underline forecolor backcolor | lineheight | removeformat',-
Add the block_formats option, and include the “code” HTML tag in the list of options:
//Alignment and Layout for Text Area Style
block_formats: "Paragraph=p; Header 1=h1; Header 2=h2; Header 3=h3; Code=code";
-
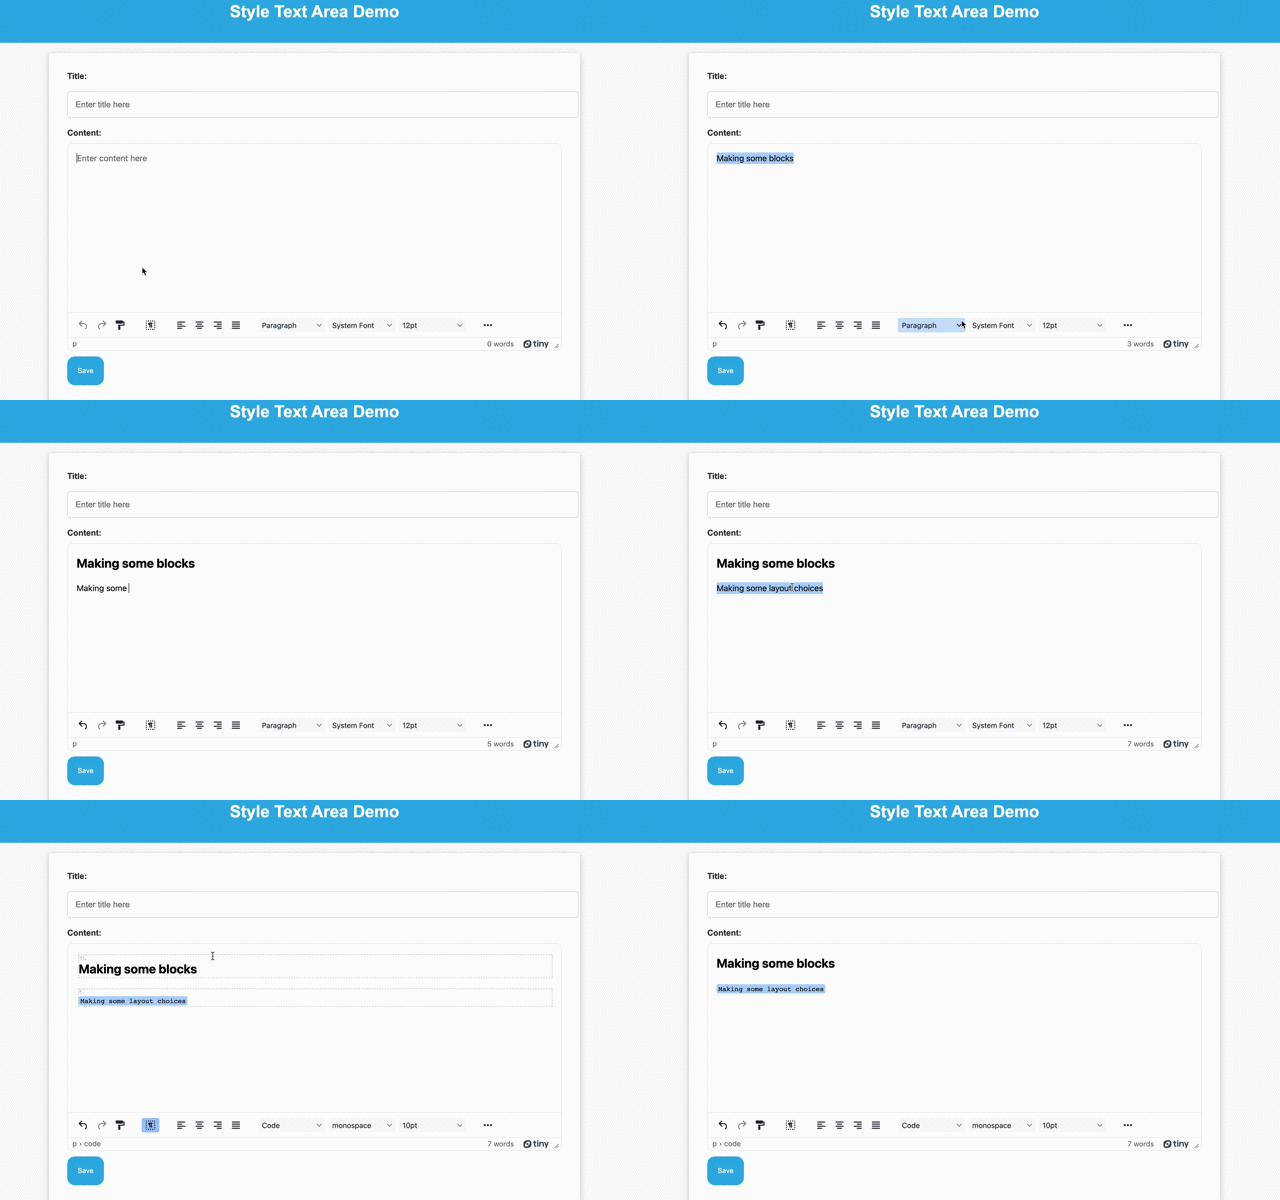
Save the changes, and then experiment with the alignment and layouts:

Style text areas with more customization
These are some of the essential methods for customizing and modifying the text area style options available with TinyMCE. But there is much more available for you to set up different styles and looks for your customers to try out in your app. For instance:
- Configure the visual blocks plugin further to better fit your needs
- Create a custom skin and icon set for the text area
- Add text animation effects
There’s a diverse world of possibilities out there, and you can reach out to us to talk about how TinyMCE can work in your application.
