


If you need to clearly see HTML elements when you’re working on content inside a rich text editor, the TinyMCE Visual Blocks plugin highlights block level elements. It’s one of our Open Source plugins – and when it’s activated, it gives you more information about the structure, or Document Tree, of any HTML content inside the WYSIWYG editor area.
If you have a web application or website that requires end users to enter HTML inside a WYSIWYG, the Visual Blocks plugin can help your users understand the structure of their content, and see which elements are nested within others.
What can Visual Blocks do for a WYSIWYG editor?
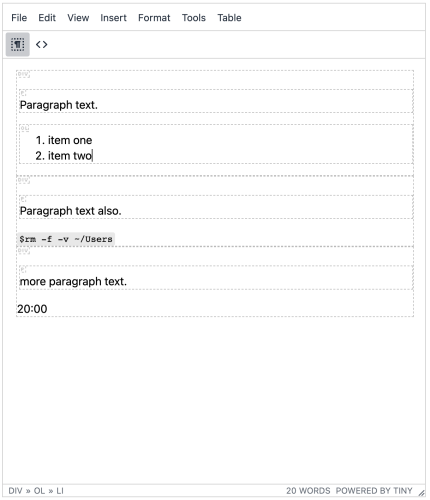
When activated, the plugin shows both parent elements and their child elements, neatly arranged in boxes with dotted borders. The elements also receive a small label in the top left corner of the visual blocks – for easier identification.
As an example, the following parent div element and it’s paragraph and ordered list child elements are highlighted with the Visual Blocks plugin switched on from the Toolbar.
It’s important to note that the Visual Blocks plugin only highlights HTML tags that ordinarily appear inside the ags of a web page:
- Divs
- Spans and Paragraphs
- Formatted and Unformatted lists
It does not highlight bold, italics, code, or other style tags, such as date and time, that ordinarily appear inside paragraph or span tags.
If you have the style attribute applied to one or more of your HTML elements, the visual blocks view works around the styling. For example, a border and background color for a div element in our example fits seamlessly alongside the visual blocks border:
It works well with the code plugin. You can see the rich text editor html elements inside the text area, and then switch over to the code plugin dialog to adjust and change the elements as needed.
Adding Visual Blocks to your WYSIWYG editor
When you’re taking your WYSIWYG editor online, the Visual Blocks plugin follows the same few steps as incorporating TinyMCE’s other plugins:
- Access your website or web applications html index file.
- Copy in the TinyMCE CDN script and the
tinymce.initscript, with your API key. This information is found in your TinyMCE account after you Log in. - Check on the Plugins array inside the tinymce.init script. Make sure that
visualblocksandcodeare typed into the array. - Load your application, and confirm that the WYSIWYG html renders in your browser.
After you have added the plugin to your WYSIWYG editor, you can click on the Visual Blocks icon to switch the view on and off.
You can even configure the plugin to be available by default (if it’s needed) for your project. In the tinymce.init script, add a new line with the visualblocks_default_state: true option, and then save and reload the application.
Switching Visual Blocks on outside the WYSIWYG
But what if your web application or website doesn’t need the TinyMCE toolbar and menubar? Or if the User Experience design means that the toolbar and menubar would break the interface?
It’s possible to configure the Visual Blocks plugin with user actions or browser events outside the WYSIWYG. All you need to get this working is to use the tinymce.activeEditor.execCommand('mceVisualBlocks'); segment of JavaScript inside a function.
Here’s how to toggle the Visual Blocks plugin using a button element:
- Set the toolbar and menubar arrays to
falsesince they are not needed in this example. - Outside your WYSIWYG html, set up a button tag with an onclick event:
<button onclick="visualblocktoggle()">Visualblocks Switch<button>
- Inside your websites head tags, set up script tags with a function inside:
function visualblocktoggle() {}
Make sure that you make the function name the same as the name used in the onclick event in the button tags.
- Paste in the TinyMCE Visual Block JavaScript into the new function:
function visualblocktoggle() {
  tinymce.activeEditor.execCommand("mceVisualBlocks");
}
- Open the file in a browser, and test out the button to make sure the onclick button and function are working.
Here’s the results from a test run. The CSS styling was adapted from a freecodecamp tutorial about JavaScript onclick events:
You can try out the Visual Blocks plugin right now – follow the TinyMCE Quickstart Guide, and contact us if you need further information.
If you’d like to read more about our Open Source plugins, and what goes into developing them, check out the TinyMCE project on Github.


