


Text animation, like most front end animation, comes with a significant list of requirements. First, the timing of the animation must fall within a specific range of milliseconds to maximize usability. Then, there are specific CSS classes to choose and implement, and adding one library after another to your list of requirements.
If your aim is to animate text in a WYSIWYG, then instead of setting up something complex with CSS and JavaScript, why not incorporate a WYSIWYG with time saving features that can run text animation?
TinyMCE is the WYSIWYG favored by developers worldwide – it’s downloaded 300,000+ times per week, for its features. And this article explains how to set up text animation inside the TinyMCE text area. Let’s begin…
What is text animation?
Text animation is when text on a website changes its appearance or position over a period of time. In some cases, objects that move around or near the text fall into the text animation category, like a blinking cursor. Text animation can include:
- Movement up and down, or left and right.
- Changing color, or transparency
- Shifting and changing font and distance between letters on the page
If any of these text animation use cases are what you’re looking for, read on to see how they work within TinyMCE.
Types of text animation
Text animation is made possible through the languages that support browsers:
1. HTML text animation
On its own, HTML is not known for producing text animation unless it’s combined with CSS. The HTML holds the classes that the CSS animation works, which brings your design to life. In your CSS design, it is important to keep the HTML of the page in mind.
2. CSS text animation
CSS controls the style of animation across time, which means that as time moves forward, the CSS changes the style of the text – creating movement, color change, etc.
While the animation property is essential for CSS text animation, an essential CSS rule is @keyframes. It controls intermediate steps in the animation cycle and also defines what the animation should look like at each step of the animation. The Mozilla documentation has a useful starting point for CSS text animation.
3. Javascript text animation
Text animation is also possible with JavaScript, combined with CSS, even without any HTML. One example is this interactive text animation created by Jenny B Kowalski. The JavaScript creates the HTML, and manipulates it:
This JavaScript text animation example dynamically changes the font size when the mouse X position on the page changes.
Text animation examples
The following examples of essential text animation are developed by Alvaro Trigo, who designed the following text animations. They give a glimpse into what’s possible with text animation, especially if you need text to animation continuously in a loop:
- This “Hey” Text expands and shrinks on a loop
- The gradient of text animation changing on a loop
- A wave text animation effect also on a loop
Another example of modifying text in the TinyMCE WYSIWYG is text modification with glowing text animation effects. This article on glowing and neon fonts in TinyMCE is a good place to start.
How to create text animation in your WYSIWYG editor
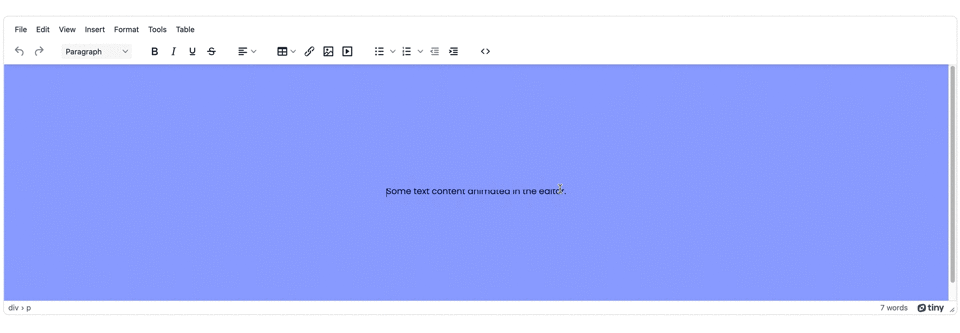
As an example, here’s how the wave text animation would work in a TinyMCE example. You can follow along with this short tutorial, with the demo available at the end:
-
Create an index.html file in your development environment
-
Add the following TinyMCE demo template based on the CMS Solution page:
  <script src="https://cdn.tiny.cloud/1/no-api-key/tinymce/6/tinymce.min.js" referrerpolicy="origin"></script>

        <script>
            tinymce.init({
                selector: 'textarea',
                plugins: 'a11ychecker code advlist advtable anchor autocorrect autosave editimage image link linkchecker lists media mediaembed pageembed powerpaste searchreplace table tinymcespellchecker typography visualblocks wordcount',
                toolbar: 'undo redo | styles | bold italic underline strikethrough | align | table link image media pageembed | bullist numlist outdent indent | spellcheckdialog a11ycheck typography code',
                height: 540,
                a11ychecker_level: 'aaa',
                typography_langs: ['en-US'],
                typography_default_lang: 'en-US',
                object_resizing: false,
                image_caption: true,
                style_formats: [
                  {title: 'Heading 1', block: 'h1'},
                  {title: 'Heading 2', block: 'h2'},
                  {title: 'Paragraph', block: 'p'},
                ],
                content_style: `
</head>
    <body>
        <form method="post">
            <textarea>
                <div class="content">
                    <p>Some text content animated in the editor.</p>
                </div>
            </textarea>
</form>The TinyMCE above demo template has no API key, and cannot access premium features. You can sign up for an API key using Google and GitHub accounts, and when you sign up for an API key, you get 14 days FREE access to Premium TinyMCE plugins, like those found in the demo. The API key also removes the domain name warning in the text area.
-
Add the following CSS to the content_style option in the TinyMCE configuration (adapted from the work done by Trigo):
                content_style: `
                @import url("https://fonts.googleapis.com/css?family=Poppins:100,200,300,400,500,600,700,800,900");
                * {
              margin: 0;
                  padding: 0;
                  box-sizing: border-box;
                  font-family: "Poppins", sans-serif;
                }
                body {
                    display: flex;
                    background: #99aeff;
                    min-height: 100vh;
                    align-items: center;
                    justify-content: center;
                }

                .content {
                    position: relative;
                }

                .content {
                    color: #17224f;
                    animation: animate 4s ease-in-out infinite;
                }

                @keyframes animate {
                    0%,
                    100% {
                      clip-path: polygon(
                        0% 25%,
                        16% 24%,
                        33% 30%,
                        54% 40%,
                        70% 41%,
                        84% 39%,
                        100% 32%,
                        100% 100%,
                        0% 100%
                        );
                      }

                    50% {
                     clip-path: polygon(
                        0% 40%,
                        15% 45%,
                        34% 46%,
                        51% 42%,
                        67% 30%,
                        84% 25%,
                        100% 36%,
                        100% 100%,
                        0% 100%
                        );
                      }
                    }
                    `
});-
Save the changes, and try out the demo in a browser. You can use the Python command to test out the demo as something closer to production, or the PHP command as well:
Text animation possibilities
There’s even more you can do with TinyMCE and text animations in your app, and the procedures above are just the start. If you’re looking for more information on TinyMCE, or design, or CMS content, check on some of the other articles you can find here:
- Different editing modes with TinyMCE for different requirements
- Best landing page elements for your front end content
- Custom, seasonal skins for TinyMCE
The demos created by developers like Kowalski and Trigo are strong examples of text animation that you can look at closely to start planning, or expanding, your own text animation designs. And, of course, you can incorporate those different possibilities for text animation into your editor with TinyMCE.


