


Templates make building content faster and easier. So given that, it’s confusing why some rich text editors don’t offer this powerful functionality. Perhaps, control is the obstacle. TinyMCE’s new Multi-Root Editing capability overcomes that issue.
Ideally what you need is a rich text editor that gives you control as well as the ability to create visually stunning HTML documents, emails and other types of content with various editable (and non-editable) areas, right inside a single editor UI.
For example, imagine that you could create, within the one editor, an entire email with a static, non-editable header and footer, and an editable body. TinyMCE rich text editor now has that exact new capability with the editable_root option. This new configuration option in TinyMCE 6.5, allows you to create document templates without needing to configure an editor for each editable document section – a concept known as Multi-Root Editing.
It’s also useful in more complex, collaborative content workflows. When you use Multi-Root Editing to create templated content, the creation process becomes more visual within the UI (and the end results are more stunning). The UX is more satisfying and significant time is saved.
This post explains the new Multi-Root Editing capability works with the editable_root option, as well as other useful options such as the new newdocument_content option, to create document templates in your content creation app.
How to create document templates in TinyMCE
The demo in the following sections shows you how to configure Multi-Root Editing with the editable_root option alongside several other useful options available with TinyMCE to create a document template.
Prerequisites to create document templates
Before getting started, the demo requires the following:
- Command line access through the shell you are most familiar with
- A text editor
- HTML, CSS, and JavaScript knowledge
- A TinyMCE API key
Creating document templates with Multi-Root Editing enabled
-
Create a new index.html file in your development environment, and add the following HTML:
<!DOCTYPE html>
<html lang="en">
<head>
    <meta charset="UTF-8">
    <meta name="viewport" content="width=device-width, initial-scale=1.0">
    <title>Multi-root editing and creating document templates</title>
</head>
<body>
    <textarea id="editor">
    </textarea>
</body>
</html>-
Add a script tag, and connect the demo to TinyMCE through TinyMCE Cloud. Replace the “your-api-key” string with your TinyMCE API key to remove any warnings about domain names from the text area.
When you sign up for a FREE TinyMCE API key, you also receive 14 days access to TinyMCE’s Premium plugins, like PowerPaste, and Accessibility Checker.
<script
  src="https://cdn.tiny.cloud/1/your-api-key/tinymce/6-dev/tinymce.min.js"
  referrerpolicy="origin"
></script>;
-
Add a second script tag, and include the TinyMCE init script, which controls how TinyMCE creates document templates:
<script>
      tinymce.init({
          selector: '#editor',
          plugins: 'anchor autolink link lists image code advcode mergetags wordcount',
          toolbar: 'undo redo | blocks | bold italic strikethrough backcolor | link image | align bullist numlist | code',
          height: 500,
          editable_root: false,
</script>NOTE: At this step, you can save the changes, and test out the demo by opening the index.html file in the browser. When the editable_root option in the TinyMCE init script is set to false, any attempts to add new content are NOT possible.
-
Add the editable_class option to the TinyMCE init script:
...
          editable_root: false,
          editable_class: 'editable',
</script>-
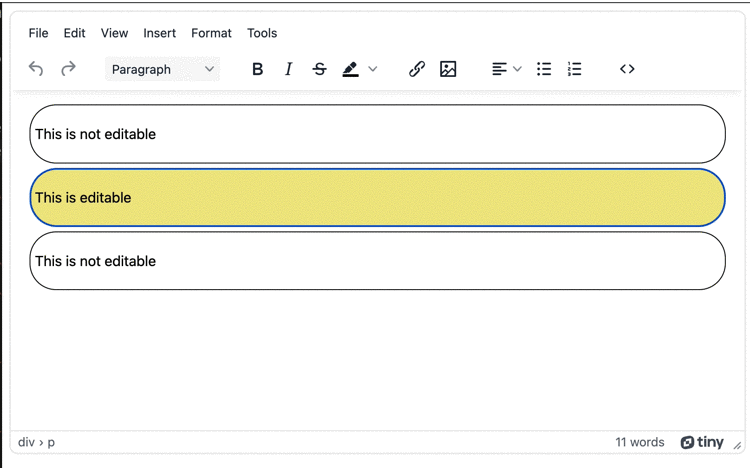
Include the following demo HTML within the textarea element, where one of the div elements contains the editable class, and some style to differentiate it:
<textarea id="editor">

  <div style="border; 1px solid: border-radius: 30px;">
               <p></p>

  </div>

  <div class="editable" style="background-color: #F0E68C; border-radius: 30px;">
               <p></p>

  </div>

  <div style="border; 1px solid: border-radius: 30px;">
               <p></p>

  </div>

</textarea>;
-
Save the changes, and then test the demo by opening the file in your browser, or by running a localhost test with the Python command, or PHP command. As a result of the configuration, you can only edit the element with the editable class:
Creating more vivid document templates
While there are now some editable elements within the TinyMCE text area, the initial demo described above is not something that resembles a document template. The following steps show how to create a document template with more true-to-life (or WYSIWYG) content:
-
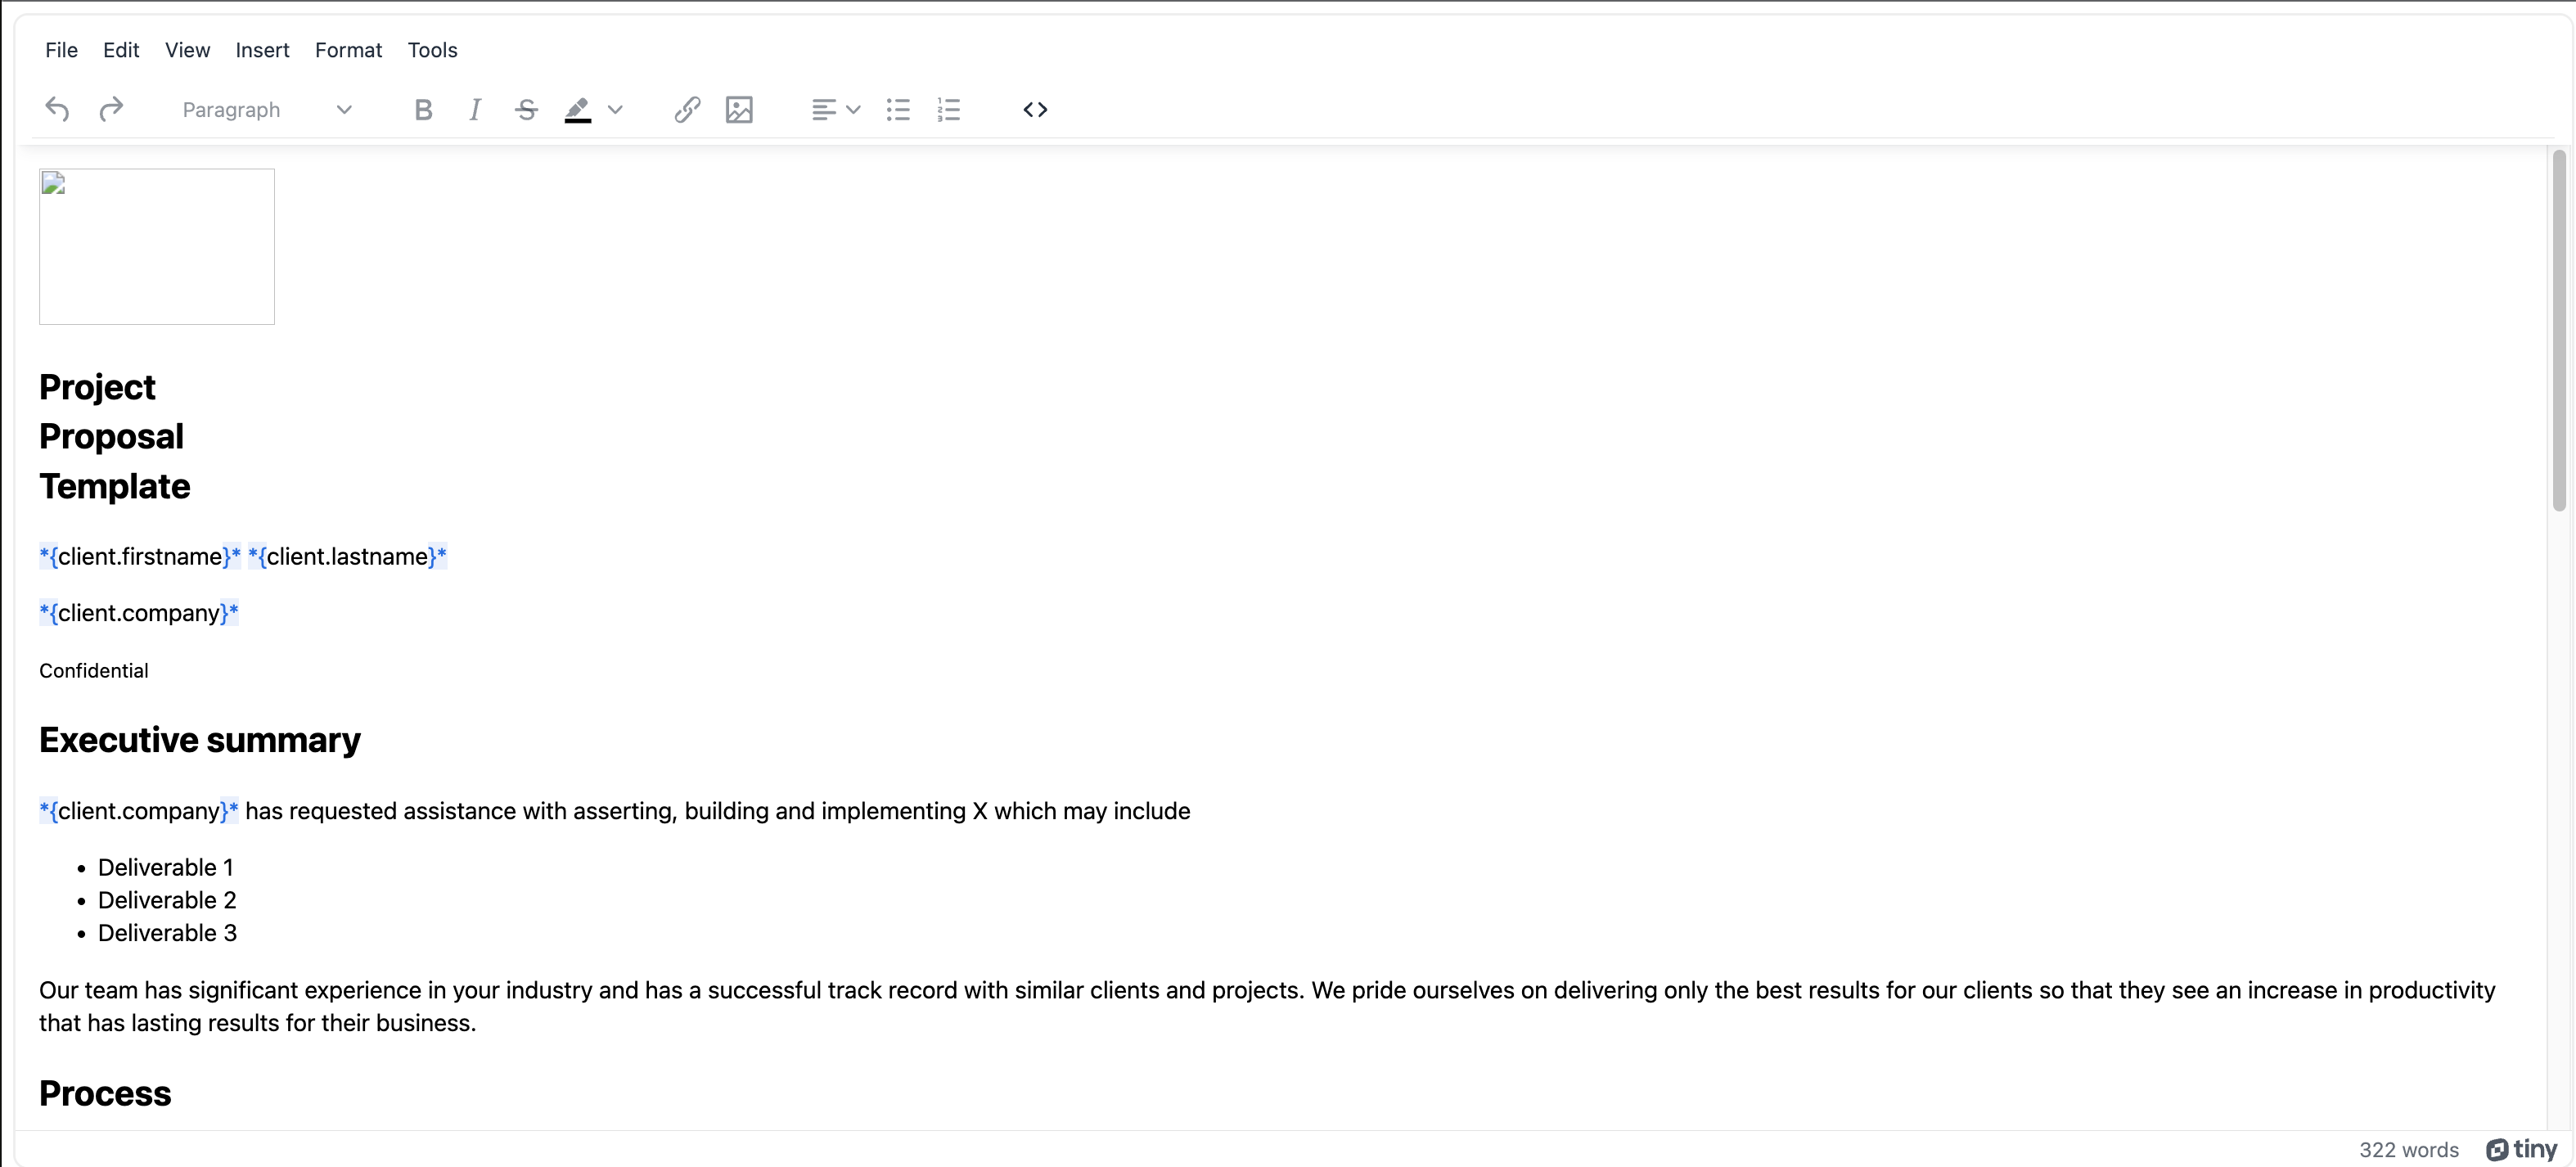
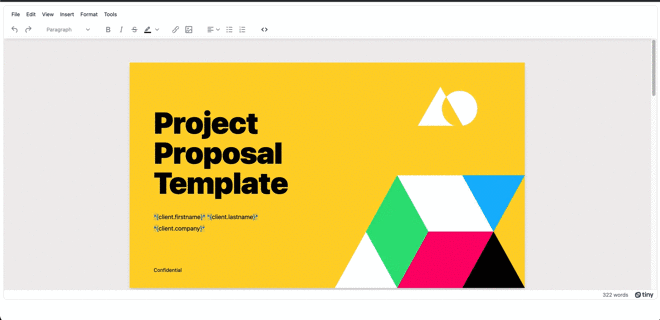
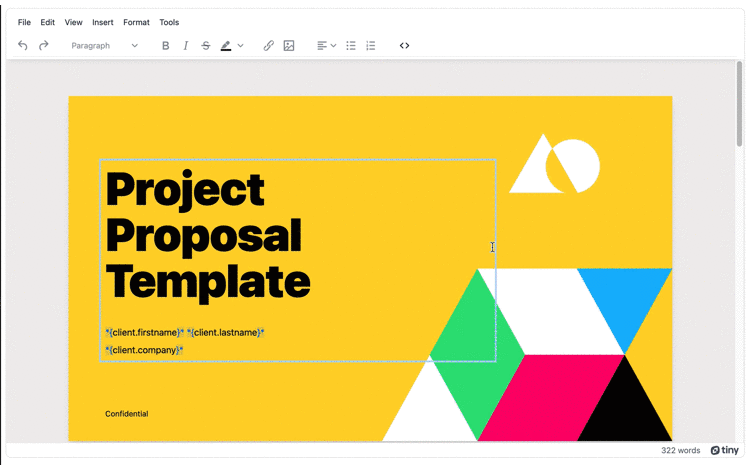
In the index.html file from the previous section, include the following HTML to start creating a new document template:
    <textarea id="editor">
        <section class="cover">
            <header>
                <img src="image/template-document-logo@2x.png" alt="demo document logo with triangle shapes" width="160" height="106">
            </header>
            <main class="editable">
                <h1>Project<br>Proposal<br>Template</h1>
                  <p>*{client.givenname}* *{client.familyname}*</p>
  <p>*{client.company}*</p>
            </main>
            <footer>
                <p><small>Confidential</small></p>
            </footer>
        </section>
</textarea>-
Add the next sections of the document template to the textarea:
        <section>
            <main class="editable">
                <h1>Executive summary</h1>
                <p>*{client.company}* has requested assistance with asserting, building and implementing X which may include</p>
                <ul>
                    <li>Deliverable 1</li>
                    <li>Deliverable 2</li>
                    <li>Deliverable 3</li>
                </ul>
                <p>Our team has significant experience in your industry and has a successful track record with similar clients and projects. We pride ourselves on delivering only the best results for our clients so that they see an increase in productivity that has lasting results for their business.</p>
            </main>
        </section>

        <section>
            <main class="editable">
                <h1>Process</h1>
                <p>We work closely with you to build and fulfill the project’s needs by *{completion.date}*.</p>
                <p>We do this by establishing clear goals and a comprehensive solution based on *{client.company}*’s needs.</p>
                <p>Our process is as follows.</p>
                <h2>Phase 1: initial consultation</h2>

                <p>Our expert team reviews any and all project-related systems and determines:<p>

                <ul>
                  <li>existing pain points; and</li>
                  <li>existing leverage opportunities.</li>
                </ul>

               <p>Based on this initial consultation we develop a solutions list.</p>
    <h2>Phase 2: solution model</h2>
    <p>Working with your team we implement the selected solution.</p>
    <p>This allows us to tailor the solution specifically for *{client.company}*’s needs, ensuring the solution does not include services you do not need and should not pay for.</p>

    <h2>Phase 3: implementation</h2>
    <p>Once we have agreed on a solution, our team implements the project plan.</p>
    <p>We will first deliver a detailed outline of the plan with a timeline that includes and all relevant due dates and deliverables.</p>

  </main>
</section>

        <section class="end">
            <main class="editable">
                <p><span style="font-size: 20px;">Acme Projects have been helping customers for over 20 years. Since the beginning the focus has always been quality and delivery. Over six thousand customers over 4 continents, Acme is there for you, when you need it.</span></p>
                <p> </p>
                <p><span style="font-size: 20px;">Please reach out to our region associates for any inquiries</span></p>
                <p> </p>
                <p> </p>
                <p><img src="image/template-document-fredrik@2x.png" alt="profile picture of one staff member" width="84" height="84"></p>
                <p>Fredrik Danielsson <br>+46 70 1740605<a href="mailto:fredrik.danielsson@example.com">fredrik.danielsson@acme.test</a></p>
                <p> </p>
                <p><img src="image/template-document-viola@2x.png" alt="profile picture of a second staff member" width="84" height="84"></p>
                <p>Viola From <br>+46 70 1740699 <br><a href="mailto:viola.from@example.com">viola.from@acme.test</a></p>
            </main>
</section>NOTE: There are sections within this demo that make use of the TinyMCE Merge Tags plugin. Check on the Merge Tags How-to tutorial for more information on configuring Merge Tags to speed up the document template creation process.
-
The document template HTML is now created, and available in the TinyMCE textarea:
The style has not been added yet, but there is another problem to solve – it’s not reusable. If the user wants to create a new document from the template, the content is lost. The next sections also adjust the merge tags settings slightly. Merge tags are flexible, and can fit your specific needs.
Here’s how to set up the template for reuse. To keep content in one place, and reuse it, TinyMCE has a new option available called newdocument_content (also released with TinyMCE version 6.5). It lets you configure and reuse some HTML content in a string format when selecting the File > New document menu item.
Here’s how to set up the proposal template for the newdocument_content option to use:
-
Create a new JavaScript variable above the TinyMCE init script:
<script>
   const documentTemplate = ``
tinymce.init({ ...-
Add the following JavaScript - it’s the document proposal template HTML from the previous steps. The newdocument_content option makes use of the variable, which is demonstrated in step 10 of this procedure:
const documentTemplate = `<section class="cover">
<header>
   <img src="image/template-document-logo@2x.png" alt="" width="160" height="106">
</header>

<main class="editable">
    <h1>Project<br>Proposal<br>Template</h1>
    <p>*{client.firstname}* *{client.lastname}*</p>
    <p>*{client.company}*</p>
</main>

<footer>
    <p><small>Confidential</small></p>
</footer>
</section>
<section>
<main class="editable">
    <h1>Executive summary</h1>
    <p>*{client.company}* has requested assistance with asserting, building and implementing X which may include</p>
    <ul>
        <li>Deliverable 1</li>
        <li>Deliverable 2</li>
        <li>Deliverable 3</li>
    </ul>
    <p>Our team has significant experience in your industry and has a successful track record with similar clients and projects. We pride ourselves on delivering only the best results for our clients so that they see an increase in productivity that has lasting results for their business.</p>
</main>
</section>

<section>
<main class="editable">
    <h1>Process</h1>
    <p>We work closely with you to build and fulfill the project’s needs by *{completion.date}*.</p>
    <p>We do this by establishing clear goals and a comprehensive solution based on *{client.company}*’s needs.</p>
    <p>Our process is as follows.</p>

    <h2>Phase 1: initial consultation</h2>
    <p>Our expert team reviews any and all project-related systems and determines:<p>
    <ul>
    <li>existing pain points; and</li>
    <li>existing leverage opportunities.</li>
    </ul>

    <p>Based on this initial consultation we develop a solutions list.</p>
    <h2>Phase 2: solution model</h2>
    <p>Working with your team we implement the selected solution.</p>
    <p>This allows us to tailor the solution specifically for *{client.company}*’s needs, ensuring the solution does not include services you do not need and should not pay for.</p>

    <h2>Phase 3: implementation</h2>
    <p>Once we have agreed on a solution, our team implements the project plan.</p>
    <p>We will first deliver a detailed outline of the plan with a timeline that includes and all relevant due dates and deliverables.</p>
</main>
</section>

<section class="end">
<main class="editable">

    <p><span style="font-size: 20px;">Acme Projects have been helping customers for over 20 years. Since the beginning the focus has always been quality and delivery. Over six thousand customers over 4 continents, Acme is there for you, when you need it.</span></p>
    <p> </p>
    <p><span style="font-size: 20px;">Please reach out to our region associates for any inquiries</span></p>
    <p> </p>
    <p> </p>
    <p><img src="image/template-document-fredrik@2x.png" alt="" width="84" height="84"></p>
    <p>Fredrik Danielsson <br>+46 70 1740605 <br><a href="mailto:fredrik.danielsson@example.com">fredrik.danielsson@acme.test</a></p>
    <p> </p>
    <p><img src="image/template-document-viola@2x.png" alt="" width="84" height="84"></p>
    <p>Viola From <br>+46 70 1740699 <br><a href="mailto:viola.from@example.com">viola.from@acme.test</a></p>
</main>
</section>
`;
-
Save the changes
-
To style the document, create a folder called images alongside the index.html file and save the following six demo images to the folder. You may need to adjust the image links within the document template HTML to ensure that the demo can find the image folder and display the files:
- Logo image
- Profile one image
- Profile two image
- Landscape body image background
- Landscape cover image background
- Landscape end image background
mkdir image

…

//image link #1
<img src="image/template-document-logo@2x.png" alt="demo document logo with triangle shapes" width="160" height="106">

//image link #2
<p><img src="image/template-document-fredrik@2x.png" alt="profile picture of one staff member" width="84" height="84"></p>

//image link #3
<p><img src="image/template-document-viola@2x.png" alt="profile picture of a second staff member" width="84" height="84"></p>The three landscape images are referenced by the CSS stylesheet (created in the next step):
//image link #4
section {
...
background-image: url("image/template-document-body-landscape@2x.png");

//image link #5
section.cover {
    background-color: #fed330;
    background-image: url("image/template-document-cover-landscape@2x.png");
...

//image link #6
section.end {
    background-color: #2C3A47;
    background-image: url("image/template-document-end-landscape@2x.png");
...-
Change out of the image directory, and create a CSS stylesheet in the same directory as your index.html file, and then add the following CSS:
cd ..

touch style.css

…
body {
    background-color: #f0eeee;
    padding: 1rem;
}

section {
    padding: 4rem 4rem 1rem;
    box-sizing: border-box;
    max-width: 1050px;
    min-width: 820px;
    min-height: 600px;
    margin: 2rem auto;
    background-color: #fff;
    box-shadow: rgba(0, 0, 0, 0.1) 0px 10px 15px -3px, rgba(0, 0, 0, 0.05) 0px 4px 6px -2px;
    background-image: url("image/template-document-body-landscape@2x.png");
    background-size: 100%;
    background-position: right bottom;
    background-repeat: no-repeat;
    display: grid;
    grid-template-columns: auto 220px;
    grid-template-rows: auto 60px;
    column-gap: 2rem;
    row-gap: 1rem;
}

section header,
section aside {
    grid-column: 2 / 3;
    grid-row: 1 / 2;
}

section main {
    position: relative;
    grid-column: 1 / 2;
    grid-row: 1 / 2;
}

section footer {
    grid-column: 1 / 3;
    grid-row: 2 / 3;
}

section main:empty::before,
section main:has(> br[data-mce-bogus]:first-child)::before {
    content: "Write something...";
    position: absolute;
    top: 0;
    left: 0;
    color: #999;
}

section main > * {
    margin: 0;
}

section main > * + * {
    margin-top: .5rem;
}

section.cover {
    background-color: #fed330;
    background-image: url("image/template-document-cover-landscape@2x.png");
    background-size: cover;
    background-position: right bottom;
    background-repeat: no-repeat;
}

section.cover main {
    align-self: center;
}

section.cover h1 {
    font-weight: 900;
    font-size: 5rem;
    letter-spacing: -1px;
    line-height: 1em;
    margin-bottom: 2.5rem;
}

section.end {
    background-color: #2C3A47;
    background-image: url("image/template-document-end-landscape@2x.png");
    background-size: 100%;
    background-position: right bottom;
    background-repeat: no-repeat;
    color: #C0C4C8;
}

section.end  a {
    color: #fff;
}

.editable:hover:not(:focus) {
    outline: 3px solid #b4d7ff;
    outline-offset: 8px;
}

.editable:focus {

    outline: none;

}-
Save the changes, and then link the stylesheet to TinyMCE using the content_css option:
    <script>
      tinymce.init({
          selector: '#editor',
          plugins: 'advtemplate anchor autolink link lists image code advcode mergetags wordcount',
          toolbar: 'undo redo | blocks | bold italic strikethrough backcolor | link image | align bullist numlist | code',
          height: 500,
          editable_root: false,
          editable_class: 'editable',
          content_css: 'style.css'
        });
</script>-
Prevent the TinyMCE textarea from being adjusted by adding the resize option, and setting it to false:
…
          content_css: 'style.css',
          resize: false,
        });
</script>-
Add the elementpath option and set it to false to prevent the elements from appearing in the lower left bar of the TinyMCE editor. This is a small but significant step to add more control over creating document templates, by concealing what elements different content creators are working on as they type:
…
          content_css: 'style.css',
          resize: false,
          elementpath: false,
        });
</script>- Configure the TinyMCE Merge Tags plugin:
elementpath: false,
mergetags_prefix: '*{',
            mergetags_suffix: '}*',
            mergetags_list: [
            {
                title: 'Client',
                menu: [
                {
                    value: 'client.givenname',
                    title: 'Given name'
                },
                {
                    value: 'client.familyname',
                    title: 'Family name'
                },
                {
                    value: 'client.company',
                    title: 'Company'
                }
               ]
            },
            {
                title: 'Schedule',
                menu: [
                {
                    value: 'submission.date',
                    title: 'Submission date'
                },
                {
                    value: 'completion.date',
                    title: 'Completion date'
                }
                ]
            },
],-
Save the changes, and then refresh the demo in your browser:
-
To test the reuse options previously set up for the demo, in the TinyMCE init script, add the newdocument_content option, and reference the variable with the document template HTML held within it:
          content_css: 'style.css',
          resize: false,
          ...
          newdocument_content: document_template,
        });
</script>-
Save the changes, and then test out the new document capability by deleting the template, and then restoring it by going to File and selecting New Document:
Creating document templates on setup
Using the TinyMCE setup function, you can make use of the document template variable created for the newdocument_content option, and load the specific document template when TinyMCE runs in the browser:
-
Add the setup function to the TinyMCE init script to set the document template as the default content when the editor reloads:
          content_css: 'style.css',
          resize: false,
          ...
          newdocument_content: document_template,
                setup: function (editor) {
                  editor.on('init', function (e) {
                    editor.setContent('document_template');
                  });
                }
        });
</script>-
In your text editor, clear the HTML content from the textarea and save the change:
<body>
     <textarea id="editor">   </textarea>
</body>;
-
Reload the demo in the browser to test the setup function. Checking on the developer console, the setup function creates the document template using the variable set up in the previous section:

This lifelike example shows how Multi-root editing in TinyMCE gives significant control. It demonstrates TinyMCE’s new ability – to support a document template creation experience from the center of the app, without spreading it over multiple editor instances.
What’s next for creating document templates
Try loading up your own documents, and setting specific areas as editable. You’ll find that you can create document templates quickly and easily within TinyMCE.
Want to make life even better for your users? With the new Advanced Templates plugin, you can give users the ability to create and insert predefined content snippets into their content, in seconds. Find out how this works in the How to use Advanced Templates guide.
For more information, or if you have any questions on using Multi-Root Editing in your content creation app, you can contact us to find out how TinyMCE can best support you and your projects.


