


In a conversation, one person speaks, and their partner responds. It’s the type of turn-taking pattern that informs communication and comments systems in computer software design. The back and forth then forms a thread of ideas shared along a clear timeline.
Many of the apps you use each day at work have some form of comment system. The first comment usually invites a reply, which then creates a comment thread. It’s a common feature on the surface, but behind the scenes, it’s another story.
If you want to add a commenting system to your website or your app, you might find it ultra confusing, and it then becomes a lengthy experience trying to set it up. But with the TinyMCE rich text editor running in your website or app, you can configure the ability to add comments quickly, and help your customers communicate more efficiently.
That’s what this article walks you through: the procedures found in the middle of the article, contains the steps needed to create a minimum working version of TinyMCE comments, with an avatar, and a basic notification broadcast to the browser console.
|
Note: A more advanced and detailed demo is included in the next section if you’d like to see the Comments plugin’s potential in action. It shows you how TinyMCE comments can send vital information through email notifications once the comment events are saved. Later sections in this article explain some of the logic behind the advanced demo. |
Table of Contents
What are comments in your app?
Advanced comments demo in action
How does the comments API work?
Understanding the demo in detail
How the save and email preview works
Explaining the core demo components
How to add comments to your website or app
How to make a basic commenting system with TinyMCE
Comment Plugin prerequisites
Why use embedded mode for TinyMCE comments?
Set up a comments demo
Change the default editor style to reflect a DMS
Setting up the Comments plugin
Creating comment content
Creating demo users for commenting
Adding Avatars
Using the Comments API for Logging
Your commenting system moving forward
What are comments in your app?
These are small messages added directly to a document. They usually appear in Document Management Systems, or Learning Management Systems. They take the form of a window that floats over the document, and connects to a specific word, letter, or some other content found inside the document.
For developers, the commenting pattern follows a specific sequence. This is a simplified summary, however it highlights the trigger events to be aware of in a commenting system:
- A user selects some text, or content they wish to comment on (The TinyMCE Comments Plugin can target images and rich media content as well as text)
- The users clicks on the comment option in the User Interface, usually a drop down menu option or a toolbar button
- That click triggers a comment UI
- The customer types a comment
- Inside the comment UI, the user has the option to cancel the comment and remove it. They can do this even if they have started entering text into the comment UI dialog
- Clicking on a save button in the UI then stores the comment contents, and a lot of other data such as a timestamp and location in the document
The TinyMCE editor saves all comments when the document saves, which allows the user to add, remove, edit, or change the comments as they wish, up until they're happy with what they’ve commented.
Advanced comments demo in action
The following is an advanced comments demo. What you’ll find below shows you how to add comments with TinyMCE. You can interact with the advanced demo, and see how the versatile TinyMCE getEventLog() API works in something close to production.
|
What’s the best practice for your commenting system with TinyMCE? |
|
It’s strongly recommended to save the content to your back end before performing any actions based on the event log API. If you don’t, you risk sending out a reply notification that can't be actioned because the updated comments aren't yet on the back end. While the advanced demo does show an email preview after clicking the save button, this takes place only after the user has “saved” the comments. In short, if you’re copying or checking through the advanced demo for production ideas, make sure you save event log data, and then send out the clean and sanitized data where it needs to go. |
To use the advanced demo:
- Make a comment or adjust an existing comment conversation
- Click on the Save button on the TinyMCE toolbar
- In the dialog window that opens, you can see how content from the API logs can be processed and broadcast – in this case, it’s an email notification
- You can output the comments output to the browser console
The API, configured in this advanced demo, handles an array that collates each CommentChange event that has happened since the user opened the editor. These events include details like the context of a conversation, the content of the first comment, the user who created the conversation or reply, and the time at which the event occurred.
How does the comments API work?
This process is an extraction. The details of each event are extracted in chronological order, which tells you exactly what happens, and when it happens. The advanced demo iterates through these events and builds an email notification using these details. Be aware that this data is less suitable for building a structured update about the status of comments for notification purposes.
Understanding the demo in detail
You can see the demo in detail in this TinyMCE fiddle.
How the save and email preview works
The save and email preview feature found in the advanced demo takes the data provided by the getEventLog API and expands on it. An event log updates when new activity happens (comments created, edited, deleted, resolved, etc).
The advanced demo contains custom code that iterates through the event log, and extracts relevant data from each specific type of event. It pulls the data into a well structured, organized html email update. The custom TinyMCE dialog displays the organized, html email when the save button is pressed.
|
Note: the email won’t generate unless comments are made inside the demo. Without a comment, there is no comment event (called ‘CommentChange’) to extract and send to the html email preview. |
The save button has two TinyMCE API methods within it’s JavaScript:
- The email toolbar button itself is built using the TinyMCE editor.ui.registry.addButton API method.
- The dialog showing the demo email is displayed using the TinyMCE custom dialog API method.
Explaining the core demo components
The advanced demo, as mentioned in previous paragraphs, iterates through the log, and extracts relevant data from each specific type of event. It provides a log of all comments and conversations created, edited, resolved, or deleted since the page loaded, sanitizing that raw log content.
The following section briefly shows the code that sanitizes the log content for the save button:
-
Collecting event log data starts with a representation of the backend, and an extraction process from the raw event log.
The app identifies customers logged in with their account name, id and email. This information would be represented in a different way in production – here, it follows the same format as read by the TinyMCE Comments plugin. The Author value could be any kind of ID, and in this case it’s email.
// Demo backend data
const currentAuthor = {
  author: "M.Woolf@email.com",
  authorName: "Martha Woolf",
};
const authorAvatars = {
  "Martha Woolf": "<link>",
  "George Albee": "<link>",
  "Honey Lehmen": "<link>",
};
const admin = "M.Woolf@email.com";
const docName = "Proposal Template";
-
The editor.plugins.tinycomments.getEventLog() API call represents the first step of data being extracted from the event log. More on this in step 5 below.
// This is the eventLog API, as it is available through the `editor` API object
const getEventLog = (editor) => {
  return editor.plugins.tinycomments.getEventLog({
    after: documentSaveTimestamp.toISOString(),
  });
};
-
The actual sanitizing of data happens when the handleEvent method works on each event in the eventLog.
  // Handle each event in the eventLog
  eventLog.events.forEach(handleEvent);

  // Use recipient id (email) to store email content
  Object.keys(recipientData).forEach((id) => {
    const recipient = recipientData[id];
	Array.from(recipient.conversations).forEach((convId) => {
	  recipientData[id].conversationData[convId] = conversationData[convId]
	});
	delete recipientData[id].conversations;
  });

  return recipientData;
};The handleEvent method uses if-else logic to first check if the event is to delete all conversations or not. It can be found inside the getConversationData function. It builds a ‘recipients’ object and a ‘conversationLog’ object. Here are the properties of these objects:
|
Object |
Properties |
|
‘recipients’ |
Objects named for the email of each user. The name of the user (first and last), and conversation ids. |
|
‘conversationLog’ |
Objects named for the separate conversation id. Contains a time, author, status, context, and commentLog properties. Note: The commentLog property contains time, author, status, and the content of each comment in the conversation. |
It’s important to understand these two objects, as they form the essential extraction of comment information that you can set up to be saved, stored on a database, and then sent out to where the notification is needed.
If there is no delete all conversations event, then the sanitizing continues to check the conversation log for more events.
The JavaScript also handles when customers don’t need to see conversation updates.
-
The next step is handling the type of content event, and checking and extracting the actual text content typed into the comment:
// Adds conversation information from event to conversationData, and updates recipientLog
const conversationEvent = (event) => {
  const convId = event.conversationUid;
  const eventTime = timestampToLocalString(event.timestamp);
  const eventType = event.type;

  // skipping lines

  // Event is handled after this point
  if (eventType === "create") {
    // Conversation creation event
    createConversation(eventType, currentAuthor);
  } else {
    // Existing conversation,
    if (!Object.keys(conversationData).includes(convId)) {
      // add a new empty conversation record
      existingConversation(event.conversationAuthor);
    }

    // Conversation in Log after this point, and not create event
    if (eventType === "delete" || eventType === "resolve") {
      deleteResolveConversation();
    } else {
      commentEvent();
    }
  }
};
Each function (`addConversationToLog`, `deleteResolveConversation` and `commentEvent`) determines the content extracted from the eventLog. There are helper functions added within the larger functions for the comment event type and comment text extraction steps.
-
After each event has been identified and had data extracted and added to the conversationLog, the recipients are updated, and data is then changed to a usable format by the getEmailDialogConfig function. Clicking on the save toolbar button calls this function. The result is a dialog config that displays the comment information.
In the editor interface, the demo shows directly what a potential email built from this sorted and sanitized content could look like. Check on the exact JavaScript, and some jQuery, on codepen.io to see the entire advanced demo running.
How to add comments to your website or app
One way is to hack together a div element with CSS to style it into a window that rests outside the text in the app text editor, but not too far. Then write a script with PHP or other language that moves content from the HTML into the database, and associates it with a specific username. Not too difficult, you may think, but there are two problems with this:
- The comment is not associated with a specific word or sentence, so it lacks context
- It would be time consuming to build this functionality from scratch
An easier and better method is to let the rich text editor handle this component for you. That’s where TinyMCE shines as an application component.
Using the TinyMCE Comments premium plugin, available with a paid subscription, you can create comments directly within the rich text editor. The plugin provides an interface for customers to communicate. It also provides useful API commands – getEventLog – which allows you to connect the comments events (for instance, resolve a comment, reply to a comment, delete a comment) to notifications.
How to make a basic commenting system with TinyMCE
The following procedure explains how to make a basic commenting system with TinyMCE. In order to insert a comment into your app’s content, the procedure explains what you need to set up basic commenting functionality in your editor.
Comment Plugin prerequisites
You’ll need the following to build the basic TinyMCE comments demo:
- Knowledge of JavaScript
- Access to your browser’s developer console
With Comments configured with TinyMCE, you can insert a comment directly onto text in the editor using the comments toolbar buttons.
Why use embedded mode for TinyMCE comments?
If you have a small number of users, or you’re looking to try out the comments app as a demo, TinyMCE comments offer embedded mode, which is the simplest implementation of Comments in TinyMCE (as compared to callback mode). Using embedded mode saves the overhead of connecting the system directly to a database in the first instance. It’s the minimum recommended setup, and it’s a stepping stone so you can have a lightweight comment system experience to find out if it works for you, for your app, and for your users or not.
Set up a comments demo
First, you need an API key. This key gives you free access to TinyMCE premium plugins for 14 days. Navigate to the sign up page to get your FREE API key.
- Create an index.html file.
- With your file open, in the head section, add script tags, and reference TinyMCE Cloud through a CDN link within the script tags. This is what the link looks like:
<script src="https://cdn.tiny.cloud/1/your-api-key/tinymce/6/tinymce.min.js" referrerpolicy="origin"></script>|
Note: When you use your API key, you get access to Premium TinyMCE plugins (including Comments) for 14 days, as well as no warning messages concerning API keys in the text area. |
-
Replace the “your-api-key” string with your API key, which you can copy and paste from your TinyMCE dashboard.
-
Add another pair of script tags, add the following JavaScript:
<script>
  tinymce.init({
  selector: "#editor",

   plugins: "tinycomments powerpaste searchreplace directionality visualblocks image link media mediaembed codesample table charmap tableofcontents insertdatetime advlist lists checklist wordcount tinymcespellchecker editimage help formatpainter linkchecker emoticons advtable export autosave",

   toolbar: "undo redo print spellcheckdialog formatpainter | blocks fontfamily fontsize | bold italic underline forecolor backcolor | link image | alignleft aligncenter alignright alignjustify lineheight | checklist bullist numlist indent outdent | removeformat |  addcomment showcomments",
   height: '700px',
   tinycomments_mode: 'embedded',
   sidebar_show: 'showcomments'
        });
</script>-
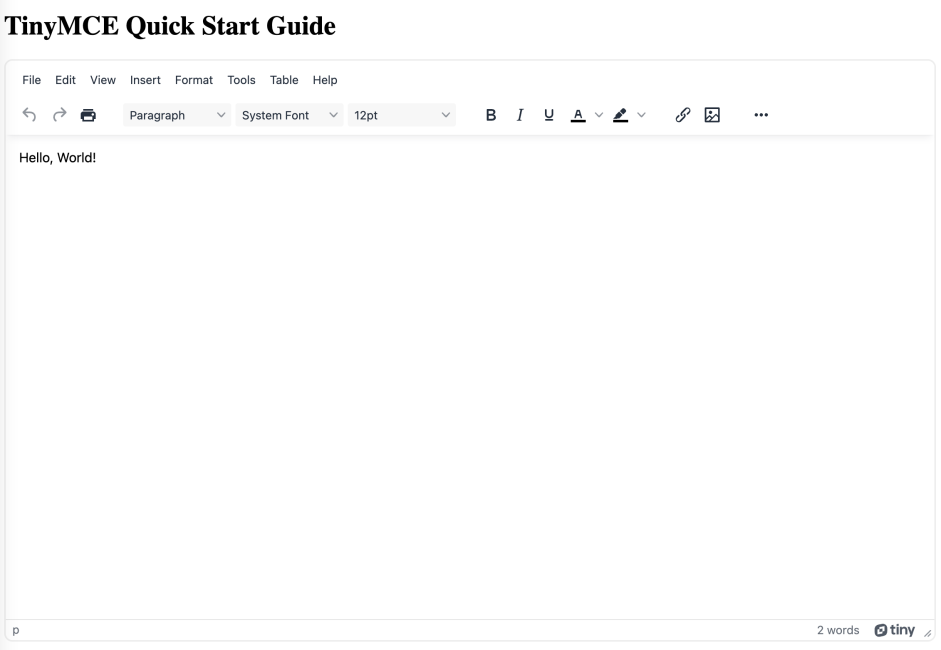
Add initial HTML content, and the CSS selector class to some textarea tags:
<body>
  <h1>TinyMCE Example</h1>
  <form method="post">
    <textarea id="editor">Hello, World!</textarea>
  </form>
</body>-
Open the index.html file in your browser, or use a local server command with Python or with the PHP command:
Change the default editor style to reflect a DMS
-
Add the following content_css option and CSS to your TinyMCE init script:
content_css: ‘document’,-
Save the changes and reload the app.
Setting up the Comments plugin
With the editor now working, the next setting up stage involves adding the Comments plugin and configuring it with some demo content, including a conversation:
-
Configure the following options in the TinyMCE init script:
-
Make sure tinycomments appears in your plugin list
-
Make sure addcomment and showcomments appear as a toolbar option
-
Add the tinycomments_mode: option to the script with the value 'embedded'
-
Include the option sidebar_show with the value ‘showcomments’ in your init script
-
-
Save the changes, and confirm that your new script has the basic comments options configured:
<script>
  tinymce.init({
  selector: "#editor",

   plugins: "tinycomments powerpaste searchreplace directionality visualblocks image link media mediaembed codesample table charmap tableofcontents insertdatetime advlist lists checklist wordcount tinymcespellchecker editimage help formatpainter linkchecker emoticons advtable export autosave",

   toolbar: "undo redo print spellcheckdialog formatpainter | blocks fontfamily fontsize | bold italic underline forecolor backcolor | link image | alignleft aligncenter alignright alignjustify lineheight | checklist bullist numlist indent outdent | removeformat |  addcomment showcomments",
   height: '700px',
   tinycomments_mode: 'embedded',
   sidebar_show: 'showcomments'
        });
</script>And the demo app looks like this:

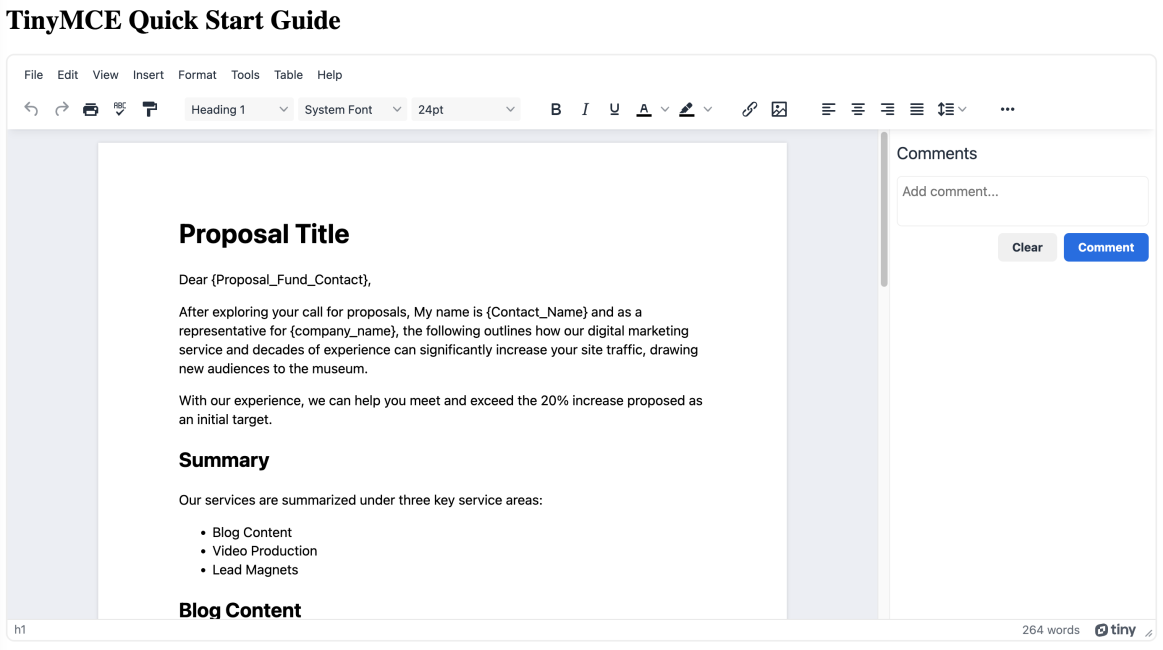
Creating comment content
To add some demo content to the TinyMCE text area:
-
Update the contents of the TinyMCE text area with the content from the demo:
   <textarea id="editor">

                <h1>Proposal Title</h1>
                <p>Dear {Proposal_Fund_Contact},</p>
                <p>After exploring your call for proposals, My name is {Contact_Name} and as a representative for {company_name}, the following outlines how our digital marketing service and decades of experience can significantly increase your site traffic, drawing new audiences to the museum.</p>
                <p>With our experience, we can help you meet and exceed the 20% increase proposed as an initial target.</p>
                <h2>Summary</h2>
                <p>Our services are summarized under three key service areas:</p>
                <ul>
                    <li>Blog Content</li>
                    <li>Video Production</li>
                    <li>Lead Magnets</li>
                </ul>
                <h2>Blog Content</h2>
                <p>Our expertise takes content writers from the audience analysis, research and writing stage, through review and editing, and finally to publication. Previous audits into past work for clients have shown significant increases in traffic, for example, a result of 11,200 views per quarter to 14,883 views per quarter for one previous client
                    (Testimonies and Results, Appendix A).</p>
                <h3>Video Production</h3>
                <p>With sharp design and editing our video production team have produced trailers, sizzle reels, and demos across a variety of industries, increasing followers across video social media sources up to 55% in some instances.</p>
                <h3>Lead Magnets</h3>
                <p>A good lead magnet provides an essential entry point for attracting qualified leads. We can set up lead magnets, and produce valuable content to target your audience, garnering their respect and collecting contact information for follow up.</p>
                <h3>Background</h3>
                <ul>
                    <li>
                        <p>WIP</p>
                    </li>
                </ul>
                <h3>Objectives</h3>
                <ul>
                    <li>
                        <p>WIP</p>
                    </li>
                </ul>
                <h3>Methods</h3>
                <ul>
                    <li>
                        <p>WIP</p>
                    </li>
                </ul>
                <h3>Budgets and Schedules</h3>
                <p> </p>
                <div align="left">
                    <table>
                        <colgroup><col><col><col></colgroup>
                        <tbody>
                            <tr>
                                <td>
                                    <p>Blog Creation</p>
                                </td>
                                <td>
                                    <p>Research will inform blog topics and content relevant to your industry and target audience.</p>
                                </td>
                                <td>
                                    <p>$450</p>
                                </td>
                            </tr>
                            <tr>
                                <td>
                                    <p>Lead Magnets</p>
                                </td>
                                <td>
                                  <p>Valuable long-form content relevant to your industry and targeted audience, including individual landing pages and lead forms.</p>
                                </td>
                                <td>
                                    <p>$1900</p>
                                </td>
                            </tr>
                        </tbody>
                    </table>
                </div>
                <p> </p>
                <h3>Appendices</h3>
                <p>Testimonies and Results</p>
Save the changes, and check that the editor now shows a Proposal Title:
Creating demo users for commenting
To set up a demo user for a commenting system:
-
Configure the following TinyMCE comments options in the init script. These options set up an author name and their permissions to resolve comments. This procedure draws content from the comments API demo:
tinycomments_author: "Martha Woolf",
tinycomments_can_resolve: (req, done, fail) => {
    const allowed = req.comments.length > 0 && req.comments[0].author === "Martha Woolf";
        done({
    canResolve: allowed || currentAuthor === 'Martha Woolf'
            });
},-
Save the changes, and then test out the newly created user from the demo.
Adding Avatars
With the essential aspects of Comments setup, adding avatars to the basic demo is the next step. This feature was introduced in the TinyMCE 6.1 release. It gives your users an image to represent them when they are having a conversation with comments:
-
Add the tinymce avatar option to the TinyMCE init script:
tinycomments_author_avatar: '',
tinycomments_author_avatar: '',-
Include a link to the author avatar. This image scales down to 36px for the purposes of becoming an avatar. In the real world, you would specify an image hosted on your server.
tinycomments_author_avatar: '',
tinycomments_author_avatar: 'https://live.staticflickr.com/7599/16371126374_c2c1295a4e_b.jpg',-
Save the changes and for the new Avatar
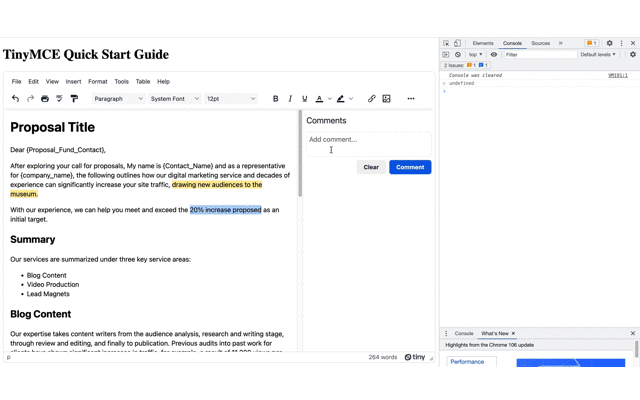
Using the Comments API for logging
Now that you have a demo working, including avatars, the next procedure adds logging functionality. It shows how to add the TinyMCE getEventLog API method to print out a log of commenting activity to the developer console in the browser.
This API is another Comments plugin feature that arrived in the TinyMCE 6.1 release. The API returns a log with information and timestamps of all changes to comments.
To see what it looks like, set up the demo to display the event log to the console whenever a comment is changed or added:
-
Add the init instance callback function, and set it up to target the tinymce editor:
// Comments event API
     init_instance_callback: (editor) => {
},-
Inside the function, set up the comment change method.
// Comments event API
     init_instance_callback: (editor) => {
      editor.on('CommentChange', (evt) => {})
},-
Set up the getEventLog API methods, including a method that prints a timestamp to the console:
// Comments event API
     init_instance_callback: (editor) => {
      editor.on('CommentChange', (evt) => {
         onsole.log(evt.getEventLog());
         console.log(evt.getEventLog().timestamp);
         });
},-
Save the changes, and test out the event logging function by adding a comment, and checking on the Developer Console of your browser.
Here's how the basic demo works, as an example:
Your commenting system moving forward
Now that you’ve tried out a demo, and put together an essential version of TinyMCE Comments, you can integrate the experience, and integrate the commenting system into your app as needed.
If you need more assistance in solving any problems around commenting systems, let us know – when you sign up for a FREE API key, you also receive 14 days support from TinyMCE’s customer success team when you reach out for help.
With the TinyMCE Comments plug set up, you can help your app’s users start a conversation, and communicate to better solve the problems and overcome any communication barrier they may face as they talk to each other within your app.


