


Project and workflow apps appear simple in what they do. The key goal is to organize big projects into small manageable tasks, while the secondary goal is to give users the ability to control those many small tasks. They can be labeling tasks, estimates (either time or dollars), applying deadlines, or classifying the tasks in some other industry-specific way.
They’re the big priorities: get them right, and you’ve got a useful tool.
But what supports all those big moving parts? A series of small moving parts. Those small parts are by no means the fulcrum that leverages the workflow app, but they’re indispensable. And indispensable components provide something useful – they don’t add more maintenance or difficulty.
This is the exact place that TinyMCE provides support for your workflow app.
TinyMCE’s rich text editing capabilities are indispensable, trusted by over 1.5 million developers worldwide. Our TinyMCE Cloud set-up is fast, and you can get started with TinyMCE in 5 minutes (one more reason it’s indispensable).
This article explains how to get started with TinyMCE Cloud in a demo project and workflow management app. The demo uses the TinyMCE Workflow starter config.
Getting started with a workflow app
The first step for setting up your workflow app editor component is getting your TinyMCE API key. Go to the TinyMCE account page and follow the steps listed. You can also check on the pricing plans page, and select the plan that works best for you.
The second step is to familiarize yourself with the workflow demo config. To find the workflow config, check on Workflow Solutions Page to find the code snippet you need to get started.
You can check on the video tutorial:
And here is the transcript of the tutorial:
Locating your FREE API key
Once you have your TinyMCE account, your API key is available on the top section of the account page.
Your key gives you 14 days FREE access to TinyMCE premium plugins, cloud or self-hosted. The free trial begins when you use the key in your editor, and load it into a browser with premium plugins configured in the tiny.init script.
When using Tiny Cloud, you need your API key to prevent TinyMCE changing into read-only mode. Your API key also prevents error messages related to domain names from appearing in the text area.
Create your demo workflow project
The demo workflow has a UI that matches a task screen that would appear inside a workflow app. It recreates the design of a Kanban board task and comes pre-configured with TinyMCE Cloud premium plugins. And, if you have an existing workflow project, you can adapt these instructions to add TinyMCE in as your upgraded rich text editing component.
To get started:
-
Set up a folder inside your workstation environment, and include an index.html file inside it.
-
Copy the following workflow demo HTML into your index file. This content is draw from the TinyMCE Workflow and Collaboration Platforms configuration:
<!doctype html>
<html>
<head>
  <meta charset="utf-8">
  <title>TinyMCE Workflow Starter Config</title>
  <meta name="viewport" content="width=device-width, initial-scale=1">
  <script>
    let commonConfig = {
      plugins: "advcode advtable autocorrect autolink checklist codesample editimage emoticons image link linkchecker lists media mediaembed powerpaste table tinymcespellchecker",
      menubar: false,
    }
      toolbar: "blocks | bold italic forecolor backcolor | numlist bullist checklist | link image emoticons table codesample hr blockquote | code ",
      setup: (editor) => {
        editor.on('focus', () => {
          document.getElementById('editor-description-wrap').classList.add('enabled');
        });
      },

      ...commonConfig,
    });

    tinymce.init({
      selector: "#editor-comment-content",
      toolbar: "bold italic forecolor backcolor | numlist bullist | link image emoticons codesample blockquote ",

      setup: (editor) => {
          editor.on('focus', () => {
            document.getElementById('editor-comment-wrap').classList.add('enabled');
          });
        },
      ...commonConfig,
    });

    function save(id) {
      document.getElementById(id).classList.remove('enabled');
    }

  </script>
  </head>
<body>
  <main>
  </main>
</body>- Save the changes
Configuring the CDN link and API key
-
Copy the API key CDN link:
<script src="https://cdn.tiny.cloud/1/your-api-key/tinymce/6/tinymce.min.js" referrerpolicy="origin"></script> -
Paste the CDN script before the tinymce.init script in your index.html file:
-
Change the “your-api-key”, replacing it with your own API key.
-
Save the changes.
Including the TinyMCE Workflow configuration
- Update the TinyMCE configuration script with the following content:
  <script>
    let commonConfig = {
      plugins: "advcode advtable autocorrect autolink checklist codesample editimage emoticons image link linkchecker lists media mediaembed powerpaste table tinymcespellchecker",
      menubar: false,
      inline: true,
      toolbar_persist: true,
      object_resizing: false,
      spellchecker_language: 'en',
      spellchecker_active: true
    }
      toolbar: "blocks | bold italic forecolor backcolor | numlist bullist checklist | link image emoticons table codesample hr blockquote | code ",
      fixed_toolbar_container: '#editor-description-toolbar',
      placeholder: "Add a description",
      editimage_toolbar: "rotateleft rotateright",
      setup: (editor) => {
        editor.on('focus', () => {
          document.getElementById('editor-description-wrap').classList.add('enabled');
        });
      },

      ...commonConfig,
    });

    tinymce.init({
      selector: "#editor-comment-content",
      toolbar: "bold italic forecolor backcolor | numlist bullist | link image emoticons codesample blockquote ",
      placeholder: "Add a comment...",
      fixed_toolbar_container: '#editor-comment-toolbar',

      setup: (editor) => {
          editor.on('focus', () => {
            document.getElementById('editor-comment-wrap').classList.add('enabled');
          });
        },
      ...commonConfig,
    });

    function save(id) {
      document.getElementById(id).classList.remove('enabled');
    }

</script>This TinyMCE configuration uses a common config, and then extends the configuration by adding it to another TinyMCE editor
- Save the changes
Configuring the workflow app interface
-
Copy the following style tag content, and paste it into your index.html file after the TinyMCE Script content:
<style>
        body {
            font-family: -apple-system, BlinkMacSystemFont, 'Segoe UI', Roboto, Oxygen-Sans, Ubuntu, Cantarell, 'Helvetica Neue', Helvetica, Arial, sans-serif;
        }

        main {
            max-width: 720px;
            margin: auto;
        }

        .editor-wrap.enabled {
            border-radius: 3px;
            border: 1px solid #ccc;
        }

        .editor-content {
            transition: min-height .25s, padding-bottom .25s;
            min-height: 0;
            outline: none;
            border-radius: 1px;
            transition: box-shadow .15s, background-color .15s;
        }

        .editor-content>*:first-child {
            margin-top: 0;
        }

        .editor-content>*:last-child {
            margin-bottom: 0;
        }

        .editor-wrap#editor-description-wrap:hover:not(.enabled) .editor-content {
            background-color: #efefef;
            box-shadow: 0 0 0 6px #efefef;
        }

        .editor-wrap.enabled .editor-content {
            min-height: 140px;
            padding: 1rem;
        }

        .editor-toolbar {
            padding: 3px;
            display: none;
            border-bottom: 1px solid #ccc;
            z-index: 1;
        }

        .editor-wrap.enabled .editor-toolbar {
            display: block;
        }

        .editor-footer {
            margin: 1rem;
            display: none;
            padding-top: .5rem;
        }

        .editor-wrap.enabled .editor-footer {
            display: block;
        }

        .editor-save-btn {
            background: #207ab7;
            font-size: 16px;
            font-weight: bold;
            color: #fff;
            border: none;
            outline: none;
            height: 34px;
            line-height-step: 34px;
            padding: 0 16px;
            border-radius: 4px;
            margin: 0;
            -webkit-tap-highlight-color: rgba(0, 0, 0, 0);
            -webkit-user-select: none;
        }

        .editor-cancel-btn {
            background: #dfe3ec;
            font-size: 16px;
            font-weight: bold;
            color: #17224f;
            border: none;
            outline: none;
            height: 34px;
            line-height-step: 34px;
            padding: 0 16px;
            border-radius: 4px;
            margin: 0;
            -webkit-tap-highlight-color: rgba(0, 0, 0, 0);
            -webkit-user-select: none;
        }

        .editor-label {
            font-size: 19px;
            margin: 2rem 0 1rem;
            display: block;
            border-bottom: 1px solid #dfe3ec;
        }

        .comment {
            display: flex;
        }

        .avatar {
            background-color: #ff9999;
            color: #17224f;
            font-size: 18px;
            font-weight: bold;
            border-radius: 100px;
            width: 42px;
            height: 42px;
            line-height: 42px;
            text-align: center;
            margin-right: 8px;
        }

        .editor-wrap#editor-comment-wrap {
            padding: 1rem;
        }

        .editor-wrap#editor-comment-wrap .editor-content {
            padding: 1rem;
        }
        /* and not namespaced to `.editor-content` */

        .componentBorder {
            border: 1px solid #ccc;
            border-radius: 3px;
            padding: 0.01rem;
            flex-grow: 1;
            position: relative;
            width: 900px;
        }

        a,
        a:link {
            color: blue;
        }

        a:visited {
            color: purple;
        }

        a:hover {
            color: green;
        }

        a:active {
            color: red;
        }

        h1 {
            font-size: 1.75rem;
            font-weight: strong;
        }

        h2 {
            font-size: 1.5rem;
            font-weight: strong;
        }

        h3 {
            font-size: 1rem;
            font-weight: strong;
        }

        hr {
            margin: 1.5rem 0;
            padding: .5rem 0;
            border: 0;
        }

        hr::after {
            content: '';
            display: block;
            border-width: 0 0 1px 0;
            border-color: #ccc;
            border-style: solid;
        }

        img {
            max-width: 100%;
            height: auto;
        }

        .tox.tox-tinymce-aux .tox-toolbar__overflow {
            background-color: #fff !important;
        }
</style>-
Update the HTML content by copying the following configuration into your demo file between the body tags:
<body>
<div class="componentBorder">
<main>
<label class="editor-label">Description</label>
<div class="editor-wrap" id="editor-description-wrap">
<div class="editor-toolbar" id="editor-description-toolbar"></div>
<div class="editor-content" id="editor-description-content">
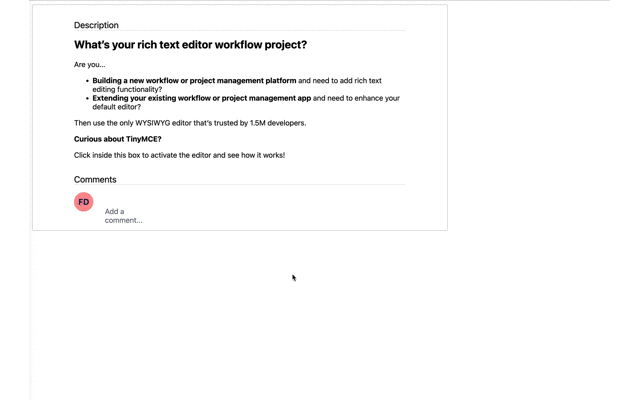
<h2><strong>What’s your rich text editor </strong><strong>workflow</strong><strong> project? </strong></h2>
<p>Are you…</p>
<ul>
<li><strong>Building a new workflow or project management platform</strong> and need to add rich text editing functionality?</li>
<li><strong>Extending your existing workflow or project management app</strong> and need to enhance your default editor?</li>
</ul>
<p>Then use the only WYSIWYG editor that’s trusted by 1.5M developers.</p>
<h3><strong>Curious about TinyMCE?</strong></h3>
<p>Click inside this box to activate the editor and see how it works!</p>
</div>
<footer class="editor-footer">
<button type="button" id="save-description-btn" onclick="save('editor-description-wrap')" class="editor-save-btn">Save</button>
<button type="button" onclick="alert('Your own custom save function')" class="editor-cancel-btn">Cancel</button>
</footer>
</div>
<label class="editor-label">Comments</label>
<div class="comment">
<div class="avatar">FD</div>
<div class="editor-wrap" id="editor-comment-wrap">
<div class="editor-toolbar" id="editor-comment-toolbar"></div>
<div class="editor-content" id="editor-comment-content"></div>
<footer class="editor-footer">
<button type="button" id="save-description-btn" onclick="save('editor-comment-wrap')" class="editor-save-btn">Save</button>
<button type="button" onclick="alert('Your own custom cancel function')" class="editor-cancel-btn">Cancel</button>
</footer>
</div>
</div>
</main>
</div>
</body>-
Save the changes, and load the demo in your browser:
Need more workflow information?
The workflow page explains what each of the Premium plugins that are configured for the workflow app can do for your project. For more granular information, you can toggle the HTML comments in the workflow config on, to see the intent behind each line of markup and JavaScript.
Signing up for a FREE rich text editor API key -- cloud or self-hosted -- gives you access to Premium plugin functionality for 14 days before you need to consider whether the Core plan without premium plugins is suitable, or if the Premium plugins better suit your workflow app needs, and therefore need to sign up for one of the TinyMCE Paid plans.
During your 14-day free trial period - cloud or self-hosted - (or after you’ve signed up for a paid plan), you can contact support if you have any questions on adding TinyMCE to your workflow app.


