


It’s frustrating when you’re let down by frameworks that boast about DOM efficiency, but end up being slow and ineffective. Their inefficiency directly impacts how easily customers connect with your application. Getting the right framework can require some evaluation, but resources like the following guide are here to help.
TL;DR
- The Vue framework provides the lightest JavaScript-based framework available, and specializes in constructing interfaces.
- Vue image upload can take additional time to configure, with interface design and routing configuration, but a WYSIWYG component can speed up this process.
- TinyMCE’s rich text editor dedicated Vue integration allows for effective image upload with Axios and a PHP script, and this article explains how to configure Vue image upload with TinyMCE.
For Vue image upload, the TinyMCE rich text editor provides a more efficient path to configuring the necessary requirements for image upload. It’s also flexible, and able to adapt to different use cases. Plus, the out-of-the-box image handling interface provides an intuitive pathway for customers to upload images, and it can be easily customized.
This post explores Vue image upload, and explains how to configure TinyMCE for image uploads, including the ability for Vue image drag and drop.
Exploring Vue image handling capabilities
Any app, regardless of the framework, follows the pattern of a client-side, and a server-side. Here’s some of the ways Vue connects to server-side for image upload and storage:
- PHP: Vue is designed for creating interfaces, but works with PHP.
- Laravel: It can integrate with the Laravel framework (a more common configuration) for server-side Vue image upload and image handling.
- Third party configuration: Some server-side storage configurations may include a third party back-end.
Vue image upload interfaces and routing
Vue's design options allow for an easier time creating interfaces by combining the logic, structure, and style (JS, HTML, CSS) in one file. Vue can rapidly create Single Page Applications (SPA), in which case, the routing can take place on the client-side. Vue router libraries are available to better support this type of application.
For Vue image upload, the specific interface that handles the image can still package the image data into a FormData object and send it through the configured routing in an SPA.
The role of TinyMCE in Vue image upload
Within an application built within Vue, there are various components that accept text entry. These could be the login screen's username and password input fields. Or if you're building something more extensive like a Document Management System (DMS) in Vue, TinyMCE works well in place of a textarea element, providing a comprehensive and flexible WYSIWYG.
TinyMCE's Image plugin enables easier Vue image uploads by providing a dialog to guide customers through the process. The image upload steps in more detail with TinyMCE are the following:
- TinyMCE’s dialog interface for selecting an image opens
- Customers have the option to configure an Alt Text attribute for the image within the dialog
- An XHR or Axios script sends the image data to the server-side
✏️ NOTE: The script used for data transfer needs to return to TinyMCE the image location uploaded as a JSON formatted object. The key and value must be “location”, and the address at which the server-side is actually serving the image.
How to configure your Vue application for image uploads
There are some prerequisites needed before starting the following tutorial for configuring Vue image upload with TinyMCE:
- JavaScript and PHP experience
- Node.js and npm installed for package management
- The Vue command line package installed
- A text editor such as Sublime Text, or VS Code
Getting started with Vue and TinyMCE
-
Create a new project with Vue using the Vue command line:
vue create dms-application-0b-
Change into the new application, and install the TinyMCE Vue integration:
npm install --save "@tinymce/tinymce-vue@^5"-
Change into the src/components/ directory, and create a TinyMCE vue file:
cd src/components/ touch TinyMCE.vue-
Add the following JavaScript to your new TinyMCE.vue file:
<script setup>

import Editor from '@tinymce/tinymce-vue'

</script>

<template>
    <Editor
      api-key="no-api-key"
      :init="{
        plugins: 'lists link image table code help wordcount'
      }"
    />
</template>

<script>
export default {
  name: 'TinyMCE',
  props: {
  }
}
</script>
💡NOTE: Change the "no-api-key" string to your TinyMCE API key. You can sign up for a FREE TinyMCE API key with your Google or GitHub accounts, and your key comes with a 14-day free trial of TinyMCE’s Premium plugins – for you to trial different features such as Spell Checker Pro and PowerPaste.
-
Save the new TinyMCE configuration
-
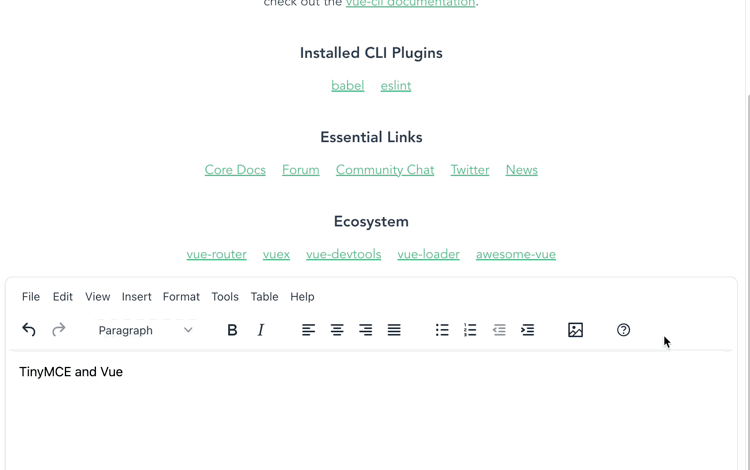
Change back into the src/ directory, and configure TinyMCE as the text editor in the App.vue file:
<template>
  <img alt="Vue logo" src="./assets/logo.png">
  <HelloWorld msg="Welcome to Your Vue.js App"/>
  <TinyMCE />
</template>

<script>
import HelloWorld from './components/HelloWorld.vue'
import TinyMCE from './components/TinyMCE.vue'

export default {
  name: 'App',
  components: {
    HelloWorld,
    TinyMCE
  }
}
</script>
//Style section omitted for brevity-
Save the change
-
Test run the Vue project with the serve command:
npm run serve
Image upload configuration
-
Add the following configuration options to the TinyMCE.vue file within the TinyMCE init script:
images_upload_url: 'http://localhost:8000/server.php',
automatic_uploads: true,
images_reuse_filename: true,
images_upload_handler: handleImageUpload,-
Copy the following Axios script, and paste it inside the < script > tags of the TinyMCE.vue file, above export default:
const handleImageUpload = async (blobInfo, progress, failure) => {
  const formData = new FormData();
  formData.append("file", blobInfo.blob(), blobInfo.filename());

  try {
    const response = await axios.post(
      "http://localhost:8000/server.php",
      formData,
      {
        headers: { "Content-Type": "multipart/form-data" },
        onUploadProgress: (progressEvent) => {
          const percentCompleted = Math.round(
            (progressEvent.loaded * 100) / progressEvent.total
          );
          if (progress && typeof progress === "function") {
            progress(percentCompleted);
          }
        },
      }
    );

    if (response.status === 403) {
      throw new Error("HTTP Error: " + response.status);
    }

    if (response.status < 200 || response.status >= 300) {
      throw new Error("HTTP Error: " + response.status);
    }

    const json = response.data;

    if (!json || typeof json.location !== "string") {
      throw new Error("Invalid JSON: " + JSON.stringify(json));
    } else response;
    {
      return json.location;
    }
  } catch (error) {
    if (failure && typeof failure === "function") {
      failure(error.message);
    }
  }
};
✏️ NOTE: The example images_upload_handler in the documentation example uses XHR, but the Axios script in the previous code block provides a better solution for transporting HTML data in a Vue context.
-
Save the new image handling configuration added to TinyMCE.
Configuring the demo image upload server
-
At the base level of the Vue demo app, create a new server folder:
mkdir server-
Change into the folder, and create another folder called images/:
cd server mkdir images-
Create a PHP file called server.php:
touch server.php-
Add the following content to the file, and save it:
<?php
 //Adpated from the postAcceptor.php file example from the documentation https://www.tiny.cloud/docs/tinymce/6/php-upload-handler/
 $accepted_origins = array('http://localhost:8080', 'http://192.168.68.60', '*');

 $imageFolder = dirname(__FILE__).'/' . 'images/';

 //handle same-origin requests, which won't set or be valid unliess configured to allow origins
 if (isset($_SERVER['HTTP_ORIGIN'])) {
     if (in_array($_SERVER['HTTP_ORIGIN'], $accepted_origins)) {
         header('Access-Control-Allow-Origin: ' . $_SERVER['HTTP_ORIGIN']);
  } else {
     header("HTTP/1.1 403 Origin Denied");
   return;
  }
 }
 //Prevent uploads on an OPTIONS request
 if ($_SERVER['REQUEST_METHOD'] == 'OPTIONS') {
     header("Access-Control-Allow-Methods: POST, OPTIONS");
 return;
 }
 //sanitize and verify images before they arrive on the server
 reset ($_FILES);
     $temp = current($_FILES);
 if (is_uploaded_file($temp['tmp_name'])){
     if (preg_match("/([^\w\s\d\-_~,;:\[\]\(\).])|([\.]{2,})/", $temp['name'])) {
         header("HTTP/1.1 400 Invalid file name.");
     return;
     }

 if (!in_array(strtolower(pathinfo($temp['name'], PATHINFO_EXTENSION)), array("gif", "jpg", "png"))) {
         header("HTTP/1.1 400 Invalid extension.");
     return;
   }
 //Configure the script to accept an image upload if there is an accepted origin, or if there was no origin
     $filetowrite = $imageFolder . $temp['name'];
     move_uploaded_file($temp['tmp_name'], $filetowrite);

     $protocol = isset($_SERVER['HTTPS']) && $_SERVER['HTTPS'] == 'on' ? "https://" : "http://";
     $localAddress = 'localhost:8000/images/';
     $baseurl = $protocol . $localAddress; //$_SERVER["HTTP_HOST"] . rtrim(dirname($_SERVER['REQUEST_URI']), "/") . "/";

 //Send the required JSON object that has 'location' as a property back to TinyMCE
 echo json_encode(array('location' => $baseurl . $temp['name'])); //was $filetowrite
     } else {
 header("HTTP/1.1 500 Server Error");
}

?>With that complete, you can now do two things to get the demo Vue image upload server working:
-
Run the PHP localhost command in the server/ folder:php -S localhost
-
In a separate command line window, at the Vue app base directory, run the npm server command to start it up: npm serve
You can now open the address that the Vue app produces in the browser, and test out uploading an image:
Enhancing UX with Vue drag and drop
With TinyMCE as your Vue app editor, you can drag and drop images directly into the editor. TinyMCE can detect the event, and automatically provides the UX needed to respond to image drag and drop. There's no requirement to create this additional behavior or UX for yourself. TinyMCE is also flexible, and you can adjust the appearance of the image dialog windows to better fit your Vue interfaces.
Vue image picker options with TinyMCE
You can add additional security to your Vue image upload options using the images_upload_credentials option. This option works alongside the images_upload_url option. When set to "true", you can send credentials through to the server along with the Axios or XHR POST.
The option to configure images_reuse_filename is also useful. It's included in the demo, and set to "true" to preserve the filenames. You can adjust it to "true" or "false" depending on how you want to handle file names in production.
Image uploads and other integrations
TinyMCE also has a dedicated integration for the React framework, and you can also check on the demo and end-to-end guide on configuring image upload in a React project.
For more on Vue integrations, check on the guide explaining how to enrich a textarea in Vue with TinyMCE.
If you’re working on a new application and TinyMCE’s options and features can help, contact us for support on getting started with TinyMCE!


