


With 1.5M+ developers running our rich text editor, it remains the most trusted editing software available. And in early 2022, we released TinyMCE version 6, which brought a brand new look and several enhancements to the editor. Then, throughout 2022 we introduced six new plugins, released several improvements, and fixed over 99 customer and community reported bugs. That’s a big list! Many new things!
Throughout 2023 and beyond, we’ll continue our investment, which means we need to stop working on older versions of TinyMCE to free up resources to work on more innovations. This means TinyMCE 5 is reaching its end of support, which is scheduled for April 20, 2023.
Beyond this date, further bug fixes and features won’t be introduced into TinyMCE 5, and our support team will have limited resources available to help troubleshoot issues within TinyMCE 5.
The upgrade to TinyMCE 6 requires changes to the tiny.init script, and a check through options, plugins, and APIs (the checking steps are needed since the upgrade to TinyMCE 6 includes optimizations, and in some cases has rebuilt and renamed capabilities.)
This guide explains how to upgrade to TinyMCE 6, and covers exactly what to change in regards to:
- The TinyMCE Content Delivery Network (CDN) link
- The tiny.init script
- Plugin and theme adjustments
When upgrading check your plugin configuration, and make sure that it matches one of the new plugin formatting patterns displayed in the following sections.
It also explains what changes to look for in API and plugin options, when you’re upgrading to TinyMCE 6.
TinyMCE 5 to TinyMCE 6 migration: video guide
Check on the video guide for an overview of how to upgrade:
Hey there it's John from Tiny and in this video I'm going to show you how to upgrade to tiny mc6 but before we get into it let's talk about a few reasons why you want to upgrade first of all TinyMCE 5 reaches end of support on April 20th 2023. what that means is beyond this date we're no longer going to be releasing any more updates to Tiny MC5 that means no more new features and also no more bug fixes or security updates so if you want to stay current offer your users the newest features and stay up to date with security patches and Bug fixes now is the time to upgrade to Tiny MCE 6 now there are four simple steps to upgrading Tiny MCE in your app you'll want to do this in a testing or staging environment to make sure everything works well before deploying to your users so the first step is to update the editor then check the dev console for messages check for theme plugin and API changes test it and then deploy it to your live environment this upgrade process will work if you're coming from TinyMCE 4 or TinyMCE 5 so before we get started let's find out what version of Tiny MCE we're on so I'm going to load up Tiny MCE wherever it's located in my app I'm going to go to developer tools and I'm going to type in Tiny MCE dot major version and that's going to tell me what version I'm on so I'm on version five now at this point I'll pause and introduce you to a few resources that can help you troubleshoot upgrading if you run into any errors if you go to tiny.cloud and you click on Docs and then migrating to TinyMCE it's going to bring you to this page with some upgrade guides so there's two types of resources under upgrades there's some blog articles that cover most of the issues you'll run into when upgrading and they're a great start and then there's also the migration guides which are full reference guides that cover all the specific things that have changed so for now we're going to use the migration guide to help us troubleshoot errors that the developer console will be throwing I've got my HTML on the right here and TinyMCE on the left I've intentionally inserted a few things to trip up the upgrade process so we can look at how to
troubleshoot them we have our selector option we've specified our plugins our toolbar and we're using the table of contents plugin and we've specified a depth of the table of contents so if you're not familiar with TinyMCE it's a series of these options that are specified within the init function and sometimes the options apply to the entire editor for example the toolbar and what plugins are loaded and other options are specific to plugins you'll see why that's important when this plugin is upgraded now the next step is to update tiny MC I'm loading TinyMCE from the cloud so all I have to do is change the version number to six but if you're self-hosting tiny MC you'll want to download the latest version from npm our website or GitHub okay so I've updated it to six loading it from the cloud and now I'm just going to reload the page and look for any errors so the first thing that we're seeing here is a failed to load plug-in error one of the things that we changed with tiny mc6 is we no longer allow you to enter a space separated list of plugins within an array so to fix this it's actually really simple all you have to do is remove the two square brackets and it'll start loading the plugins all right so I'm going to hit save and reload that again Okay so we've made some progress here but we're still seeing some errors around Toc HR paste so let's take a look at those next what I'm going to do is I'm going to search for those plugin names within the migration guide to see if it gives me any hints as to what I have to do so I'm going to search for paste in the migration guide okay great so it says four plugins were removed because their functionality is a core part of TinyMCE 6 HR paste non-editable and print so I think I can see paste in HR in here so what we'll do since they're now part of the course we don't have to specify them in the config when we load the plugins so I'm going to remove paste and I'm going to remove HR save and then reload and check for more errors okay so the next error I'm getting here is failed to load Toc plugins Toc that's the table of contents plugin from Tiny MCE 5 so let's look for that next I'm going to search for Toc it says as noted in the release notes the TOC plugin is no longer part of the free editor it's now a premium plugin okay so what I either need to do if I'm on a free version of tiny MC I need to remove the plugin its options and remove it from the toolbar or if I'm on a premium tiny MC plan I just need to update the plugin name and change some of the option names so I'm on a TinyMCE plan so all I'm going to do is follow these instructions to rename it so I have Toc here in my plugins options so I'm going to rename that to table of contents I have Toc in my toolbar I'm going to
rename that to table of contents and then I'm using an option from the table of contents plugin in tiny MC5 Toc depth which specifies how many headings deep the table of contents will go I want to maintain that functionality when I upgrade to six so I'm just going to look for that as well here we go Toc depth becomes table of contents underscore depth so I'll update that too I'll hit save and reload my page okay good so it looks like that error is gone now and I can confirm I have my table of contents button back here as well now at this point you'll look if you have any other options that you've specified in your config and it's great to just copy them and you can go back in here and search for them to make sure that you're not using something that's been deprecated or changed with tiny mc6 there are a few other changes that you want to check out if you're leveraging some of the more advanced apis for example tiny mc6 now uses promises instead of callbacks there's changes to the forced root block option and a few others so if you're using more advanced tiny MCE customizations or API functionality definitely check out the migration guide now lastly if your app was relying on the TinyMCE 5 skin and then all of a sudden you're updating to Tiny mc6 and you don't want to use the new skin that we've come up with you can always specify the old TinyMCE 5 skin so all I have to do here is Type in skin Tiny MCE 5 and that'll bring us back to the older skin now like I said before it's the same process if you're upgrading from Tiny MC four to six or TinyMCE 5 to 6. you'll just want to check both migration guides the four to five migration guide and the five to six migration guide to make sure that you're covering all the changes needed to move across both versions okay that's it hopefully you're excited to try some of the new features in Tiny MCE 6 and you can
continue to benefit from new features ongoing bug fixes and security updates and of course we encourage you to check out tiny.cloud to see what new premium features we've introduced as well if you haven't looked at Tiny MCE in a few years we're really excited for you to see what we've been working on now if you run into any issues with your upgrade you
can always head over to stock overflow for Community Support or if you'd like to leverage our us-based professional support team you can sign up for any one of our plans and we'll help you out with the upgrade good luck
TinyMCE 5 vs 6
The main differences between version 5 and 6 of TinyMCE are user interface related changes, and API configuration changes. If you’re starting out with a plan for migration, check through the changed plugins first. Then, progress to checking on any APIs if you’re making use of APIs in your app. Find out more about the key differences between versions in the TinyMCE 6 migration guide.
How to upgrade to TinyMCE 6
|
NOTE: Before you upgrade, be aware that TinyMCE 5 custom plugins are not compatible with TinyMCE 6. If upgrading to TinyMCE 6, you must adjust your tiny.init script to only use plugin names and options specific to TinyMCE 6, otherwise they will not work. |
There are three main steps needed to complete the upgrade:
- Check on your CDN script, and update the editor
- Review themes and editing modes
- Consider any plugin changes, and review the console dev log
If at any time you want more detail on any of the plugins, APIs or options mentioned in this document, visit the Migration Guide for detailed information.
Upgrade the editor from TinyMCE version 5 to 6
If you’re using Tiny Cloud, migrating from TinyMCE 5 to TinyMCE 6 requires you to update the TinyMCE CDN script tag.
If you haven’t already, remember to replace no-api-key with your own API key: from your Tiny account dashboard.
-
Locate the TinyMCE CDN script in your project, and change the version after /tinymce/5 to /tinymce/6:
<script
  src="https://cdn.tiny.cloud/1/no-api-key/tinymce/6/tinymce.min.js"
  referrerpolicy="origin"
></script>;
-
Confirm that your HTML and JavaScript configuration has TinyMCE 6 configured – check on the following example, which compares TinyMCE 5 and 6:
TinyMCE 5 config
<!DOCTYPE html>
<html lang="en">
  <head>
    <meta charset="utf-8">
    <meta name="viewport" content="width=device-width, initial-scale=1">
    <script src="https://cdn.tiny.cloud/1/no-api-key/tinymce/5/tinymce.min.js" referrerpolicy="origin"></script>
    <script>
      tinymce.init({
        selector: "#mytextarea",
        plugins: ['image' 'help' 'wordcount']
      });
    </script>
  </head>
  <body>
    <h1>TinyMCE Quick Start</h1>
    <form method="post">
      <div id="mytextarea">Hello, World!</div>
    </form>
  </body>
</html>TinyMCE 6 config
<!DOCTYPE html>
<html lang="en">
  <head>
    <meta charset="utf-8">
    <meta name="viewport" content="width=device-width, initial-scale=1">
    <script src="https://cdn.tiny.cloud/1/no-api-key/tinymce/6/tinymce.min.js" referrerpolicy="origin"></script>
    <script>
      tinymce.init({
        selector: "#mytextarea"
       //plugin configuration has changed in TinyMCE 6. Arrays of strings must be comma separated. They cannot be space separated.
        plugins: [ 'image', 'help', 'wordcount' ]
      });
    </script>
  </head>
  <body>
  <h1>TinyMCE Quick Start</h1>
    <form method="post">
      <div id="mytextarea">Hello, World!</div>
    </form>
  </body>
</html>If you’re Self-hosting TinyMCE, upgrade to TinyMCE 6 by navigating to the new community downloads page and selecting the TinyMCE SDK button for the latest version, or updating TinyMCE through your package manager (e.g. NPM or Bower).
- Navigate to the TinyMCE community downloads page.
- Click the Download button under the Download TinyMCE Community heading to receive the .zip format file.
- Unzip the files contents, and move the TinyMCE folder to overwrite the current TinyMCE folder in your project.
Plugin configuration
Specific plugin formatting rules are new to TinyMCE 6. You can configure plugins in one of the three following patterns:
- An array of strings: plugins: [ 'image', 'help', 'wordcount' ]
- A space-separated string: plugins: 'image help wordcount'
- A comma-separated string: plugins: 'image,help,wordcount'
TinyMCE 5 and previous versions allowed for a comma-separated string with spaces, and an array of space-separated strings. Upgrading to TinyMCE 6 means using one of three new methods:
- An array of comma separated strings in quote marks
- A space separated string in one set of quotes
- A comma separated string in one set of quotes.
When upgrading to TinyMCE 6, check on your plugin configuration, and make sure that it matches one of the new plugin formatting patterns.
Upgrade and adjust themes and skins
TinyMCE 6 includes a new skin, which appears automatically when loaded. You can change back to the TinyMCE 5 appearance by configuring the tinymce-5 skin in your tiny.init script.
If you’re still using the mobile theme for TinyMCE, this theme was previously deprecated in TinyMCE 5.1. The mobile theme is now removed as of version 6. If you load your project with TinyMCE 6, and you have the mobile theme configured, you will receive a deprecation notice in the browser console log.
Mobile User Interface support is now available by default in TinyMCE. For mobile design, remove the reference to the mobile theme from your tiny.inti script.
theme: 'mobile',
    mobile: {
        menubar: true
},If you reload your application after changing to TinyMCE 6, the editor will not load, and you will receive a warning message:
tinymce.min.js:4 The following deprecated features are currently enabled and have been removed in TinyMCE 6. These features will no longer work and should be removed from the TinyMCE configuration. See  for more information.
Themes: - mobile- Remove the reference to the mobile theme: change the mobile theme to the silver theme.
-
Check for any deprecation messages in the developer console log.
Check your default editor height
When upgrading to TinyMCE 6, the height now defaults to 400px. In previous versions of TinyMCE, the default height was 200px.
1. Check your tiny.init configuration for the “height” property.
2. Specify “height” and the number of pixels if you require an editor height larger than 400px, or smaller than 400px.
With these last steps complete, you have successfully completed the first phase in upgrading to TinyMCE 6.
Since this is a major release, with potential breaking changes, the next steps are to:
- Carefully check through your plugins, and adjust if needed
- Check any options or APIs you have configured, and adjust if needed
What you need to do after the upgrade
Now you’ve completed the upgrade, an important step is to double check your console log in developer tools for any errors, especially if you’re using any custom plugins you’ve developed yourself, or included from an open project.
Additional changes
HTML Schema changes
In TinyMCE 6, the default HTML schema is now HTML 5. If you were using an old schema and don’t have it specified, your new editor will start creating objects using HTML 5. For example, as the editor loads content that was created using an older schema, it will automatically convert <i> tags to <em>. No action is required on your part; this is just something to be aware of.
Since TinyMCE 6 uses HTML5 schema by default, you’ll need to use the HTML 5 elements within the TinyMCE rich text editor. As an example, this means switching out <i> tags for the HTML5 <em> tag syntax.
Upgraded plugins and plugin changes
1. Have you used any of the following plugins?
In TinyMCE 6.0, these plugins are now part of the TinyMCE core. You no longer need to specify them in the plugins, menubar, or toolbar configuration.
Therefore, remove any references to the following plugins:
- colorpicker
- contextmenu
- hr
- noneditable
- paste
- textcolor
- textpattern
There are also several plugins that have changed from being free functionality, to being included only in TinyMCE premium plans. You will need to remove these plugins or upgrade if you’re using the TinyMCE open source or the Cloud free plan.
- BBcode – removed in TinyMCE 6
- Full Page – removed in TinyMCE 6
- Image Tools – moved to the Premium plugin list for more support and development and renamed to “Edit Image”
- Legacy Output – removed in TinyMCE 6
- Spell Checker – removed in TinyMCE 6
- Tabfocus – Removed as a plugin in TinyMCE 6. Similar capabilities are available with tab index.
- Table of Contents – moved to the Premium plugin list for more support and development, and renamed from “TOC” to “Table of Contents”
Here is an example of a tiny.init script from TinyMCE 5 to 6, demonstrating plugin changes with the upgrade:
<script type="text/javascript">
tinymce.init({
    selector: "textarea",
    plugins: [
        "advlist", "anchor", "autolink", "charmap", "code", "fullscreen",
        "help", "image", "insertdatetime", "link", "lists", "media", "paste",
        "preview", "print", "searchreplace", "table", "visualblocks",
        "bbcode", "fullpage", "imagetools", "legacyoutput", "spellchecker", "toc",
    ],

    toolbar: "undo redo | styleselect | bold italic underline strikethrough | alignleft aligncenter alignright alignjustify | bullist numlist outdent indent | link image"
});
</script>And here is the console response if any of the now removed plugins are present:
The following deprecated features are currently enabled and have been removed in TinyMCE 6.0. These features will no longer work and should be removed from the TinyMCE configuration. See https://www.tiny.cloud/docs/tinymce/6/migration-from-5x/ for more information.

Plugins:
- bbcode
- fullpage
- legacyoutput
- spellchecker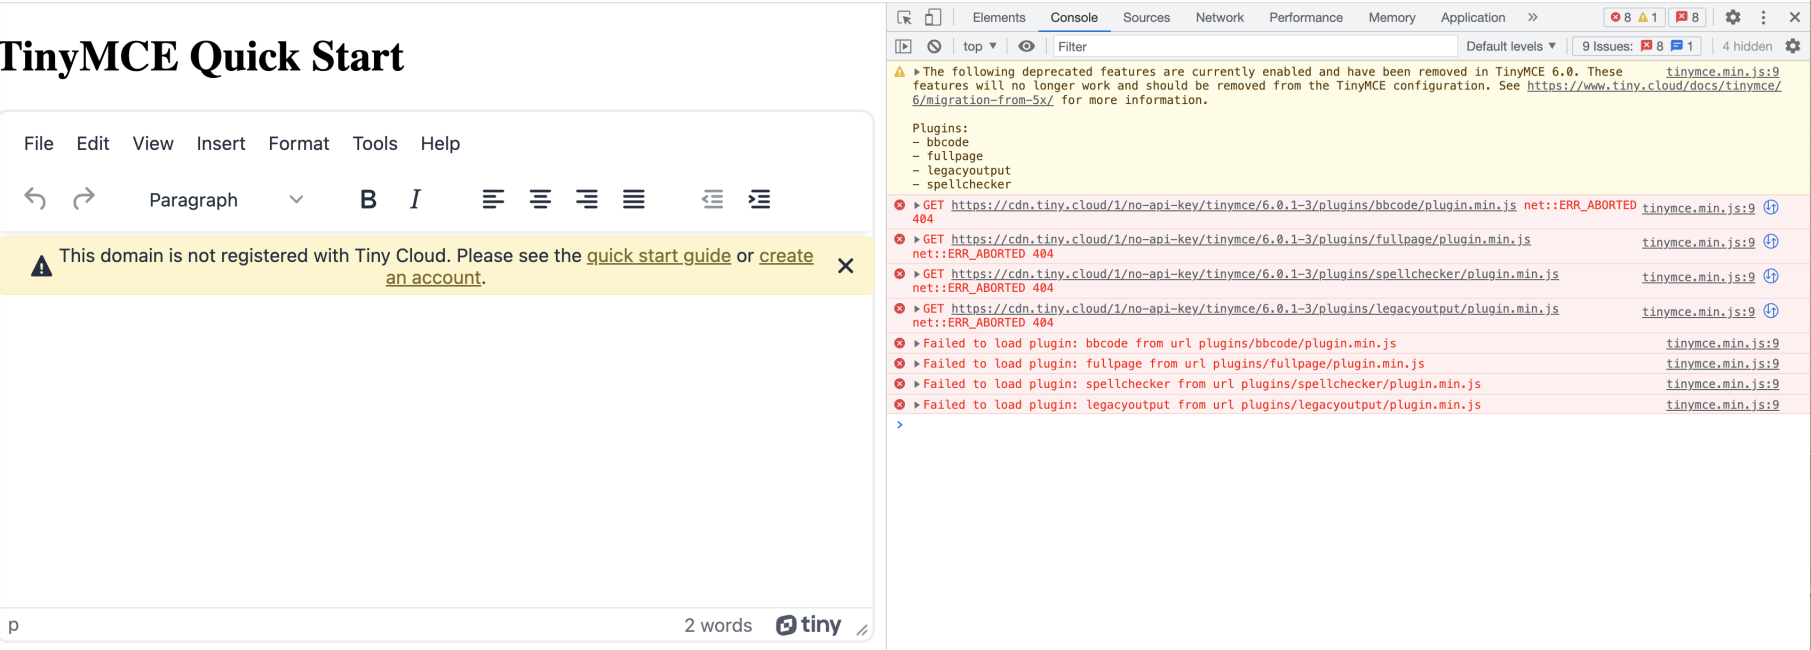
If you notice this message in your browser console log, remove the plugins listed from your tiny.init script. Then, save and restart your project. Read the Migration Guide for more information on the plugin changes in TinyMCE 6.
2. Renamed plugins and options
The following plugins have been renamed in TinyMCE 6, and are now only available on TinyMCE paid plans:
- Image tools > Enhanced Image Editing
- TOC > Table of Contents
And as a result of the name changes, the options available from each plugin have changed as well.
Enhanced Image Editing
- imagetools_toolbar > editimage_toolbar
- imagetools_proxy > editimage_proxy
- imagetools_cors_hosts > editimage_cors_hosts
- imagetools_credentials_hosts > editimage_credentials_hosts
- imagetools_fetch_image > editimage_fetch_image
- imagetools_api_key > editimage_api_key
- images_upload_timeout > editimage_upload_timeout
Table of Contents
Several commands for the Table of Contents plugin are now changed. The change mainly affects toolbar buttons:
- tocupdate > tableofcontentsupdate
- toc_class > tableofcontents_class
- toc_depth > tableofcontents_depth
- toc_header > tableofcontents_header
- If you have any of these configured in your tiny.init script:
- Locate the plugin or options previous name
- Replace it with the new name as of TinyMCE 6
3. Other plugins and options changes
If you’ve configured the toolbar_mode option or the forced_root_block option, the way these plugin options behave have changed in TinyMCE 6.
The toolbar_mode option will no-longer accept the false value in TinyMCE 6. This was retained for backwards compatibility with the toolbar_drawer option. The 'wrap' option instead keeps the same functionality as false.
The forced_root_block option will no-longer accept the false value or an empty string value. It also blocks various editor functions from working correctly and causes non-semantic HTML to be generated.
The Media plugin
Since the Media plugin configuration has changed, any audio, iframe, object, or video tagged elements are no longer treated as a separate or a special element by TinyMCE. These elements need to be configured by specifying them as valid_elements in your TinyMCE configuration.
The Table plugin
The Table plugin functions are now included in the core capabilities of TinyMCE. Integrating the Table plugin options in TinyMCE 6 focuses on User Interface options. Tables also now use the margin attribute and not float to determine their position on a page.
Upgraded options and API changes
1. API changes: callbacks to promises
Update these APIs to use a promise instead of the success and failure call back: AddOnManager, PluginManager, ScriptLoader, StyleSheetLoader, and ThemeManager.
2. Have you used textpattern_patterns?
Change this option to the new name text_patterns. This option is now enabled by default. You can switch it off by including the option in your tiny.init script with the false value: text_patterns: false,
3. Have you configured the isDisabled() method?
The isDisabled() function is now renamed to isEnabled(). If you’ve configured isDisabled() === false, change it to the new isEnabled() === true call. The meaning is reversed, but the function remains the same.
The same change is also in place for the disabled property. This is now the enabled property – set it to enabled: true or false as needed. Search your configuration for these properties and change them out.
If you’re using any Dialog APIs and have disable(<name>) or enable(<name>), change them to setEnabled(<name>, <state>).
4. Have you configured the fire() function?
The fire() function has been renamed in all TinyMCE APIs. The new dispatch() function replaces it.
5. Have you configured the closeButton API?
This API no longer needs the timeout option configured with it. The closeButton API now shows or hides the close button, and you can set the timeout option to set up how long the notification appears before it closes.
6. Have you configured the link_default_protocol option?
This option now defaults to https. It used to default to a value of http, however this improvement enhances TinyMCE’s security capability.
Final points for upgrading to TinyMCE 6
You can have a test drive of the TinyMCE community edition for Version 6, to see how the updates and improvements work, within your project.
For more information about upgrading to TinyMCE 6, refer to the Migration guide. It contains extensive lists of option and API deprecations and adjustments. If you have any questions or concerns, reach out on the TinyMCE GitHub if you have any feedback.
If you’re aiming to upgrade to use Premium plugins with TinyMCE 6, sign up for a FREE API key, and then try out some of the TinyMCE Premium plugins in your project. When you’re ready, our sales team is here to chat about available plans to suit your app’s needs (all of which come with professional support to help with your upgrade, by the way!)


