


If there’s one detail you need when writing something important, it’s protecting the work you’ve done. Better still, make it uneditable. (Autosave is helpful too.) The best solution though, is to restrict who can edit your work.
But what about being able to set certain areas of your content as non-editable? That’s a detail that your Document Management System (DMS) needs to give you.
Without non-editable abilities, your DMS is letting you down.
non-editable (AKA, read-only or non editable) is a small but high achieving ability, and if it’s not available in the DMS software itself, make sure your DMS’s rich text editor can make content non-editable. That’s where TinyMCE can give you what you need, and this article explains how our non-editable feature works within a DMS.
Non-editable content in TinyMCE
In versions released before TinyMCE 6, the non-editable functionality was a separate plugin. However with TinyMCE 6, the plugin became a core part of the rich text editor’s abilities.
Convenience guides some design choices. And adding non-editable to the core, is one example of how TinyMCE adapts its core content, to improve its rich text editing abilities.
There are two methods to set up non-editable content within TinyMCE. A non-editable class, and a non-editable regular expression, or regex.
Non-editable classes for TinyMCE
This method is ideal for targeting a specific HTML element on a page, and making it non-editable. For example, if you had a tinymce.init script set up, add the noneditable_class value:
tinymce.init({
  selector: '.myTextarea’, //The syntax for the selector is not the same as the syntax for the non editable class. You do not need to specify the ‘.’ character before the class name.
  noneditable_class: ‘uneditable'
});The next step is including a template, or a custom menu button to create a non-editable section within the document. The section can be any HTML element as long as it contains the class=”uneditable” inline option in the opening HTML tag (e.g. <div class=”uneditable”>You cannot edit this</div>).
Non-editable regex with TinyMCE
If you need something more specific than a class, you can use a regular expression (AKA regex) to configure text or a specific character as non-editable. This option requires some regex knowledge to configure. It’s also better suited to making key numbers, addresses, or words, or phrases within a document non-editable rather than a whole section.
To configure it, place the nonedtiable_regexp: in your tinymce.init script, and specify the regex you want to match, and make uneditable:
tinymce.init({
  selector: ".mytextarea",
  noneditable_regexp: /\d{3}-\d{3}-\d{3}/g, // matches 123-456-789
});
Two things to know:
- The regular expressions need to be global so that TinyMCE can match all instances of the regex within the document. That’s what the /g is for.
- This option is not designed to find HTML elements and make them non-editable. Use the noneditable_class option for HTML elements. The regex option is for specific text. Using the regex option to find HTML elements will transform the elements into <span> tags (this does have the effect of making read-only content easier to spot in the HTML).
Non-editable configured in proposal writing DMS
It can be easier to understand and apply non-editable in TinyMCE if you test it out in a demo for yourself. This demo covers the set up of a proposal writing system that could appear in a real-world DMS.
How to set up TinyMCE
For this demo, set up TinyMCE by accessing it through the cloud, with the CDN link:
- Navigate to the Get TinyMCE page, and register for an account.
Signing up and getting an API key prevents any error messages appearing in the textarea. It gives you 14 days FREE access to try out our Premium TinyMCE plugins.
It also gives you pre-configured HTML content to copy and help you get-started, and other useful features such as domain registration.
- Copy the HTML content under the TinyMCE installation heading.
- Create a new directory on your workstation. Make an index.html file inside that folder.
- Paste the HTML content into the index.html file. Save the file, and then open it in your browser to test it. You can also run a local server with Python or PHP to test TinyMCE.
Configuring DMS design and elements
WIth TinyMCE running, the next component to add is the DMS elements around it. The following design is drawn from the TinyMCE DMS solution config. The proposal writing aspects are adapted from the config.
-
Adjust the initial HTML, moving the tinymce.init script into the head section of the file:
<!DOCTYPE html>
<html>
<head>
  <script src="https://cdn.tiny.cloud/1/your-api-key/tinymce/6/tinymce.min.js" referrerpolicy="origin"></script>
</head>
<body>
  <textarea>
    Welcome to TinyMCE!
  </textarea>
  <script>
    tinymce.init({
      selector: 'textarea',
      plugins: 'advlist autolink lists link image charmap preview anchor pagebreak',
      toolbar_mode: 'floating',
    });
  </script>
</body>
</html>-
Change the content of the tinymce.init script to include aspects of DMS design, and plugins:
tinymce.init({
  selector: "textarea",
  plugins:
    "powerpaste casechange searchreplace autolink directionality advcode visualblocks visualchars image link media mediaembed codesample table charmap pagebreak nonbreaking anchor tableofcontents insertdatetime advlist lists checklist wordcount tinymcespellchecker editimage help formatpainter permanentpen charmap linkchecker emoticons advtable export print autosave",
  toolbar:
    "undo redo print spellcheckdialog formatpainter | blocks fontfamily fontsize | bold italic underline forecolor backcolor | link image | alignleft aligncenter alignright alignjustify lineheight | checklist bullist numlist indent outdent | removeformat",
  height: "700px",
  toolbar_sticky: true,
  icons: "thin",
  autosave_restore_when_empty: true,
  content_style: `
                body {
                    background: #fff;
                }

                @media (min-width: 840px) {
                    html {
                        background: #eceef4;
                        min-height: 100%;
                        padding: 0 .5rem
                    }

                    body {
                        background-color: #fff;
                        box-shadow: 0 0 4px rgba(0, 0, 0, .15);
                        box-sizing: border-box;
                        margin: 1rem auto 0;
                        max-width: 820px;
                        min-height: calc(100vh - 1rem);
                        padding:4rem 6rem 6rem 6rem
                    }
                }
                `,
});
-
Add style elements to the DMS page
<style>
        body {
            margin: 4rem auto;
            padding: 0 2rem;
            background-color: #f9f9fb;
        }
        main {
            width: 100%;
        }
</style>-
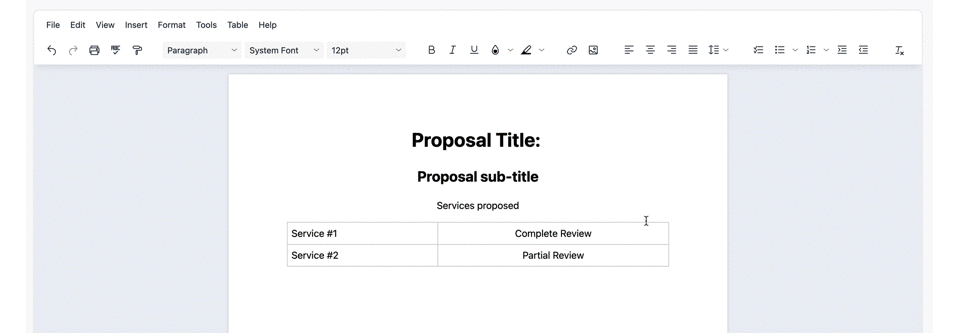
Include some DMS content in the HTML body section. The <td> element classes are left blank for the non-editable configuration.
<textarea class="textarea">
            <h1 style="text-align: center;">Proposal Title: Your new proposal</h1>
            <h2 style="text-align: center;">Proposal sub-title</h2>
            <p style="text-align: center;">Services proposed</p>
            <table style="border-collapse: collapse; width: 100%;" border="1">
                <tbody>
                    <tr>
                        <td class="">Service #1</td>
                        <td class="" style="text-align: center;">Complete Review</td>
                    </tr>
                    <tr>
                        <td class="">Service #2</td>
                        <td class="" style="text-align: center;">Partial Review</td>
                    </tr>
            </tbody>
            </table>
</textarea>-
Save the changes, and reload the page in your browser.
How to configure non-editable classes in your DMS
Start by setting up the class to make specific sections non-editable:
-
Include a noneditable_class option in the tinymce.init script (in this case "uneditable":
<script>
    tinymce.init({
        ...
        plugins: "powerpaste casechange searchreplace autolink directionality advcode visualblocks visualchars image link media mediaembed codesample table charmap pagebreak nonbreaking anchor tableofcontents insertdatetime advlist lists checklist wordcount tinymcespellchecker editimage help formatpainter permanentpen charmap linkchecker emoticons advtable export print autosave",
        toolbar: "undo redo print spellcheckdialog formatpainter | blocks fontfamily fontsize | bold italic underline forecolor backcolor | link image | alignleft aligncenter alignright alignjustify lineheight | checklist bullist numlist indent outdent | removeformat",
        noneditable_class: 'uneditable',
        height: '700px',
...-
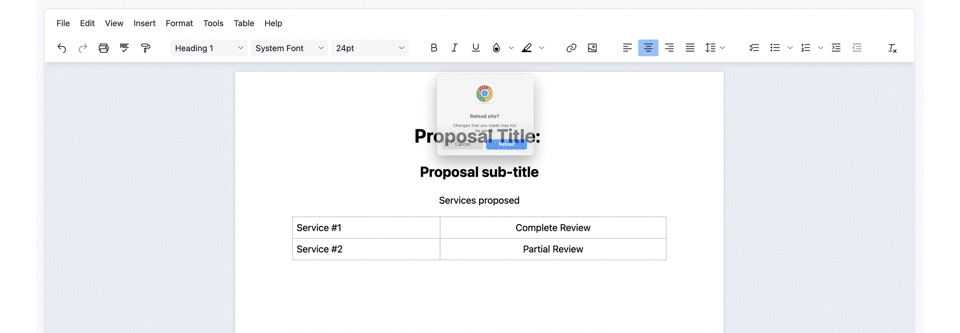
Give the table <td> elements the new uneditable class:
<tbody>
    <tr>
      <td class="uneditable">Service #1</td>
      <td class="uneditable" style="text-align: center;">Complete Review</td>
    </tr>
    <tr>
      <td class="uneditable">Service #2</td>
      <td class="uneditable" style="text-align: center;">Partial Review</td>
    </tr>
</tbody>-
Save the changes, and reload the file in your browser:
You can see that the service rows in the table are blocked from editing by the uneditable class. This is the first step in configuring non-editable content in your DMS.
For a proposal, if you didn’t set specific prices, customers would complain (or revolt, depending on your industry). The regex option works well for setting your proposal rates and locking them down.
Non-editable with regex
If your proposed rates are $159.99 and $200.00, here’s how to make the numbers non-editable:
-
Modify the tinymce.init script to include the following:
noneditable_regexp: /\d{3}-\d{3}-\d{3}/g, // matches 123-456-789-
Change the initial content to match the specific rates. In this case, we want to match on exactly 1 of any character (the price sign $), between 2 and 3 numbers, a decimal, and then exactly two numbers:
noneditable_regexp: /\W{1}\d{1,4}\.\d{2}/g, //matches any non-word ($, in this case) followed by between 1 to 4 numbers, a "." character, and then exactly 2 numbers-
Add the rates to the table:
<tbody>
    <tr>
        <td class="uneditable">Service #1</td>
        <td class="uneditable" style="text-align: center;">Complete Review</td>
        <td style="text-align: right;">$200.00</td>
    </tr>
    <tr>
        <td class="uneditable">Service #2</td>
        <td class="uneditable" style="text-align: center;">Partial Review</td>
        <td style="text-align: right;">$59.99</td>
    </tr>
</tbody>-
Save and reload the demo config in your browser. With the regex configured, the prices are locked. Since there is no class to modify, they will remain locked down and non-editable:
What else does your DMS need?
From here, there are more directions you can go to add to your DMS. For more read-only, non-editable content:
- Discover more about setting up read-only mode with TinyMCE
- Look into templating with TinyMCE. It’s a feature that combines well with non-editable.
As an additional bit of information, since the noneditable_class uses an HTML valid class, you can combine it with the TinyMCE content_css function.
As a next step, you can create a style for content that’s not editable, and make it stand out on the page. Find out more on creating custom styles with TinyMCE.
The power of building non-editable content in your DMS provides a small, but significant, level of protection. In production, you can further lock down who can edit documents and sections within documents using features like access control, or templates with locked classes or regex to isolate specific points of information.
For more information about TinyMCE’s features for your DMS, contact us, or check on our DMS solutions page.


