


Whatever your use case (needing a rich text editor that’s easier to manage, more secure, or more extendable), you’re covered with this brief guide to migrating from Tiptap to TinyMCE in React. If you’re using Tiptap in Vue.js instead, check out the guide for migrating from Tiptap to TinyMCE in Vue.
Here’s an example project that shows a Tiptap instance inside a reactive content management system (CMS) app that logs the JSON created in the content area and then shows a preview of that JSON.
Right now, Tiptap is integrated and customized in this CMS app:
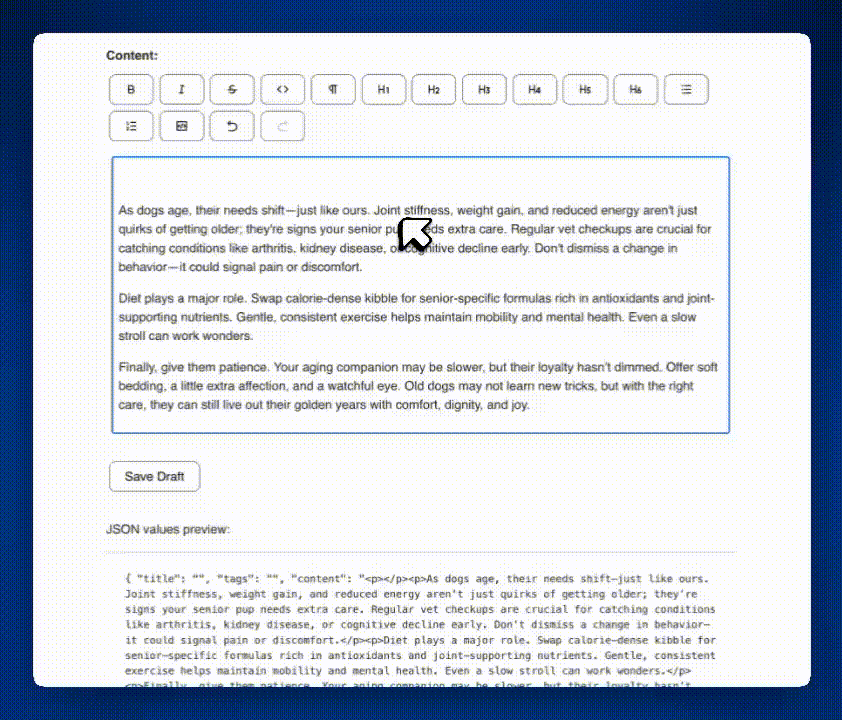
You’ll remove Tiptap from the React project and replace it with TinyMCE, without disturbing the rest of my app, and while keeping my content area reactive.
Step one: Remove Tiptap from the React project
The first thing you’ll need to do is remove Tiptap from my project to make room for the TinyMCE rich text editor. This will take a few different steps.
- Delete TiptapEditor.jsx (or your custom Tiptap component) from the project. If you have multiple Tiptap extensions you will also need to delete these extensions as well.
- Delete index.scss from the project.
- Open App.jsx (Or wherever your Tiptap editor lives) and remove the following lines of code (and any additional Tiptap extensions) :
import Tiptap from "./TipTapEditor.jsx";and
<Tiptap onContentChange={handleEditorChange} />;⚠️ Note: If you have a larger project and the Tiptap editor is in multiple .jsx or .tsx files, you will need to remove the editor and replace it in multiple files also.
🔥 Hot Tip: Leave App.jsx open because you’ll need to add TinyMCE to this file.
-
Remove the NPM packages for Tiptap and its extensions. For this CMS app, I’m uninstalling a few:
npm uninstall @tiptap/react @tiptap/starter-kit @tiptap/extension-color @tiptap/extension-list-item @tiptap/extension-text-style
If you’ve successfully uninstalled Tiptap and you’re running a dev instance, you’ll see an empty place where your editor used to be on your page. Now you’re ready to add and configure TinyMCE.
Step two: Add and configure TinyMCE
Installing TinyMCE in React is simple and only takes a few steps. You will:
-
Install TinyMCE into the React project via npm:
npm install @tinymce/tinymce-react - Add TinyMCE to the list of imports in the .jsx or .tsx file where your RTE will live:
import { Editor } from "@tinymce/tinymce-react"; -
Initialize TinyMCE as a reactive
Editorwith a basic setup inside theform-group.- ⚠️
onContentChangeisn’t a valid prop for TinyMCE’s React wrapper, so it must be changed toonEditorChangeto get live editor updates.
<div className="form-group">
  <label>Content:</label>
  <Editor
    onEditorChange={(newContent, editor) => handleEditorChange(newContent)}
    apiKey="no-api-key"
    initialValue="<p>Welcome to TinyMCE!</p>"
    init={{}}
  />
</div>;
- ⚠️
Example App.jsx with TinyMCE
🤔 Note: This implementation is made for a small demo. In production for large-scale React apps, you’ll want to use react-hook-form or formik for validation, add accessibility optimizations, add debounce, and probably break all of the different parts of the app into smaller components for performance.
With these caveats, here’s a sample App.jsx with TinyMCE:
import { useState } from "react";
import { Editor } from "@tinymce/tinymce-react";
import "./App.css";

function App() {
  const [formData, setFormData] = useState({
    title: "",
    tags: "",
    content: "",
  });

  const handleInputChange = (e) => {
    const { name, value } = e.target;
    if (name === "tags") {
      setFormData((prev) => ({
        ...prev,
        tags: value.split(",").map((tag) => tag.trim()),
      }));
    } else {
      setFormData((prev) => ({ ...prev, [name]: value }));
    }
  };

  const handleEditorChange = (html) => {
    setFormData((prev) => ({
      ...prev,
      content: html,
    }));
  };

  const handleSave = () => {
    console.log("Saved Draft:", formData);
  };

  return (
    <div className="cms-container">
      <header className="cms-header">
        <h1>New Blog Entry</h1>
      </header>
      <form onSubmit={handleSave}>
        <main className="cms-main">
          <div className="form-group">
            <label htmlFor="title">Title</label>
            <input
              type="text"
              name="title"
              value={formData.title}
              onChange={handleInputChange}
              placeholder="Enter blog title"
            />
          </div>

          <div className="form-group">
            <label htmlFor="tags">Tags</label>
            <input
              type="text"
              name="tags"
              value={
                Array.isArray(formData.tags)
                  ? formData.tags.join(", ")
                  : formData.tags
              }
              onChange={handleInputChange}
              placeholder="e.g. comics, literacy, creativity"
            />
          </div>

          <div className="form-group">
            <label>Content:</label>
            <Editor
              onEditorChange={(newContent, editor) =>
                handleEditorChange(newContent)
              }
              apiKey="no-api-key"
              initialValue="<p>Welcome to TinyMCE!</p>"
              init={{}}
            />
          </div>

          <div className="form-actions">
            <button type="submit">Save Draft</button>
          </div>
        </main>
      </form>

      <div className="form-actions">
        <label>JSON values preview:</label>
        <pre className="cms-preview">{JSON.stringify(formData, null, 2)}</pre>
      </div>
    </div>
  );
}

export default App;
⚠️ Note: You’ll need to replace the value for apiKey="no-api-key" with a valid key. If you don’t already have one, you can get a TinyMCE API key for free and plug it in in a few minutes.
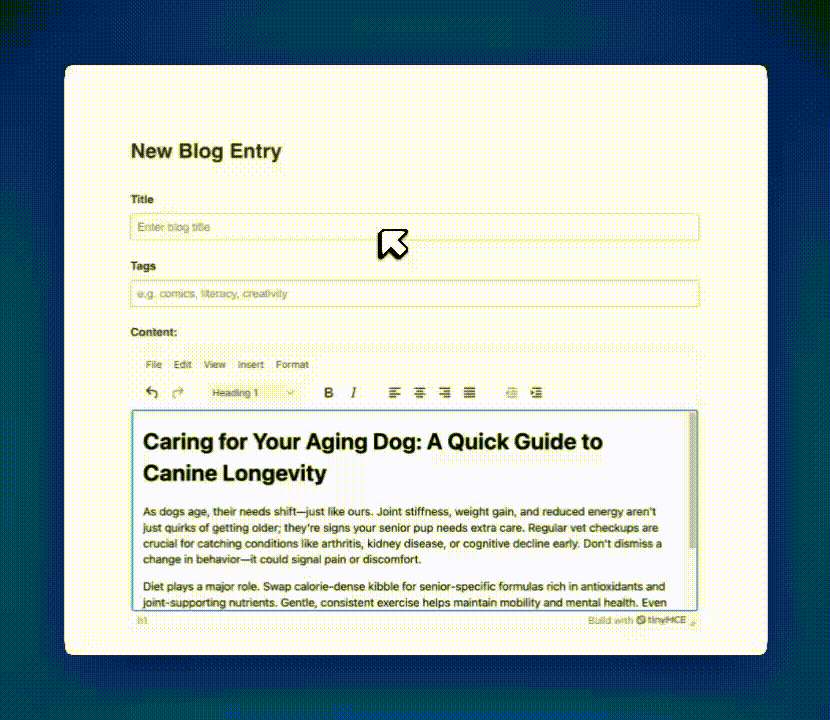
Now you’ve changed App.jsx to include TinyMCE, a useful rich text editor even in the default state, without adding any toolbars or features.
How long does it take to migrate from Tiptap to TinyMCE?
The timeline for migrating from Tiptap to TinyMCE depends on:
- The number of Tiptap extensions you are using in your current Tiptap instance: The more Tiptap extensions you need to replace with TinyMCE plugins, the longer it may take. But it really depends on the plugins, because some TinyMCE features only require adding a single word to plugins to implement.
- The complexity of your reactive form containing your rich text editor: If you’re already using onContentChange with Tiptap, you can alter it to onEditorChange for TinyMCE. If you have a more complex setup, you’ll need a custom solution.
- The complexity of your React application: It’s likely that your RTE doesn’t live in App.jsx in your app. You may need to alter more than one file in the project, depending on its scale.
Migrating from Tiptap extensions to TinyMCE plugins
Migrating from Tiptap extensions is easy, depending on the comparable extension. Here is a reference table of several popular Tiptap extensions and which TinyMCE features they convert to.
|
TinyMCE feature |
Comparable Tiptap extension |
TinyMCE integration notes |
|
Built in |
Table, Table Cell, Table Header, Table Row |
Can be upgraded to Enhanced Tables. |
|
Built in |
Text Align |
|
|
Built in |
Typography |
Can be upgraded to Advanced Typography. |
|
Built in (Media) |
YouTube, Image |
Can be upgraded to Image Optimizer. |
|
Built in |
Bold, Italic, Strike, Code, Subscript, Superscript, Underline |
|
|
Snapshot Compare |
Follow this installation guide for Suggested Edits. |
|
|
AI Agent, AI Changes, AI Generation, AI Suggestions |
||
|
Version History, Compare Snapshots |
Follow this four step installation guide, beginning with How to Set Up and Use Revision History in TinyMCE. |
|
|
Collaboration |
||
|
Comments |
||
|
Export |
Upgrade your RTE with Export to PDF. |
If you’re migrating from another RTE like Froala or CKEditor to TinyMCE, or even from TinyMCE 6 to TinyMCE 7, check out the TinyMCE migration page for a comprehensive list of guides.
What’s next?
If you haven’t heard yet, TinyMCE has a brand new Developer Center full of resources made just for you. Check it out today, or read the “Hello” blog post from our new Developer Relations Manager, Fred Harper!
If you’re migrating from another rich text editor like Froala, CKEditor, or even from an older version of TinyMCE, you’ll find the process straightforward and well-supported. And if you run into snags, don’t worry, you’re not alone. You can contact us at TinyMCE any time to ask questions about your migration, or how TinyMCE fits into your app. Happy coding!


