


One of the most important parts of developing software is targeting markets in different countries, which means (where appropriate) you use the language of those countries. For example, in order to serve the Israeli market, the software must support Hebrew. This concept is called internationalization and to support internationalization, it’s vital to have the ability to change the direction of text.
Rich text editors have the ability to change the text direction. They do this through HTML rtl and ltr options (that’s right to left, and left to right).
If the rich text editor is a What You See Is What You Get (WYSIWYG) then developers and content creators can publish their content without needing in-depth knowledge of text direction.
How to set text direction for internationalization
To adapt a product or software to meet the language or culture of a specific market, you must define the locale, which is a set of parameters detailing user preferences for a specific location such as; language, date-time format, currency format, and other settings.
When working with an RTE, you need to configure the text directions based on the default language. Thankfully, you can set the HTML text direction and other details automatically with TinyMCE based on the configured language. For example, when the language Hebrew is configured, by default, the editor text direction will be right to left.
Can’t you set text direction in just one place?
While you can set text direction, and let each page element inherit the configuration (you can also set text direction with TinyMCE), users may need to create or edit an English-language document going left to right, but still want to have user interface (UI) options in Hebrew. This can be achieved through setting up TinyMCE’s directionality option for internationalization, and this tutorial explains how to do it.
Setting up TinyMCE
Your aim: create a project using TinyMCE, configure the language for the UI, and set the text direction to be used in the editor window, changing to and from ltr and rtl.
The TinyMCE editor supports a cloud-hosted version and a self-hosted version – these instructions use the self-hosted version.
Collecting the self hosted files
- Navigate to the downloads page
- Download the community version of the TinyMCE editor, and extract it to your desired location.
- Find a folder named
\tinymce\js\tinymceinside the extracted folder. This is the root folder. It contains all the necessary files for creating the TinyMCE editor. It also contains folders,plugins, andlangs, used to install additional plugins and languages, respectively.
Setting up the editor
-
Create an HTML file in the root folder with a text area, which will act as an editor window.
-
Use the following snippet to create a webpage with a text area.
<!DOCTYPE html>
<html>
<head>
<title>
My TinyMCE Editor
</title>
</head>
<body>
  <textarea>
    Welcome to TinyMCE Editor!
  </textarea>
</body>
</html>Initializing TinyMCE
To initialize the TinyMCE editor, you need to add the TinyMCE reference and the tiny.init() method.
-
Add the following script in the
<head>tag of your HTML file. It adds a reference to the TinyMCE JavaScript file you’ve downloaded.
<script src="js/tinymce/tinymce.min.js" referrerpolicy="origin"></script>;
-
Add this script at the bottom of your
<body>tag to initialize the TinyMCE editor.
 <script>
tinymce.init({
      selector: 'textarea',
      plugins: 'table code colorpicker textcolor',
     toolbar: 'table code bold italic alignleft aligncenter alignright alignjustify | outdent indent ',
      toolbar_mode: 'floating'
    });
</script>In the above code:
selector: 'textarea' specifies theCSSselector to find the text area you created earlier.plugins: specifies the list of TinyMCE plugins to be used in your editor. Open-source plugins are available by default when you download the community version of the TinyMCE editor. You can find the list on the plugins page.toolbar: enables and configures the items in the toolbar displayed beneath the Menu bar. Use|to add separators within the toolbar icons.toolbar_mode: configures how the toolbar icons are accommodated in the toolbar in different screen sizes. Possible values are listed in the toolbar documentation.
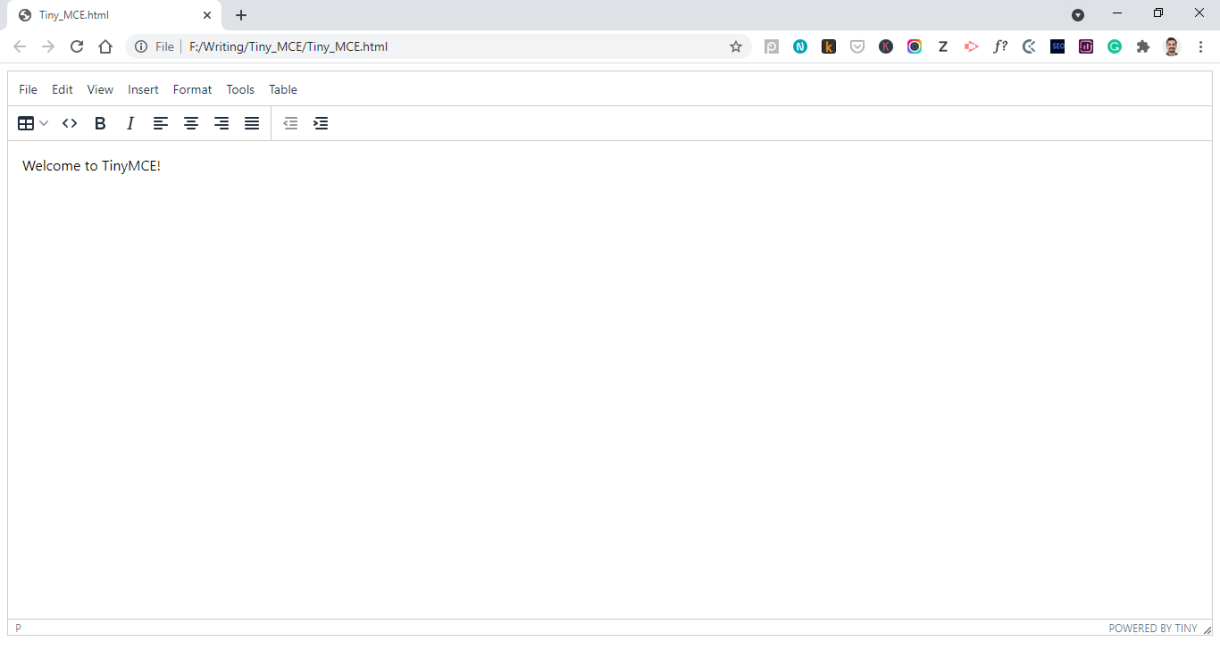
Save the file as index.htm in the root folder. When you load the file in the browser, you should see something like this:
Now configure internationalization.
Localizing the interface
Installing language packages
A language package contains every UI text label in a specific language.
In order to configure the UI text in a specific language:
- Download the language package from the Language Packages page and extract it to the
js/tinymce/langsfolder of the TinyMCE installation location. - Download and install the language package Hebrew. Remember, this requires a right to left direction. You’ll configure options and directionality around that.
Configuring language and text direction
Understand the following components for setting TinyMCE for internationalization and text direction:
- The
languageoption is used to configure the language of the UI. The UI text direction is automatically configured based on the language package. - The
directionalityoption is used to configure the text direction in the editor text area.
The language and directionality options are configured in the init() method, which is used to initialize the editor.
To configure the language of the UI:
-
Extract file name of the downloaded language package. For example, the downloaded language package has the file name
he_IL.js, which you need to use in the language option. -
Add the following option in the
tinymce.init()method to configure Hebrew as the UI language:
language: "he_IL";
When you configure the language, the text direction of the UI will be automatically adapted to match the language. In this case, the text will move from right to left.
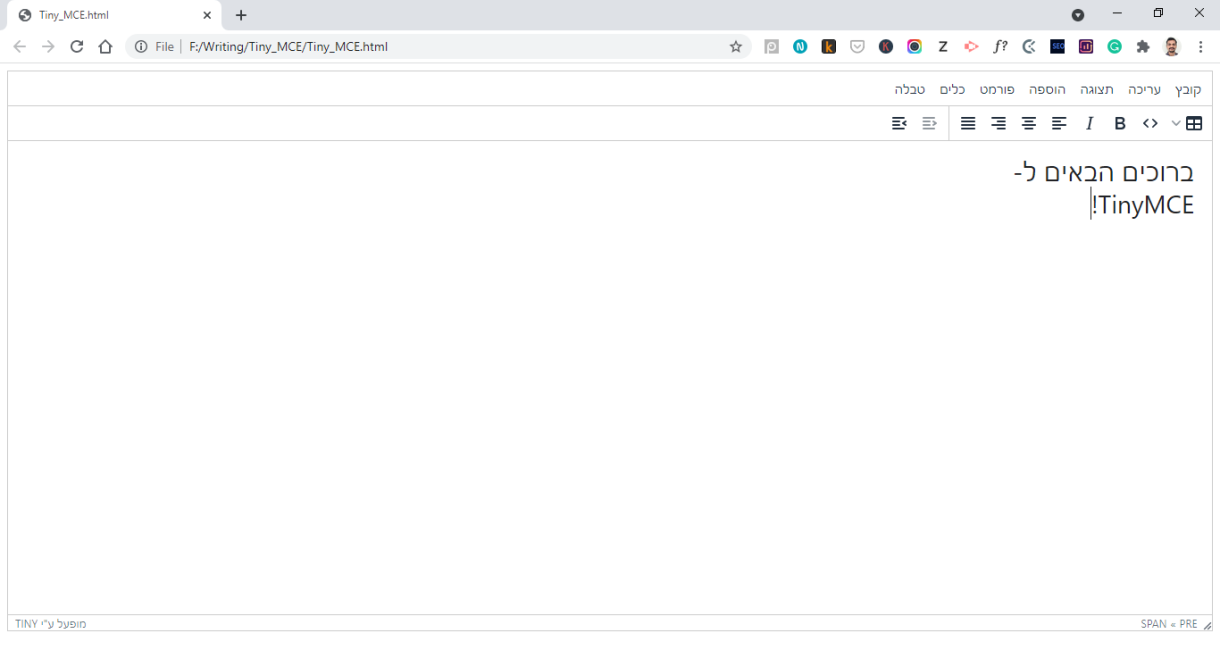
Reconfigure and adjust text direction
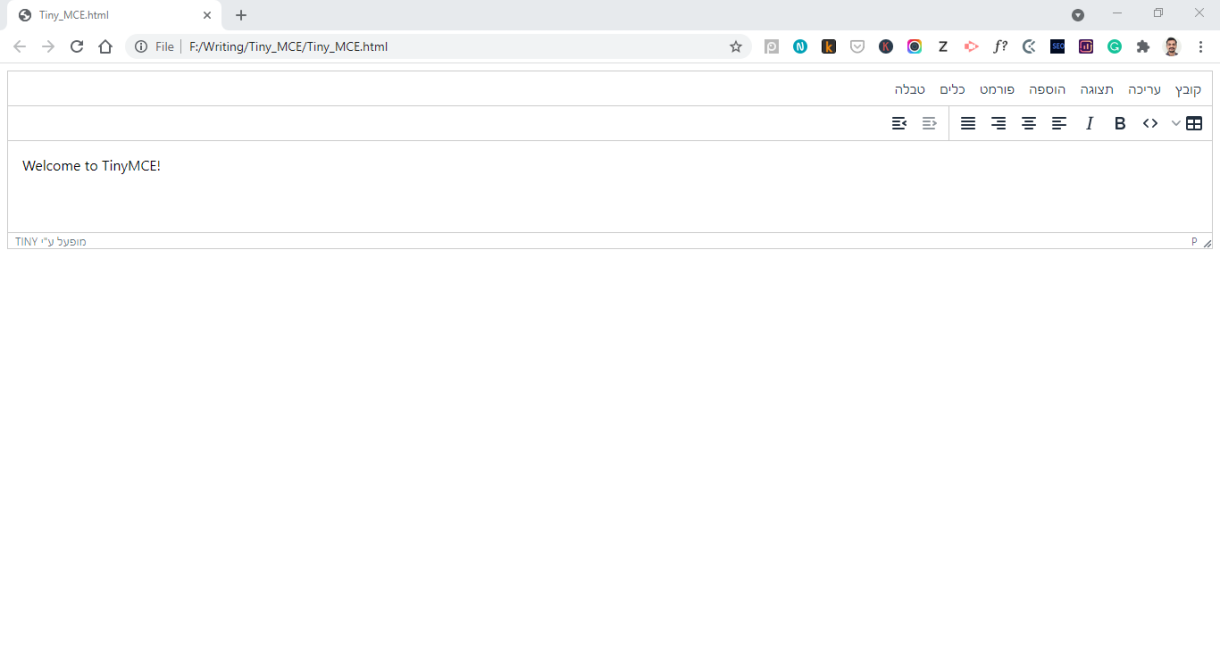
TinyMCE also allows you to configure the desired text direction in the editor using the directionality option, which is independent of the configured language. This way, you can adjust the text direction, changing it from left to right as needed. To create or work with English text, you set the directionality to ltr, or rtl:
directionality : 'ltr'With this option added, the editor will have the language set as Hebrew and the text direction from left to right:
You can check on the TinyMCE documentation to find out more about the directionality plugin.
The final HTML file with language and text direction should look like this:
<!DOCTYPE html>
<html>
<head>
  <script src="js/tinymce/tinymce.min.js" referrerpolicy="origin"></script>
</head>
<body>
  <textarea>
    Welcome to TinyMCE!
  </textarea>
  <script>
    tinymce.init({
      selector: 'textarea',
      plugins: 'table code colorpicker textcolor',
      toolbar: 'table code bold italic alignleft aligncenter alignright alignjustify | outdent indent |',
      toolbar_mode: 'floating',
	  language: 'he_IL',
	  directionality : 'ltr'
	  })
  </script>
</body>
</html>Conclusion
To better serve your users in multiple countries and regions, you need to present your products in multiple languages. TinyMCE allows you to set HTML text direction while providing many other customizable features to internationalize.
If you’d like to try this out for yourself, you can sign up for a FREE API key, and set TinyMCE text direction on your website with Tiny Cloud.


