

TinyMCE’s Image Optimizer, powered by Uploadcare, provides an out-of-the-box solution for content workflows that are image-heavy. From content management solutions to ecommerce platforms, advanced tools for handling visual assets are helpful for all kinds of web apps.
In this guide, we’ll show you how to integrate Image Optimizer into a rich text editor instance and use Uploadcare’s Admin Panel. This tutorial is based on our recent “What’s New in TinyMCE?” webinar, where the team from Uploadcare showed off the admin panel for image file management. Whether or not you’re familiar with TinyMCE and Image Optimizer, our step-by-step walkthrough will guide you through the process. And if you’re more of a visual learner, check out our webinar replay below, and follow the process there 👇
Prerequisites
Before we dive in, here’s what you’ll need:
- TinyMCE Github Boilerplate Code: Clone the starter boilerplate from our repository to get up and running quickly.
- A TinyMCE API key: You should already have with your TinyMCE account, which you can find on the Integrate page under My Account.
- Uploadcare Account: If you don’t have an Uploadcare account yet, reach out to your TinyMCE Customer Success Manager and they’ll help you get started.
Part one: Set up Image Optimizer in TinyMCE
Setting up this feature in TinyMCE involves configuring the plugin, adding signed uploads, configuring storage options, and adding options for responsive images. Image Optimizer is available for TinyMCE 7.6 or later, for both cloud-hosted and self-hosted TinyMCE customers on the enterprise plan. There’s a self-service option launching later in 2025.
Step one: Integrate Image Optimizer into tinymce.init
To integrate Image Optimizer into your TinyMCE editor:
- Include
uploadcarein the plugins option and toolbar - Configure your Uploadcare public key in the TinyEditor.jsx file.
- Note: If you don't already have an Uploadcare account, contact your TinyMCE Customer Success Manager to get set up.
<Editor
  apiKey={import.meta.env.VITE_TINYMCE_API_KEY}
  onInit={(_evt, editor) => editorRef.current = editor}
  init={{
    plugins: ["advcode", "link", "preview", "lists", "uploadcare"],
    uploadcare_public_key: import.meta.env.VITE_UPLOADCARE_PUBLIC_KEY,
    a11y_advanced_options: true,
    toolbar: "undo redo | styles | bold italic underline | forecolor | bullist numlist| link uploadcare | code preview",
    height: 500,
        advcode_inline: true,
...
      }}
      value={value || ''}
      onEditorChange={handleEditorChange}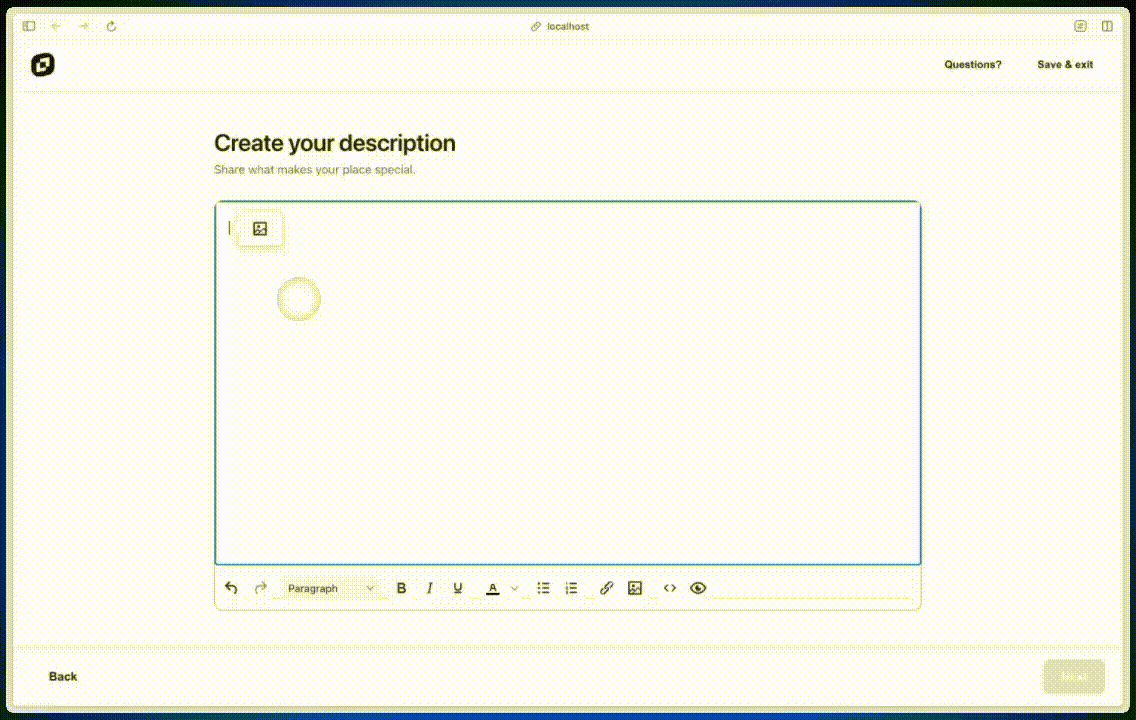
/>Open your browser and navigate to the local development URL (usually http://localhost:3000). You should see a basic Airbnb-like listing page with a TinyMCE Component. This component, and specifically Image Optimizer, will be the focus of this guide.
Step two: Add Uploadcare signed uploads with uploadcare_signed_upload_auth_provider
This option for signed upload auth providers verifies that only authorized users can upload files using your public key. To add signed uploads to TinyMCE, you’ll implement a Promise under uploadcare_signed_upload_auth_provider :
tinymce.init({
  selector: "textarea",
  plugins: "uploadcare",
  toolbar: "uploadcare",
  uploadcare_public_key: "<your-public-key>",
  uploadcare_signed_upload_auth_provider: (publicKey) =>
    Promise.resolve({
      signature: "sig",
      expire: 123,
    }),
});
💡Note: While this is optional for demos and internal testing, it is strongly recommended for production to protect against unauthorized uploads and maintain data integrity.
Step three: Set up a custom CDN base URL with uploadcare_cdn_base_url
If you already use a CDN to serve images, you can use the custom CDN option to deliver images through your own domain. By default, Uploadcare serves images from https://ucarecdn.com/, but you can replace it with your own CDN endpoint.
tinymce.init({
  selector: "textarea",
  plugins: "uploadcare",
  toolbar: "uploadcare",
  uploadcare_public_key: "<your-public-key>",
  uploadcare_cdn_base_url: "https://cdn.mydomain.com",
});
Step four: Configuring Storage Type
Uploadcare gives you control over how files are stored with the uploadcare_story_type option, with three available values.
|
Value |
Functionality |
Notes |
|
|
Default behavior. Files are stored permanently in the connected Uploadcare account. |
|
|
|
Files are automatically deleted after 24 hours. |
Testing or staging environments. |
|
|
File handling decisions are deferred to the Uploadcare Dashboard settings. |
Useful when you need to manage behavior centrally across multiple projects. |
It looks like this when implemented:
tinymce.init({
  selector: "textarea",
  plugins: "uploadcare",
  toolbar: "uploadcare",
  uploadcare_public_key: "<your-public-key>",
  uploadcare_store_type: "temporary",
});
To test uploadcare_story_type:
- Upload an image.
- Visit the Uploadcare dashboard to verify its storage status and expiration timeline under the Files section.
Step five: Set uploadcare_srcset_steps for responsive images
This option generates multiple image resolutions to populate the srcset attribute and make images responsive for all kinds of browsers. The uploadcare_srcset_steps option also allows browsers to choose the most appropriate version of an image based on screen size and network conditions. This is critical for apps that need to provide a great experience across devices, especially on mobile and high-DPI displays.
tinymce.init({
  selector: "textarea",
  plugins: "uploadcare",
  toolbar: "uploadcare",
  uploadcare_public_key: "<your-public-key>",
  uploadcare_srcset_steps: [100, 200, 300, 500, 750],
});
The array values represent the widths (in pixels) of the images to be generated, with a default range spanning from 100 to 3000 pixels. You can modify these to match your layout needs by setting a lower minimum to reduce load time on low-bandwidth devices, and a higher maximum to generate sharp images on large screens.
You can see the results by uploading an image in TinyMCE and toggling the source code view to inspect the srcset URLs served by the CDN.
Part two: Walkthrough of the Uploadcare Admin Panel
Now that you've integrated the Image Optimizer plugin into TinyMCE, it's time to explore the Uploadcare Admin Panel. This panel allows you to manage files, view analytics, configure settings, and more.
In the Uploadcare Admin Panel
Within the Admin Panel, you can configure settings that enable teams to manage high volumes of media. These settings give organizations the flexibility to enforce data retention policies, control who can upload content, and tailor image delivery to align with performance goals and brand standards. To begin, log in to your Uploadcare account to access the Uploadcare Dashboard.
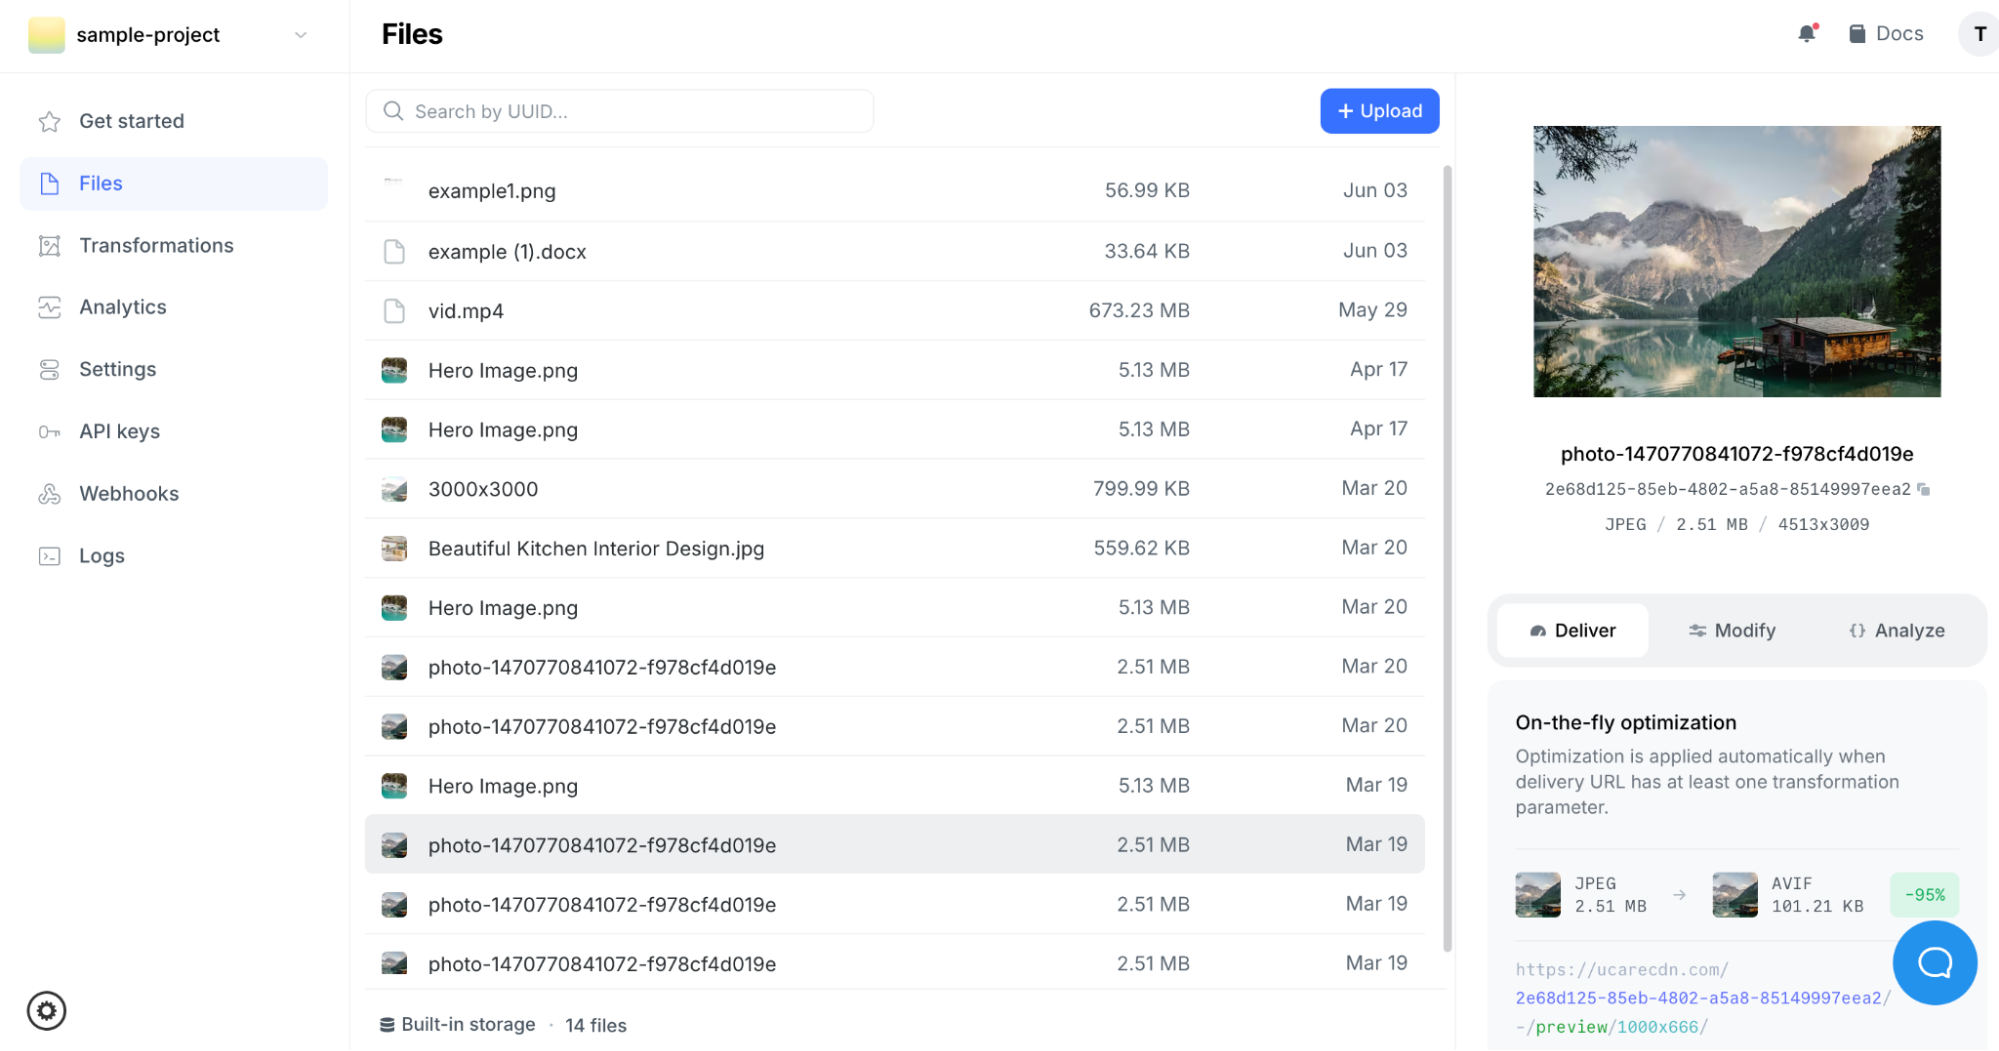
Files dashboard
The Files section shows all images uploaded to your Uploadcare project and supports file management and configuration of global file settings.
You can search for files using their UUID, preview them, or apply transformations like crop, fill, blur, and optimize. Each transformation automatically generates a URL that can be copied directly into your site or app. This makes it easy to test different image edits and apply them without the need to reprocess assets manually.
Transformations dashboard
Uploadcare provides built-in transformation examples like auto-generated profile photos or face blurring that demonstrate what’s possible. Clicking on a photo applies a transformation and instantly shows the result as a shareable URL. These examples help teams try out different optimization scenarios before implementing them in production.
![]()
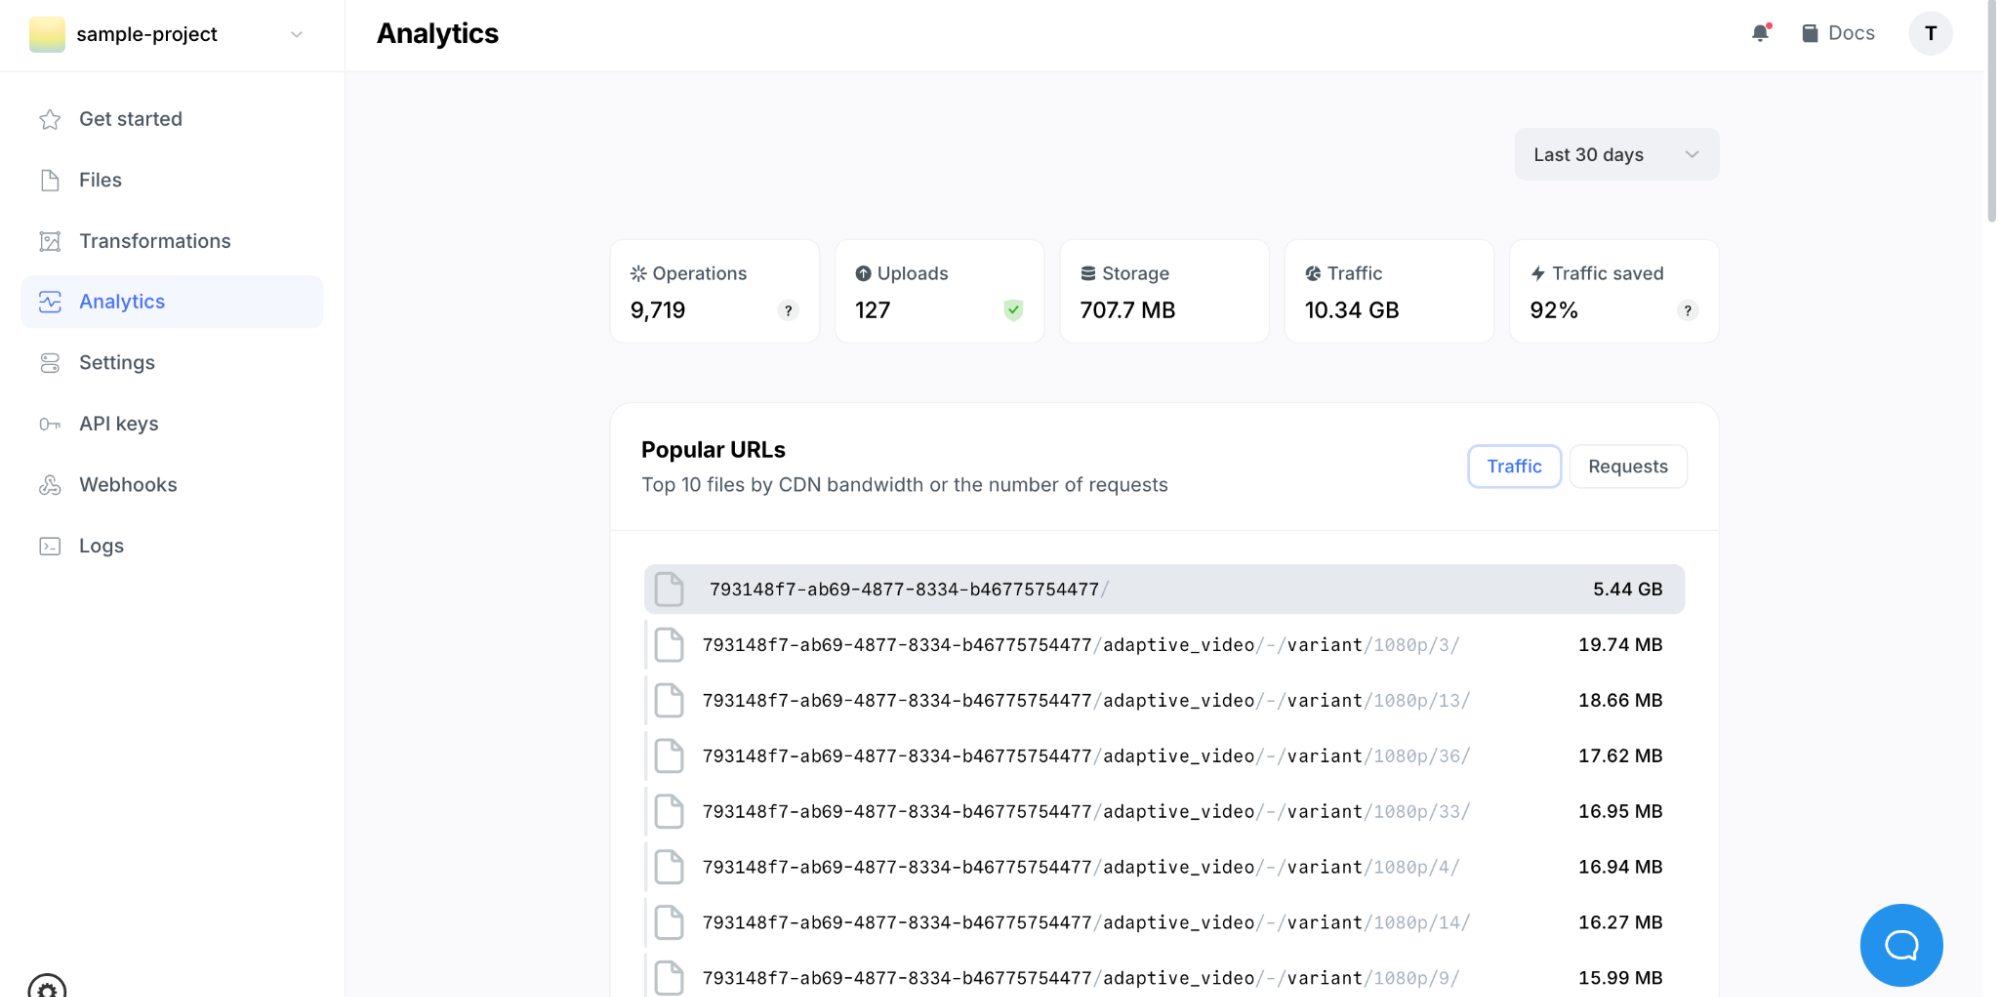
Analytics dashboard
The Analytics section gives insight into image performance in your app. You can monitor upload activity, total storage used, CDN traffic, and image operations like format conversions. This is especially helpful for teams tracking optimization impact and usage over time. Every image transformation or delivery action is counted as an operation, so you’ll also see what’s contributing to billing.
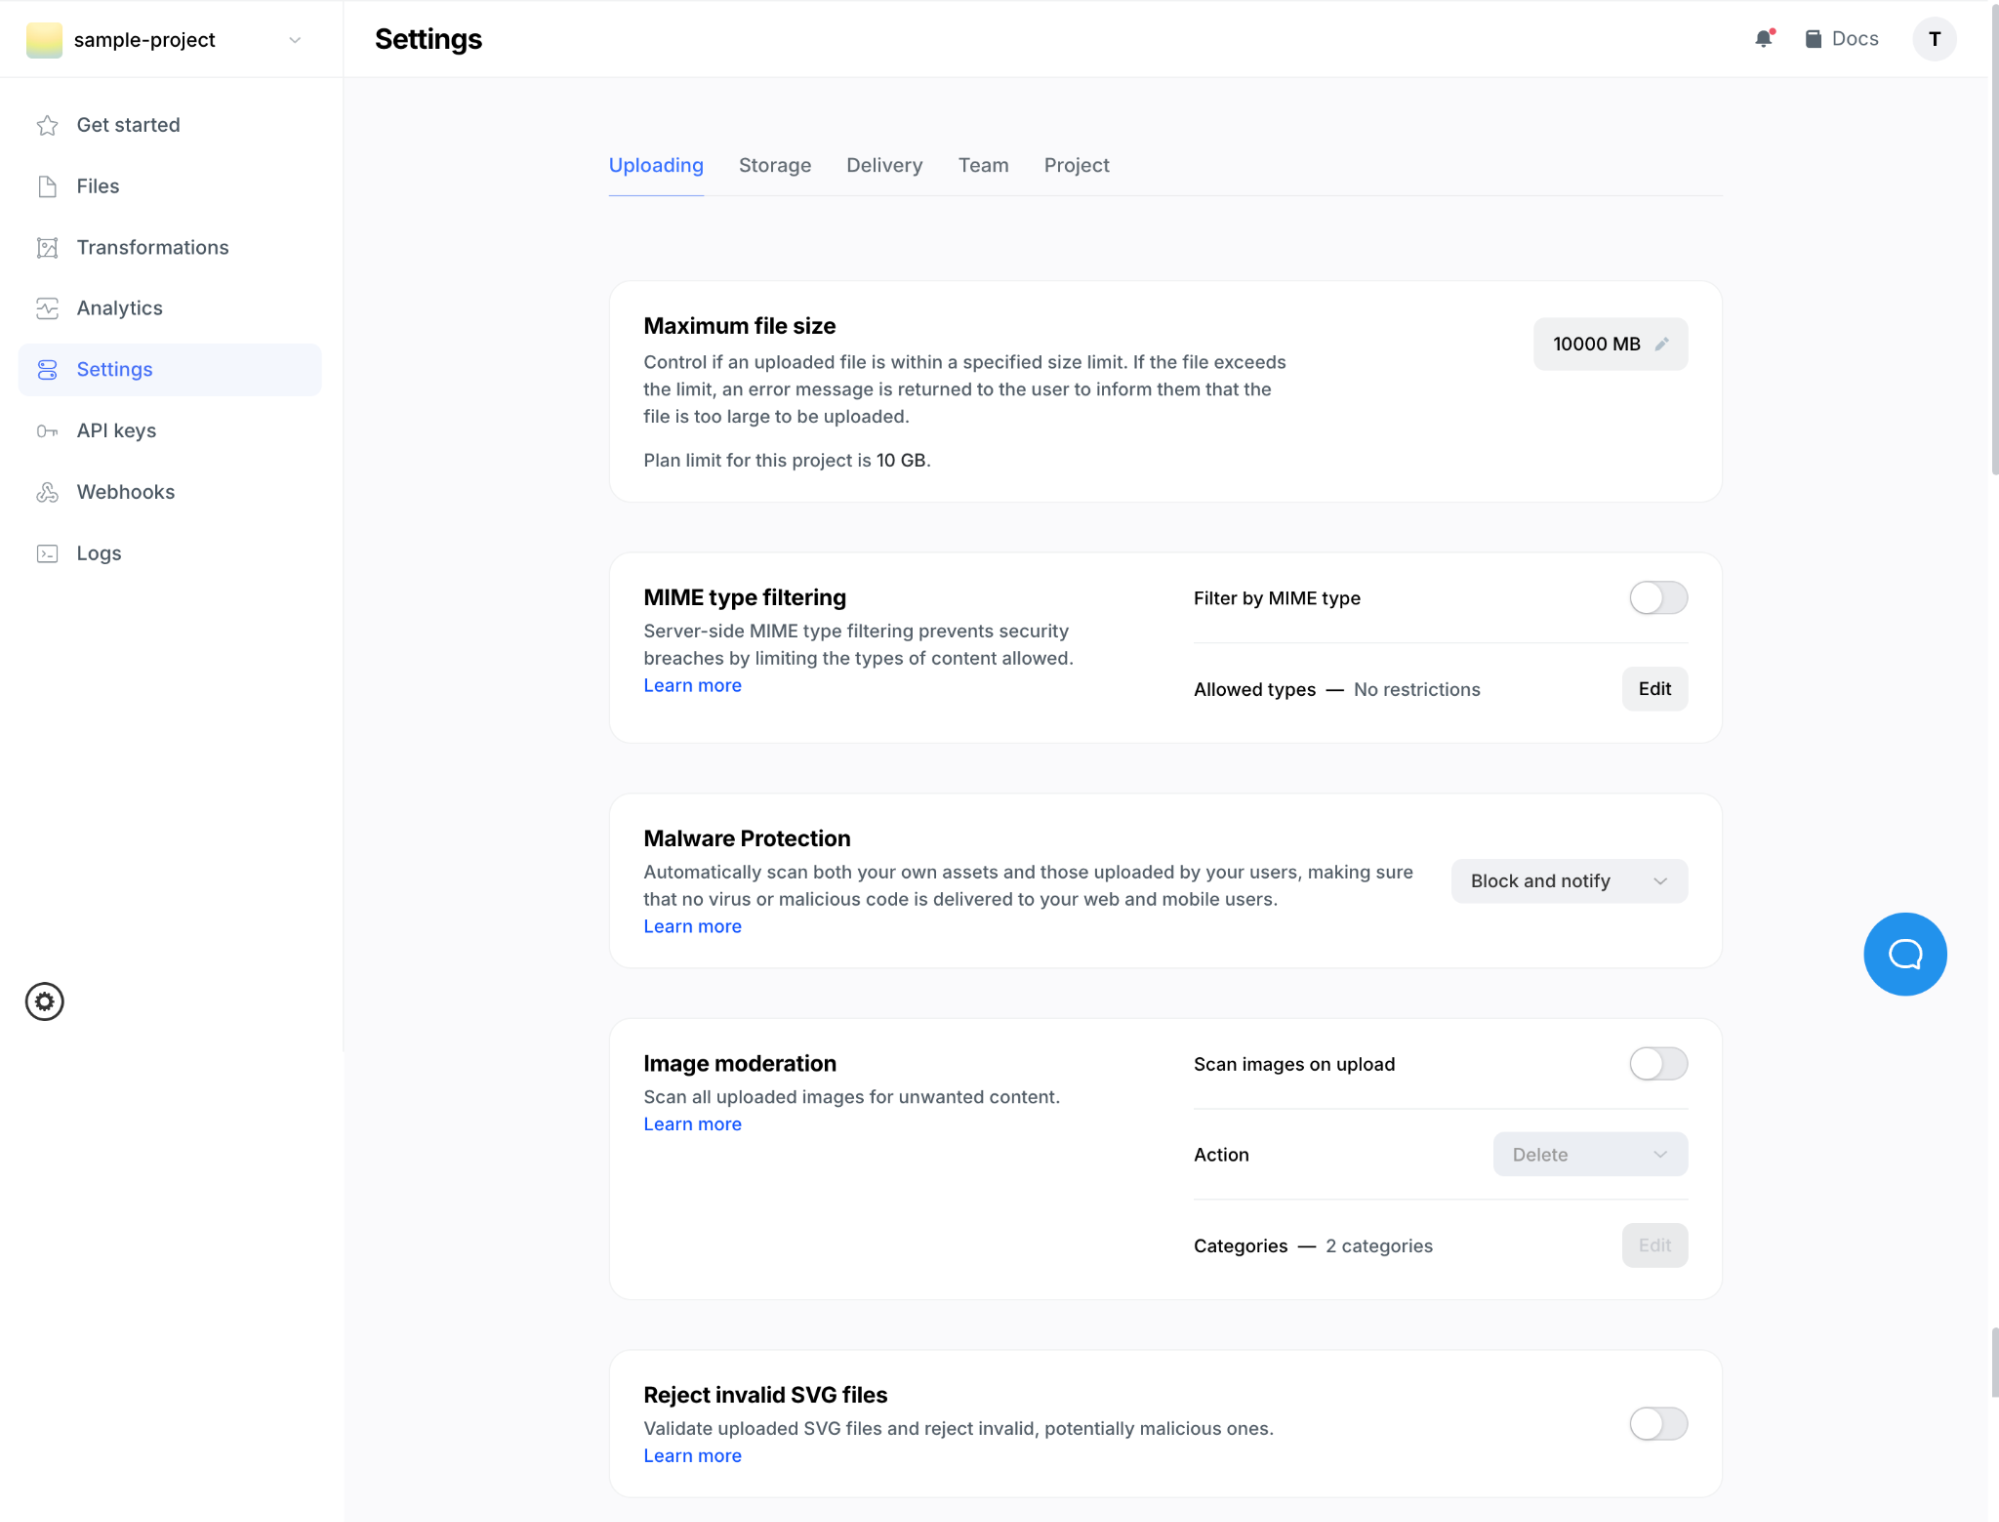
Uploadcare settings
Under Settings, you can enable features to secure and customize how your content is handled. You can:
- Set max upload file size
- Turn on malware scanning
- Enable image moderation to detect unsafe content
- Restrict SVG uploads
- Require signed uploads to control who can send files
These options are particularly useful for enterprise teams concerned with compliance, safety, and user-generated content.
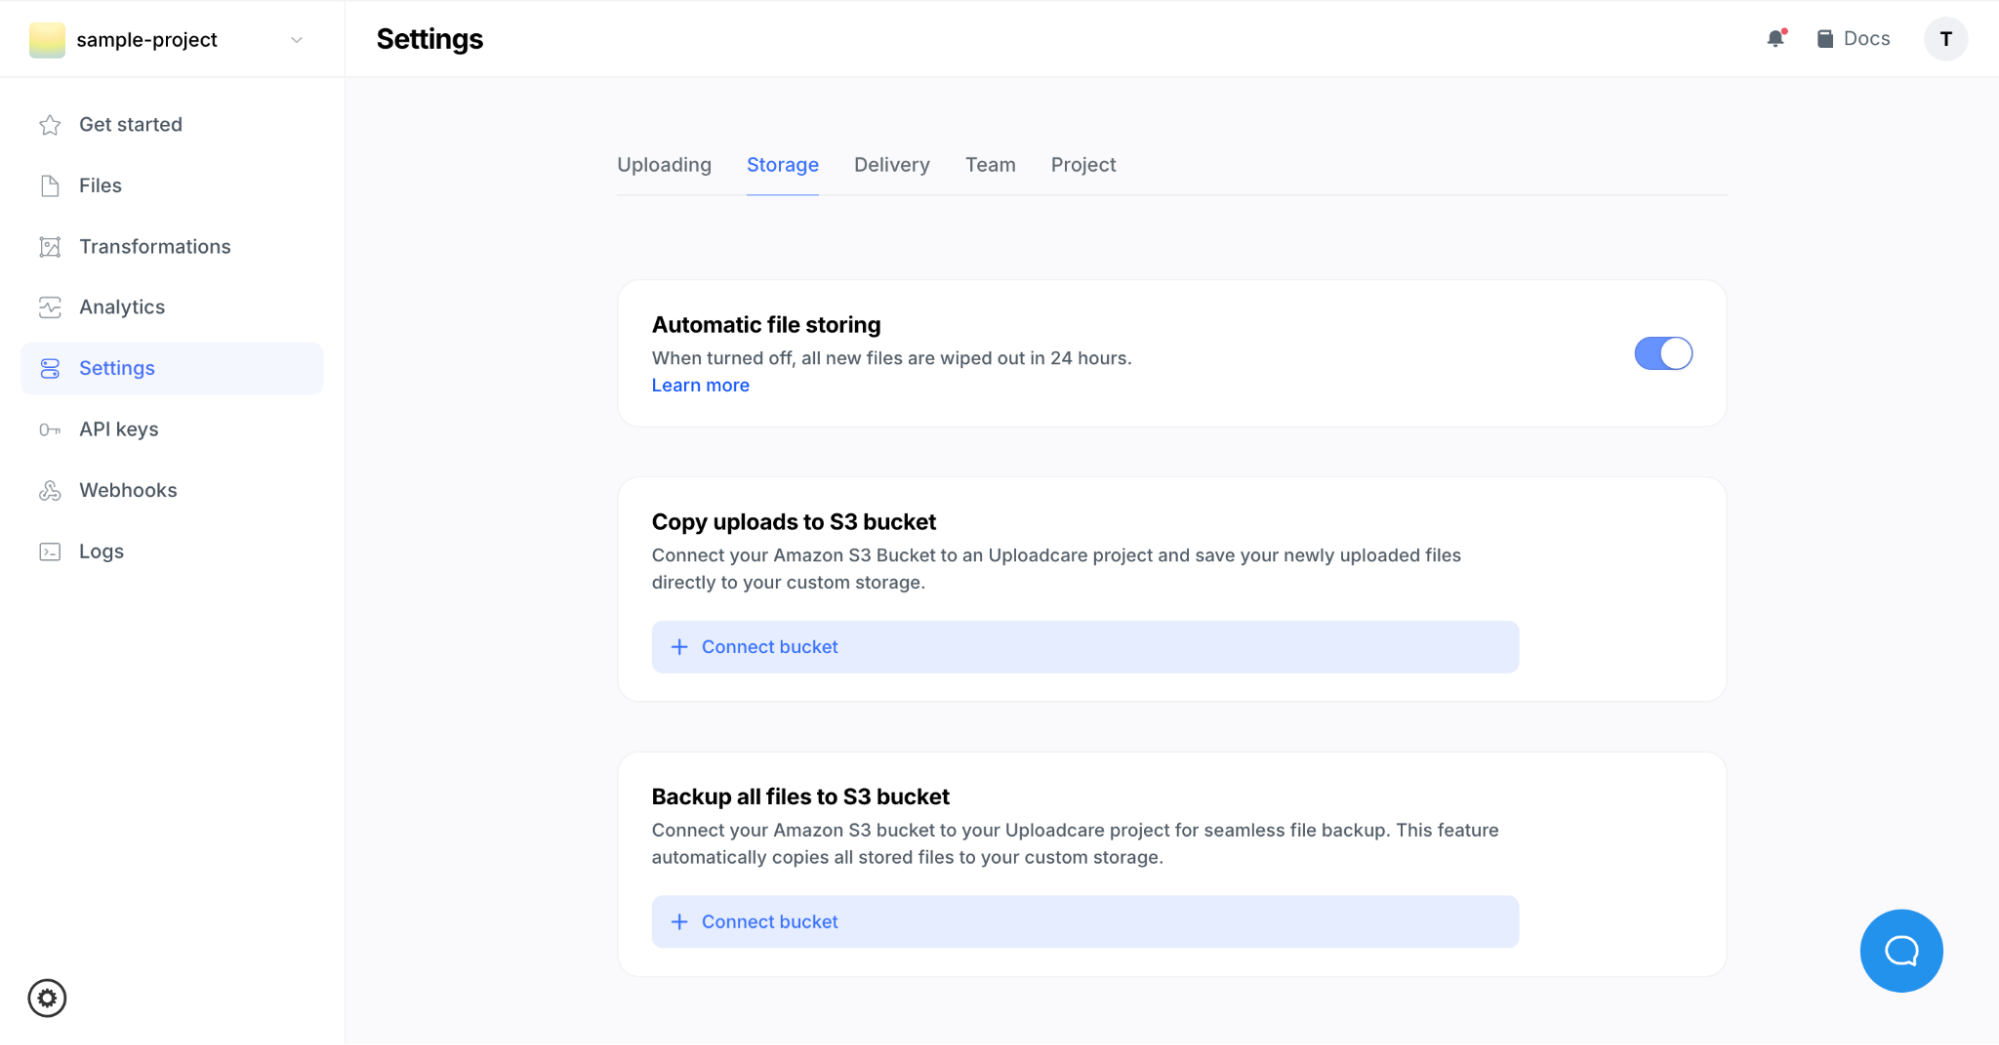
Storage settings
In Storage, you can choose how long your files are retained. You can also bring your own S3 bucket and integrate external storage with Uploadcare, or back up project files to S3 as needed.
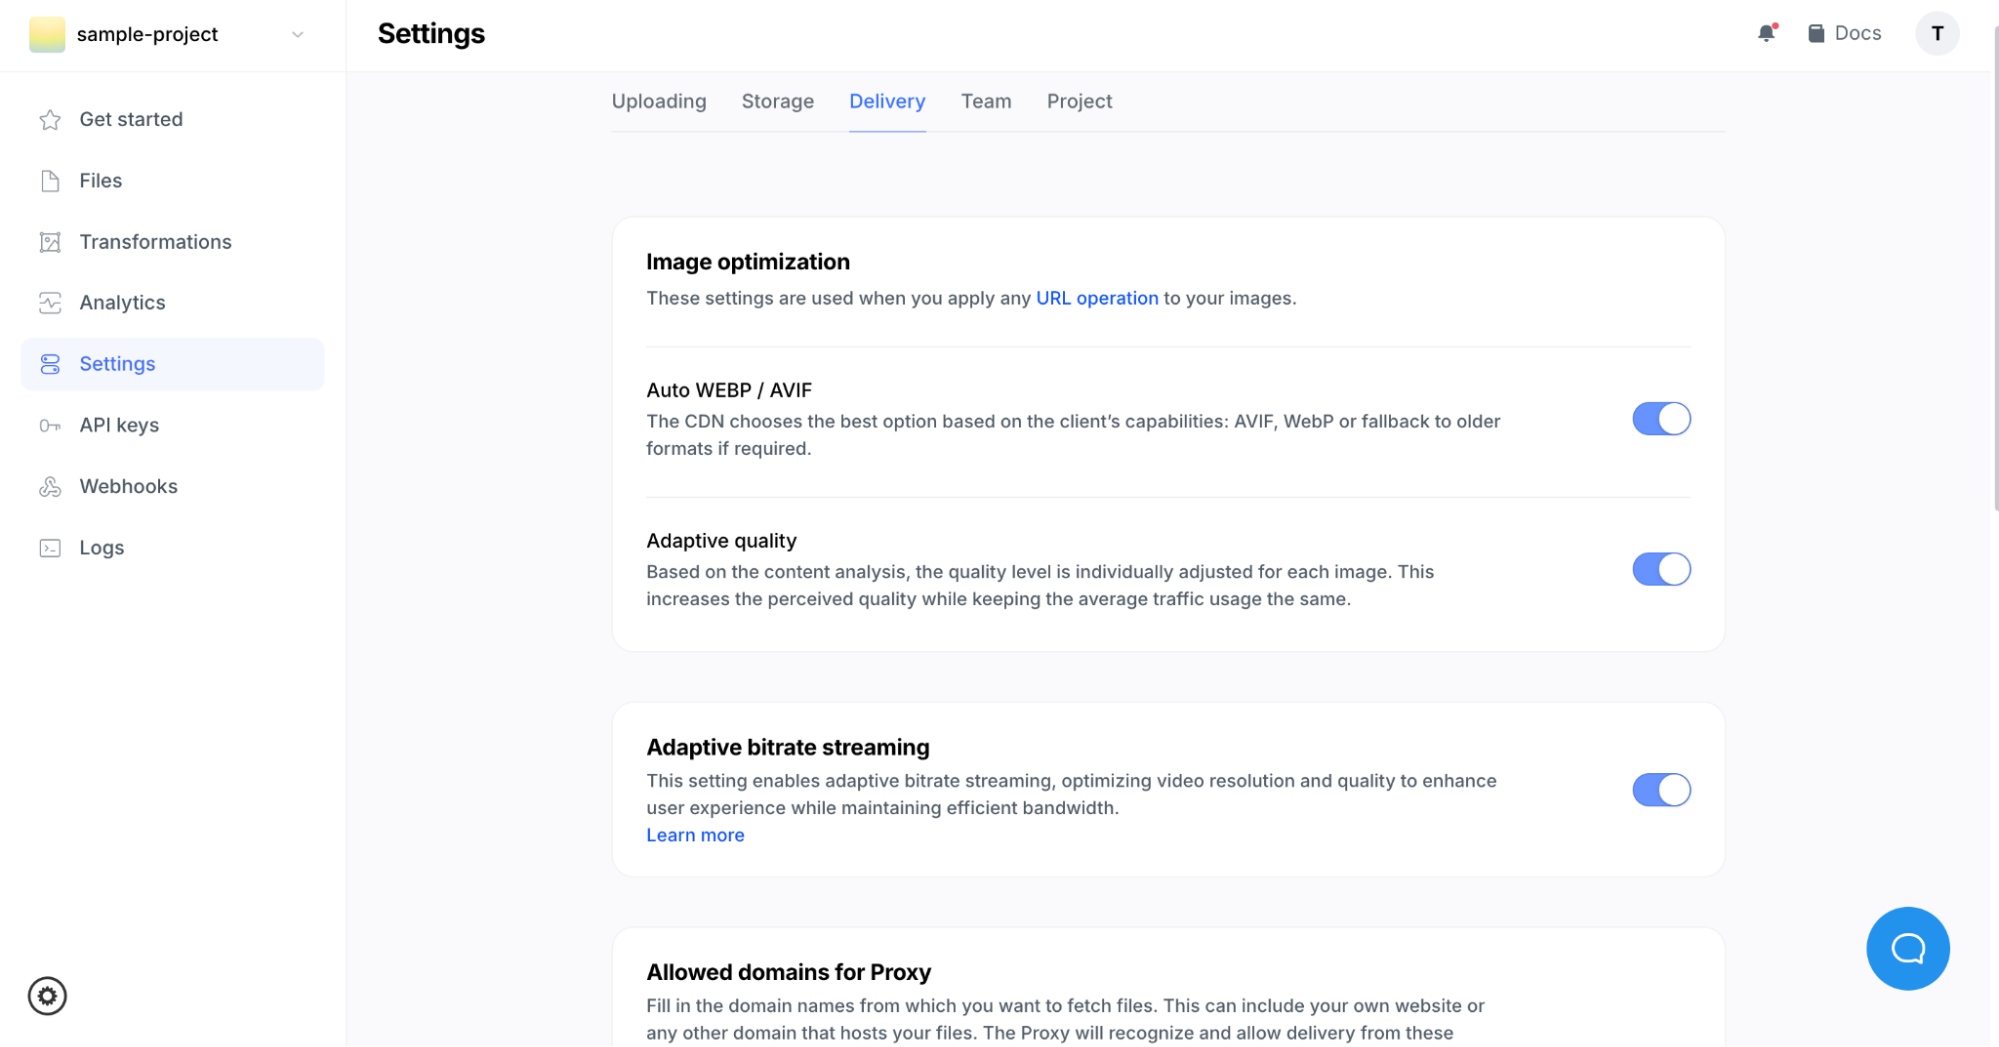
Delivery dashboard
Uploadcare’s delivery options automatically serve the best image format supported by the user’s browser (AVIF, WebP, or JPEG). Adaptive quality can also be enabled to ensure the image is both high-quality and optimized for the user’s device and connection. This helps improve performance and save bandwidth without compromising image quality.
Try it yourself and see the difference
Ready to give your users faster load times, snappier image editing, and a smoother web experience? TinyMCE’s Image Optimizer delivers all that, and it’s easier than ever to integrate into your RTE. Whether you're scaling images for mobile, compressing them without sacrificing quality, or users are editing them in real-time, you can speed up the media workflow in your app.
Want to see it in action or explore how it fits into your current stack? Contact TinyMCE today to let us know how you’d like to use Image Optimizer, and see the difference in image optimization for yourself. Let’s make slow-loading images a thing of the past.


