


If you’re running a bank, you need security. Now more than ever. A self-hosted configuration offers a secure solution, while self-hosted software grants you additional security by giving you control over your software services.
No outside links are required to get the services you need working. But it’s not only big banks and financial institutions that need control, and self-hosting...
Depending on your business needs, there may be some level of security restrictions that prevent the use of links or connections to any server that’s not allowed to connect and talk to your network. Or, you may have a selection of services only you can access, and some you cannot. It can vary.
For DMS systems though, some things don’t vary at all:
Priority one: You need to keep your documents safe.
Also a priority: You need diverse features, customization, and text editing that’s easy to integrate.
To create secure documentation, self-hosted TinyMCE provides everything you need. It offers security by working with no outside connections (if that’s important), and a broad range of advanced features to help you create the documents you need.
That’s what you’ll find in this article – an explanation of how to try out TinyMCE Self-hosted
It also covers the process of combining TinyMCE Self-hosted with TinyMCE Cloud, to demonstrate how TinyMCE works for a multitude of DMS needs and hosting setups.
Whether you’re trying out Self-hosting for the first time, or giving it a test drive with the goal of transitioning across from Cloud to Self-hosted in the future, this guide explains what you need, the steps involved, and some additional considerations.
What you need to get started
TinyMCE Cloud component for DMS
First, you need an API key. This key gives you free access to TinyMCE premium plugins for 14 days, on the cloud or self-hosted. Adding your API key also prevents the TinyMCE editor from changing into read-only mode, and prevents any warning messages about domain names. There are two links to follow.
- Navigate to the pricing plans for TinyMCE. Choose the plan that fits your app.
- Go directly to the Get-tiny sign up page to get your FREE API key.
Enter the information for your account, and select Sign up. When you arrive at the dashboard screen, your API key is at the top center of the page.
TinyMCE Self-hosted component for DMS
The second thing you need is a copy of TinyMCE in .zip format.
-
On the Get-tiny sign up page, click the Download TinyMCE SDK Now button. A .zip file then starts downloading into your downloads folder.
This .zip file is the actual rich text editor that you’ll host on your own workspace. For the following example config, it’ll run on your local workstation environment.
Why use an API key?
You can use TinyMCE without an API key. However there will be warning messages in the text editor area.
This domain is not registered with Tiny Cloud. Please see the quick start guide or create an accountAdding your API key to your app or project, removes these warning messages.
Set up TinyMCE Self-hosted
The following video outlines the process:
And here's the transcript:
The first steps you to take for self-hosting TinyMCE is the following:
- Unzip the tinymce file you downloaded in the previous step (the file name - tinymce_6.0.3.zip or similar)
- Create a new directory for testing out TinyMCE Self-hosted for your DMS (try mkdir TinymceDMS for example)
- Move the unzipped tinymce folder into the directory
Get TinyMCE Self-hosted started
With the .zip file unzipped and saved in a new folder:
-
Create a new index.html file in that directory.
-
Include some boilerplate HTML:
<!doctype html>
<head>
  <meta charset="utf-8">
  <title>TinyMCE in DMS</title>
</head>
  <body>
  </body>
</html>-
Inside the head of the document, add a pair of script tags, and reference the tinymce.min.js file (the Self-hosted configuration requires referencing TinyMCE from the html file). Here’s the pathway to use:
<script src="/tinymce/js/tinymce/tinymce.min.js"></script>;
-
Configure TinyMCE by placing another script tag after the Self-hosted content, and include the tinymce.init script:
<script>
   tinymce.init({
     selector: "#editor"
</script>-
Add a pair of textarea tags into your html file body file, and give them the id of “editor”. Save the file, and then load the file in a browser, or use a local server with Python or PHP:
Here's how the complete, essential setup looks:
<!DOCTYPE html>
<html>
<head>
  <meta charset="utf-8">
  <title>TinyMCE Document Management System (DMS)</title>
  <meta name="viewport" content="width=device-width, initial-scale=1">
  <script src="https://cdn.tiny.cloud/1/your-api-key/tinymce/6/tinymce.min.js" referrerpolicy="origin"></script>

  <script>
    tinymce.init({
      selector: "#editor",
    });
  </script>

</head>
<body>
  <main>
    <textarea id="editor"></textarea>
  </main>
</body>
</html>
Seeing the rich text editor load means you’ve successfully tested TinyMCE with a Self-hosted model (Well done!).
You can now set up TinyMCE Cloud to access premium plugins, and see a DMS in action.
TinyMCE Cloud and TinyMCE Self-hosted
-
Within your index.html file in the head section, add script tags, and add a link to TinyMCE with your API key.
This is what the link looks like:
https://cdn.tiny.cloud/1/your-api-key/tinymce/6/plugins.min.jsAnd this is where it goes in the index.html file (replace “your-api-key” with the API from your TinyMCE account dashboard):
<script
  src="https://cdn.tiny.cloud/1/your-api-key/tinymce/6/plugins.min.js"
  referrerpolicy="origin"
></script>;
-
To your tinymce.init script, include the following lines to add plugins, change the icons, and expand the toolbar options. Also include the following CSS content to add some style to your DMS:
  <script>
    tinymce.init({
      selector: "#editor",
      plugins: "advcode advlist advtable anchor autocorrect autolink autosave casechange charmap checklist codesample directionality editimage emoticons export footnotes formatpainter help image insertdatetime link linkchecker lists media mediaembed mergetags nonbreaking pagebreak permanentpen powerpaste searchreplace table tableofcontents tinycomments tinymcespellchecker visualblocks visualchars wordcount",

      toolbar: "undo redo spellcheckdialog | blocks fontfamily fontsize | bold italic underline forecolor backcolor | link image addcomment showcomments  | align lineheight checklist bullist numlist | indent outdent | removeformat",

      spellchecker_active: true,
      spellchecker_language: 'en_US',
      spellchecker_languages: 'English (United States)=en_US,English (United Kingdom)=en_GB,Danish=da,French=fr,German=de,Italian=it,Polish=pl,Spanish=es,Swedish=sv',

      tinycomments_mode: 'embedded',
      tinycomments_author: 'rmartel',
      tinycomments_author_name: 'Rosalina Martel',
      tinycomments_author_avatar: 'https://www.tiny.cloud/images/avatars/avatar-RosalinaMartel.jpg',

      sidebar_show: 'showcomments',

      mergetags_list: [
        {
          value: 'Document.Title',
          title: 'Document Title'
        },
        {
          value: 'Publish.Date',
          title: 'Publish Date'
        },
        {
          value: 'Author.Name',
          title: 'Author Name'
        }
      ],

      content_style: `
        body {
          background: #fff;
        }
        @media (min-width: 840px) {
          html {
            background: #eceef4;
            min-height: 100%;
            padding: 0 .5rem;
          }
          body {
            background-color: #fff;
            box-shadow: 0 0 4px rgba(0, 0, 0, .15);
            box-sizing: border-box;
            margin: 1rem auto 0;
            max-width: 820px;
            min-height: calc(100vh - 1rem);
            padding:4rem 6rem 6rem 6rem;
          }
        }
      `,
    });
</script>-
Next, for the DMS appearance around the rich text editor, include style tags in your index.html head content:
  <style>
    body {
      margin: 4rem auto;
      padding: 0 2rem;
      background-color: #f9f9fb;
    }

    main {
      width: 100%;
    }
</style>-
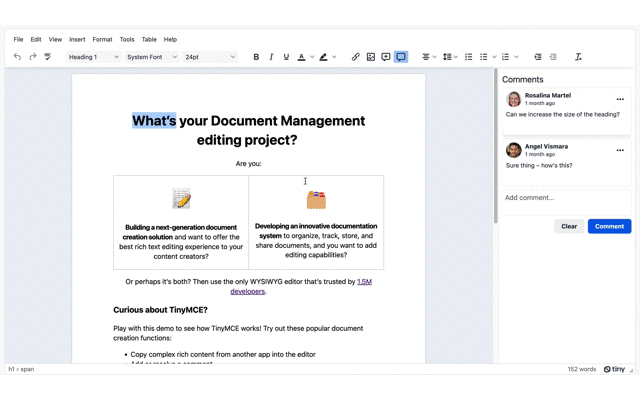
Save and reload the demo. You should see the beginnings of TinyMCE’s DMS abilities in your browser:
TinyMCE as DMS content in action
With TinyMCE configured, add some example documentation to see the DMS configuration in action.
This content is drawn from the TinyMCE DMS Editor page.
-
In the body content of your index.html file there should be textarea tags from the previous steps. Add a heading and paragraph inside the textarea tags:
<h1 style="text-align: center;"><span class="mce-annotation tox-comment" data-mce-annotation-uid="mce-conversation_95621585221662750341026" data-mce-annotation="tinycomments">What’s</span> your Document Management editing project? </h1>
<p style="text-align: center;">Are you:</p>-
Include an HTML table in the demo:
<table style="border-collapse: collapse; width: 100%;" border="1"><colgroup> <col style="width: 50%;"> <col style="width: 50%;"> </colgroup>
        <tbody>
          <tr>
            <td style="text-align: center;"><strong><span style="font-size: 36pt;">📝</span><br><br>Building a next-generation document creation solution</strong> and want to offer the best rich text editing experience to your content creators?</td>
            <td>
              <p style="text-align: center;"><span style="font-size: 36pt;"><strong>🗂️</strong></span></p>
              <p style="text-align: center;"><strong>Developing an innovative documentation system</strong> to organize, track, store, and share documents, and you want to add editing capabilities?</p>
            </td>
          </tr>
        </tbody>
</table>-
Add the additional paragraphs, and an unordered list:
<p style="text-align: center;">Or perhaps it’s both? Then use the only WYSIWYG editor that’s trusted by <a href="<a href="https://tiny.cloud">https://tiny.cloud</a>" target="_blank" rel="noopener">1.5M developers</a>.</p>
<h3>Curious about TinyMCE?</h3>
<p>Play with this demo to see how TinyMCE works! Try out these popular document creation functions:</p>
<ul>
<li>Copy complex rich content from another app into the editor</li>
<li>Add or resolve a comment</li>
<li>Drag-and-drop an image from your computer, then edit it within TinyMCE</li>
<li>Insert {{dynamic.content}} into the document using Merge Tags (start typing "{{")</li>
<li>Any other functionality that you would expect in a document editor!</li>
</ul>
<p>Watch the video below to see how easy it is to get started (embedded in one click using <em>Enhanced Media Embed</em>):</p>
<div style="left: 0px; width: 100%; height: 0px; position: relative; padding-bottom: 56.25%; max-width: 650px;" data-ephox-embed-iri="<a href="https://www.youtube.com/watch?v=_Pp1xnhQqec">https://www.youtube.com/watch?v=_Pp1xnhQqec</a>"><iframe style="top: 0px; left: 0px; width: 100%; height: 100%; position: absolute; border: 0px;" src="<a href="https://www.youtube.com/embed/_Pp1xnhQqec?rel=0&controls=0">https://www.youtube.com/embed/_Pp1xnhQqec?rel=0&controls=0</a>" scrolling="no" allowfullscreen="allowfullscreen"></iframe></div><!--tinycomments|2.1|data:application/json;base64,eyJtY2UtY29udmVyc2F0aW9uXzk1NjIxNTg1MjIxNjYyNzUwMzQxMDI2Ijp7InVpZCI6Im1jZS1jb252ZXJzYXRpb25fOTU2MjE1ODUyMjE2NjI3NTAzNDEwMjYiLCJjb21tZW50cyI6W3sidWlkIjoibWNlLWNvbnZlcnNhdGlvbl85NTYyMTU4NTIyMTY2Mjc1MDM0MTAyNiIsImF1dGhvciI6InJtYXJ0ZWwiLCJhdXRob3JOYW1lIjoiUm9zYWxpbmEgTWFydGVsIiwiYXV0aG9yQXZhdGFyIjoiaHR0cHM6Ly93d3cudGlueS5jbG91ZC9pbWFnZXMvYXZhdGFycy9hdmF0YXItUm9zYWxpbmFNYXJ0ZWwuanBnIiwiY29udGVudCI6IkNhbiB3ZSBpbmNyZWFzZSB0aGUgc2l6ZSBvZiB0aGUgaGVhZGluZz8iLCJjcmVhdGVkQXQiOiIyMDIyLTA5LTA5VDE5OjA1OjQxLjAyNVoiLCJtb2RpZmllZEF0IjoiMjAyMi0wOS0wOVQxOTowNTo0MS4wMjVaIn0seyJ1aWQiOiJtY2UtcmVwbHlfNzk5MTUxODA5MjE2NjI3NTA1NTM5MjYiLCJhdXRob3IiOiJhdmlzbWFyYSIsImF1dGhvck5hbWUiOiJBbmdlbCBWaXNtYXJhIiwiYXV0aG9yQXZhdGFyIjoiaHR0cHM6Ly93d3cudGlueS5jbG91ZC9pbWFnZXMvYXZhdGFycy9hdmF0YXItQW5nZWxWaXNtYXJhLmpwZyIsImNvbnRlbnQiOiJTdXJlIHRoaW5nIOKAkyBob3cncyB0aGlzPyIsImNyZWF0ZWRBdCI6IjIwMjItMDktMDlUMTk6MDk6MTMuOTI2WiIsIm1vZGlmaWVkQXQiOiIyMDIyLTA5LTA5VDE5OjA5OjEzLjkyNloifV19fQ==-->
</textarea>-
Save and reload the DMS config. With the example contents added inside the textarea, the ability for TinyMCE to organize your DMS content becomes clear:
The next steps for your DMS editor
Check out our DMS editor page for further information, and remember that your FREE API key grants free access to Premium Plugin functionality for 14 days (self-hosted or cloud), after which you need to either choose a Premium Plan or remove the TinyMCE premium features.
|
This guide covers the steps to set up a hybrid TinyMCE Cloud and TinyMCE Self-hosted configuration. |
|
You can configure a TinyMCE Self-hosted solution with premium plugins – if you need that completely secure configuration – when you sign up for a TinyMCE Premium pricing plan. Contact us for more information. |
It’s important for your documentarians or customers to have a smooth and secure experience when they use your DMS. Especially if they need flexible, powerful features to create their varied documentation. TinyMCE provides those features and more, as well as supporting your subject matter writers when they’re creating their documents.


