How often would you guess customers reuse the same content snippets and text templates over and over again in your app? There’s a good chance they’re writing and rewriting each one from scratch each time they need it. That might work well once. But if it’s done daily, the consequences are dire: productivity drops, errors appear, content becomes inconsistent, and the entire user experience slips into misery. Your app’s rich text editor has the answer to prevent these problems. Say ‘Hello’ to TinyMCE Advanced Templates plugin.
Using the TinyMCE rich text editor and Advanced Templates (Premium) plugin gives writers the power to quickly save and insert content, as well as creating their own templates from content snippets. Sound perfect for what you’re working on? Very good – this article shows the basics, and it specifically explains the essentials of the new plugin – from getting started, to understanding the basics of content snippets and Advanced Templates plugin abilities.
Contents
How Advanced Templates plugin works with content snippets
How to set up content snippets in TinyMCE
Other prerequisites for content snippets
How to create content snippets in TinyMCE
Getting templates from the database
Creating content snippets and saving them as templates
Deleting templates from the database
Next Steps for content snippets and Advanced Templates
What are content snippets?
Content snippets are selections of content that writers create with the intention of reusing them over and over – a time saving feature that CMSs often use. Therefore, applications that have an inbuilt functionality to save and modify content snippets, offer distinct time savings, positive user experience, and great marketability advantages.
On a larger scale, templates are made from specific content snippets.
A content snippet is part of the text sitting in the text editor. By combining the content snippet’s selected, customers then assemble text templates and the templates are saved for reuse. The templates can be sorted into categories, and modified or moved around as needed.
In short, before a text template is made, it begins as a content snippet.
How Advanced Templates plugin works with content snippets
The Advanced Templates (Premium) plugin lets you highlight a selection of content, and either save it as a standalone text template, or add it to a collection (called a category). It can then be reused as needed.
IMPORTANT NOTE: The Advanced Templates plugin’s content snippet capture and management exceeds the templating capacity of TinyMCE’s other, more basic, Templates plugin.
Broadly, here’s how it works:
- Once the user has highlighted their content snippet, they can click the Advanced Template toolbar button to create a new template.
- The plugin runs a fetch API call, and uses the GET, (also the POST, PUT, DELETE, and PATCH methods depending on the selected option) to connect with the database.
- Server-side code interprets the fetch API call, and then checks the database with queries to extract or change the templates saved there.
- A response is sent back to the fetch API, completing the promise.
- You can then view a list of saved templates. Clicking the template runs another fetch call to get the content.
- The content appears in the text area once you click the Insert button.
How to set up content snippets in TinyMCE
Before anything else, you’ll need to get a TinyMCE API key. The Advanced Templates plugin is a Premium plugin, and when you sign up for an API key, you get 14 days free access to all of TinyMCE’s Premium plugins. Navigate to the Get-tiny sign up page to get your FREE rich text editor API key.
Other prerequisites for content snippets
There are other prerequisites for this demo:
- HTML and JavaScript knowledge
- Some knowledge of PHP (Setting variables, prepared statements, and json encoding specifically).
- Some familiarity with SQL based database queries as the demo makes use of SQLite as a database.
- Check on the SQLite documentation for more guides on making use of the minimal database option.
- The SQLite tutorial website can also provide guidance.
- Command line access to run the PHP command for setting up a local testing server.
Prepared statements are essential in production for security support. The following demo uses prepared statements in the PHP scripts, separating the queries from the incoming Advanced Template plugin content snippet.
Alternatives to databases
If your aim is to create content snippets without modifying the template built from the snippet, then another option is available. The Advanced Template plugin provides an option called advtemplate_templates (the same name as the plugin iteself) that can be configured as a variable holding a JSON object that defines a fixed template:
const advtemplate_templates = [
  {
    title: 'Quick replies',
    items: [
      {
        title: 'Message received',
        content: '<p dir="ltr">Hey !</p>\n<p dir="ltr">Just a quick note to say we’ve received your message, and will get back to you within 48 hours.</p>\n<p dir="ltr">For reference, your ticket number is: </p>\n<p dir="ltr">Should you have any questions in the meantime, just reply to this email and it will be attached to this ticket.</p>\n<p><strong> </strong></p>\n<p dir="ltr">Regards,</p>\n<p dir="ltr"></p>'
      },
      {
        title: 'Thanks for the feedback',
        content: '<p dir="ltr">Hi ,</p>\n<p dir="ltr">We appreciate you taking the time to provide feedback on .</p>\n<p dir="ltr">It sounds like it wasn’t able to fully meet your expectations, for which we apologize. Rest assured our team looks at each piece of feedback and uses it to decide what to focus on next with .</p>\n<p dir="ltr"><strong> </strong></p>\n<p dir="ltr">All the best, and let us know if there’s anything else we can do to help.</p>\n<p dir="ltr">-</p>'
      },
      {
        title: 'Still working on case',
        content: '<p dir="ltr"><img src="https://lh4.googleusercontent.com/-H7w_COxrsy2fVpjO6RRnoBsujhaLyg6AXux5zidqmQ_ik1mrE6BtnaTUdWYQuVbtKpviRqQiuPBOHNGUsEXvrRliEHc4-hKDrCLgQQ9Co-MI4uY2ehUvYtU1nn3EeS0WiUzST-7MQB2Z5YFXrMDwRk" width="320" height="240"></p>\n<p><strong> </strong></p>\n<p dir="ltr">Hi ,</p>\n<p dir="ltr">Just a quick note to let you know we’re still working on your case. It’s taking a bit longer than we hoped, but we’re aiming to get you an answer in the next 48 hours.</p>\n<p dir="ltr">Stay tuned,</p>\n<p dir="ltr"></p>'
      }
]After setting the content snippets, reference the advtemplate_templates constant in the TinyMCE init script, and the Advanced Template plugin dialog displays the saved content. It's a great solution if all that's needed is a fixed set of templates that don't need editing, and it's available from TinyMCE version 6.5 onwards.
If you need to update and edit templates, the following demo shows how to connect Advanced Templates to a database, and set up the basic functionality:
-
Create an index.html file in your development environment:
touch index.html-
Add the following HTML to get the demo started:
<!DOCTYPE html>
<html lang="en">
<head>
    <meta charset="UTF-8">
    <meta name="viewport" content="width=device-width, initial-scale=1.0">
    <title>TinyMCE Advanced Templates for Content Snippets</title>

</head>
<body>
    <textarea id="editor"></textarea>
</body>
</html>-
In the head section, add script tags, and reference TinyMCE Cloud through a CDN link within the script tags. Replace the “your-api-key” string with your TinyMCE API key:
<script
  src="https://cdn.tiny.cloud/1/your-api-key/tinymce/6/tinymce.min.js"
  referrerpolicy="origin"
></script>;
-
Add another pair of script tags, add the following JavaScript. It’s the tinymce.init method, and it’s how you control TinyMCE and get the Advanced Templates plugin configured:
<script>
   tinymce.init({
     selector: '#editor',
     plugins: 'advtemplate powerpaste casechange searchreplace autolink directionality advcode visualblocks visualchars image link media mediaembed codesample table charmap pagebreak nonbreaking anchor tableofcontents insertdatetime advlist lists checklist wordcount tinymcespellchecker editimage help permanentpen charmap linkchecker emoticons advtable export autosave',
     toolbar: 'undo redo | fontfamily fontsize blocks | bold italic underline | alignleft aligncenter alignright alignjustify | checklist bullist numlist indent outdent | inserttemplate addtemplate',
     height: '600px',
     advtemplate_list,
   });
</script>-
Configure JavaScript above the TinyMCE init script to handle the headers needed for the promises, and for handling any errors:
<script>
const headers = {
  'Accept': 'application/json',
  'Content-Type': 'application/json',
}

const handleResponse = (message) => (response) => {
  if (!response.ok) {
    response.text().then((message) => console.error(message))
    throw new Error(message);
  } else {
    return response.json();
  }
}

tinymce.init({
…-
Add the following JavaScript after the header and response constants – it’s the Advanced Template List option, and it’s an essential part of the plugin:
const advtemplate_list = () => {
  return fetch('connect.php', {
      method: 'GET',
      headers,
    })
    .then(handleResponse('Failed to get template list'))
}

tinymce.init({
…-
Save the changes
-
Create a new PHP file alongside the index.html file, which is needed to create the SQLite database file, and connect to the database:
touch connect.php
<?php

$connect = new SQLite3("TemplateDatabase.db") or die("Could not connect to database, and save TinyMCE content");
$db = 'CREATE TABLE IF NOT EXISTS templates(id INTEGER PRIMARY KEY AUTOINCREMENT NOT NULL, title TEXT, content TEXT)';

$connect->exec($db);

$select = "SELECT CAST(id AS TEXT) AS id, title AS title, content AS content FROM templates ORDER BY id ASC";
$result = $connect->query($select);

if ($result === false) {
    echo "Error: " . $connect->lastErrorMsg();
    exit;
} else {
    while ($row = $result->fetchArray(SQLITE3_ASSOC)) {
      $rows[] = $row;
  }
    $response = array_values($rows);
    header('Content-Type: application/json');
    echo json_encode($response, JSON_UNESCAPED_SLASHES);
}

?>-
Save the changes
-
Test run the index.html file with the PHP command. Open the TinyMCE demo from the localhost address, and click on the Advanced Templates toolbar button (configured by the inserttemplate option in the toolbar).
There won't be any changes at this stage, and this is because there must be template content available in the database and returned to the Advanced Templates plugin in the right JSON format for the plugin to work:
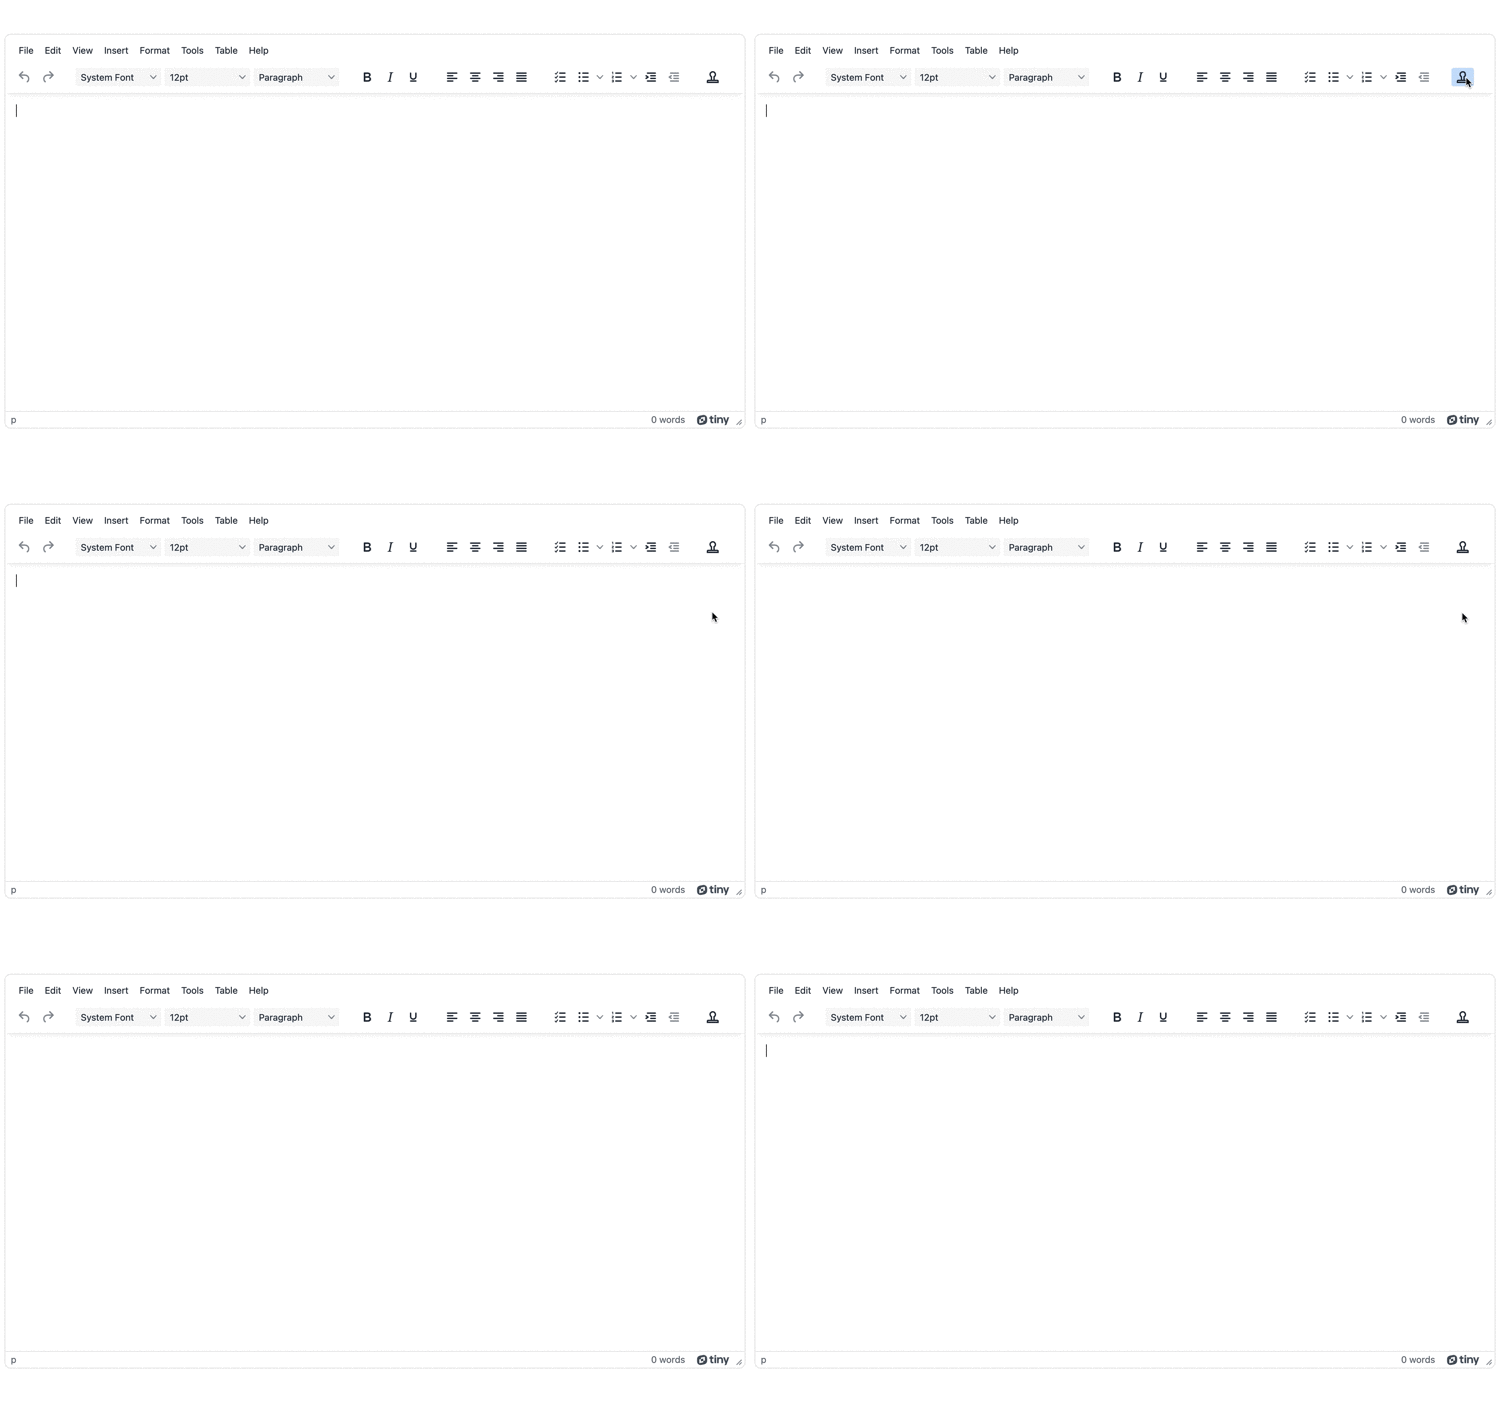
The PHP script has created the database file, so by adding content to the database, the plugin dialog appears. To add some demo content to the database:
-
Access the SQLite database file (created by the connect.php script) through the command line:
sqlite3 TemplateDatabase.db-
Insert a demo template into the database:
INSERT INTO templates (title, content) VALUES ("The First Template", "<h1>This is the first template</h1><p>Welcome to the Advanced Templates plugin</p>");-
Exit the database
.exit-
Test run the TinyMCE Advanced Template content again. The Advanced Templates dialog window now appears with the demo template visible:
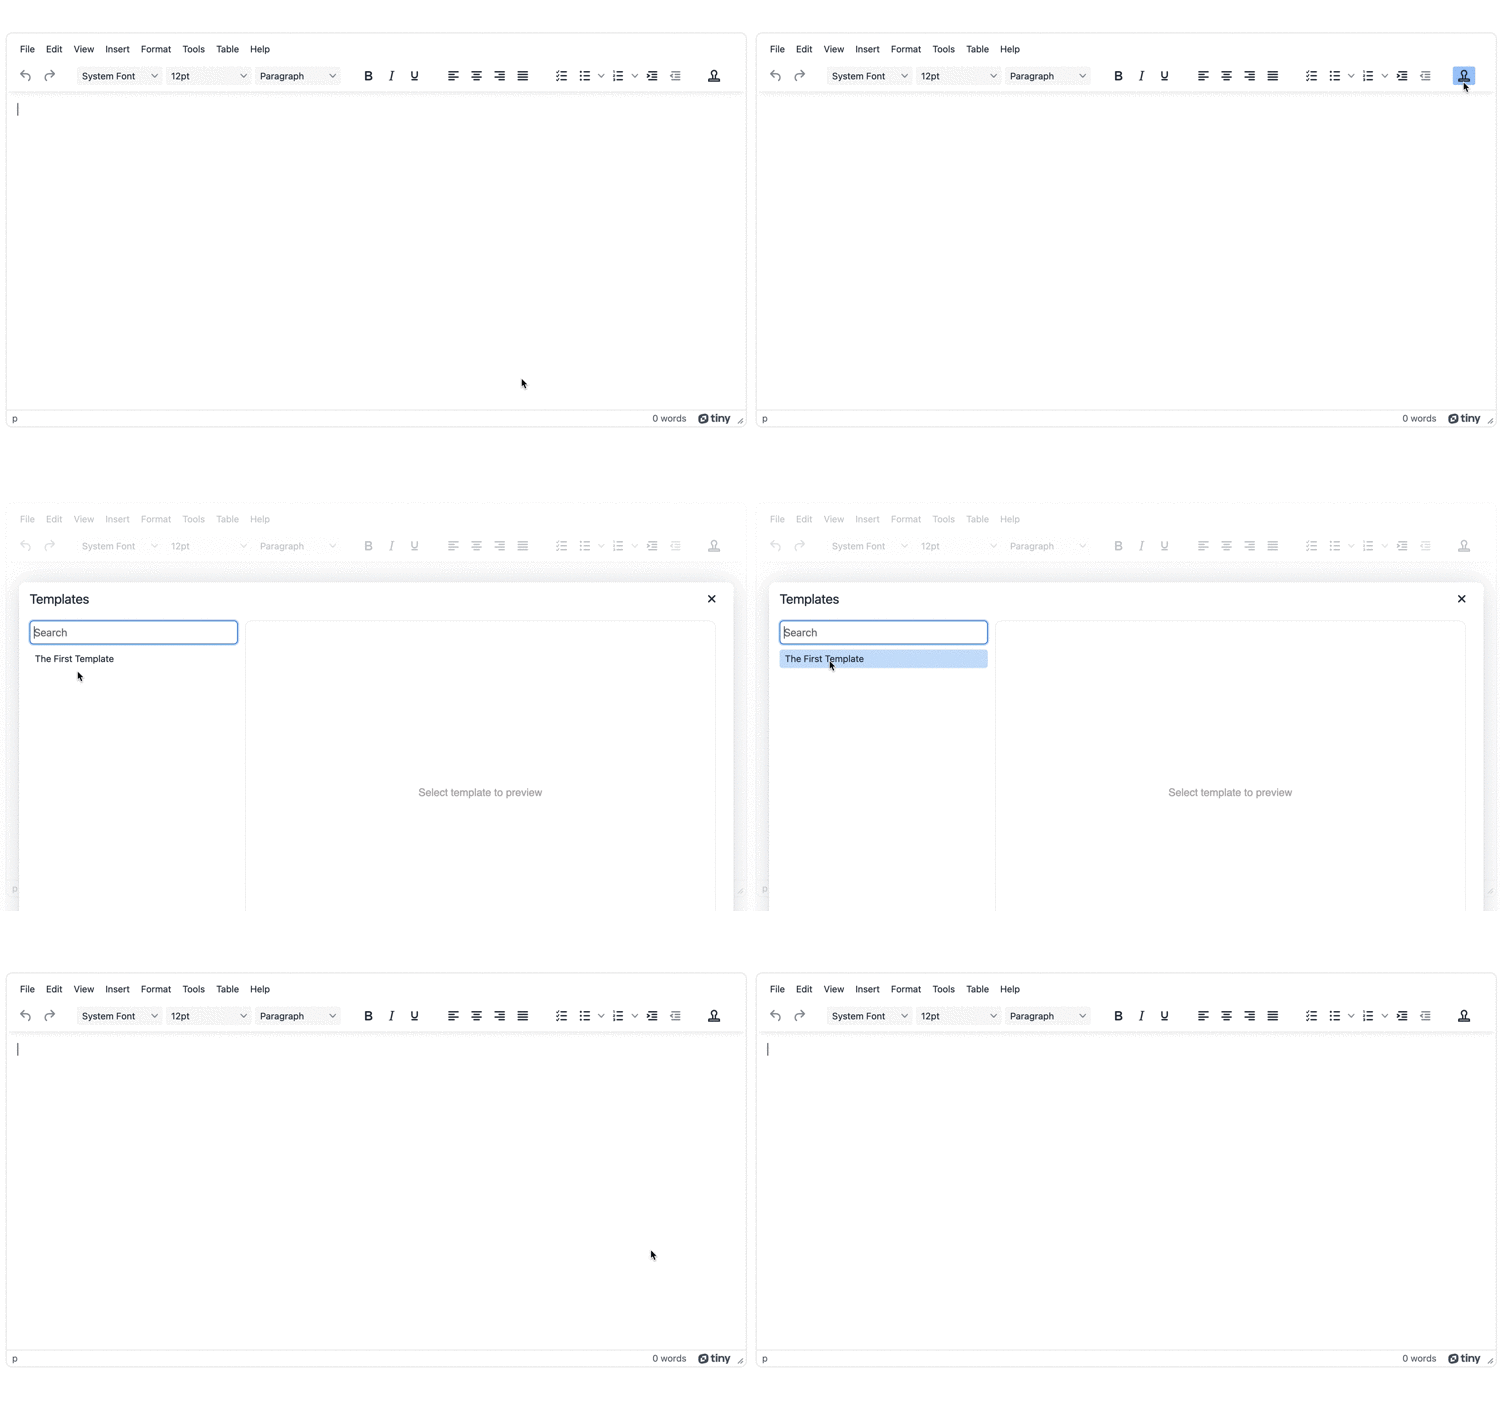
The Advanced Templates plugin essential configuration is now working, but it needs some more options set up to create templates and delete templates. The following sections explain how to configure these functions.
How to create content snippets in TinyMCE
With the advtemplate_list option set, the next options to set up are advtemplate_get_template, advtemplate_create_template, and advtemplate_delete_template. This provides the essential ability to create a content snippet, save it as a template, and reuse until it is no longer needed, and then delete it.
Getting templates from the database
-
Add the following JavaScript to the index.html file head section after the advtemplate_list option:
const advtemplate_get_template = (id) => {
  const url = new URL("get_template.php", window.location.href);
  url.searchParams.append("id", id);
  return fetch(url, {
    method: "GET",
    headers,
  }).then(handleResponse("Failed to get template"));
};
- Add the advtemplate_get_template option to the TinyMCE init script:
          advtemplate_list,
          advtemplate_get_template
      });
</script>-
Create a new PHP file in the same directory as your index.html file, and add the following content to get the templates from the database:
touch get_template.php
…<?php
$connect = new SQLite3("TemplateDatabase.db") or die("Could not connect to database, and save TinyMCE content");
$id=$_GET['id'];
if ($id === NULL) {
echo "the GET component is not working";
} else {
$query = "SELECT CAST(id AS TEXT) AS id, title AS title, content AS content FROM templates WHERE id = :id ORDER BY id ASC";
$stmt = $connect->prepare($query);
$stmt->bindValue(':id', $id, SQLITE3_INTEGER);
$result = $stmt->execute();
}
$process = $result->fetchArray(SQLITE3_ASSOC);
$jsonFlags = JSON_UNESCAPED_SLASHES | JSON_FORCE_OBJECT;
$response = json_encode($process,$jsonFlags);
echo $response;
?>-
Save the changes
-
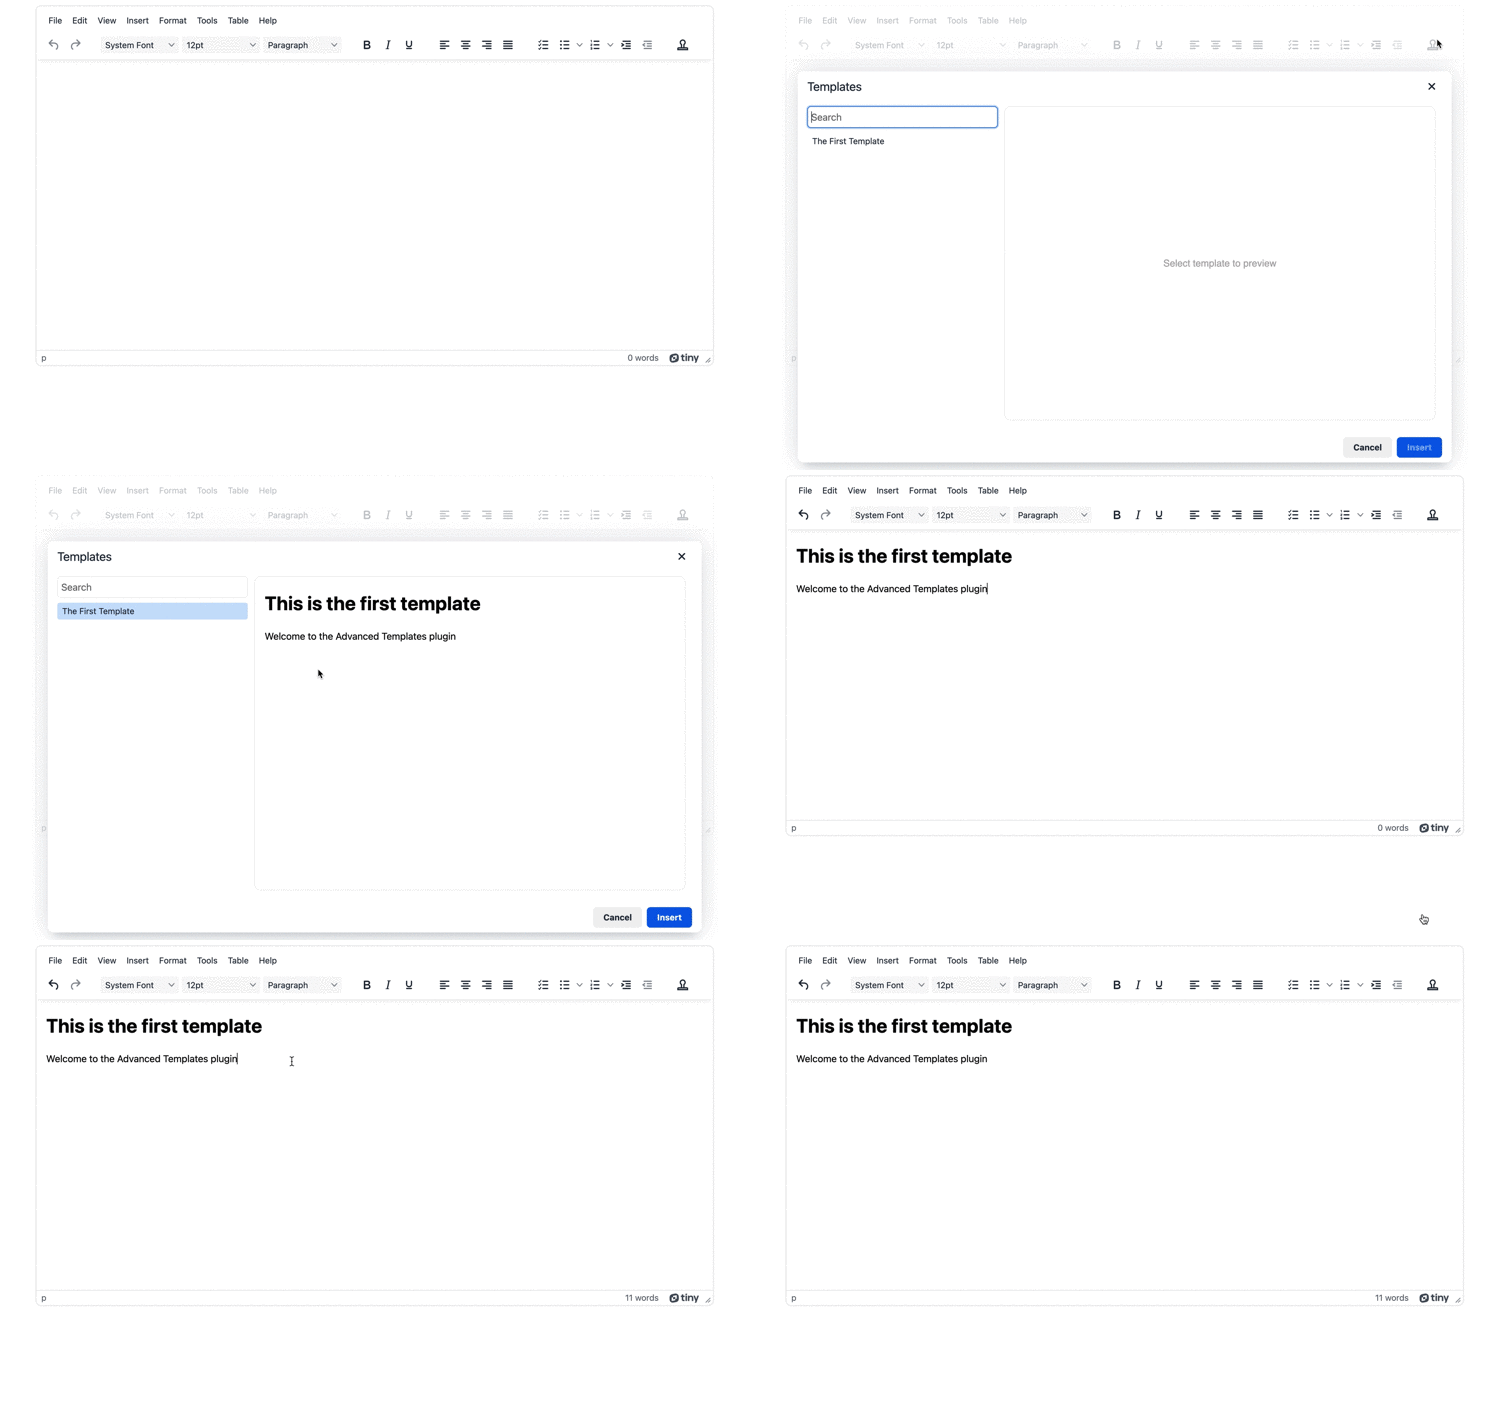
Test run the new option by clicking on the insert template button, and selecting the demo database created in the previous section:
Creating content snippets and saving them as templates
-
Add the following JavaScript to the index.html file head section after the advtemplate_get_template option:
const advtemplate_create_template = (title, content) => {
  return fetch("create_template.php", {
    method: "POST",
    body: JSON.stringify({
      title,
      content,
    }),
    headers,
  }).then(handleResponse("Failed to create template"));
};
-
Add the advtemplate_create_template option to the TinyMCE init script:
          advtemplate_list,
          advtemplate_get_template,
          advtemplate_create_template
});-
Create a new PHP file for creating templates, and add the following content:
touch create_template.php

...<?php
$connect = new SQLite3("TemplateDatabase.db") or die("Could not connect to database, and save TinyMCE content");
$json = file_get_contents('php://input');
$array = json_decode($json);
$title = $array->title;
$content = $array->content;
if (isset($content)) {
$stmt = $connect->prepare("INSERT INTO templates (title, content) VALUES (:title, :content)");
("INSERT INTO `Content` (Content) VALUES (:Content)");
$stmt->bindparam(':title', $title);
$stmt->bindparam(':content', $content);
$stmt->execute();
} else {
echo "the template has no content, please add some content before creating a template";
}
$stmt = $connect->prepare("SELECT CAST(id AS TEXT) AS id FROM templates ORDER BY id DESC LIMIT 1");
$result = $stmt->execute();
$process = $result->fetchArray(SQLITE3_ASSOC);
$jsonFlags = JSON_UNESCAPED_SLASHES | JSON_FORCE_OBJECT;
$id = json_encode($process,$jsonFlags);
echo $id;
?>-
Save the changes
-
Add some content to the TinyMCE textarea, and test out the advtemplate_create_template abilities by saving the content snippet as a template:
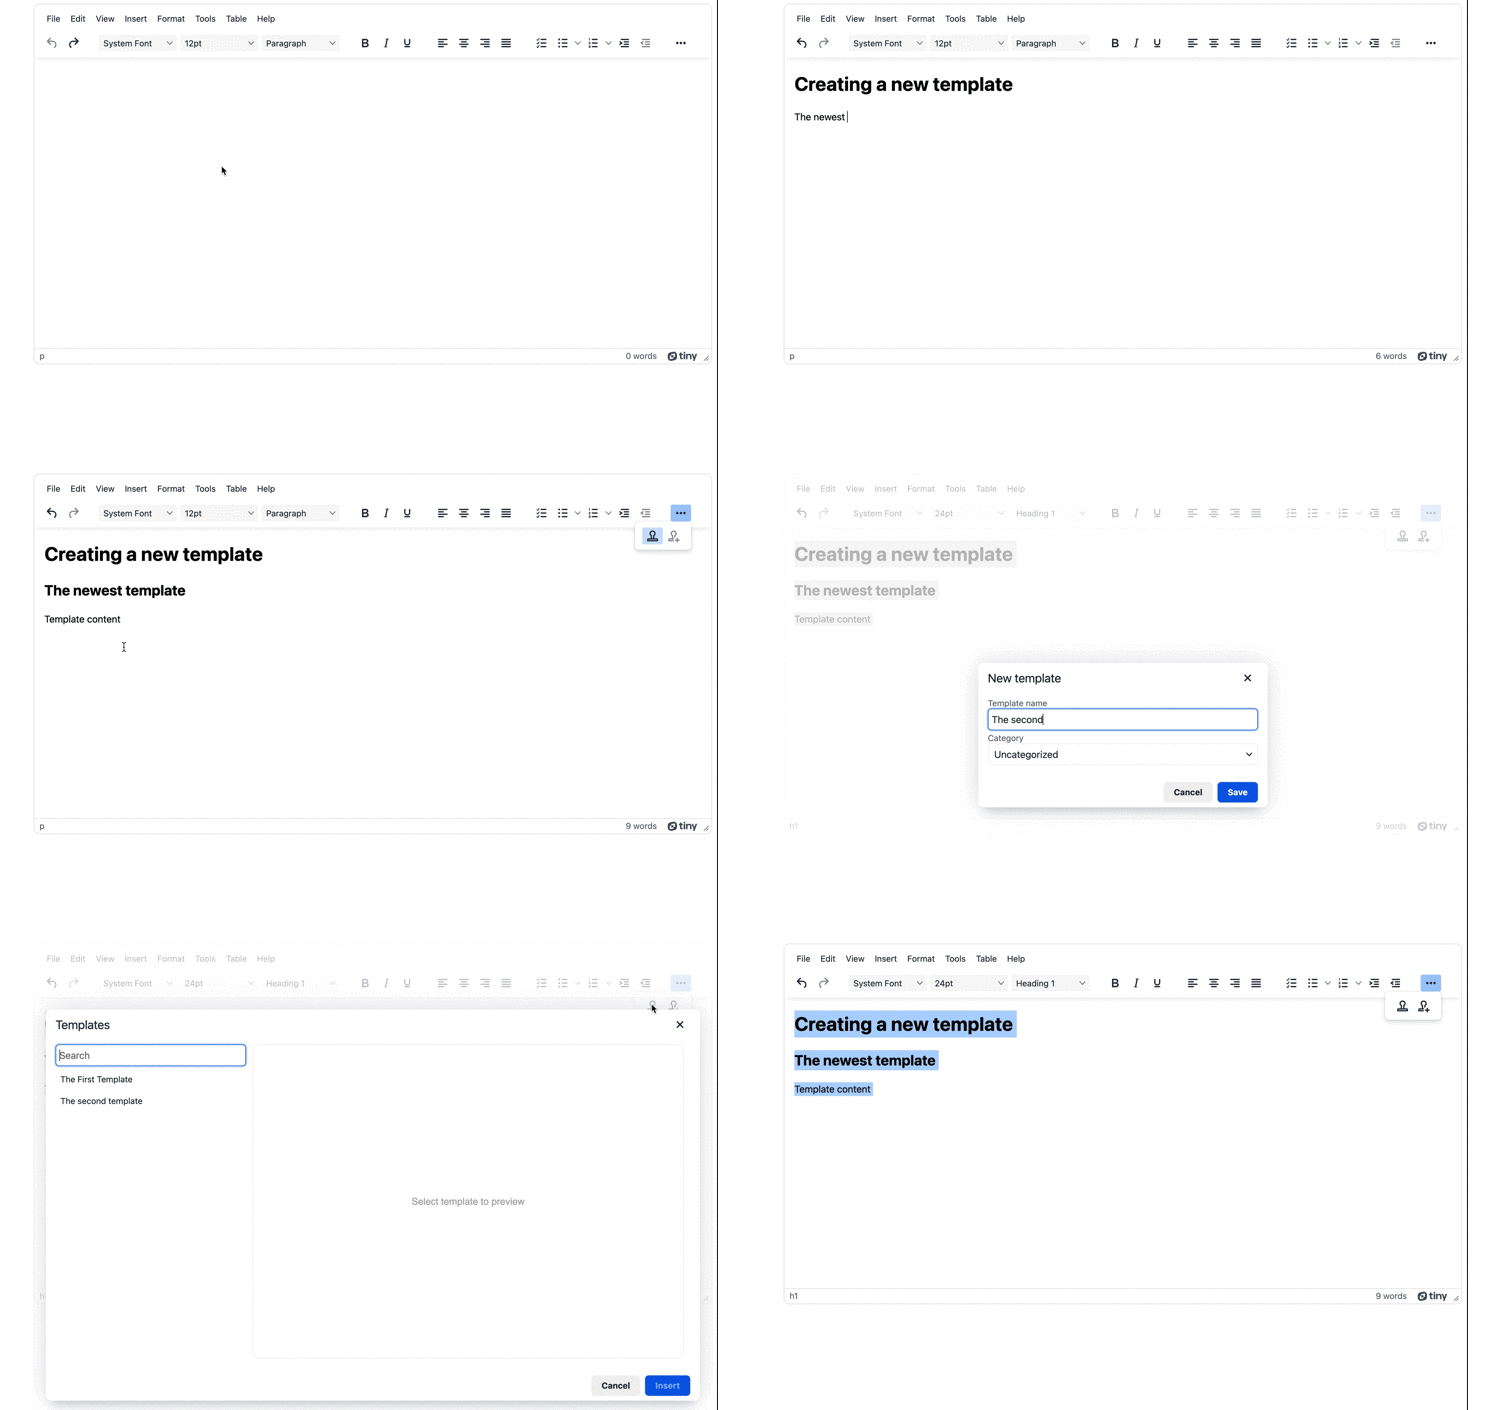
What becomes clear when creating a template is the ease of integration involved when creating content snippets and managing templates with the Advanced Templates plugin. The plugin handles the front-end collection of content snippets with minimal JavaScript, which saves time and energy for ensuring the database connections are secure.
Deleting templates from the database
-
Include the following JavaScript to the index.html file head section directly after the advtemplate_create_template option:
        const advtemplate_delete_template = (id) => {
            const url = new URL('delete_template.php', window.location.href);
            url.searchParams.append('id', id);
             return fetch(url,
                 method: 'DELETE',
                 headers,
             })
             .then(handleResponse('Failed to delete template'))
}-
Add the advtemplate_delete_template option to the TinyMCE init script:
          advtemplate_list,
          advtemplate_get_template,
          advtemplate_create_template,
          advtemplate_delete_template
});-
Create a new PHP file that contains the following PHP for querying the database with a DELETE request, and returns the required empty array:
touch delete_template.php

…<?php
$connect = new SQLite3("TemplateDatabase.db") or die("Could not connect to database, and save TinyMCE content");
$id=$_GET['id'];
if ($id === NULL) {
echo "the GET component is not working";
} else {
$query = "DELETE FROM templates WHERE id = :id";
$stmt = $connect->prepare($query);
$stmt->bindValue(':id', $id, SQLITE3_INTEGER);
$result = $stmt->execute();
}
$empty = [];
$jsonFlags = JSON_UNESCAPED_SLASHES | JSON_FORCE_OBJECT;
$response = json_encode($empty,$jsonFlags);
echo $response;
?>-
Save the changes
-
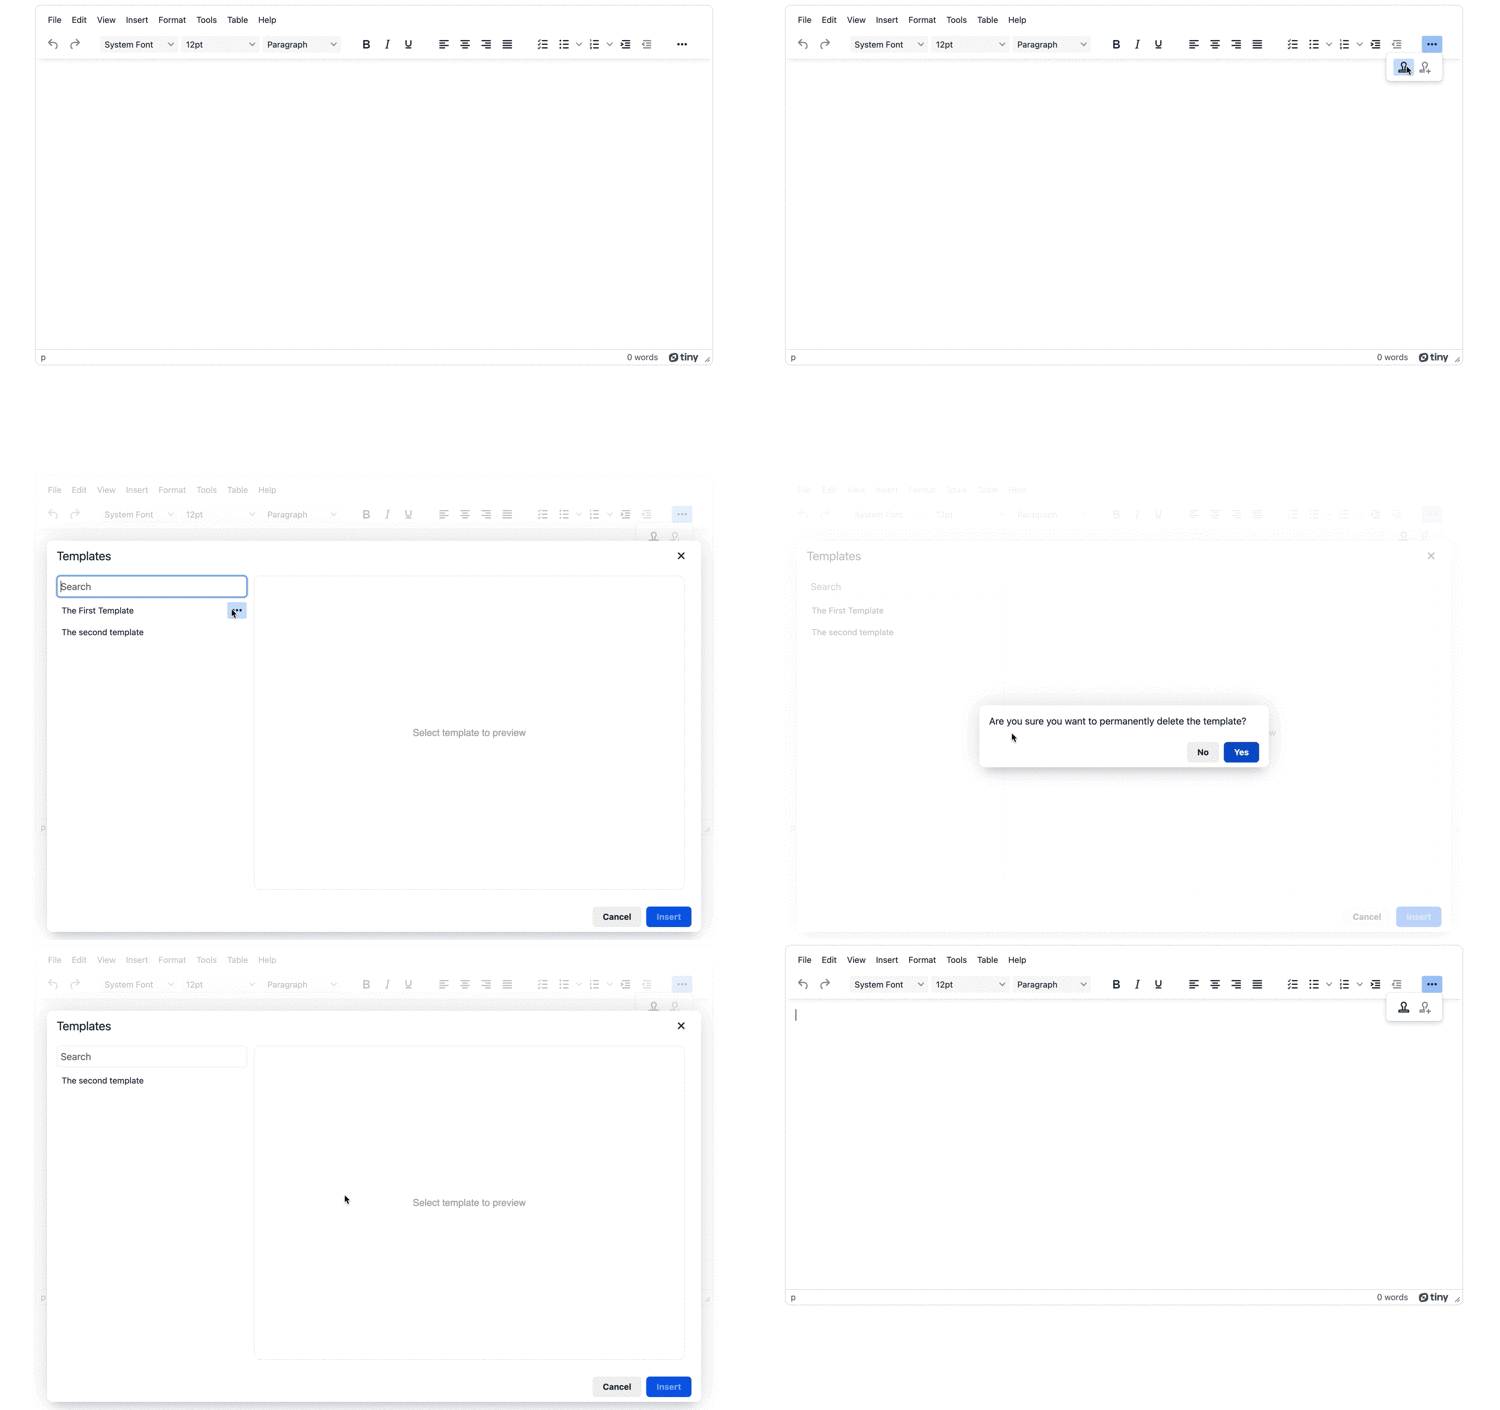
Test out this option by deleting templates that are no longer needed:
Next steps for Advanced Templates and content snippets
The next steps for your application is to configure the complete options available from the Advanced Templates plugin:
- Set up categories for the templates
- Move templates to different categories
- Amend template and category names
Consider the schema of the database – A category to template configuration would require a one to many database table relationship. Moving templates to different categories also requires use of the PATCH method. The PHP configured for this would need to provide the database queries to properly patch the template content.
Check on the documentation for more information on setting up all the options the Advanced Templates (Premium) plugin offers.
You can contact us if you have any questions about how Advanced Templates can help you develop a better experience for your customers.
