


What if there was a way to get 99.9% accurate clean copy-paste results, everytime? No matter if the content comes from MS Word, MS Excel, (or Google Docs). Sounds amazing, right?
It’s possible, if your web application has the right component: a reliable core rich text editor and plugin that does almost perfect clean copy-paste,using the Power Paste plugin.
This article explains how to configure TinyMCE for clean copy-paste of MS Word and Excel (and Google Docs) content. While the options do require some JavaScript for the configuration, setting the options and values in your web application doesn’t require much time, or a deep knowledge of coding.
How do you copy and paste cleanly?
The first step is to set up TinyMCE, and then configure the TinyMCE Power Paste plugin. Be aware that MS Word and MS Excel content is not directly copied to web-based applications.
Here’s what’s going on behind the scenes:
- When you click the copy button, the contents are saved to the computer clipboard as HTML content.
- When you right click and paste into the web application, the browser (Firefox, Safari, Chrome etc) interprets the HTML content from MS Word and Excel.
- In most copy and paste cases, they try to get a match as close as possible to the original style and format of the text.
Bear in mind that some design elements, including “word art” from MS Word, don’t have an HTML equivalent that can easily be replicated.
Setting up TinyMCE for copy-paste
Start with your API key. This key gives you free access to TinyMCE premium plugins for 14 days, including the PowerPaste plugin, as well as avoiding any warning messages concerning domain names in the text area.
- Navigate to the Get-Tiny sign up page
- Create an account – you can use your GitHub account, or Google account, to sign in
- On your local development environment, create an index.html file
- With your file open, in the head section, add script tags, and reference TinyMCE Cloud through a CDN link within the script tags. This is what the link looks like:
<script
  src="https://cdn.tiny.cloud/1/your-api-key/tinymce/6/tinymce.min.js"
  referrerpolicy="origin"
></script>;
-
Add another pair of script tags, add the following JavaScript. It’s the tinymce.init method, and it’s how you control TinyMCE:
<script>
  tinymce.init({
    selector: '#editor',
    plugins: 'powerpaste casechange searchreplace autolink directionality advcode visualblocks visualchars image link media mediaembed codesample table charmap pagebreak nonbreaking anchor tableofcontents insertdatetime advlist lists checklist wordcount tinymcespellchecker editimage help formatpainter permanentpen charmap linkchecker emoticons advtable export autosave',
    toolbar: 'undo redo print spellcheckdialog formatpainter | blocks fontfamily fontsize | bold italic underline forecolor backcolor | link image | alignleft aligncenter alignright alignjustify lineheight | checklist bullist numlist indent outdent | removeformat',
    height: '700px
  });
</script>-
Add initial HTML content, and the CSS selector class to some textarea tags. The selector is set as an id with the value “editor” in the TinyMCE init script:
<body>
  <h1>TinyMCE Quick Start Guide</h1>
  <form id="post">
       <textarea id="editor"></textarea> {" "}
  </form>
</body>;
-
Test run the index.html file by opening it in your browser, or use a local server command with Python or with the PHP command:
Paste with formatting
With TinyMCE running and the PowerPaste plugin set up, if you want to maintain the formatting of the content, set the powerpaste_word_import option. The formatting option to configure here is to set Word import as ‘merge’. Doing so preserves the formatting and structure. Any invalid HTML content is removed.
<script>
  …//content script removed for brevity powerpaste_word_import: 'merge', });
</script>;
-
Paste without formatting
if you want to remove and clean the formatting of the content, the the powerpaste_word_import option has a ‘clean’ option designed for this purpose:
<script>
  …//content script removed for brevity powerpaste_word_import: 'clean', });
</script>;
Copy and paste a table from Word
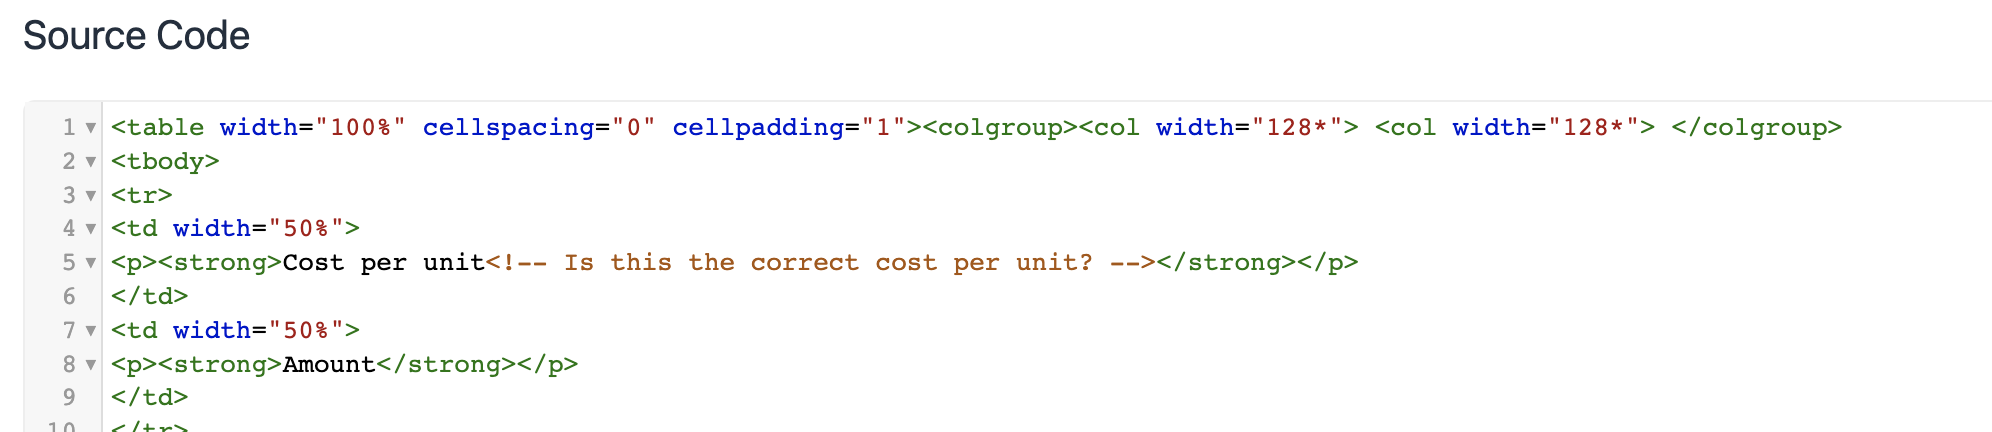
If you have a table in MS Word, you can copy and paste it directly into TinyMCE’s text area and it can interpret the HTML tags that make up the table. The following is an example of pasting a basic table into TinyMCE with the word import option set to ‘clean’:
Checking on the source code reveals that the spacing was preserved during the paste process, producing a close copy of the original table.
Can you copy comments from Word?
When copying comments from Track Changes in Word, the comments are carried over in the HTML. They appear as concealed HTML notation, however, and you can view them in the text area source code.
For example, if the track change comment looked like this:

That comment appears in the text area HTML as the following:
Copy and paste from Excel
PowerPaste can handle table content pasted from MS Excel, interpreting the rows and columns as the <td> and <tr> HTML tags.
How to copy paste a table from Excel
You can highlight the parts of the spreadsheet you need, and then copy it, or highlight and copy across rows and columns.
Note: Any blank columns following columns or rows with content, are not copied over, even if they’re highlighted.
For MS Excel, you can configure the powerpaste_html_import option to ‘prompt’, ‘merge’, or ‘clean’ as you need it:
<script>
  //Script content skipped for brevity   //powerpaste_word_import: 'merge',
    powerpaste_html_import: 'prompt', });
</script>;
How to copy and paste a formula from Excel
While the final result of the formula will copy over into the text area, the logic of the formula itself won’t be copied over.
How to copy a graph from Excel
When you’ve created a graph in MS Excel, remember that the chart in the Excel file is essentially an image file. To successfully copy and paste it, you may require some of the following image control options the PowerPaste plugin provides:
- Allow local images: powerpaste_allow_local_images, when set to true, preserves images in the copied content (specifically Base64 encoded images using data URI).
- Keep the source when not supported: powerpaste_keep_unsupported_src, when set to true, TinyMCE stores the original src attribute of any unsupported images in a new attribute called “data-image-src”. Post processing can then make use of this attribute to include the image.
- Images hosted elsewhere: smart_paste detects anything that resembles a URL in relation to pasted images, and changes them into a hyperlink, which is useful for preserving the image if there is a link to it online.
If you need to restrict and prevent certain kinds of images from pasted into the text area, use the image_file_types option. You can see this option in action in the following tutorials:
Why have clean copy-paste?
With the right rich text editor and plugin in place, you can save time when copy-pasting content from MS Word and Excel files, into your web app.
Using the options available within the TinyMCE PowerPaste plugin, you can gain a clean appearance, everytime, for your copied data. Contact us if you need more information or support on how the PowerPaste plugin can help you preserve your content.


