


Sometimes you don’t need a heavy-duty solution. Why use a hammer when something lighter is more effective? It all boils down to the job at hand,
Lightweight alternatives are important to have available too, especially in web application development. The faster a page loads content, the less likely readers are to leave.
TinyMCE is the world's most trusted open source text editor for web applications. There are several ways you can integrate TinyMCE into your codebase, with options to suit whatever programming language and framework you’re using. One such example is that you can use TinyMCE as a web component.
What’s a web component? Web components are snippets of reusable HTML that include the CSS styles and JavaScript code they depend on.
You can choose to use web components as a lightweight alternative to fully fledged frameworks like React and Angular, in situations where you don’t need the power that those alternatives offer.
In this tutorial, you’ll learn how to include TinyMCE as a web component. This modern approach is powerful, intuitive and lets you create TinyMCE text editor instances by adding a <tinymce-editor> tag to your page.
What are web components?
“Web components”, as they’re collectively known, are actually three different technologies. Together they can be used to create your own self-contained HTML elements that provide functionality for reuse throughout your application, and the relevant APIs are fully supported in all modern browsers.
- Custom elements define HTML elements, such as <tinymce-editor>, that you can add to a page.
- HTML templates provide a mechanism for writing sections of HTML that aren’t automatically rendered. They’re inert until explicitly referenced by your application. Templates are most commonly used to define markup rendered by custom elements.
- Shadow DOM is a JavaScript API for rendering an HTML element’s content in a separate DOM tree. It prevents a custom element’s styles and functionality from leaking out to the page’s main DOM.
How to use web components
Register your custom elements with the browser by using JavaScript to reserve an element name and provide code that’s executed when the component is used. Event handlers let you set up a shadow DOM, render an HTML template, and access the attributes applied to each element instance.
Once you register your custom element, you can use it anywhere in your application by writing that HTML tag. The element looks and feels like any other HTML element, such as <a> or <div>. And, you can reuse it throughout the page.
For instance, you can place multiple text editors into the page.
TinyMCE’s web component is a great example of usability and reusability. You can drop a fully featured text editor into a web page without writing any JavaScript, or managing a heavy framework.
How to configure TinyMCE using web components
You can link directly to the TinyMCE web component using a <script> tag. Alternatively, you can integrate TinyMCE through npm packages using a module bundler such as webpack or Rollup. You’ll see examples of both approaches below.
Setting up your HTML page
First, prepare an HTML page to host your TinyMCE editor. This should have the following:
- An HTML5 DOCTYPE
- The utf-8 character set
- A
<meta name="viewport">tag that sizes the page correctly
Here’s an example that you can use:
<!DOCTYPE html>

<html>
    <head>
   	 <meta charset="utf-8">
   	 <meta name="viewport" content="width=device-width, initial-scale=1">
    </head>

    <body>
   	 <h1>TinyMCE Web Component Demo</h1>
   	 <!-- Add the TinyMCE Web Component here later -->
    </body>
</html>The <meta name="viewport"> tag is required for TinyMCE to render properly on mobile devices. It scales the HTML document to match the user’s device. Without this tag, your page appears tiny on phones and tablets, because it’ll use absolute pixel sizing.
Adding TinyMCE to the page
Using TinyMCE as a web component requires two different, linked scripts:
-
The web component (tinymce-webcomponent.min.js), provides the <tinymce-editor> custom HTML element
-
The standard TinyMCE JavaScript code (tinymce.min.js) powers the editor.
The web component is best sourced directly from TinyMDN’s CDN endpoint.
-
Add the following
<script>tag before the closing </head> tag in your HTML file to include the minified web component:
<script src="https://cdn.jsdelivr.net/npm/@tinymce/tinymce-webcomponent@1/dist/tinymce-webcomponent.min.js"></script>;
-
Save the changes, and load the file into a browser. The web component script will automatically load the latest TinyMCE editor version hosted on Tiny Cloud.
Note: For the Tiny Cloud connection, creating an account with TinyMCE gets you a FREE API key. When you use this key, you get access to Premium TinyMCE plugins for 14 days, as well as no warning messages concerning API keys in the text area.
To deploy a self-hosted version of the TinyMCE script
-
After downloading the latest TinyMCE Web component SDK file, extract the ZIP archive
-
Place the folder on your web server, or in your project directory on your workstation
-
Copy the tinymce-webcomponent.min.js file location
-
Use a <script> tag to reference the file from your HTML page within the <head> section:
<preclass="language-javascript"><script src="/vendor/tinymce/tinymce-webcomponent.min.js"></script>-
Download the SDK file for the TinyMCE core editor, extract the ZIP archive, and place the folder alongside the Web Component folder
-
Finally, reference the TinyMCE core editor script alongside the Web Component script:
<script src="/vendor/tinymce/tinymce.min.js"></script>;
Save the changes, and load the HTML page in a browser. Web components will now use your Self-hosted TinyMCE script when it creates TinyMCE editor instances.
Installing with npm and module bundlers
You can set up TinyMCE with web components using the npm package in conjunction with a module bundler.
You can follow the Webpack getting started guide to begin working with module bundlers:
-
Add the TinyMCE web component’s package to your project:
npm install @tinymce/tinymce-web-component-
Import the web component script as part of your bundle:
import { Editor } from "@tinymce/tinymce-web-component";
Compiling the bundle with your build tool, such as the npm start command, adds the web component inline, as if you’d written a <script> tag referencing it.
Refer to the documentation for your framework or bundler if you’re not using Webpack and are unsure where you should place the import statement.
How to create a TinyMCE editor with web components
Add a <tinymce-editor> element inside your HTML document’s <body> tag. Provide your Tiny Cloud API key as the api-key attribute if you’re using the hosted editor version.
Here’s what your final HTML should look like:
<!DOCTYPE html>

<html>
    <head>
    <meta charset="utf-8">
    <meta name="viewport" <content="width=device-width, initial-scale=1">

    <scriptsrc="webcomponent@1/dist/tinymce-webcomponent.min.js"></script>
    </head>

    <body>
    <h1>TinyMCE Web Component Demo</h1>

    <tinymce-editor api-key="XXXXXX">
    </tinymce-editor>
    </body>
</html>Open your web page in your browser. You’ll see a fresh TinyMCE editor that you can use to begin writing rich text: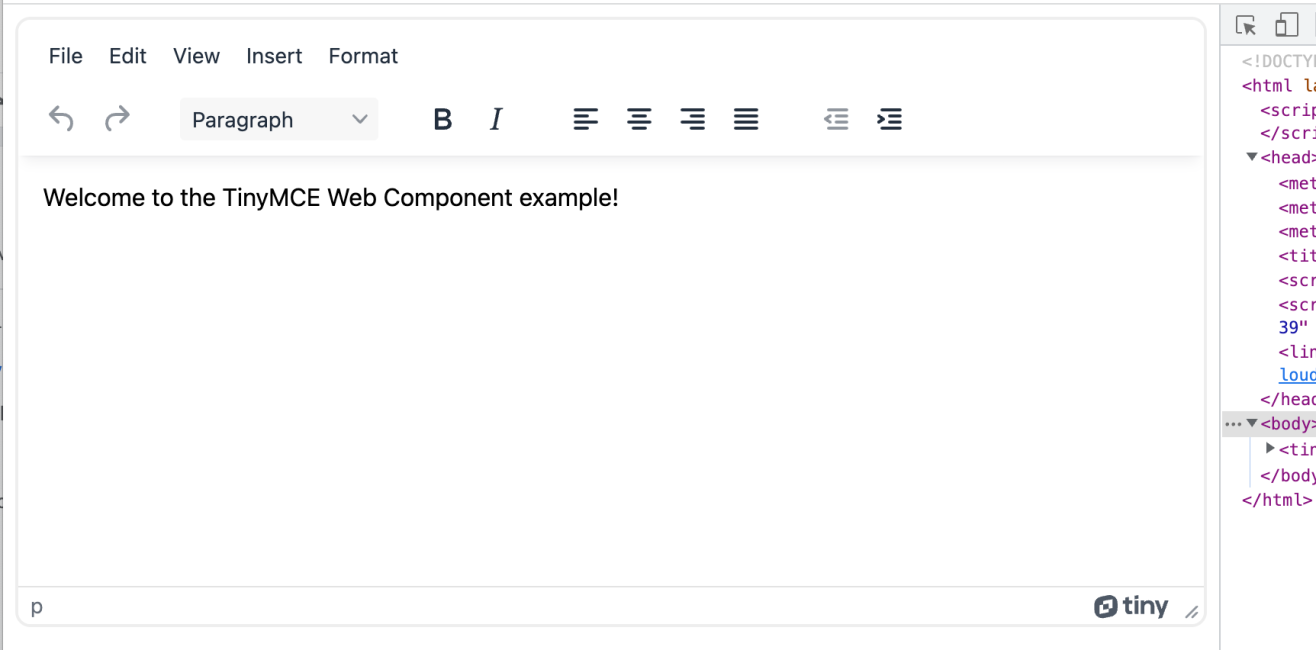
The above example show in the image was built using NPM, the TinyMCE web component integration, and webpack.
In the developer tools view of the page, you can see the main.js file built with webpack: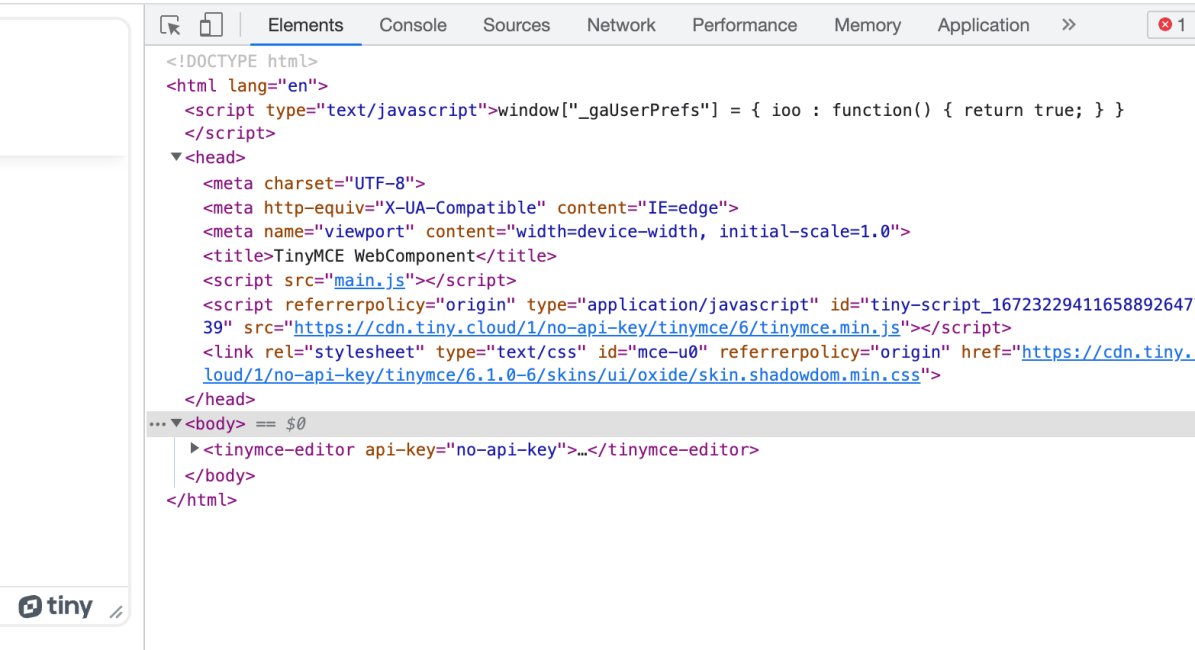
Configuring your TinyMCE component
The TinyMCE web component provides HTML attributes that expose most common editor options. Below are some you might want to use.
a. Setting the initial editor content
You can set the initial content of the editor after TinyMCE loads by providing a text node as the child of your <tinymce-editor> element. It’s important not to insert raw HTML here, as that would allow JavaScript embedded in the content to run unintentionally. Encode the content as text when adding initial editor text.
See the Web Component documentation for an example of avoiding raw HTML
b. Setting the width and height of the editor
TinyMCE’s dimensions are configured with the width and height attributes. These accept either an absolute numeral representing the precise size in pixels, such as 640, or a CSS unit like 10em for more nuanced control:
<tinymce-editor width="640" height="10em">

</tinymce-editor>c. Customizing the menu bar
TinyMCE defaults to a standard set of toolbar controls. These include undo and redo buttons, a dropdown menu for styling text, and essential formatting options for emphasis and alignment.
You can customize the toolbar layout by providing a toolbar attribute – its value should be a space-separated list of button names to display.
You can place the pipe character (|) between buttons to visually group them together.
This example creates a simple toolbar with two groups of controls: first, the three core formatting types, then individual buttons for the six standard heading levels:
<tinymce-editor toolbar="bold italic underline | h1 h2 h3 h4 h5 h6"></tinymce-editor>;
A complete reference of available buttons is provided in the TinyMCE documentation. The plugins you’ve installed might offer additional toolbar buttons as well.
Enabling plugins
TinyMCE has Premium Plugins available that add extra functionality to your editor. While many plugins are open source, the premium-tier features are available with a paid subscription.
You can activate plugins by passing their names to the plugins attribute. This editor has both Link and Table enabled:
<tinymce-editor plugins="link table"></tinymce-editor>;
Injecting CSS into the editor
Sometimes you might want to apply custom styling to the content in your editor instance. This can help you align the editor’s presentation with how authored content will be consumed and used.
The content_style attribute lets you inject a string of CSS directly into your TinyMCE instance, which is ideal when you’re applying a limited number of minor style overrides:
<tinymce-editor content_style="* {font-family: Calibri;}"></tinymce-editor>;
More extensive customization is better handled by the content_css attribute. This will automatically load and inject styles from a CSS file. It accepts either a relative or absolute path, as shown below:
<tinymce-editor content_css="/css/tinymce.css"></tinymce-editor>;
Controlling other TinyMCE options
The full reference of supported web component attributes is available in the TinyMCE documentation. The web component still lets you change TinyMCE settings that aren’t exposed as attributes if you’re prepared to write some JavaScript.
First, create a property on the window object that will hold your TinyMCE settings:
<script>
    window.tinyConfig = {
   	 templates: [
   		 {
   			 title: "Blog post",
   			 description: "A templated blog post",
   			 content: "<p>Post copyright: 2022.</p>"
   		 }
   	 ]
    };
</script>Then, use the config attribute on your editor elements to reference the object you’ve created:
<tinymce-editor config="tinyConfig"></tinymce-editor>;
This approach accepts any of the options you can pass to TinyMCE’s init() function when using the editor’s standard JavaScript-based initialization routine.
How TinyMCE web components work
The TinyMCE official web component wrapper lets you drop an editor into your pages by placing the <tinymce-editor> elements.
Remember the big advantage: you don’t need to write JavaScript or manually configure placeholder DOM elements. You can sign up for a FREE rich text editor API key, and try out TinyMCE’s Premium plugins with a 14-day trial. Get your Tiny Cloud account up and running today.


