


Web API commands – they seem simple, but they can be hard to understand.
But those commands don’t have to be.
The TinyMCE rich text editor APIs allow you to test essential TinyMCE functions. They are JavaScript APIs that allow you to activate and take control of essential TinyMCE functions. They’re definitely an API type that is worth understanding.
So what’s the main API type to run for TinyMCE? That would be the execCommand API.
You can even run the TinyMCE APIs with something as direct as a function and a button.
This article explains the execCommand API – what it is, how it works, and how to test it out (including example demos).
What does the execCommand API do?
This API command runs a specific change to the currently active TinyMCE rich text editor. It’s part of the TinyMCE core class and is therefore a useful command to know about and test run. It can be especially useful if you want to try running the same functions you can find in the TinyMCE toolbar and menubar, outside of the rich text editor interface.
In essence, when added to a website, TinyMCE joins in the Document Object Model (DOM), and that means you can use its API types to manipulate it.
|
Note: These changes are powered by TinyMCE 6, and are not provided by the browser. The TinyMCE 6 API execCommand is not related to Document.execCommand web API. But, it's important to know that earlier TinyMCE versions fall back to the Document.execCommand API where an override doesn't exist. |
API syntax and the execCommand
Here’s how the syntax works:
execCommand(1. Add the name of the statement as a “string”, 2. Add a boolean if needed, true or false, 3. other information needed – a “string”, or sometimes an "object").
There’s a specific set of TinyMCE statements that you can run to change the rich text area content. They are available to view in your browser, with the developer tools console.
The collection is also listed in the documentation on TinyMCE executable commands.
It’s a lengthy list, but if you want to view them all at once in the developer console. Here's how:
-
Create a new index.html file, and add HTML content, the TinyMCE CDN link, and tinymce.init script.
<!doctype html>
<html lang="en">
    <head>
        <meta http-equiv="Content-Type" content="text/html; charset=utf-8">
        <meta name="viewport" content="width=device-width, initial-scale=1, shrink-to-fit=no">
        <title>TinyMCE execCommand API</title>
        <script src="https://cdn.tiny.cloud/1/your-api-key/tinymce/6/tinymce.min.js" referrerpolicy="origin"></script>

        <script>
            tinymce.init({
                selector: ".myTextarea",
            });
        </script>
    </head>
<body>
  <textarea class="myTextarea">
  </textarea>
</body>
</html>Sign up for a FREE API key, and add it into your CDN script in place of 'your-api-key'.
Note: The last demo in this article makes use of a premium plugin, and you can access TinyMCE’s premium plugins for 14 days free - cloud or self-hosted - when you sign up for an API key.
-
Add some style content to the demo (it’ll be useful to keep the API elements organized – particularly when adding content to the file during these demos.)
-
Include links to Bootstrap in the head section of your index.html file after the TinyMCE CDN link. The Bootstrap design properties, like the grid layout, keeps the interface organized:
-
<script src="https://code.jquery.com/jquery-3.3.1.slim.min.js" integrity="sha384-q8i/X+965DzO0rT7abK41JStQIAqVgRVzpbzo5smXKp4YfRvH+8abtTE1Pi6jizo" crossorigin="anonymous"></script>
        <script src="https://cdn.jsdelivr.net/npm/popper.js@1.14.7/dist/umd/popper.min.js" integrity="sha384-UO2eT0CpHqdSJQ6hJty5KVphtPhzWj9WO1clHTMGa3JDZwrnQq4sF86dIHNDz0W1" crossorigin="anonymous"></script>
<script src="https://cdn.jsdelivr.net/npm/bootstrap@4.3.1/dist/js/bootstrap.min.js" integrity="sha384-JjSmVgyd0p3pXB1rRibZUAYoIIy6OrQ6VrjIEaFf/nJGzIxFDsf4x0xIM+B07jRM" crossorigin="anonymous"></script>-
Include style tags after the tinymce.init script to set up the Bootstrap grid layout, and style the demo appearance:
<style>
            body {
                margin: 4rem auto;
                padding: 0 2rem;
                background-color: #f9f9fb;
            }

            main {
                width: 100%;
            }

            .button_style {
                background-color: white;
                font-size: larger;
                padding: 15px;
                border-radius: 4px;
                text-align: center;
                display: inline-block;
                margin: 4px 2px;
            }
            .container {
                display: flex;
                gap: 10px;
                flex-direction: row ltr;
                justify-content: center;
                align-items: center;
            }
            .row {
                flex-direction: row ltr;
                align-items: center;
            }
            .col-sm {
                flex-direction: row ltr;
            }
            .col-md {
                flex-direction: row ltr;
            }
</style>For more information on TinyMCE and Bootstrap, read this article on setting up an integration.
-
Save the design changes.
-
Open the demo file in your browser, or use a local server command with Python or PHP (depending on what you have installed in your local environment).
-
Open developer tools in your browser (
CTRL + shift + ikeys for instance) -
Run the
editorCommands.commands.exec;statement. A long list of executable commands appears:
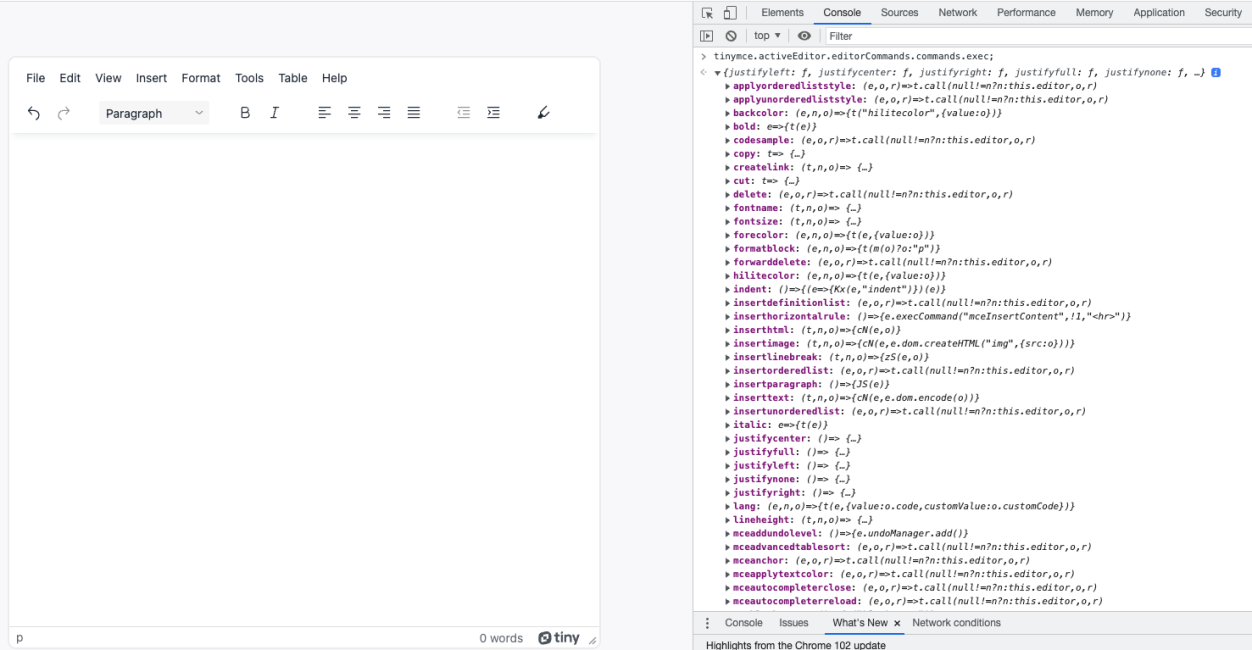
There’s variety, as you can see. To demonstrate what’s possible, including rerouting TinyMCE functions from the menu bar or toolbar into interactive, interface elements, the following examples combine some of the executable commands.
API for adding a horizontal line
You can separate one section from another in your rich text editor with a horizontal line created by using the execCommand:
-
Open the index.html file from the example in the preceding procedure.
-
Add some additional plugins and style elements to the tinymce.init script:
<script>
    tinymce.init({
                selector: ".myTextarea",

                plugins: "preview powerpaste casechange advcode importcss tinydrive searchreplace autolink autosave save directionality advcode visualblocks visualchars fullscreen image editimage link media mediaembed template codesample table charmap pagebreak nonbreaking anchor insertdatetime advlist lists checklist wordcount tinymcespellchecker a11ychecker help formatpainter permanentpen pageembed charmap mentions quickbars linkchecker emoticons advtable export",

                height: '700px',
                width: '700px',
                icons: 'thin',
                content_style: `
                body {
                    background: #fff;
                }

                @media (min-width: 840px) {
                    html {
                        background: #f9fafb;
                        min-height: 100%;
                        padding: 0 .5rem
                    }

                    body {
                        background-color: #f9fafb;
                        box-shadow: 0 0 4px rgba(0, 0, 0, .15);
                        box-sizing: border-box;
                        margin: 1rem auto 0;
                        max-width: 620px;
                        min-height: calc(100vh - 1rem);
                        padding:4rem 6rem 6rem 6rem
                    }
                }
                `,
            });
</script>-
Add HTML elements to the body:
<div class="container">
            <div class="row">
                <div class="col-md">
                  <form method="post" action="dump.php">
                    <textarea class="myTextarea">
                      <p>Add a horizontal line</p>
                    </textarea>
                  </form>
                </div>
            </div>
            <div class="row">
                <div class="col-sm">

                </div>
            </div>
</div>-
Add a new button to the html body inside the empty
<div class="col-sm"></div>tags. Name this one “buttonOne” as an id.
<button id="buttonOne" class="button_style">
  Press for line
</button>;
-
Between the closing
</body>tag and the closing</html>tags, create a new function with the InsertHorizontalRule command and add a new event listener for the lineCommand function:
function lineCommand() {
  tinymce.activeEditor.execCommand("InsertHorizontalRule");
}
var buttonLine = document.getElementById("buttonTwo");
buttonLine.addEventListener("click", lineCommand, false);
-
Save the changes, and then run the index.html file in your browser. When you press the button, you can add a line at the same point that the cursor sits in your editor:
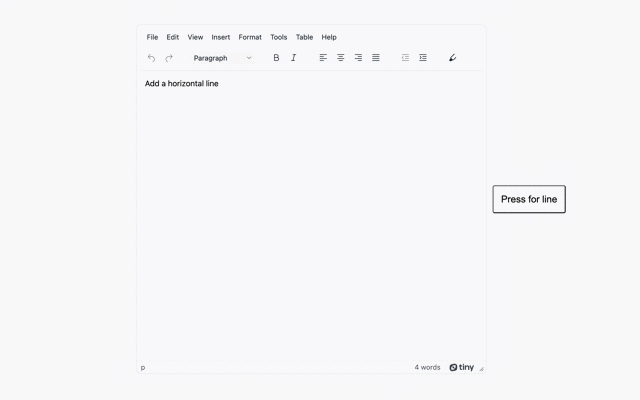
Configuring the InsertHorizontalRule executable means you don’t need to access the menubar or toolbar for a line. The execCommand reroutes the horizontal line function into a button, activated by a click.
Font size control with API
Changing font using the execCommand is another example you can test run.
-
In your example index.html file, add two additional buttons after the “Press for line” button.
<button id='buttonFontL' class='button_style'>Larger Font</button>
<button id='buttonFontS'class='button_style'>Smaller Font</button>-
Create two new functions after the horizontal line function.
//Increase font size up to 24px, or down to 8px
function fontCommand0() {
  tinymce.activeEditor.execCommand("FontSize", false, "24px");
}

function fontCommand1() {
  tinymce.activeEditor.execCommand("FontSize", false, "8px");
}

var buttonFonts0 = document.getElementById("buttonFontL");
buttonFonts0.addEventListener("click", fontCommand0, false);

var buttonFonts1 = document.getElementById("buttonFontS");
buttonFonts1.addEventListener("click", fontCommand1, false);
-
Save the changes, and then reload the demo file in your browser.
-
Highlight some text in the rich text editor, and then use the new buttons to adjust the font size.
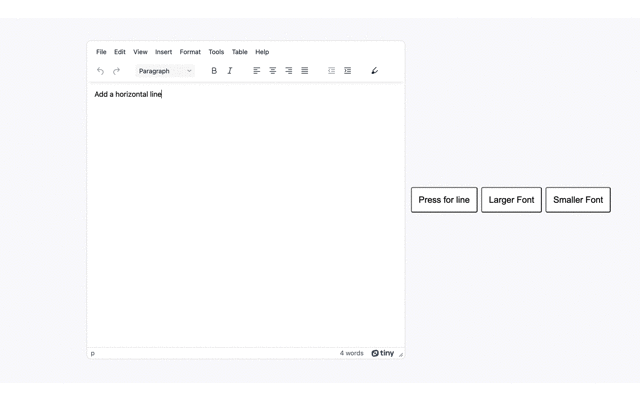
Image control with API
It’s possible to replicate the Enhanced Image Editing plugin’s features using what's available with the plugin (once again, rerouting control to another part of the interface as needed).
-
Add four more buttons to the index.html body. These buttons make use of HTML unicode to add arrow symbols to the demo interface:
<button id='buttonImage0' class='button_style'>↶</button>
<button id='buttonImage1'class='button_style'>↷</button>
<button id='buttonImage2' class='button_style'>↑</button>
<button id='buttonImage3'class='button_style'>→</button>-
Add some new functions to the list of functions in the script below the body closing tags:
//Image control functions
function imageRR() {
  tinymce.activeEditor.execCommand("mceImageRotateRight");
}
var buttonFonts0 = document.getElementById("buttonImage0");
buttonFonts0.addEventListener("click", imageRR, false);

function imageRL() {
  tinymce.activeEditor.execCommand("mceImageRotateLeft");
}
var buttonFonts1 = document.getElementById("buttonImage1");
buttonFonts1.addEventListener("click", imageRL, false);

function imageV() {
  tinymce.activeEditor.execCommand("mceImageFlipVertical");
}
var buttonFonts0 = document.getElementById("buttonImage2");
buttonFonts0.addEventListener("click", imageV, false);

function imageH() {
  tinymce.activeEditor.execCommand("mceImageFlipHorizontal");
}
var buttonFonts1 = document.getElementById("buttonImage3");
buttonFonts1.addEventListener("click", imageH, false);
-
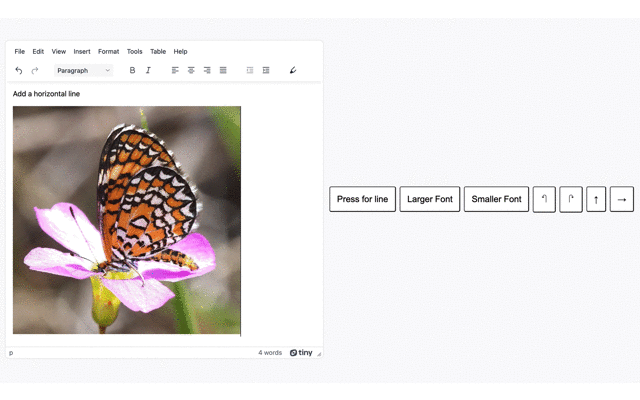
Finally, add an image to the text editor so you have an image element ready when you save and reload the index.html file in your browser:
<textarea class="myTextarea" id="editorOne"> <p>Add a link to this content</p> <img src="images/7659558228_a13bcbe259_k.jpeg" height="500" width="500" alt="Butterfly Image to change"> </textarea> -
You can now interact with the image using the configured buttons:
The TinyMCE execCommand API and new ideas
Using the execCommand API, you can change the experience of TinyMCE. It offers the ability to reroute changes to the editor content from the menubar and toolbar into different functions.
The functions outlined here are just the start. Once you see it in action, ideas of what you can do with execCommand can often start to emerge. And as you can see, when you run the commands and explore, there’s a lot you can try out!
When you sign up for a FREE API key, you get 14 days access to TinyMCE premium features on the cloud or self-hosted, which includes the APIs you can try out.


