The "rich" in rich text editing generally means adding images, videos, and other files that are embedded in your content. This involves file management, and until now, developers have had to undertake the difficult and time-consuming task of wiring up file upload and management themselves.
To solve this issue, we created Tiny Drive, a new cloud-based asset management and storage service. If you've ever marveled at Dropbox's ease of use, or considered MoxieManager for self-hosted asset management but were discouraged by the server requirements, then Drive will be an excellent solution for your team.
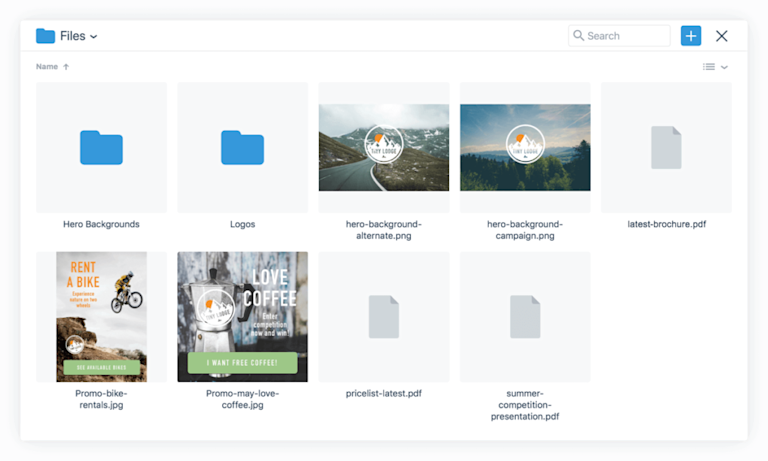
Drive automatically uploads and stores images, videos, and files when they are added to TinyMCE while editing content. It also provides the ability to manage files using a very familiar user interface. Drive is automatically provisioned for all Tiny Cloud accounts, and there is even a free tier that includes 100MB of storage and 1GB bandwidth.
Let's get to it.
Part 1. Configure TinyMCE
If TinyMCE is already set up, you will have a config that looks something like the one below. It's likely that you have a more complex init, possibly used a different HTML element for the selector, or you might even call an advanced config from an external JS file. Whatever your config looks like, in this section our focus is TinyMCE's init.
<!DOCTYPE html>
  <html>
    <head>
      <script src="https://cloud.tinymce.com/stable/tinymce.min.js"></script>
      <script>tinymce.init ({ selector:'textarea' });</script>
    </head>
    <body>
      <textarea>Next, let's add Tiny Drive</textarea>
    </body>
  </html>
The next steps update tinymce.init with the options required to connect to the Drive service.
If you are not familiar with configuring TinyMCE, you might like to take a quick look at our Quick Start or General Configuration guide.
1. Add the "tinydrive" plugin
First, add tinydrive to the plugins key:
tinymce.init({
  selector: "textarea",
  plugins: "tinydrive",
});
2. Declare JWT token provision
Next, declare how the JWT token will be provisioned. First, add the tinydrive_token_provider key with either a Provider URL or a Provider Callback as the key pair.
Example using a JWT Provider URL
In this option, use a URL to a page that takes an HTTP JSON POST request and produces a JSON structure with a valid JWT. It uses a POST request to avoid caching by browsers and proxies.
tinymce.init({
  selector: "textarea",
  plugins: "tinydrive",
  tinydrive_token_provider: "/jwt",
});
Example using a JWT Provider Callback
The other option is to use a function that provides the same token through a callback. This allows you to make your own HTTP request in any format you like. The provider function is a function that has a success and failure callback where success takes an object with a token property containing the JWT, and the failure callback takes a string to present as an error message if the token could not be produced.
tinymce.init({
  selector: "textarea",
  plugins: "tinydrive",
  tinydrive_token_provider: function (success, failure) {
    success({ token: "jwt-token" }); // failure('Could not create a jwt token')
  },
});
How to create a token will be explained later in this guide.
3. File upload path
By default, all objects will be uploaded to the path /uploads. Using the tinydrive_upload_path config option you can change the default path for files that get uploaded when pasted into the editor, uploaded directly through the Image dialog, or when you drag-and-drop images into the editor. It will produce a date-based structure within this path like this /uploads/{year}{month}{day}. We do this to avoid placing thousands of files in the same directory.
tinymce.init({
  selector: "textarea",
  plugins: "tinydrive",
  tinydrive_upload_path: "/some/other/path",
});
4. Add an Insert File toolbar button
Drive will automatically integrate into the Image, Link, and Media dialogs as a file picker. You can also configure it to insert files directly into your content using the insertfile button. To enable this button, add it to your toolbar editor setting.
tinymce.init({
  selector: "textarea",
  plugins: "tinydrive",
  toolbar: "insertfile",
});
The Insert File toolbar button will insert images as img elements and other files as links to that file.
Note that the process of declaring a toolbar value specifically overrides the default toolbar config. It will need to be rebuilt manually. An advantage is that you will end up with the exact toolbar config you want, rather than what we deliver out of the box.
5. Add an Insert File menu item
Now that you have a toolbar button set up, you should consider adding a menu item also. To do this add it to the menu editor setting or the insert_button_items setting. As with the toolbar mentioned above, declaring a menu value overrides the default config.
tinymce.init({
  selector: "textarea",
  plugins: "tinydrive",
  toolbar: "insertfile",
  menu: {
    insert: { title: "Insert", items: "insertfile" },
  },
  insert_button_items: "insertfile",
});
Full example config using JWT Token Callback
tinymce.init({
  selector: "textarea",
  plugins: "tinydrive",
  tinydrive_upload_path: "/some/other/path",
  tinydrive_token_provider: function (success, failure) {
    success({ token: "jwt-token" });
    // failure('Could not create a jwt token')
  },
  toolbar: "insertfile",
  menu: {
    insert: { title: "Insert", items: "insertfile" },
  },
  insert_button_items: "insertfile",
});
In Part 2 we'll show you how to set up JWT authentication for Drive.
Part 2. JWT Authentication
Some TinyMCE cloud-based services require JWT authentication. This allows us to verify that you and your end user are allowed to access a particular feature. JWT is a common authorization solution for web services and is documented in more detail at the https://jwt.io/ website. This section of the guide aims to show how to setup JWT authentication for TinyMCE's cloud services.
Before starting, this section assumes prior knowledge of JSON Web Token (or JWT), including how they can be used for user authentication and session management in a web application. Some coding on both the client-side and the server-side is required to configure JWT as per the instructions in this section.
Private/Public Key Pair
Tokens used by the TinyMCE cloud services make use of a public/private RSA key-pair. This allows you as an integrator to have full control over the authentication as we don't store the private key.
Only you have access to the private key, and only you can produce valid tokens. We can only verify that the tokens are valid and extract user information from that token.
Public key creation
The private/public key pair is created using the Tiny account JWT key manager page. Detailed instructions are provided on the keygen page itself, and (again) be assured we only store the public key on our side. The private key is for you to store in your backend.
JWT Provider URL
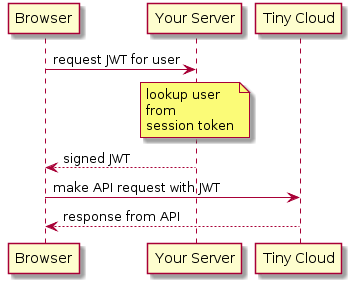
The easiest way to setup JWT authentication against TinyMCE cloud services is to create a JWT provider endpoint. This endpoint takes a JSON HTTP POST request and produces a JSON result with the token that the service will then use for all the HTTP requests.
The following diagram explains the JWT call flow:

JWT requirements
1. Algorithm
The following algorithms are supported for the JWT header/signature:
- RS256
- RS384
- RS512
- PS256
- PS384
- PS512
All of these algorithms use the private RSA key to sign the JWT, but vary in how they execute. RS256, the most widely supported algorithm, features in the code examples below.
2. Drive specific JWT Claims
- sub - (required) Unique string to identify the user. This can be a database ID, hashed email address, or similar identifier.
- name - (required) Full name of the user that will be used for presentation inside Drive. When the user uploads a file, this name is presented as the creator of that file.
Node Token Provider example
This example shows how to set up a Node.js express handler that produces the tokens. It requires the Express web framework and the jsonwebtoken Node modules to be installed. Each service requires different claims to be provided. The following example shows the sub and name claims needed for Drive.
const express = require("express");
const jwt = require("jsonwebtoken");
const cors = require("cors");

const app = express();
app.use(cors());

const privateKey = `
-----BEGIN PRIVATE KEY-----
....
-----END PRIVATE KEY-----
`;

app.post("/jwt", function (req, res) {
  const payload = {
    sub: "123", // Unique user id string
    name: "John Doe", // Full name of user
    exp: Math.floor(Date.now() / 1000) + 60 * 10, // 10 minutes expiration
  };
  try {
    const token = jwt.sign(payload, privateKey, { algorithm: "RS256" });
    res.set("content-type", "application/json");
    res.status(200);
    res.send(
      JSON.stringify({
        token: token,
      })
    );
  } catch (e) {
    res.status(500);
    res.send(e.message);
  }
});
app.listen(3000);
PHP Token Provider example
This example uses the Firebase JWT library provided through the Composer dependency manager. The private key should be the private key that was generated through your Tiny Account. Each service requires different claims to be provided. The following example shows the sub and name claims needed for Drive.
<?php
require 'vendor/autoload.php';
use \Firebase\JWT\JWT;

header("Access-Control-Allow-Origin: *");
header("Access-Control-Allow-Headers: Origin, X-Requested-With, Content-Type, Accept");

$privateKey = <<<EOD
-----BEGIN PRIVATE KEY-----
....
-----END PRIVATE KEY-----
EOD;

$payload = array(
  "sub" => "123",           // Unique user id string
  "name" => "John Doe",     // Full name of user
  "exp" => time() + 60 * 10 // 10 minutes expiration
);

try {
  $token = JWT::encode($payload, $privateKey, 'RS256');
  http_response_code(200);
  header('Content-Type: application/json');
  echo json_encode(array("token" => $token));
} catch (Exception $e) {
  http_response_code(500);
  header('Content-Type: application/json');
  echo $e->getMessage();
}
?>Drive restrictions and quotas
An important note about some restrictions Drive has on the types of files that can be uploaded and the size of these files:
- The maximum file size is 100MB
- Allowed image extensions: gif, jpeg, jpg, png, tif, tiff, bmp
- Allowed document extensions: doc, xls, ppt, pps, docx, xlsx, pptx, pdf, rtf, txt, keynote, pages, numbers
- Allowed audio extensions: wav, wave, mp3, ogg, ogv, oga, ogx, ogm, spx, opus
- Allowed video extensions: mp4, m4v, ogv, webm, mov
- Allowed archive extensions: zip
- The Copy operation is limited to single files due to technical reasons
Storage and bandwidth quota vary based upon your subscription. All Tiny Cloud accounts start with 100MB storage and 1GB bandwidth included free. Sign up to get started.
Upload URLs
All files are uploaded to a central storage with a CDN endpoint, which means that we host your files and that they are publicly available in read-only mode for anyone that has access to the URL of that file. The URL format for each file is https://drive.tiny.cloud/1/{your-api-key}/{uuid}, which gets generated when a file is uploaded. If a file is moved or renamed, it will still have the same unique URL, so the restructuring of files using Drive will not affect where they are used. However, deleting a file will mark the URL as unused, and the URL will not continue to work.
Next steps
You are only a few steps away from attaching free, cloud file management to TinyMCE. Here's a quick review:
- Create a Tiny Cloud account (if you haven't already)
- Configure the editor
- Create JWT Authentication and a Provider using our Node or PHP examples
If you have any questions about setting up Tiny Drive, the TinyMCE Community is a great place to get help.
