


Slack links professionals together, and the businesses using it can set up their slack with custom emoji for their team. A shortcut to adding these emoji is to use a slash command, or type “/”. When a user types in the “/”, a menu opens — it’s usually called a selection menu.
Similarly, in the world of Twitch, streamers and their moderators type slash commands as a shortcut to access emoticons, and make chatbots behave (amusingly). Without slash command shortcuts, the fast-paced nature of Twitch would diminish, and likewise for chat server apps like Discord.
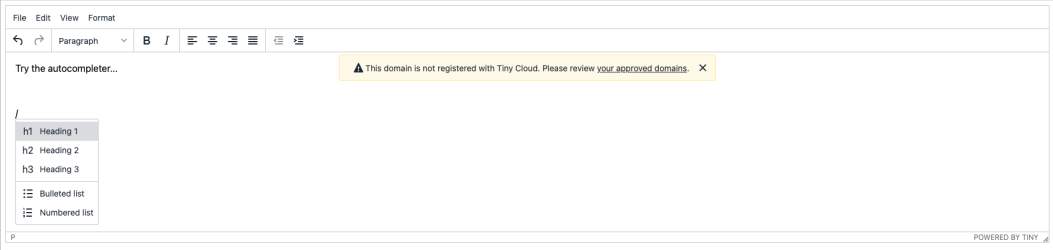
It’s also possible to configure TinyMCE to use slash commands with our rich text editor. TinyMCE has an Autocompleter API suitable for configuring slash commands. With some configurations, here’s what our simple, flexible rich text editor looks like, with slash commands.
Where can you configure slash commands in TinyMCE?
You can configure slash commands in either the tinymce.init section of the html index file, or in a separate JavaScript file. If you’re writing the JavaScript directly into the index file, it can be helpful to include a script tag and move the slash command integration to a separate file.
We’ve created a codepen with an example of the slash command, where you can test out the slash commands, and see the code snippets mentioned in the following sections in action. Here’s how our codepen looks:
How does the Autocompleter API provide a slash command?
Defining the trigger character that invokes the slash command is the most important part of using the Autocompleter API to make slash commands actually work. Here’s an example:
ch: '/'.
minChars: '0',You can designate trigger characters like a $ or an @ symbol, and when the designated character is typed into the rich text editor (in this case a slash) the trigger character activates the Autocompleter API, providing a list of options on a selection menu. And where the TinyMCE slash command configuration gets really interesting is configuring the Autocompleter API trigger to bring up a selection menu of TinyMCE’s plugins. This can be a major time saver. Users don’t need to let go of the keyboard.
How’s the API involved in the shortcut?
The trigger character creates an event, which lets the Autocompleter API know it can fetch something for the user. A fetch action makes a request, and receives a response. In this case, the request is the event of typing of a slash command, and in response the Autocompleter API returns a selection of options for the user — that is, a menu of TinyMCE plugins.
What goes into setting up the slash command?
In a demo we put together, we limited options to headings, and lists. When users type in the slash command, the selection of options that the Autocompleter API returns are plugins and menu items. Here’s how we configure the Autocompleter API to return plugins and menu items after a slash command:
var optionPlugins = [
{
  text: 'Heading 1',
  icon: 'h1',
  action: () => {
    editor.execCommand('mceInsertContent', false, '<h1>Heading 1</h1>');
    editor.selection.select(editor.selection.getNode());
  }
},The action variable has an editor.execCommand function inside it. This function executes an action that inserts HTML into the editor when the user clicks on the option they want from the selection menu. Other toolbar items in the array call out to specific plugins:
{
  text: 'Numbered list',
  icon: 'ordered-list',
  action: function () {
    editor.execCommand('InsertOrderedList', false);
   }
},Integrating the Autocompleter API
The remaining lines of the JavaScript include the actual Autocompleter API, and a filter to sort through the plugins and options and present them in the a selection menu.
/* The autocompleter that allows you to use slash commands */
    editor.ui.registry.addAutocompleter('Menubar-item-variable', {
      ch: '/',
      minChars: 0, /** Zero value means that the menu appears as soon as you type the "/" */
      columns: 1,
fetch: function (pattern) {}How you set up the fetch: function (pattern) {} property determines how the slash commands will work. We set up a constant variable in our fetch callback that filters through the plugins and menu items to determine what should be included. The displayed menu then shows the user a text, icon, and value of the menu item.
Our JavaScript searches through the index of items, looking for a pattern match.
fetch: function (pattern) {
            const matchedActions = insertActions.filter(function (action) {
                return action.type === 'separator' ||
                    action.text.toLowerCase().indexOf(pattern.toLowerCase()) !== -1;
            });

            return new Promise((resolve) => {
                var results = matchedActions.map(function (action) {
                    return {
                        meta: action,
                        text: action.text,
                        icon: action.icon,
                        value: action.text,
                        type: action.type
                    }
                });
                resolve(results);
            });
        },
        onAction: function (autocompleteApi, rng, action, meta) {
            editor.selection.setRng(rng);
            // Some actions don't delete the "slash", so we delete all the slash
            // command content before performing the action
            editor.execCommand('Delete');
            meta.action();
            autocompleteApi.hide();
        }
    });
    return {};
});This content needs to appear before the tinymce.init JavaScript. When the rich text editor loads in a browser, the slash commands should show the following:
Note that in versions of TinyMCE before version 6, the tinymce.util.Promise API appeared to set up the promise. This API was deprecated in TinyMCE 6. Previous versions of TinyMCE will need to use the return new tinymce.util.Promise(function (resolve) API command in place of the return new Promise((resolve) => { promise set up in the previous code sample.
What's next?
Flexibility is without a doubt one of the greatest advantages that the TinyMCErich text editor brings with it. Slash command integration with the Autocompleter API is just one example of what’s possible.
Open the Quickstart Guide to get an instance of the editor up and running quickly. Contact us to find out more about the other flexible options TinyMCE provides for developers to create the best applications for their users.


