


In an ideal world, when software needs an upgrade, it’s fast and painless. But in reality, some upgrades aren’t quick – they’re actually a migration. And, that's the case if you’re planning an upgrade from CKEditor 4 to 5. It’s a decision that requires some thought: some developers have had a great experience:
Morning guys
— Gen (@TheKinng96) September 8, 2020
Just an update about Rich Text Editor I shared yesterday
Found an update of ckeditor4 >>> ckeditor5
Now it has more functionalities
One word: it is the king now for all JS framework to use#100DaysOfCode #DEVCommunity #CodeNewbies pic.twitter.com/fa6pRlAX8u
When your upgrade becomes a migration it is worth considering the other alternatives on the market to see if they better fit your needs. This can especially be true when developers have reported frustrations with the process.
That’s what this article is about – it looks specifically at upgrading from CKEditor 4 to CKEditor 5, versus an easier to handle migration from CKEditor 4 to TinyMCE 6.
TinyMCE, the world’s number 1 WYSIWYG HTML editor, offers features that are perfect for many different solutions. Rather than investing time in moving from CKEditor 4 to CKEditor 5, consider the value of moving to TinyMCE 6, instead..
Table of Contents:
- CKEditor 4 end of life
- Why migrate from CKEditor 4 to a new editor?
- CKEditor 4 migration options
- What developers are saying
- CKEditor 4 vs 5 and TinyMCE
- Steps to migrate from CKEditor 4 to TinyMCE 6
- Making the decision to change from CKEditor 4 to TinyMCE
CKEditor 4 end of life
The end of life management for the older, CKEditor 4 rich text editor, is fast approaching. 2023 marks the year that support for that editor ends, so it’s time to make a plan for your future needs – sooner rather than later.
Why migrate from CKEditor 4 to a new editor?
Planning an alternative migration replaces the (not insignificant) time and energy that’s needed to upgrade from CKEditor 4 to CKEditor 5.
Information from the CKEditor documentation says the process isn’t a “drop in”, easy upgrade, so expect a lengthy migration. Indeed, if that's the case, then why not look at alternatives.
To give you an idea, which of these scenarios sounds more workable? (Note that neither of these include getting team consensus, data backups, protecting customer data, and QA tests – these are broad steps).
CKEditor 4 migration options
1. CKEditor 4 to 5 Migration:
-
- Start the migration pathway
- Study the new APIs and make a plan for changing them
- Learn the new installation pathway
- Test each of your plugins/feature
2. Change providers:
-
- Modify your Web App JavaScript
- Study the new API
- Test your plugins/features
If scenario 2 sounds better, and you’re currently using CKEditor 4 as your rich text editor, consider the value a change could bring to you and your project.
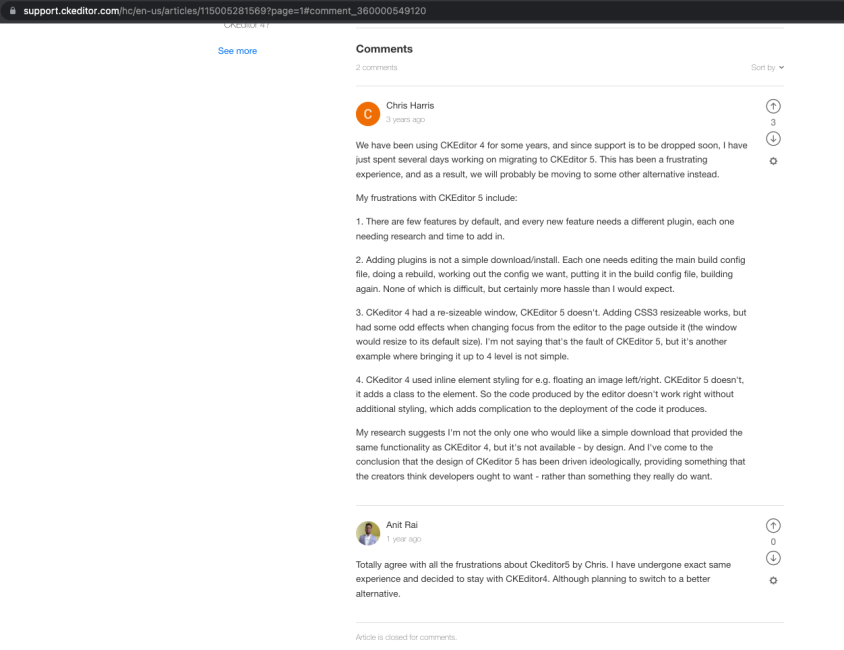
What developers are saying
“CKEditor 4 to 5 is a big change, similar to the D7 to D8 move” ~ Klonos, GitHub, October 2019
“It's not easy to switch to CKEditor 5.”
~ SeNioR-, Invision Community, May 2021
“There is a tentative plan to start moving to Ckeditor 5.”
~ herb, Backdrop CMS, Jan 2022
As the editor’s end-of-life draws closer, now is a great time to start weighing up your options, and making a solid roadmap for change. However, it’s important to weigh up the features of each editor you’re considering.
CKEditor 4 vs 5 and TinyMCE
The following table focuses specifically on features TinyMCE 6 offers that are not available in CKEditor 4 or CKEditor 5, including out-of-the-box and Premium Plugins:
|
CKEditor 4 |
CKEditor 5 |
TinyMCE 6 |
|
|
Image Editing |
❌ |
❌ |
✅ |
|
Format Painter |
✅ |
❌ |
✅ |
|
Permanent Pen |
❌ |
❌ |
✅ |
|
Case Change |
✅ |
❌ |
✅ |
|
Checklists |
❌ |
✅ |
✅ |
|
Accessibility Checker |
✅ |
❌ |
✅ |
|
Broken Link Checker |
❌ |
❌ |
✅ |
Find out more in the CKEditor vs TinyMCE summary.
Steps to migrate from CKEditor 4 to TinyMCE 6
When you have CKEditor 4 editor running, you might have the following code:
<div id="editor"></div>
<script src="https://cdn.ckeditor.com/4.19.1/standard/ckeditor.js"></script>

<textarea name="editor1"></textarea>

  <script>
    CKEDITOR.replace( 'editor1' );
</script>In order to migrate your integration from CKEditor 4 to TinyMCE 6, the two steps you need to take are:
- Change the HTML code to reference TinyMCE
- Update the JavaScript CDN to reference TinyMCE
For example:
<div id="editor"></div>
<script src="https://cdn.tiny.cloud/1/no-api-key/tinymce/6/tinymce.min.js" referrerpolicy="origin"></script>
<script>
    tinymce.init({
       selector: '#editor'
    });
</script>Note: replace no-api-key with your own Tiny API key. If you don’t already have one, you can get a free API key now which grants 14 days free access to TinyMCE Premium Plugins.
CKEditor 4 requires a rebuild to take place when adding a plugin. TinyMCE plugins can be added without any rebuilding steps.
For example, replicating the classic CKEditor functionality requires only the following plugins:
- Link
- Lists
- Image
- Table
- Media
Here’s how to add the plugins to your TinyMCE 6 configuration using the plugins option:
tinymce.init({
  selector: "#editor",
  plugins: "link, lists, image, table, media",
});
Matching the CKEditor 4 rich text editor toolbar requires the following:
toolbar: ["heading", "|", "bold", "italic", "|", "undo", "redo"];
In TinyMCE, configure these options with the following code:
toolbar: "styleselect | bold italic | undo redo";
Here’s what the change looks like:
tinymce.init({
  selector: "textarea",
  plugins: "link, lists, image, table, media",
  menubar: false,
  toolbar:
    "styleselect | bold italic link bullist numlist | outdent indent | image blockquote table media undo redo",
});
With these steps done, you have migrated away from CKEditor 4, and kept much of the basic, rich text editor functionality.
Here is a complete HTML example:
<!DOCTYPE html>
<html lang="en">
  <head>
    <meta charset="utf-8">
    <meta name="viewport" content="width=device-width, initial-scale=1">
    <script src="https://cdn.tiny.cloud/1/no-api-key/tinymce/6/tinymce.min.js" referrerpolicy="origin"></script>

    <script>
      tinymce.init({
        selector: '#editor',
        plugins: 'link, lists, image, table, media',
        menubar: false,
        toolbar: "styleselect | bold italic link bullist numlist | outdent indent | image blockquote table media undo redo"
      });

    </script>
  </head>

  <body>
  <h1>TinyMCE Example</h1>
      <div id="editor">Hello, World!</div>
  </body>
</html>Making the decision to change from CKEditor 4 to TinyMCE
If you’re an enterprise with specific use case needs, or difficult edge cases, and would like to talk to a representative on the TinyMCE team for more information, reach out and let us know what change you’re aiming to make.
If you’d like to try out TinyMCE, when you sign up for a FREE API key, you can test drive all Premium Plugins and features for 14 days at no charge.


