


An essential function for websites is the ability to update and change content without a page refresh. That’s what Ajax does. (Weird name isn’t it.) It used to mean “Asynchronous JavaScript And XML”, but the name Ajax has evolved to mean a development technique making use of asynchronous processing.
With Ajax, you can load, change, and post content to modify how your website appears to your customers. More importantly though, you can make these changes asynchronous.
Why is Ajax important?
Ajax processes don’t hold up the loading process of an entire web page. Instead, it allows for changes to web pages to happen as needed, rather than having to reload the entire website's page. That would be frustrating. Not something to do in front of the customer.
Thankfully, TinyMCE’s rich text editing abilities include working with asynchronous functions. It works in situations where web elements need text entry with load and post methods (like a form for instance).
This article explains Ajax post and load. The first demo shows how to get started with asynchronous actions using TinyMCE. The second delves into Ajax – how to load and use Ajax post techniques with TinyMCE.
How can TinyMCE handle asynchronous events?
To configure this functionality correctly, it’s worth using the setProgressState() TinyMCE API method. This provides a useful loading animation. Playing the animation eases loading events for your customers.
Also the setTimeout() global method (an asynchronous method). This method is useful for coordinating asynchronous events.
For load and post Ajax actions, it’s a useful addition to try out the setProgressState() API. This way, you can get an idea of how to set up and load content.
How to load asynchronous content with TinyMCE
-
Create a new
index.htmlfile within your development environment. -
Sign up for a TinyMCE account to get your FREE API key. You’ll need the key to prevent any error messages appearing in the text area. It stops the nag.
It will also give you access to TinyMCE's premium features for 14-days, free. -
Include the Tiny Cloud link and the
tinymce.initscript in yourindex.htmlfile. Replaceno-api-keywith your TinyMCE API key.
<head>
    <meta charset="UTF-8">
    <meta http-equiv="X-UA-Compatible" content="IE=edge">
    <meta name="viewport" content="width=device-width, initial-scale=1.0">
    <title>TinyMCE and AJAX</title>
    <script src="https://cdn.tiny.cloud/1/no-api-key/tinymce/6/tinymce.min.js" referrerpolicy="origin"></script>
    <script>
        tinymce.init({
            selector: "#mytextarea",
        });
    </script>
</head>-
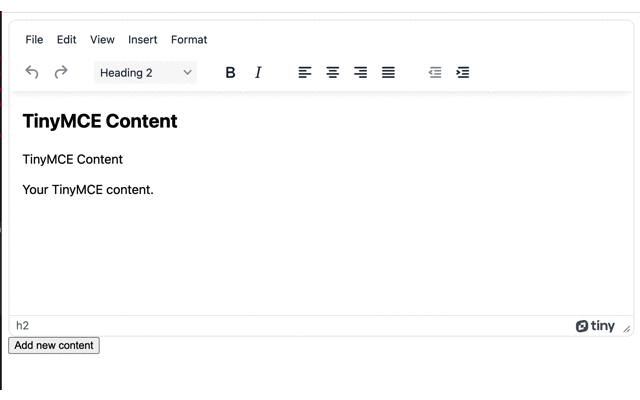
Set up the HTML content to load TinyMCE in the demo. This demo includes an HTML button element.
<body>
    <textarea name="" id="mytextarea" cols="30" rows="10">
        <h2>TinyMCE Content</h2>
        <p>TinyMCE Content</p>
        <p>Your TinyMCE content.</p>
    </textarea>
    <button>Add new content</button>
</body>-
Include a script after the
</body>close tag to select the button element
<script>const button = document.querySelector('button');</script>;
-
Add an event listener function to the script tags after the button query selector, and include inside it the
setProgressStateAPI method:
<script>
const button = document.querySelector('button');
      button.addEventListener('click', event => {
            tinymce.activeEditor.setProgressState(true)
            tinymce.activeEditor.setProgressState(false, 3000)
            setTimeout(() => {tinymce.activeEditor.setContent(
                '<h2>TinyMCE New Content</h2><p>TinyMCE New Content</p><p>Your New TinyMCE content.</p>'
            )},2000);
</script>-
Save the changes, and open the
index.htmlfile in your browser. You can do this using thepython -m http.server 8000command to run the demo as close to a production website as possible:
How about TinyMCE and Ajax?
It’s possible to configure and try out TinyMCE with an asynchronous, Ajax post event. The following example uses an Ajax post event is a form.
TinyMCE works well in forms, and the following example uses TinyMCE with inline mode and the menubar and toolbar switched off.
How to configure TinyMCE with an Ajax load event
-
Create a new
index.htmlfile, and include the TinyMCE Cloud andtinymce.initscript:
<script src="https://cdn.tiny.cloud/1/no-api-key/tinymce/6/tinymce.min.js" referrerpolicy="origin"></script>
    <script>
        tinymce.init({
            selector: ".myeditor",
            menubar: false,
            toolbar: false,
            inline: true,
        });
</script>| Note: Inline mode means that Tinymce works on an HTML element other than the <textarea> element. |
- Include a link to the Ajax, jQuery cdn next to the TinyMCE sript.
<script src="https://cdnjs.cloudflare.com/ajax/libs/jquery/3.6.0/jquery.min.js"></script>;
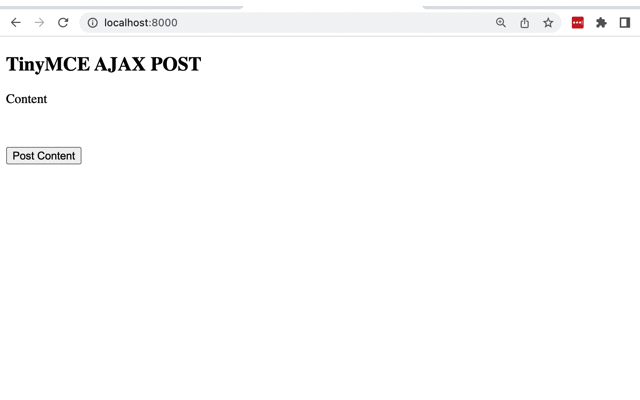
- Configure the page HTML, which includes TinyMCE inside a form element, specifically initializing TinyMCE on the <div> element.
<h2>TinyMCE AJAX POST</h2>
<form id="register" action="registry.php" method="POST">
  <label>Content<div class="myeditor"></div></label>
  <input type="submit" value="Post Content"/>
</form>- After the page
</body>closing tags, add the following jQuery script example into yourindex.htmlfile. This script includes the jQuery $.post method, which is shorthand for the Ajax post method:
$.ajax({ |
Shorthand with jQuery >>> |
$.post("url", data, function() {});
|
The example:
<script>
    $('#register').on('submit', function(ed) {
      tinymce.triggerSave();
      ed.preventDefault();
      var TinyAjaxPost = $('#register').serialize();
      $.post('registry.php', TinyAjaxPost, function(data) {
        $('#register').html(data);
      });
    });
</script>- Save the changes to the file, and then create the
registry.phpfile in the same directory that you created the index.html file. Place the following PHP script into the registry.php file:
<?php
echo '<p>The <strong>POST</strong> worked if you can see this'
?>- Save the changes, and then load the index.html file in your browser. Instead of using the python http.server command, make use of the PHP Development server command. Run
php -S localhost:8000on the command line inside the same directory as yourindex.htmlandregistry.phpfile.
How to configure TinyMCE with Ajax asynchronous posts
With some adjustments to the previous demo, it's possible to test out the TinyMCE setProgressState method with Ajax.
The only adjustments needed are the following:
- Change the tinymce.init script to turn the menubar, toolbar, and inline values to false. This changes TinyMCE out of inline mode:
<script>
  tinymce.init({
    selector: ".myeditor",
    menubar: true,
    toolbar: true,
    inline: false,
});
</script>- Replace the form contents with a
<div>element and a<button>element:
<form id="register" action="registry.php" method="POST">
  <div class="myeditor"></div>
  <button name="Ajax Post" value="Save">Add new content</button>
</form>- Adjust the jQuery script so that the
setProgressStatemethods and thesetTimeoutmethod run with the Ajax post:
<script>
  $('#register').on('submit', function(ed) {
    tinymce.activeEditor.setProgressState(true);
    tinymce.triggerSave();
      setTimeout(() => {
        ed.preventDefault();
        var TinyAjaxPost = $('#register').serialize();
        $.post('registry.php', TinyAjaxPost, function(data) {
          tinymce.activeEditor.setProgressState(false, 2000);
          $('#register').html(data);
        });
      },2000);
  });
</script>
- Adjust the message in the registry.php file (to stop this procedure being too close to the last one:
echo '<div>Thanks for trying out the Ajax <strong>POST</strong> with TinyMCE!</div>'- Save the changes, and run the demo in the browser with the PHP development server. The TinyMCE
setProgressStatemakes a brief appearance before the Ajax Post:
Go further with Ajax and TinyMCE
Ajax and asynchronous processes are important functionality for websites. With TinyMCE, you can introduce content into the rich text editor, and then make use of Ajax POST methods to send the data to your server (or to a .php file, as seen in the above example).
TinyMCE also works with asynchronous functions and in production, you can configure the different TinyMCE API methods to provide your customers with a solid UX.
You can explore TinyMCE APIs further by checking on these guides:
- Get started with the TinyMCE API beginner’s guide
- Find out how to create and change keyboard shortcuts
When you sign up for a FREE API key, you gain access to a wider range of functionality as well as the Power Paste plugin for clean copy paste, and access to more skins and icons.
Contact us if you need more information about TinyMCE’s Premium Plugins, or APIs with asynchronous methods.


