


Some of the most common questions we’re asked by developers, when they’re integrating TinyMCE with their apps for the first time, are about how to get content and set content in the editor.
So here’s a brief guide on the relevant TinyMCE API methods, as well as some of the other commonly asked questions, like:
- How do I set content on initialization?
- How do I get the content that doesn't have HTML tags?
- Why isn’t the getContent API working?
This article also explains how to fix errors and troubleshoot if you’re finding that get content and set content methods aren’t working.
TABLE OF CONTENTS
The TinyMCE getContent and setContent methods
How to use the get and set methods
How to set content dynamically in TinyMCE
How to set content with multiple editors
TinyMCE set content not working solution
How to set TinyMCE content on initialization
How to get content in TinyMCE without any HTML tags
What’s essential for getting and setting content
The TinyMCE getContent and setContent methods
When your customers create their content, the next step is providing a way for customers to save their content to a database somewhere. For this use case, you’ll need to get the content first. Use the getContent() API method for this case.
If you've initialized the editor on a textarea with id=”myTextarea”, for instance, your html content might look like this example:
<script src="https://cdn.tiny.cloud/1/your-tinymce-apikey/tinymce/7/tinymce.min.js" referrerpolicy="origin"></script>
 <script>
        tinymce.init({
            selector: "#mytextarea",
            plugins: "advtemplate preview powerpaste casechange searchreplace autolink autosave save directionality advcode visualblocks visualchars fullscreen image link media mediaembed codesample advtable table charmap pagebreak nonbreaking anchor advlist lists checklist wordcount tinymcespellchecker a11ychecker help formatpainter permanentpen pageembed linkchecker emoticons export",
            height: '700px',
            toolbar_sticky: true,
            icons: 'thin',
            autosave_restore_when_empty: true,
            content_style: `
                body {
                    background: #fff;
                }

                @media (min-width: 840px) {
                    html {
                        background: #eceef4;
                        min-height: 100%;
                        padding: 0 .5rem
                    }

                    body {
                        background-color: #fff;
                        box-shadow: 0 0 4px rgba(0, 0, 0, .15);
                        box-sizing: border-box;
                        margin: 1rem auto 0;
                        max-width: 820px;
                        min-height: calc(100vh - 1rem);
                        padding:4rem 6rem 6rem 6rem
                    }
                }
            `,
        });
    </script>
    <style>
        body {
            margin: 4rem auto;
            padding: 0 2rem;
            background-color: #f9f9fb;
        }
        main {
            width: 100%;
        }
    </style>
</head>
<body>
<main>
    <textarea id="mytextarea">
        <h1 style="text-align: center;">Getting and Setting Content</h1>
        <p style="text-align: center;">Use the only WYSIWYG editor that’s trusted by <a href="https://www.tiny.cloud" target="_blank" rel="noopener">1.5M developers</a>.</p>
    </textarea>
</main>
</body>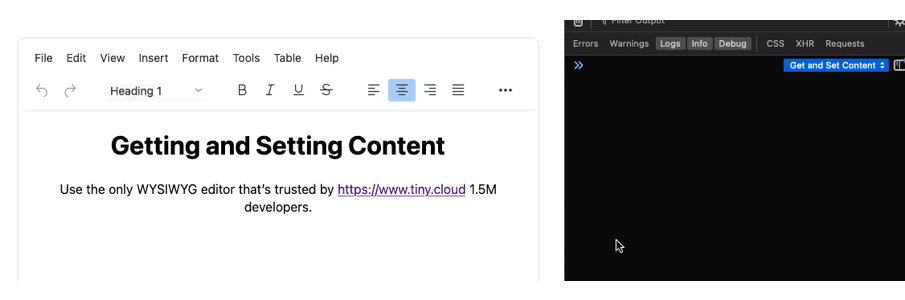
</html>Access the content in the editor by opening your browser developer tools, and running this command in the console:
tinymce.activeEditor.getContent("myTextarea");
Here’s how it goes in a variable (there’s more on variables later in this article):
var myContent = tinymce.get("myTextarea").getContent();
This will return the content in the editor marked up as HTML.
Or, instead of accessing the editor by id, you can access the active editor. This is good if you have just one editor in your app:
var myContent = tinymce.activeEditor.getContent();
Here’s an example:
How to use the get and set methods
When you’re using TinyMCE in your apps, and a user requirement is to edit content previously stored somewhere else (like in a CMS, which Tiny works well with), what you need is a way to populate the editor with that content.
You can do this using the setContent() API method.
There’s a few different ways you can do this.
One active editor
If you’ve got one active editor on the page, run this command:
tinymce.activeEditor.setContent("<p>Hello world!</p>");
Multiple editors
If you have more than one editor on the page, specify the id, and run the get command:
tinymce.get("myTextarea").setContent("<p>Hello world!</p>");
Put the get command in a function:
function Setcontent() {
     var ContentSet = tinymce.get('editorOne').setContent(‘<p>Hello World!’</p>);
}Run the setContent() method in the function with a DOM related event:
var buttonSet = document.getElementById("buttonOne");
buttonSet.addEventListener("click", Setcontent, false);
And here’s how the setContent() method works as a function within a complete example:
<!DOCTYPE HTML>
<html>
<meta charset="UTF-8">
	<meta name="viewport" content="width=device-width, initial-scale=1.0">
	<title>Get Content</title>
	<script src="https://cdn.tiny.cloud/1/your-api-key/tinymce/7/tinymce.min.js" referrerpolicy="origin"></script>
    <script type="text/javascript">
    tinymce.init({
      selector: "#editorOne",
      plugins: "advtemplate preview powerpaste casechange searchreplace autolink autosave save directionality advcode visualblocks visualchars fullscreen image link media mediaembed codesample advtable table charmap pagebreak nonbreaking anchor advlist lists checklist wordcount tinymcespellchecker a11ychecker help formatpainter permanentpen pageembed linkchecker emoticons export",
      height: '700px',
      toolbar_sticky: true,
      icons: 'thin',
      autosave_restore_when_empty: true,
      content_style: `
                body {
                    background: #fff;
                }

                @media (min-width: 840px) {
                    html {
                        background: #eceef4;
                        min-height: 100%;
                        padding: 0 .5rem
                    }

                    body {
                        background-color: #fff;
                        box-shadow: 0 0 4px rgba(0, 0, 0, .15);
                        box-sizing: border-box;
                        margin: 1rem auto 0;
                        max-width: 820px;
                        min-height: calc(100vh - 1rem);
                        padding:4rem 6rem 6rem 6rem
                    }
                }
            `,
    });
</script>
	<style>
    	body {
        	margin: 4rem auto;
        	padding: 0 2rem;
        	background-color: #f9f9fb;
    	}
    	main {
        	width: 100%;
    	}
	</style>
  <body>
     <form method="post" action="dump.php">
               <textarea id="editorOne">
                 <p>That Kermit Gif</p>
               </textarea>
     </form>
	 <button id='buttonOne' class="button_style" name="New Content">Press to set new content</button>
   <script>
   const contentOne = '<iframe src="https://giphy.com/embed/HTZVeK0esRjyw" width="480" height="269" frameBorder="0" class="giphy-embed" allowFullScreen></iframe>'
     function Setcontent() {
        var ContentSet = //The function works with tinymce.activeEditor.setContent(contentOne); too.
          tinymce.get('editorOne').setContent(contentOne);
        }
        var buttonSet = document.getElementById('buttonOne');
   buttonSet.addEventListener('click', Setcontent, false);
   </script>
   </body>
</html>And here’s the script in action:
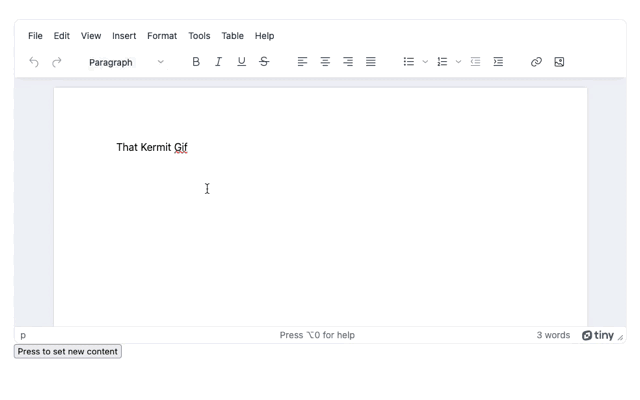
✏️NOTE: The function works with the tinymce.activeEditor.setContent(); command too.
Get the content and save the content
Check out our previous article where we save to and load from our rich text editor using JavaScript and localStorage. After the TinyMCE editor is added to the initial example, the save and load functions are updated to access the editor content using these methods.
How to set content dynamically in TinyMCE
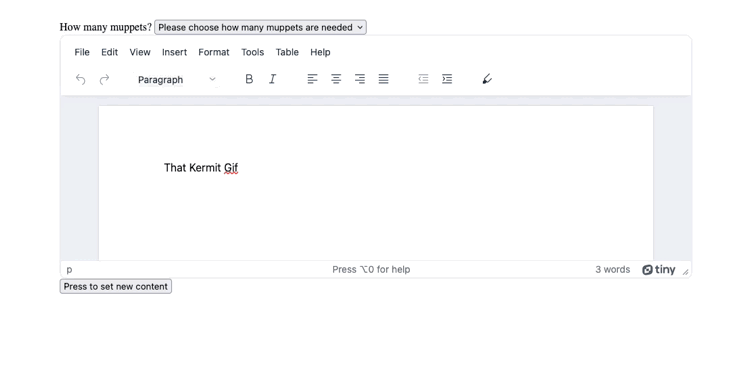
For setting content dynamically in TinyMCE, you can make use of setContent() API. The following example makes use of one example of dynamic content: a section HTML element with option tag. Customers can select an option depending on what they need, and the TinyMCE editor value could be set based on their choice. Here's how it could be set up, adding to the example in the previous paragraphs:
- Add the following HTML to the test file, inside the body section, before the TinyMCE form:
<body>
    <label for="equipmentType">How many muppets?</label>

    <select name="castSize" id="castSize" required="required">
        <option value="choose">Please choose how many muppets are needed</option>
        <option value="Two">2 more muppets</option>
        <option value="Many">Many muppets</option>
        <option value="Entire Cast">The entire cast of muppets</option>
    </select>

<form method="post" action="dump.php">- Copy the following JavaScript into the script tag at the end of the HTML file. The script listens for changes in the selection list, gets the customer's selection, and sets content dynamically on the page:
   addEventListener('change', function() {
        var type = document.getElementById('castSize');
        if (type.value === 'choose') {
            alert('Choose how many muppets are required');
        } else {
            var setContent = document.createElement('div')
            setContent.innerHTML = '<div id="castSelection">' + type.value + '</div>'
            document.body.appendChild(setContent);
        }
    });
   </script>
</html>- Modify the script to set content dynamically in TinyMCE by adding the following line to the selection event listener:
addEventListener("change", function () {
  var type = document.getElementById("equipmentType");
  if (type.value === "choose") {
    alert("Select a type of tablet");
  } else {
    var setContent = document.createElement("div");
    setContent.innerHTML = '<div id="castSelection">' + type.value + "</div>";
    document.body.appendChild(setContent);
    tinymce.activeEditor.setContent(type.value, { format: "html" }); //TinyMCE setContent()API
  }
});
- Save the change, and then test out the dynamic content:
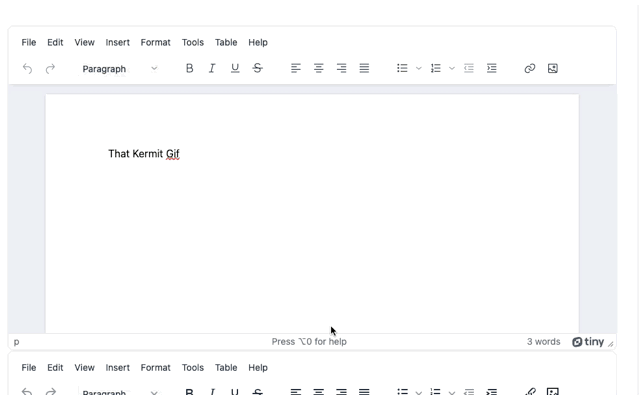
How to setContent with multiple editors
If you have multiple editors, set the specific id of the editor you want to change in your command or your function. For instance, in this index.html file, here’s how the get and set content works with another textarea added to the previous setContent example:
<form method="post" action="dump.php">

  <textarea class="myTextarea" id="editorOne">
                       <p>That Kermit Gif</p>

  </textarea>

  <textarea class="myTextarea" id="editorTwo">
                       <p>That Kermit Gif</p>

  </textarea>

</form>;
Running the setContent()method on editorOne with tinymce.get('editorOne').setContent(contentOne), you can isolate changes to this editor alone.
Here’s the change in action:
TinyMCE setContent not working
You may run into an error where setContent is not working. Like the (annoying) “Cannot read property 'setContent' of null” error.
To fix this one, and other similar errors like “undefined”, check on the order of events in your JavaScript.
✏️NOTE: Make sure that your API call with the getContent() method runs after your tinymce.init script.
Setting the setContent() method to run on initialization could also be the solution to the problem.
How to set TinyMCE content on initialization
Often you want the editor populated with content as soon as it’s initialized. In this case, you can use the setup option in the editor config.
For example:
<script>
  tinymce.init({
    selector: '#myTextarea',
    setup: function (editor) {
      editor.on('init', function (e) {
        editor.setContent('<p>Hello world!</p>');
      });
    }
  });
</script>Again, check out the JavaScript localStorage example, where towards the end, the load button is exchanged for the ability to add the content on initialization.
How to get content in TinyMCE without any HTML tags
Depending on your use case, sometimes you might want to get the TinyMCE content without the HTML markup. In this case, when calling getContent, you can pass in a parameter to indicate that, instead of returning HTML, you want the result in plaintext.
For example:
var myContent = tinymce.get("myTextarea").getContent({ format: "text" });
What’s essential for getting and setting content
Always double check the order of events loading and running on the page.
Confirm whether the TinyMCE editor has been initialized before your setContent script runs. Remember that you can place the setContent method so that it runs on the tinymce.init script as the page loads.
While we’re talking about getting and setting TinyMCE content, you might also be interested to know…Tiny provides clean copy/paste of content from Word, Excel, and other popular content tools. Check out the PowerPaste (Advanced) plugin.
There’s also an Autosave plugin that comes free with TinyMCE to save your users the frustration of losing their work based on connectivity or other issues outside their control.
Not already using TinyMCE on the Cloud? Get a free API Key and try it out. It’s super easy to set up. YourAPI key comes with a 14-day FREE trial of the full suite of Advanced features.


