


Clipboard history can’t be easily accessed. And yet there’s always questions about how customers can access the clipboard history when using your application – even though clipboard history isn’t under your direct authority to control. What you can do instead, is provide the capability to adjust or erase the change history, within your application’s text entry and input elements. Plus, instead of coding this capability from scratch, your WYSIWYG may have an out-of-the-box solution.
TinyMCE is an effortlessly customizable WYSIWYG and provides a set of useful APIs for controlling TinyMCE’s appearance and behavior. While TinyMCE can’t take control of the clipboard, you can erase undo redo history using TinyMCE undoManager() API, effectively giving your customers some control over the change history when they’re creating content.
By making use of TinyMCE’s APIs, there’s no need to write any scripts to access and erase undo and redo history in a textarea from scratch. In the following sections, you’ll find a step-by-step guide to set up this capability quickly with TinyMCE.
Can you erase clipboard history in TinyMCE?
TinyMCE is a reliable WYSIWYG editor that can easily integrate into your framework or web application, but like most components, it does not have direct control over the system clipboard history. The Clipboard is usually kept secure. Since sensitive information is often copied and pasted into the clipboard, browsers that have an interest in security don’t allow any access to the clipboard. However, you can clear the clipboard and erase copy and paste history using most browser’s history options.
You can make use of TinyMCE’s UndoManager() API methods to erase the undo and redo levels created in the editor when customers create content. This can offer a way for customers to clear the history of changes they’ve made to the editor.
✏️NOTE: A capability requested again and again on the TinyMCE product roadmap is the ability to see a history of revisions made in the editor. If this is the kind of capability you’re looking for, you can contact us for more information on revision history and its likelihood of being released.
Can you view clipboard history in TinyMCE?
Since the clipboard is a small storage buffer available to the customer’s operating system, TinyMCE can’t directly access the clipboard’s contents. The TinyMCE FakeClipboard() API contains a method for accessing clipboard content, interacting with the browser. You can also control how content is pasted from the clipboard into TinyMCE, but viewing the content is beyond this guide’s scope.
Erase undo and redo history within TinyMCE
There are a few prerequisites to have covered before starting:
- JavaScript knowledge to create key and value pairs
- Access to the command line and a text editor in your development environment
- Your TinyMCE API key ready
Your TinyMCE API key is available now on the TinyMCE dashboard, and you can access it with Google or GitHub credentials. Using your API key with the Tiny Cloud configuration prevents the editor changing to read-only mode, and comes with a 14-day free trial of advanced TinyMCE capabilities.
1. Configure TinyMCE
Open a new index.html file in your development environment, and copy the following HTML content to get started. This content is draw from the TinyMCE DMS solution, showing what TinyMCE can do to support DMS projects:
<!DOCTYPE html>
<html lang="en">
<head>
<meta charset="UTF-8">
<meta name="viewport" content="width=device-width, initial-scale=1.0">
<title>Document</title>
<script src="https://cdn.tiny.cloud/1/add-your-api-key/tinymce/6/tinymce.min.js" referrerpolicy="origin"></script>
<script type="text/javascript">
tinymce.init({
selector: "textarea",
plugins: "advcode advlist advtable advtemplate anchor autocorrect autolink autosave casechange charmap checklist codesample directionality editimage emoticons export footnotes formatpainter help image insertdatetime link linkchecker lists media mediaembed mergetags nonbreaking pagebreak permanentpen powerpaste searchreplace table tableofcontents tinymcespellchecker typography visualblocks visualchars wordcount",
toolbar: "undo redo ClearUndoRedo spellcheckdialog | aidialog aishortcuts | blocks fontfamily fontsizeinput | bold italic underline forecolor backcolor | link image addcomment showcomments | align lineheight checklist bullist numlist | indent outdent | inserttemplate | removeformat typography",
editable_root: false,
editable_class: "editable-section",
content_style: `
body {
background: #fff;
}
/* Disable the blue "focus" border for the editable region */
.editable-section:focus-visible {
outline: none !important;
}
.header,
.footer {
font-size: 0.8rem;
color: #ddd;
}
.header {
display: flex;
justify-content: space-between;
padding: 0 0 1rem 0;
}
.header .right-text {
text-align: right;
}
.footer {
padding:2rem 0 0 0;
text-align: center;
}
/* Apply page-like styling */
@media (min-width: 840px) {
html {
background: #eceef4;
min-height: 100%;
padding: 0.5rem;
}
body {
background-color: #fff;
box-shadow: 0 0 4px rgba(0, 0, 0, .15);
box-sizing: border-box;
margin: 1rem auto 0;
max-width: 820px;
min-height: calc(100vh - 1rem);
padding: 2rem 6rem 2rem 6rem;
}
}
`,
});
</script>
<style>
div.container {
padding: 2rem;
}
</style>
</head>
<body>
<div class="container">
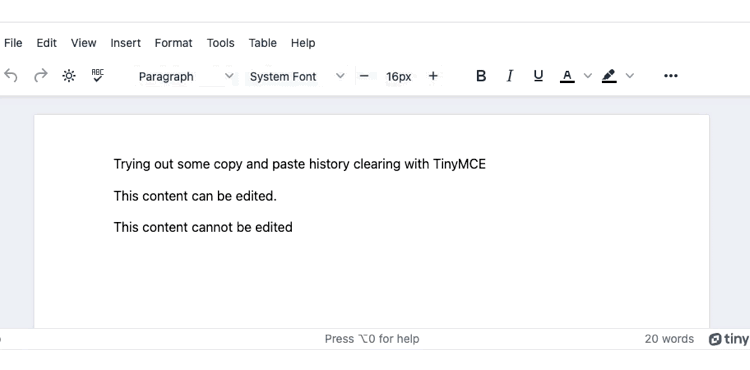
<textarea name="content">
<p class="editable-section">Trying out some copy and paste history clearing with TinyMCE</p>
<p class="editable-section">This content can be edited.</p>
<p> This content cannot be edited </p>
</textarea>
</div>
</body>
</html>Remember to add your API key into the TinyMCE CDN link, replacing the “add-your-api-key” string.
2. Set up the Undo Manager
Add the following setup option to the TinyMCE init script. This creates a new toolbar button that runs the clear() methods available with TinyMCE’s APIs to erase the undo redo history:
          `,
      setup: (editor) => {
        editor.ui.registry.addButton('ClearUndoRedo', {
          icon: 'brightness',
          tooltip: 'Clear undo redo history',
          onAction: () => {
            tinymce.activeEditor.undoManager.clear();
            tinymce.FakeClipboard.clear();
            console.log("undo and redo history cleared.");
          }
        });
      }
    });
  </script>
  <style>
    div.container {
        padding: 2rem;
    }
  </style>
</head>3. Test the new capability
Using a localhost command, such as PHP, test out the demo in your browser. You can add content to the editor, make changes, and then erase the undo redo history:
More capabilities for your customers with TinyMCE
There’s more ways that TinyMCE can provide the best possible content creation experience. For example, getting and setting content from the editor automatically is also made easier with TinyMCE dedicated APIs. You can also get started with TinyMCE quickly, getting set up in 5 minutes or less – useful if getting your project completed faster is a priority.
Contact us if you have any questions on using TinyMCE, what advanced features are available, or how TinyMCE’s APIs can speed up your project development.


