


Effective web design involves finding ways to optimize the page/s and save the browser from working too hard. This results in a fast-loading website, and a better experience for your website audience. One method of introducing this much sought after web efficiency is DOM manipulation.
However when it’s incorrectly used, DOM manipulation can also create obstacles. Have you ever tested your dynamic website with server side and client side patterns, and then found you need to solve the problem of manipulating the DOM inside an iframe or textarea element? Worse still, the problems seem to appear when they’re least needed and you haven't the time to fix them.
There is a solution. Using a reliable, enterprise-grade WYSIWYG editor shouldn’t introduce added frustration when manipulating the DOM inside the editor. Instead, use the TinyMCE editor, which provides a DOM.utils API to make the process effective and fast.
This article demonstrates how to use the DOM.utils API to quickly manipulate the DOM within the text area.
What is a DOM?
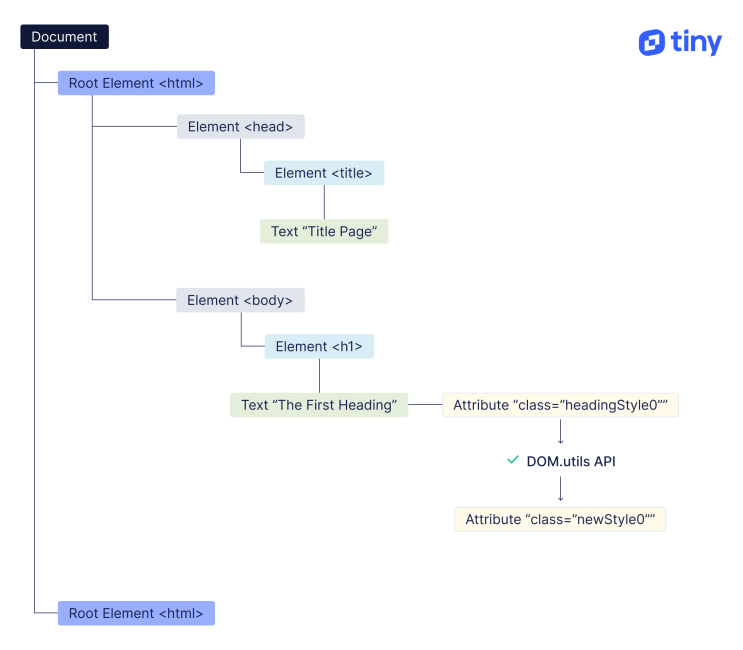
The Document Object Model (DOM) is a tree-shaped interface that allows for adding, changing, or removing content of a web page.
The tree-shape includes the tree root, the trunk, branches and leaves. Each website element from starting html tags, through to body tags, heading tags, and paragraph tags, live in each part of the DOM tree structure.
What is DOM manipulation?
DOM manipulation is the act of changing the contents of an element within a web page. Usually, this DOM change or manipulation is brought about with JavaScript. Frameworks like React, Vue, or Angular, offer a direct way to change and mManipulate the contents of each part of the DOM tree as well as using JavaScript.
The following diagram shows this relationship:
How to manipulate the DOM with TinyMCE DOM.utils
The TinyMCE DOM.utils API uses many methods for DOM manipulation. The scope of this article covers two essential method groups: add() and remove().
-
Add()
-
Remove()
The following procedures explain how these DOM.util API methods work when using TinyMCE. As the names imply, you can manipulate the DOM inside the TinyMCE text area, adding content to the tree structure, or taking it away as needed to support your dynamic web pages.
Adding to the DOM with DOM.utils
To try out the API, a demo TinyMCE editor is needed to give something to work with. You’ll need an API key to get started as the key gives you free access to TinyMCE premium plugins for 14 days. It also prevents error messages about unrecognized domain names appearing in the text area.
Navigate to the Get-tiny sign up page to get your FREE API key. You can use your GitHub or Google accounts to log in.
The following demo draws content from the TinyMCE Content Management System solution, which could use the DOM.utils API to change the content appearance.
-
Create an index.html file, and add HTML started content:
-
With your file open, in the head section, add script tags, and reference TinyMCE Cloud through a CDN link within the script tags. This is what the link looks like:
<script
  src="https://cdn.tiny.cloud/1/your-api-key/tinymce/6/tinymce.min.js"
  referrerpolicy="origin"
></script>;
-
Add another pair of script tags, add the following JavaScript. This is the tinymce.init method that enables TinyMCE and controls what functions are available:
 tinymce.init({
      selector: '#editor'
      plugins: 'a11ychecker advcode advlist advtable anchor autocorrect autosave editimage image link linkchecker lists media mediaembed pageembed powerpaste searchreplace table tinymcespellchecker visualblocks wordcount',
      toolbar: 'undo redo | styles | bold italic underline strikethrough | align | table link image media pageembed | bullist numlist outdent indent | spellcheckdialog a11ycheck code',
      height: '700px'
});-
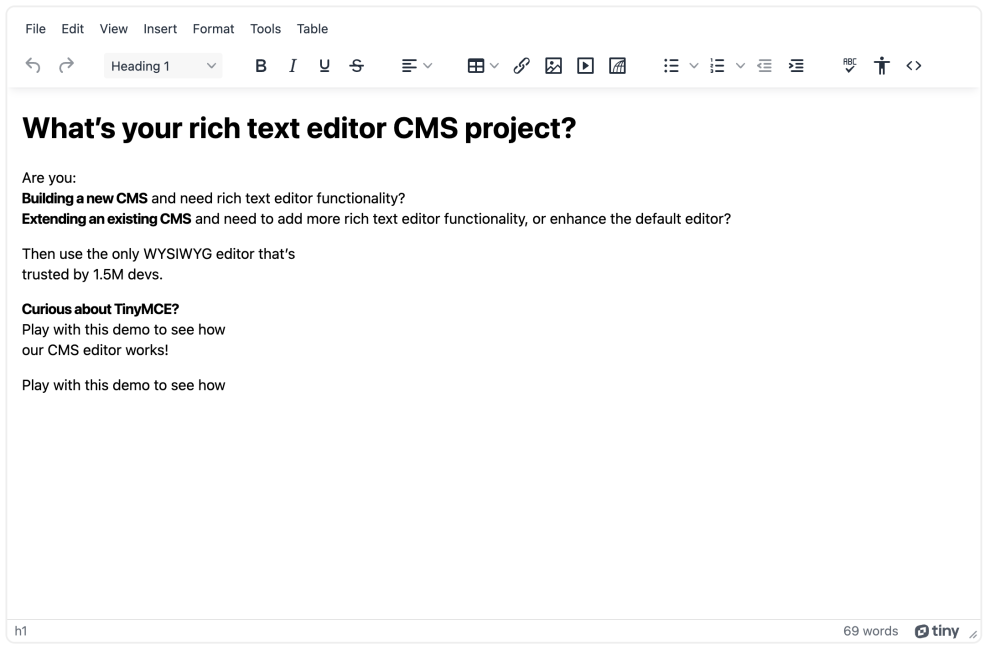
Add initial HTML content, and the CSS selector class to some textarea tags. The selector is set as an id with the value “editor” in the TinyMCE init script (this CMS content is drawn from the TinyMCE CMS solution).
 <textarea id="editor">
        <h1>What’s your rich text editor CMS project?</h1>
        <p>Are you:<br><strong>Building a new CMS</strong> and need rich text editor functionality?<br><strong>Extending an existing CMS</strong> and need to add more rich text editor functionality, or enhance the default editor?</p>
        <p>Then use the only WYSIWYG editor that’s<br>trusted by 1.5M devs.</p>
        <p><strong>Curious about TinyMCE?<br></strong>Play with this demo to see how<br>our CMS editor works!</p>
        <p>Play with this demo to see how</p>
        <p> </p>
</textarea>-
Test run the index.html file by opening it in your browser, or use a local server command with Python or with the PHP command:
Running the Add() method
Using the Add() method, it’s possible to adjust the DOM established inside the TinyMCE text area:
-
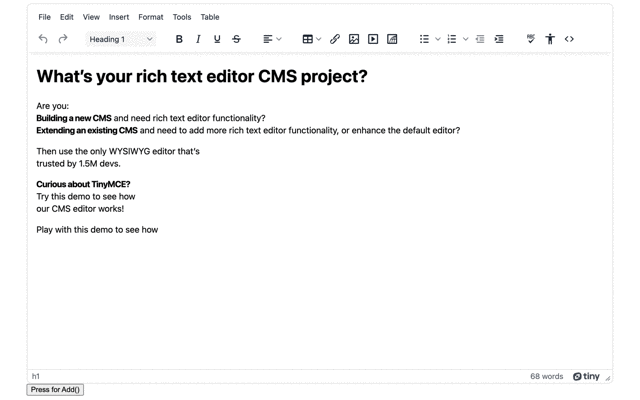
Add a button element to trigger the API change. This is positioned below the rich text editor HTML:
<button id="buttonAdd">Press for Add()</button>;
-
Add a pair of script tags to the end of the HTML file, and include the following function:
<script>
function addMethod() {
      tinymce.activeEditor.execCommand('InsertHorizontalRule');
    }

</script>-
Inside the function, use the add() method to set up a new heading element in the text area DOM:
function addMethod() {
  tinymce.activeEditor.dom.add(
    tinymce.activeEditor.getBody(),
    "h2",
    { title: "Build your rich text editor CMS Project" },
    "Some content"
  );
}
var buttonAdd = document.getElementById("buttonAdd");
-
Create a variable called buttonH2, and set an event listener to activate the function when the button receives a click event:
var buttonH2 = document.getElementById("buttonAdd");
buttonH2.addEventListener("click", addMethod, false);
-
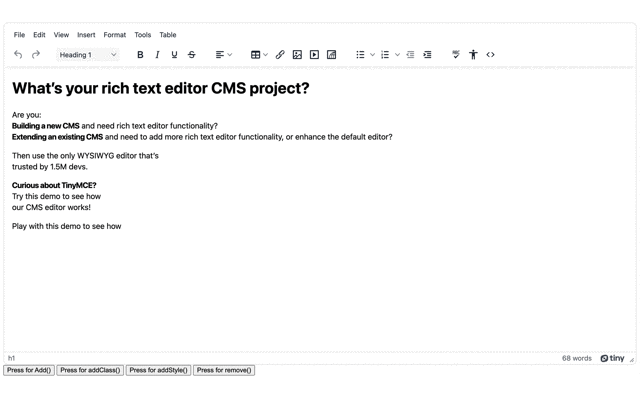
Save the changes, and test out the method:
Adding a class
-
Set up the content style option in the TinyMCE init script, and include the following class with associated style:
content_style: `
         .intro {
         background-color: yellow;
         }
       `;
-
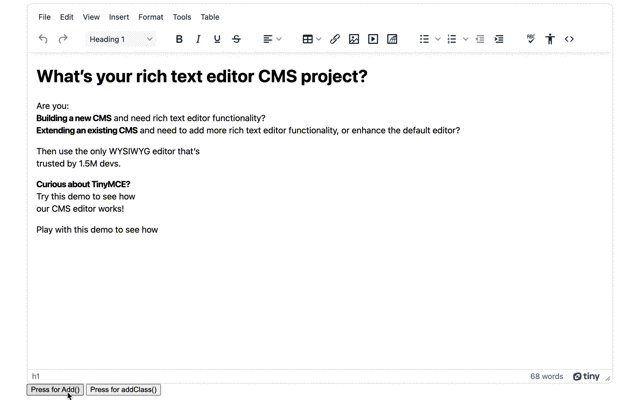
Set up a second button for adding a class:
<button id="buttonAddClass">Press for addClass()</button>;
-
Copy the function used for the add() method previously, and change the API method to add the class:
function addClassMethod() {
  tinymce.activeEditor.dom.addClass(
    tinymce.activeEditor.dom.select("h2"),
    "intro"
  );
}
-
Create the event listener for adding the class when the addClass button is clicked:
var buttonH2 = document.getElementById("buttonAdd");
buttonH2.addEventListener("click", addMethod, false);
-
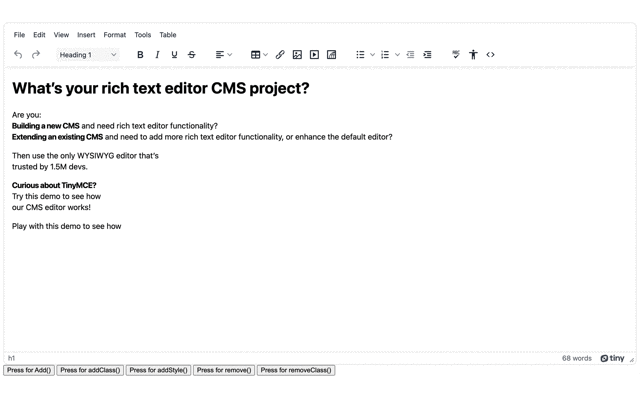
Save the changes, and try out adding the class to the h2 element:
Adding addStyle()
The addStyle() API method affects the HTML of the page holding TinyMCE. It adds CSS elements to the style tags at the top of the page within the HTML head section, allowing TinyMCE to inherit the style specified for the page it appears within.
While consistently setting up a complete page design is beyond this article’s scope (this article relies on the content style option to change the text area content appearance), the following procedure shows a demo of the API method to add style to the editor, by adding to the page style itself.
If you need to change the style of content on the page around the editor for whatever reason, then the addStyle() method is useful for this purpose. Here’s how to do it:
-
Create a new button specifically for adding style
<button id="buttonAddStyle">Press for addStyle()</button>;
-
Copy the API function from the previous step, and adjust the API method to add the following style instead of adding a class:
function addPageStyle() {
  tinymce.activeEditor.dom.addStyle("p { font-family: courier; }");
}
-
Copy the variable for listening to click events:
var buttonStyle = document.getElementById("buttonAddStyle");
buttonStyle.addEventListener("click", addPageStyle, false);
-
Save the changes
-
Test out the style adjustment. This demo changes the font of all the paragraph elements on the page:

Removing content from the DOM with DOM.utils
Adding content has created a somewhat interesting style and added a new heading in the TinyMCE text area. If you want to remove the added content, use the following methods:
Running the remove() method
-
Set up the following button alongside the others add in the preceding procedures to try the remove method:
<button id="buttonRemove">Press for remove()</button>;
-
Copy the function from the previous procedures on the add method, and change it use the remove API method:
function removeMethod() {
  tinymce.activeEditor.dom.remove(tinymce.activeEditor.dom.select("h2"));
}
-
Create a variable for listening to the click event:
var buttonRemoveMethod = document.getElementById("buttonRemove");
buttonRemoveMethod.addEventListener("click", removeMethod, false);
-
Save the changes
-
Test out the remove to clear the content:
Removing a Class
To remove a class from an element:
-
Set up a button for removing a class on click:
<button id="buttonRemoveClass">Press for removeClass()</button>;
-
Create a function for the remove method. This one targets the h2 elements in the text area DOM:
function removeClass() {
  tinymce.activeEditor.dom.removeClass(
    tinymce.activeEditor.dom.select("h2"),
    "newHeading"
  );
}
-
Add a variable with an event listener that will run the function on the click event:
var buttonRemoveClass = document.getElementById("buttonRemoveClass");
buttonRemoveClass.addEventListener("click", removeClass, false);
-
Save the changes, and try removing the h2 element class after adding a class to the element:
Removing all attributes from a DOM node
To keep the content but remove all attributes, use the following method:
-
Add a button that activates the attribute removal method:
<button id="buttonRemoveAttr">Press for removeAllAttribs()</button>;
-
Create a function for the remove all attributes method. This targets the h2 elements in the text area DOM:
function removeAttr() {
  tinymce.activeEditor.dom.removeAllAttribs(
    tinymce.activeEditor.dom.select("h2")
  );
}
-
Add the event listener for the remove all attributes button:
var buttonRemoveAllAttr = document.getElementById("buttonRemoveAttr");
buttonRemoveAllAttr.addEventListener("click", removeMethod, false);
-
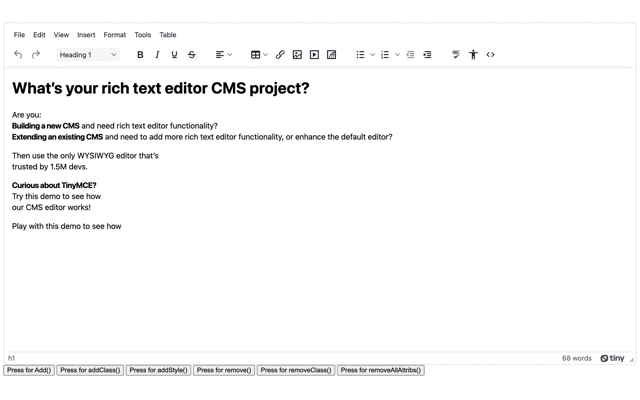
Save the changes, and try out the attribute remove:
Effective DOM manipulation with TinyMCE
The TinyMCE APIs for adding and removing DOM elements, show that an enterprise-grade WYSIWYG editor makes DOM manipulation easier, and you can adjust the API methods to fit your individual application’s needs.
If you need more information about how TinyMCE’s APIs can work, contact us, and let us know you want to know about TinyMCE DOM.utils APIs.


