


Templates save time and effort for all users creating articles, emails, invoices, reports, order confirmations, or other boilerplate content. They're documents with a standard format that’s designed to be reused and have been an essential part of word processing since the late 1960’s.
One of the overlooked parts of the process though, is how easily you can change and make custom templates for your application. Rich text editors often provide templates to ensure ease of use and consistency, and are easy to integrate into your application.
But there’s no guarantee custom templates are easy to make. Sometimes, they’re so difficult that your customers keep asking you for repairs and improvements.
Not all rich text editors provide custom templates.
Yes, it’s tempting to try and configure and rebuild your own templating system, to make template design easier. But a better solution is to rely on a rich text editor that makes templating and custom templates straightforward, with little configuration effort.
TinyMCE is a reliable rich text editor that adapts to different use cases that require powerful and versatile templates that help users work together. This article dives into how to implement the template plugin in the TinyMCE rich text editor.
It covers setting up TinyMCE, adding the plugin, and creating some essential kinds of templates.
| Hat Tip: This article would not have been possible without the work of Oluwaseyi Aderinkomi |
Contents
What Is the TinyMCE Template Plugin?
How to add a template to TinyMCE
Configuring the Plugin for custom templates
Working With Common Template Types
Adding a creation date for a custom template
Adding a modified date for a custom template
Easy to configure custom templates
What is the TinyMCE Template plugin?
In TinyMCE, rich text editor templates are easy to add with the TinyMCE Template plugin. This plugin adds instant support for custom templates, and when combined with the Merge Tags plugin, the abilities of TinyMCE to provide custom templates expands even further.
The Merge Tags plugin is one of TinyMCE’s Premium plugins, and it allows you to insert a personalization token, or a mail merge field. These are automatically replaced with values or details drawn from a customer database (or something similar), and are ideal for custom templates used for customer relationship management.
For more information about Merge Tags, check on the guide on how to use the Merge Tags plugin.
Custom template capabilities
TinyMCE offers powerful support for rich text editor templates that allows you to:
- Customize how the templates work
- Import templates from external URLs
- Change format creation date and modified date to different date and time formats
How to add a template to TinyMCE
Prerequisites
To set up the plugin, sign up with TinyMCE if you haven't already. With your API key, you'll get free access for 14 days to all the TinyMCE Premium plugins. You can sign up with a GitHub or Google account, and access your API key in your TinyMCE dashboard.
Creating a TinyMCE demo
-
Create a new project folder
-
Change into the folder, and create named index.html.
-
Paste the following code to initialize TinyMCE:
<!DOCTYPE html>
<html lang="en">
<head>
  <meta charset="UTF-8" />
  <meta name="viewport" content="width=device-width, initial-scale=1" />
  <script src="https://cdn.tiny.cloud/1/no-api-key/tinymce/6/tinymce.min.js" referrerpolicy="origin"></script>
  <script>
  // TinyMCE configuration
  tinymce.init({
    selector: '#mytextarea'
  });
  </script>
</head>

<body>
  <h1>TinyMCE - rich text editor templates</h1>
  <textarea id="mytextarea"></textarea>
</body>

</html>-
Save the file, then open it in your browser to preview the setup.
Adding the API Key
To remove the domain registration notice below, make sure to replace no-api-key in the source script (<script src="...") with the Tiny Cloud API key you got from your dashboard, and save the file.
Including the plugin
The next step is to include the template plugin to add support for custom templates. To do this, replace the inline TinyMCE initialization script with the code below:
 tinymce.init({
    selector: '#mytextarea',
    plugins: 'template',
    toolbar: 'template',

    // More code goes below
});Open your browser and refresh the page. You should see the template plugin added
Configuring the plugin for custom templates
Making a basic template
With TinyMCE, there are two methods of adding a template:
-
A an HTML string
-
A an external template using a URL to an HTML file
In this example, you'll be implementing the template as a string. To add your first template:
-
Include the following code inside your TinyMCE configuration setup:
   templates: [
      {
      title: 'Sample Template 1',
      description: 'Some desc goes here',
      content: 'This is a <b>template sample content</b>'
      },
      // Add extra templates here
    ]
In the code above, the templates option is an array of template objects, and the content is the HTML string that's inserted when the template is selected.
-
Save your code and refresh your browser, then try to insert the template to see it in action. It should look like this:
Working With common template types
Follow the steps below to configure some common template types.
Adding a creation date for a custom template
To add the document's creation date to the template, the template_cdate_classes option specifies a creation date:
template_cdate_classes: 'cdate creationdate',The template_cdate_classes option accepts a list of classes (separated by spaces). In the template, whenever this CSS class is used, the corresponding element is replaced with the creation date. The date can be formatted with the template_cdate_format option.
-
Customize the demo template by adding the following array using the code below:
{
title: 'Creation Date',
description: 'Creation Date Example',
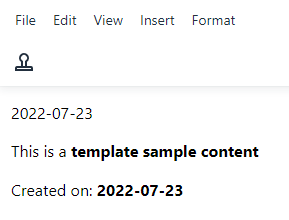
content: `
<p class="cdate">This will be replaced with the creation date</p>
<p>This is a <b>template sample content</b></p>
<p>Created on: <b class="creationdate">This will be replaced with the creation date also</b></p>
`
},
-
Save the changes, and check on the template customization:
Adding a modified date for a custom template
To add the document's last modified date to the template, add template_mdate_classes option:
template_mdate_classes: 'mdate modifieddate',The template_mdate_classes option also accepts a list of classes (separated by spaces). Anywhere in the template that this class is used, it's replaced with the modified date.
-
Add the modified date array:
     {
      title: 'Modified Date',
      description: 'Modified Date Example',
      content: '<p>Modified on: <b class="mdate">This will be replaced with the modified date</b></p>'
},-
Save and refresh the page. Here's what you should get:

Replace values
Instead of a replace value, you can also take advantage of the Merge Tags plugin to automatically add non-editable content to text area content. If making use of the replace value options, note that there are two options:
When inserting a template into the editor content, both options replace the object items with their respective string values.
| Note: a slight difference with the template_preview_replace_values option is that after the initial replacement, when the template is inserted into the editor content, it won't need to be replaced again. |
-
Add the following code to your TinyMCE configuration object:
template_replace_values: {
  fullname: 'John Doe',
  department: 'Finance department'
}
     {
      title: 'Replace Values',
      description: 'Replace Values Example',
      content: '<p>This is {$fullname} from the {$department}.</p>'
}-
Save the changes and test out the customized template:
To use the Merge tags plugin instead:
-
Set up a Merge Tag list:
mergetags_list: [
    {
   title: 'Name',
   menu: [
    {
   value: 'John',
   title: 'First.Name'
    },
    {
   value: 'Doe',
   title: 'Last.Name'
    }
   ]

    },
    {
    title: 'Proposal',
    menu: [
       {
       value: 'Finance Department',
       title: 'Department.Title'
       }
     ]
   },
]-
Save the changes, and test out the merge tags.
Easy to configure custom templates
Rich text templates are an excellent tool to add to your applications, and should be easy to set up and implement. With TinyMCE’s plugins for custom templates, you can help your users save time and effort. They can create a uniform, standardized document format that's accessible to all team members.
TinyMCE is a versatile rich text editor for developers who want control in building various products. Contact us if you need more support putting together custom templates in your application


