


Despite its widespread use, CSS has a reputation for being difficult to learn. Its multiple properties can conflict with each other, causing problems elsewhere in the code, and its deceptively simple nature can lead to syntax errors or other mistakes. What's the way around these obstacles, and putting a stop to the ongoing frustration? CSS Hacks. They can make the language work for you.
These techniques can help you more easily make changes in the CSS code to customize the layout, style, and design of a web page.
This article shows some of these CSS hacks for TinyMCE beginners, to make your web design flow after setting up your TinyMCE rich text editor (RTE). But first, let’s do a quick review of some basics.
What is CSS?
Cascading Style Sheets, known as CSS, is a stylesheet and markup language that works in tandem with HTML or XML. When used effectively, CSS gives your site a sense of brand identity and purpose.
Using CSS, wWeb designers control the appearance and feel of websites by specifying the font, colors, columns, and whitespace.
Here's how you might use CSS:
- Changing content position by moving it from left to right, from top to bottom, or to center
- Controlling how content is displayed on the page, by changing the color and font of text or adding spacing between paragraphs
- Creating a pop-up menu that appears when someone clicks an icon
- Creating a navigation bar at the top of the page that links to other pages on the site
What are CSS hacks?
CSS hacks are rules designed to hide or show CSS markup in order to get the desired result from a web page, depending on the browser or version. Web developers use CSS hacks to override the default styling of an element, usually to make small changes to the element's appearance in order to test or demonstrate a particular CSS property.
CSS hacks can be helpful in cases where you want to add a specific style or design to an individual web page.
You can also use them to fix browser compatibility problems and create page layout effects that cannot be achieved with CSS alone. In order to create a CSS hack, you need to identify what you want to change and then edit the CSS code accordingly.
When should I use CSS hacks?
There are specific times when a CSS hack can save the day. Use them when:
- You can't change the HTML because it's generated by a content management system (CMS), a library, or a web tool like TinyMCE.
- You don't want to go through the hassle of using JavaScript to alter your styling and make your website look nicer.
- You want to fix a bug in an existing web browser without waiting for the developer to release a new version.
- You have an existing site with lots of pages and don't want to change the HTML on all of them.
Implementing CSS hacks
TinyMCE is an effortlessly customizeable and flexible RTE for web developers. It’s free, open source, and licensed under a GPL 2 or later license. TinyMCE can be embedded in web pages to provide "What You See Is What You Get" (WYSIWYG) editing.
The functionality of the editor can be extended through plugins and customizations, or be limited to suit your use case.
Many popular content management systems like WordPress, Joomla, and Drupal have (and still do use) TinyMCE. It helps you avoid the stress of developing intricate content creation solutions. It also provides many advanced features, such as a spellchecker, code highlighting, and clean copy and paste.
Installing TinyMCE
TinyMCE provides several integration and installation options for you to easily incorporate it into your application. Follow the below steps to set up TinyMCE on a bare-bones HTML page.
First, insert the following code in the <head> element of your page:
<script src="https://cdn.tiny.cloud/1/no-api-key/tinymce/6/tinymce.min.js" referrerpolicy="origin"></script>
<script>
    tinymce.init({selector: '#appeditor'});
</script>This imports TinyMCE 6 and initializes an instance of the editor using the init method. The init method takes in an options object, where the selector key specifies the element to replace with the editor.
Include a <textarea> element with an id of appeditor in the <body> like so:
<body>
    <h1>TinyMCE v6 editor CSS Hack</h1>
    <form method="post">
        <textarea id="appeditor">Hello, World!</textarea>
    </form>
</body>Open the page in your browser. You'll see the editor in classic editing mode like this: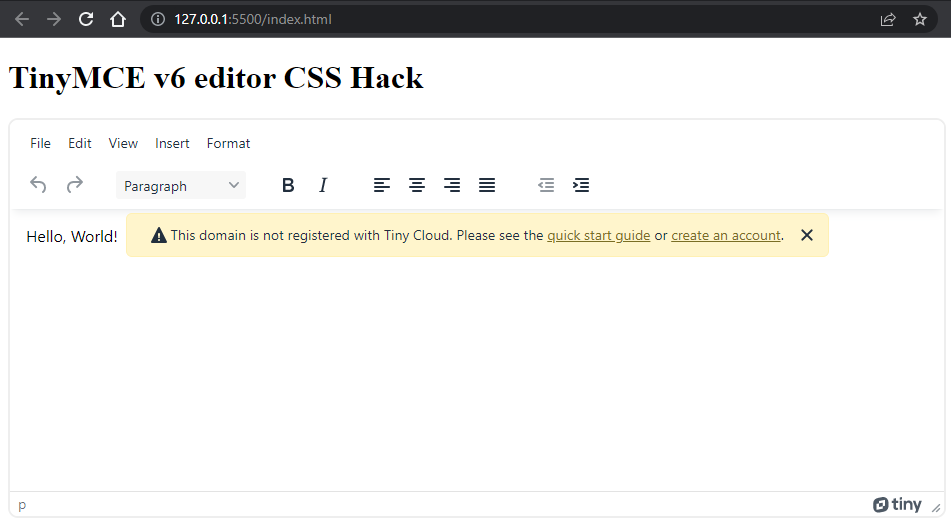
Sign up on Tiny Cloud to get a Tiny Cloud API key. Use it to replace no-api-key in the source script to remove the unregistered domain notification in the editable area.
Note: Use the below CSS to hack the display of the notification:
.tox-notifications-container {
    display: none !important;
}Now that you have TinyMCE installed, you're going to use CSS hacks to do some customizations on it.
Centering TinyMCE with CSS
If you want to cap the width of the RTE and center it horizontally, this can be done with a few lines of CSS. Create a style.css file or any stylesheet of your choice and link it to your web page with the <link src="style.css"> tag in the head of your project.
Add the below CSS code to your stylesheet:
/* Center editor horizontally */
#appeditor + .tox.tox-tinymce {
    max-width: 32rem; /* Capped width */
    margin: auto;
}This selects the HTML element immediately after the <textarea> element and centers it.
Note: TinyMCE replaces your <textarea> with id of appeditor with a parent <div> element with a class of tox tox-tinymce. The <textarea> element still exists in the DOM (with its replacement just after it) after the initialization of the editor.
Changing the Font in the editor to match the page font
Say your page has a Monda font declared in its stylesheet:
@import url('https://fonts.googleapis.com/css2?family=Monda&display=swap');

:root {
    --app-font: Monda, sans-serif;
}

body {
    font-family: var(--app-font);
}You can use a CSS hack to make the font in your RTE match that of the page.
Add the below code to your stylesheet:
/* Force font change on every element in the editor */
.tox.tox-tinymce * {
    font-family: var(--app-font) !important;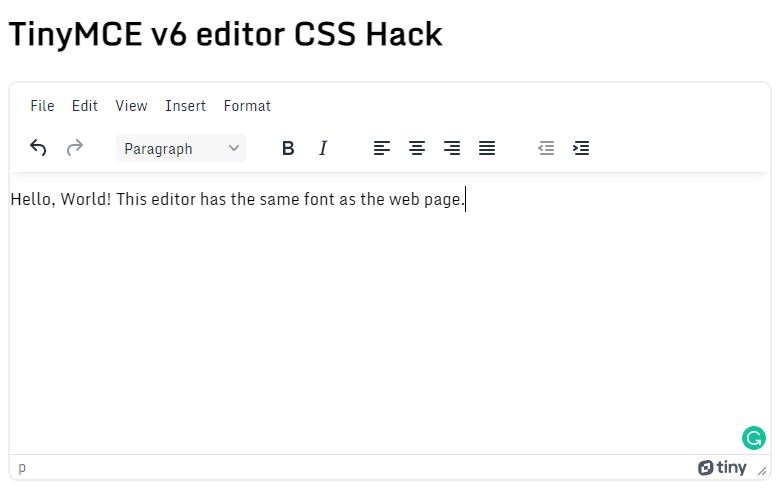
}Your editor should now have the same fonts as your page, but there's a catch – the font in the editable area where text is entered remains unchanged. This is because TinyMCE's classic editing mode wraps the editable area in an <iframe> to avoid styling conflicts, and inline frames do not directly inherit CSS styling from their parents.
Style the TinyMCE rich text editor with content_css
TinyMCE provides a content_css option that loads specified CSS files in the editor area's <iframe> (for classic editing mode) or the web page where the editor is currently embedded (for inline and distraction-free editing modes).
Note: TinyMCE wraps the editable area in an <iframe> for classic editing mode only.
content_css accepts a string or an array of strings that specify the relative path to the CSS files to be loaded. The content_css option is a better method for styling the textarea, rather than targeting specific classes such as .tox.tox-tinymce.
TinyMCE comes with six content CSS files:
- default
- dark
- document
- writer
- tinymce-5
- tinymce-5-dark
Specifying the relative path to the stylesheet (eg, /editor.css) with the styling defined above in content_css will load the CSS file in the editor's <iframe> and force the font there.
Edit your initialization code to look like the below:
tinymce.init({
  selector: "#appeditor",
  content_css: [
    "writer",
    "/editor.css", // resolves to something like http://domain.com/editor.css
  ],
});
Your editor's font should now fully match that of your page, as in the image below:
Using content_css to load a TinyMCE Skin
A skin is basically made up of CSS files that control the appearance of the editor. These CSS files are divided into content CSS files for styling the editable area and UI CSS files for styling other parts of the editor, like the toolbar and status bar. Oxide is the free default skin of TinyMCE.
The content_css option, as noted earlier, helps to load CSS files in the <head> of the editable area's <iframe> for classic editing mode or the <head> of the web page (where the editor is embedded) for other editing modes. This makes it possible for content_css to fully load TinyMCE skins for inline and distraction-free editing modes. content_css is used in conjunction with skin or skin_url options to fully load a skin in classic editing mode.
You'll need a skin to load. The TinyMCE docs have a list of TinyMCE skins and icons available for adding to the rich text editor.
You can also put together a custom TinyMCE skin. One method for styling TinyMCE 6 with a custom skin is to access the default Oxide skin and use the code as a template.
If you have a custom skin ready:
-
Enter the name of the skin as
css_hack_skinin the Setup section. -
Add the below code to the
bodyCSS in the Content CSS section to change the foreground of the editor:
background: #6C0DB3;
color: white;
- Edit the options in the Styles section to your taste.
If configuring or setting up a custom theme isn't convenient, though, TinyMCE provides handy premade premium skins that can quickly be loaded. For example, you can load the bootstrap skin like this:
tinymce.init({
  selector: "#appeditor",
  skin: "bootstrap",
  content_css: "bootstrap",
});
Using the Import CSS Plugin
TinyMCE provides a plugin that imports CSS classes from CSS files specified in the content_css option. CSS classes like .class, .class.office, and div.class are imported as format rules, which are displayed in the Formats section under the editor's Format menu item.
You can use the plugin by specifying its name in the plugins options of the init method, like this:
tinymce.init({
  selector: "#appeditor",
  content_css: ["writer", "/editor.css"],
  plugins: "importcss",
});
Open your editor.css file and add the following to it:
.text-red {
    color: #ff0000;
}

.text-spaced {
    letter-spacing: 1rem;
}

.text-shadow {
    text-shadow: 1px 1px 0px #ff0000;
}The classes above will change the text color to red, space the text, or add a shadow to it.
Since the import_css option has been included in your initialization configuration, the above
CSS classes should be exported as rules, like below:
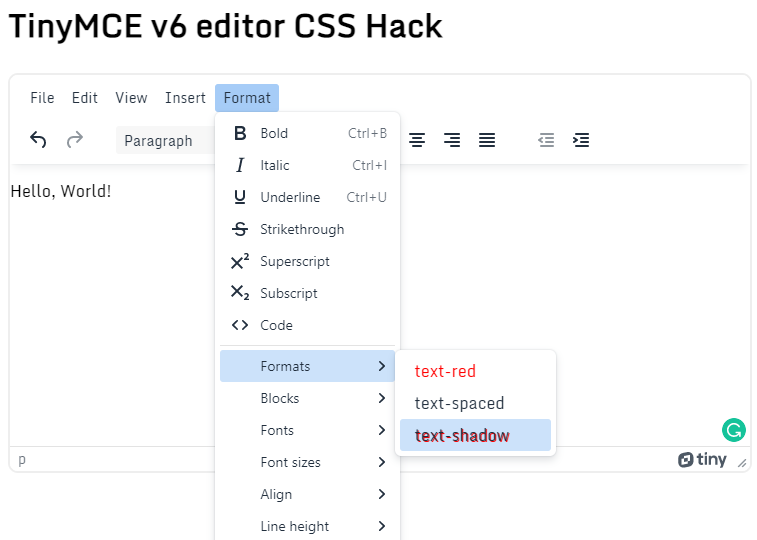
These rules can be used to style the text contents of the editable area.
CSS hacks can help your editor design
CSS hacks can make it easier, faster, and more efficient for you to fix styling issues in your web page without needing in-depth experience with CSS. As you saw in this tutorial, CSS hacks work well in customizing TinyMCE so that the RTE can match the look and feel of your web page of choice.
TinyMCE is one of several trusted products available from Tiny Cloud. The HTML editor offers easy implementation and multiple features to customize your editing functions and optimize your productivity. Get started with a free API key, and you'll get a 14--day trial to test TinyMCE's premium plugins.


