


The last thing you want when you’re getting to know a customer, is to either create an awkward impression, or damage your credibility.
So what are some ways to avoid these problems?
When it comes to credibility, consistency in communication goes a long way.
TinyMCE gives you everything you need to create consistency.
As a rich text editor component, it has features that you and your team can easily use to create and modify content that your customers see, read, and use (without any awkwardness, ideally).
By configuring TinyMCE as the rich text editor-of-choice within your business’s Customer Relations Management system (CRM), you’ll introduce a number of important features and capabilities:
Features and CRM capabilities with TinyMCE
- 99.9% accurate and clean copy-paste, using PowerPaste
- Word Count, Search and replace
- Enhanced image editing inside the text area
- Preview content before publishing
- Confirm your links are actually working with Link Checker
And that’s just five of the 60+ features TinyMCE can provide, as your CRM editor component.
Why not try out the editor in a demo? It’s the best way to get to know if a component is right for you, and with TinyMCE, setting up is fast. Be aware though, it does require HTML knowledge to get started.
In this article you’ll find a step-by-step explanation of how to include TinyMCE as your CRM text field editor and how to make use of TinyMCE Cloud (that’s the fastest way to get up and running with TinyMCE 😉).
What you need to get started
You’ll first need to get a TinyMCE API key. Your API key is free, and it also gives you 14 days free access to TinyMCE premium plugins - cloud or self-hosted (several of these are included in the CRM starter config provided in this article). Using your API key also stops warning messages in the text editor about domains not registered with Tiny Cloud.
How to get an API key:
TinyMCE needs an API key to prevent it changing into read-only mode when accessing TinyMCE through the CDN as Tiny Cloud. Your API key also prevents warning messages appearing in the text editor area:
This domain is not registered with Tiny Cloud. Please see the quick start guide or create an account
Remove these warning messages by adding your API key as a reference within an app.
- Go directly to the Get-tiny sign up page
- After typing in your account information, select Sign up.
- When you arrive at the dashboard screen, your API key appears on the page.
How to set up a CRM editor component with TinyMCE Cloud
The steps to get a CRM configuration started are straightforward, although here’s where the previously mentioned HTML knowledge, comes into play.
You can follow along with the video tutorial:
And here's the transcript:
-
In a new folder on your computer workstation, create an index.html file.
-
With your new file open, add the essential HTML:
<!doctype html>
<html>
<head>
  <meta charset="utf-8">
  <title>TinyMCE CRM Starter Config (Email Functionality)</title>
  <meta name="viewport" content="width=device-width, initial-scale=1">
  <script>
    tinymce.init({
      selector: '#editor',
    });
  </script>
</head>
<body>
<main>
  <textarea id="editor"></textarea>
</main>
</body>
</html>-
Copy and paste this content between the head section tags of your HTML file.
<script src="https://cdn.tiny.cloud/1/your-api-key/tinymce/6/tinymce.min.js" referrerpolicy="origin"></script>
Replace the “your-api-key” with your API key from your TinyMCE account.
-
Next is the tinymce.init script. Add the following to your HTML file after the API key script:
  <script>
    tinymce.init({
      selector: '#editor',
      plugins: 'advcode autocorrect autoresize editimage emoticons image link linkchecker lists mergetags powerpaste template tinymcespellchecker',

      menubar: false,
      statusbar: false,

      min_height: 300,
      max_height: 500,
      autoresize_bottom_margin: 20,

      toolbar: 'undo redo spellchecker | formatgroup | link emoticons image template mergetags | code',

      toolbar_groups: {
        formatgroup: {
          icon: 'format',
          tooltip: 'Formatting',
          items: 'blocks fontfamily fontsize | bold italic underline strikethrough forecolor | align bullist numlist outdent indent blockquote'
        }
      },

      toolbar_location: 'bottom',

      font_size_formats: "8px 10px 12px 14px 18px 24px 36px",

      formats: {
        h1: {block: 'h1'},
        h2: {block: 'h2'},
        p: [
          {block: 'p'},
          {selector: 'p'}
        ],
        small: {block: 'small', styles: {fontSize: '12px', color: '#aaaaaa'}}
      },

      block_formats: 'Normal=p; Heading=h1; Sub heading=h2; Small=small',

      forced_root_block: 'p',
      forced_root_block_attrs: {'style': 'font-size: 14px; font-family: helvetica, arial, sans-serif;'},

      images_file_types: "jpeg,jpg,png,gif",

      spellchecker_active: false,

      powerpaste_word_import: 'clean',
      powerpaste_googledocs_import: 'clean',
      powerpaste_html_import: 'clean',

      link_target_list: false,

      link_list: [
        { title: "Product demo", value: "https://www.tiny.cloud/" },
        { title: "Pricing", value: "https://www.tiny.cloud/pricing/" },
        { title: "Sign up", value: "https://www.tiny.cloud/signup/" },
        {
          title: "Case studies",
          value: "https://www.tiny.cloud/solutions/content-authoring-tool/",
          menu: [
            { title: "Thomson Reuters", value: "https://assets.ctfassets.net/sn6g75ou164i/529dmerPtej8eu8wxRFSIQ/9eeeacaf7c7f45b43db991a7064c354d/tiny-case-study-thomson-reuters.pdf" },
            { title: "Morning Brew", value: "https://assets.ctfassets.net/sn6g75ou164i/5Y5ETFsqsbxrn8KrfxxuSn/eba8bdd4be3b378b167bc9e9016f9206/tiny-case-study-morning-brew_1_.pdf" },
            { title: "Accelo", value: "https://assets.ctfassets.net/sn6g75ou164i/4Zg8kQr3vcRpwWCcjwuwTy/0363c30c76032d69d25b68a6a625126b/tiny-case-study-accelo.pdf" }
          ]
        }
      ],

      mergetags_list: [
      {
        title: "Lead",
        menu: [{
          value: 'Lead.FirstName',
          title: 'Lead First Name'
        },
        {
          value: 'Lead.LastName',
          title: 'Lead Last Name'
        },
        {
          value: 'Lead.Organization',
          title: 'Lead Organization'
        },
        {
          value: 'Lead.Email',
          title: 'Lead Email'
        }
        ]
      },
      {
        title: "Sender",
        menu: [{
          value: 'Sender.FirstName',
          title: 'Sender First Name'
        },
        {
          value: 'Sender.LastName',
          title: 'Sender Last Name'
        },
        {
          value: 'Sender.Organization',
          title: 'Sender Organization'
        },
        {
          value: 'Sender.Email',
          title: 'Sender Email'
        }
        ]
      },
      {
        title: 'Subscription',
        menu: [{
          value: 'Subscription.UnsubscribeLink',
          title: 'Unsubscribe Link'
        },
        {
          value: 'Subscription.Preferences',
          title: 'Subscription Preferences'
        }
        ]
      }
      ],

      content_style: `
        body {
          font-family: -apple-system, BlinkMacSystemFont, 'Segoe UI', Roboto, Oxygen-Sans, Ubuntu, Cantarell, 'Helvetica Neue', Helvetica, Arial, sans-serif;
          font-size: 14px;
          line-height: 1.5rem;
        }
        h1 {
          font-size: 24px;
        }
        h2 {
          font-size: 18px;
        }
      `
    });
</script>-
Add the a textarea tag, with an id that matches the selector value in the TinyMCE init script:
<textarea id="editor">
    <h1>TinyMCE</h1>
</textarea>-
Save these changes
Next steps
What you’ve just completed is the initial CRM editor configuration, and you can now integrate it into your CRM as a component for text entry.
The next section builds on this essential configuration.
Configuring a CRM editor around TinyMCE
This CRM editor config draws some sample content from the TinyMCE CRM config.
The first change to make is showing how TinyMCE fits into a CRM. So, here’s how to shape the CRM config:
-
Add the templates plugin values into the tinymce.init script after the autoresize plugin configuration:
templates: [ { title: 'Outbound email', description: 'Outbound cold email for prospects', content: '<p style="font-size: 14px; font-family: helvetica, arial, sans-serif;">Hi {{Lead.FirstName}},</p><p style="font-size: 14px; font-family: helvetica, arial, sans-serif;">My name is {{Sender.FirstName}} with {{Sender.Organization}}.</p><p style="font-size: 14px; font-family: helvetica, arial, sans-serif;">We help companies just like yours securely store data in the cloud. I wanted to learn how you handle data storage at {{Lead.Organization}} and show you some of the exciting technology we\'re working on.</p><p style="font-size: 14px; font-family: helvetica, arial, sans-serif;">Are you available for a quick call tomorrow afternoon?</p><p style="font-size: 14px; font-family: helvetica, arial, sans-serif;">{{Sender.FirstName}}</p>' }, { title: 'Follow-up email', description: 'Follow-up to be sent immediately after discovery meetings', content: '<p style="font-size: 14px; font-family: helvetica, arial, sans-serif;">Hi {{Lead.FirstName}},</p><p style="font-size: 14px; font-family: helvetica, arial, sans-serif;">Thank you for taking the time to explore a potential partnership today! It felt like our product could help you solve some of the issues that you’re having within {{Lead.Organization}}, especially in these areas:</p><ul><li style="font-size: 14px; font-family: helvetica, arial, sans-serif;">The offsite data warehouse will allow you to guarantee business continuity</li><li style="font-size: 14px; font-family: helvetica, arial, sans-serif;">Metered usage will ensure you only pay for what you consume</li><li style="font-size: 14px; font-family: helvetica, arial, sans-serif;">Level III security protocols will mean you will meet security requirements for your jurisdiction</li></ul><p style="font-size: 14px; font-family: helvetica, arial, sans-serif;">I understand that now you will discuss and agree internally on the next step. Please let me know if you have any questions or if there is anything I can do to help. If not, I’ll talk to you next week.</p><p style="font-size: 14px; font-family: helvetica, arial, sans-serif;">Best,<br>{{Sender.FirstName}}</p>' } ], -
Add style content for the rich text editor after the templates plugin configuration:
content_style: ` body { font-family: -apple-system, BlinkMacSystemFont, 'Segoe UI', Roboto, Oxygen-Sans, Ubuntu, Cantarell, 'Helvetica Neue', Helvetica, Arial, sans-serif; font-size: 14px; line-height: 1.5rem; } h1 { font-size: 24px; } h2 { font-size: 18px; } `; -
Next add style tags inside the head section of the HTML file, and include some CSS:
<style> body { font-family: -apple-system, BlinkMacSystemFont, 'Segoe UI', Roboto, Oxygen-Sans, Ubuntu, Cantarell, 'Helvetica Neue', Helvetica, Arial, sans-serif; font-size: 14px; margin: 2rem; } main { max-width: 800px; margin: auto; } </style> -
Modify the TinyMCE textarea HTML:
<textarea id="editor"> <p>Hi {{Lead.FirstName}},</p> <h2>What's your CRM editor project?</h2> <p>Are you:</p> <ul> <li>Building a new CRM and need to add rich text editing capabilities?</li> <li>Extending your existing CRM and need a more extensive rich text editor?</li> </ul> <p>Then use the only WYSIWYG CRM editor that’s trusted by 1.5M devs.</p> <p><strong>Curious about TinyMCE? </strong>Play with this demo to see how our CRM editor works 😊</p> <p>Press <img src="https://tiny.cloud/images/solutions/crm-editor/demo/i_formatting.png" width="18" height="18" alt="Formatting"> to see how a toolbar group works, and click on <img src="<a href="https://tiny.cloud/images/solutions/crm-editor/demo/i_insert_template.png">https://tiny.cloud/images/solutions/crm-editor/demo/i_insert_template.png</a>" width="18" height="18" alt="Insert Template"> and <img src="<a href="https://tiny.cloud/images/solutions/crm-editor/demo/i_insert_token.png">https://tiny.cloud/images/solutions/crm-editor/demo/i_insert_token.png</a>" width="18" height="18" alt="Insert Token"> for inspiration to include pre-defined templates and merge tags.</p> </textarea> -
Save the changes, and load the HTML file in your browser:
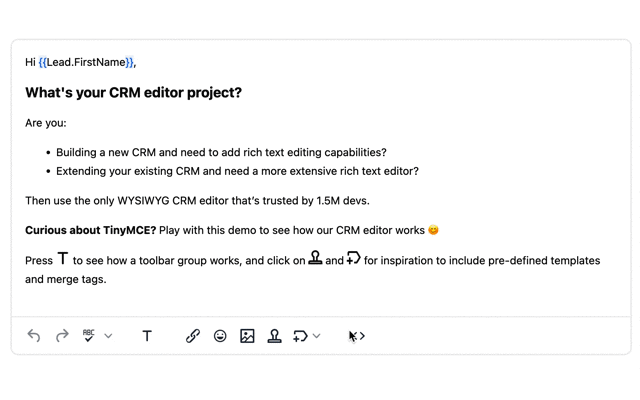
You can now test out all the features of the CRM in an interface that mimics an actual CRM app. You can test out the different plugins available, including autoresize, templates, and tokens to automatically add essential content.
|
A note on non-editable content |
|
Any content wrapped in the “{{ }}” curly bracers appears non-editable. This prevents change to vital customer information. The appearance of the non-editable areas are styled with a class – the CSS style applied to the class in the tinymce.init script controls and changes their appearance. |
The next steps for your CRM editor
Check out our CRM editor page for more content and CRM information – also, remember that your FREE API key grants free access to Premium Plugin functionality for 14 days — cloud or self-hosted. After the 14 days, you'll need to either choose a Premium plan or remove the TinyMCE premium features.
|
What’s available for your CRM with Premium Plugins: |
|
Contact us for more information if you have any questions on adding TinyMCE as a component for your CRM app. Premium customers and anyone on a 14-day free trial — cloud or self-hosted — can seek support from our professional customer service team.


