


In How to build an advanced email editor with React using TinyMCE and Nylas email API: Part 1, you created a rich text editor that evolved from a simple textarea to a Gmail-like experience. You focused on taking it from a basic textarea to a full-fledged content editor. You configured TinyMCE to ensure a real email experience with features like a customized toolbar, Inline CSS, Enhanced Code Editor, Merge Tags, Templates, Spell Checker, and even an Accessibility Checker.
You ended up with a Gmail-like experience, but let's be honest here: without the Nylas Email API the app is pretty, but you can’t use it to send emails. Part two of this series will focus on how to use Nylas to make the magic happen.
All the content in this series is from the webinar TinyMCE did with Nylas, which is available on our YouTube.
What is Nylas?
Nylas offers a powerful API that lets you integrate with email providers, calendar solutions, and meeting applications in five minutes. It gives you access to more than 250 providers like Gmail from Google, Outlook from Microsoft, and much more.
The benefit is clear: instead of manually building the integration with all those by yourself, you can use a single interface to integrate real-time bidirectional communication features in your applications much faster. As you'll see, their API is powerful, but getting started is straightforward.
Implementing the Nylas API into a React application
In the first part of this blog series, you used a fully functional backend and frontend with Nylas already up and running. Here in Part Two, you’ll start from a codebase that has the TinyMCE part completed, but doesn’t have the send email feature implemented yet.
Prerequisites
If you followed the first part of this series, you should all be set up. If not, you'll need to do a couple of things to get started:
- Install Node.js: Both the backend and frontend use Node.js.
- Install Git: You’ll need to clone the repository you’ll use for this tutorial.
- Create a free Nylas account: Create one for free if you don't have one.
- Create a free TinyMCE account: You’ll need a TinyMCE account if you don't have one already.
Step one: Clone the GitHub repository
To get started, clone the tinymce-webinar-backend branch of the nylas-samples/TinyMCE-Nylas-Email-API repository. Since Part One uses a fully functional Nylas API integration, start with this branch instead of your code to ensure you create a fully functional email application with TinyMCE and Nylas.
git clone -b tinymce-webinar-backend --single-branch git@github.com:nylas-samples/TinyMCE-Nylas-Email-API.git⚠️ Note: Keep in mind that even if the backend code compiles at that point, that without the next steps, the full application won't work as intended.
Step two: Set the environment variables
In the backend folder, there is an .env.sample file. Make a copy of the file, and rename it .env. You will then set the proper values for the NYLAS_CLIENT_ID, NYLAS_API_KEY, and NYLAS_API_URI variables.
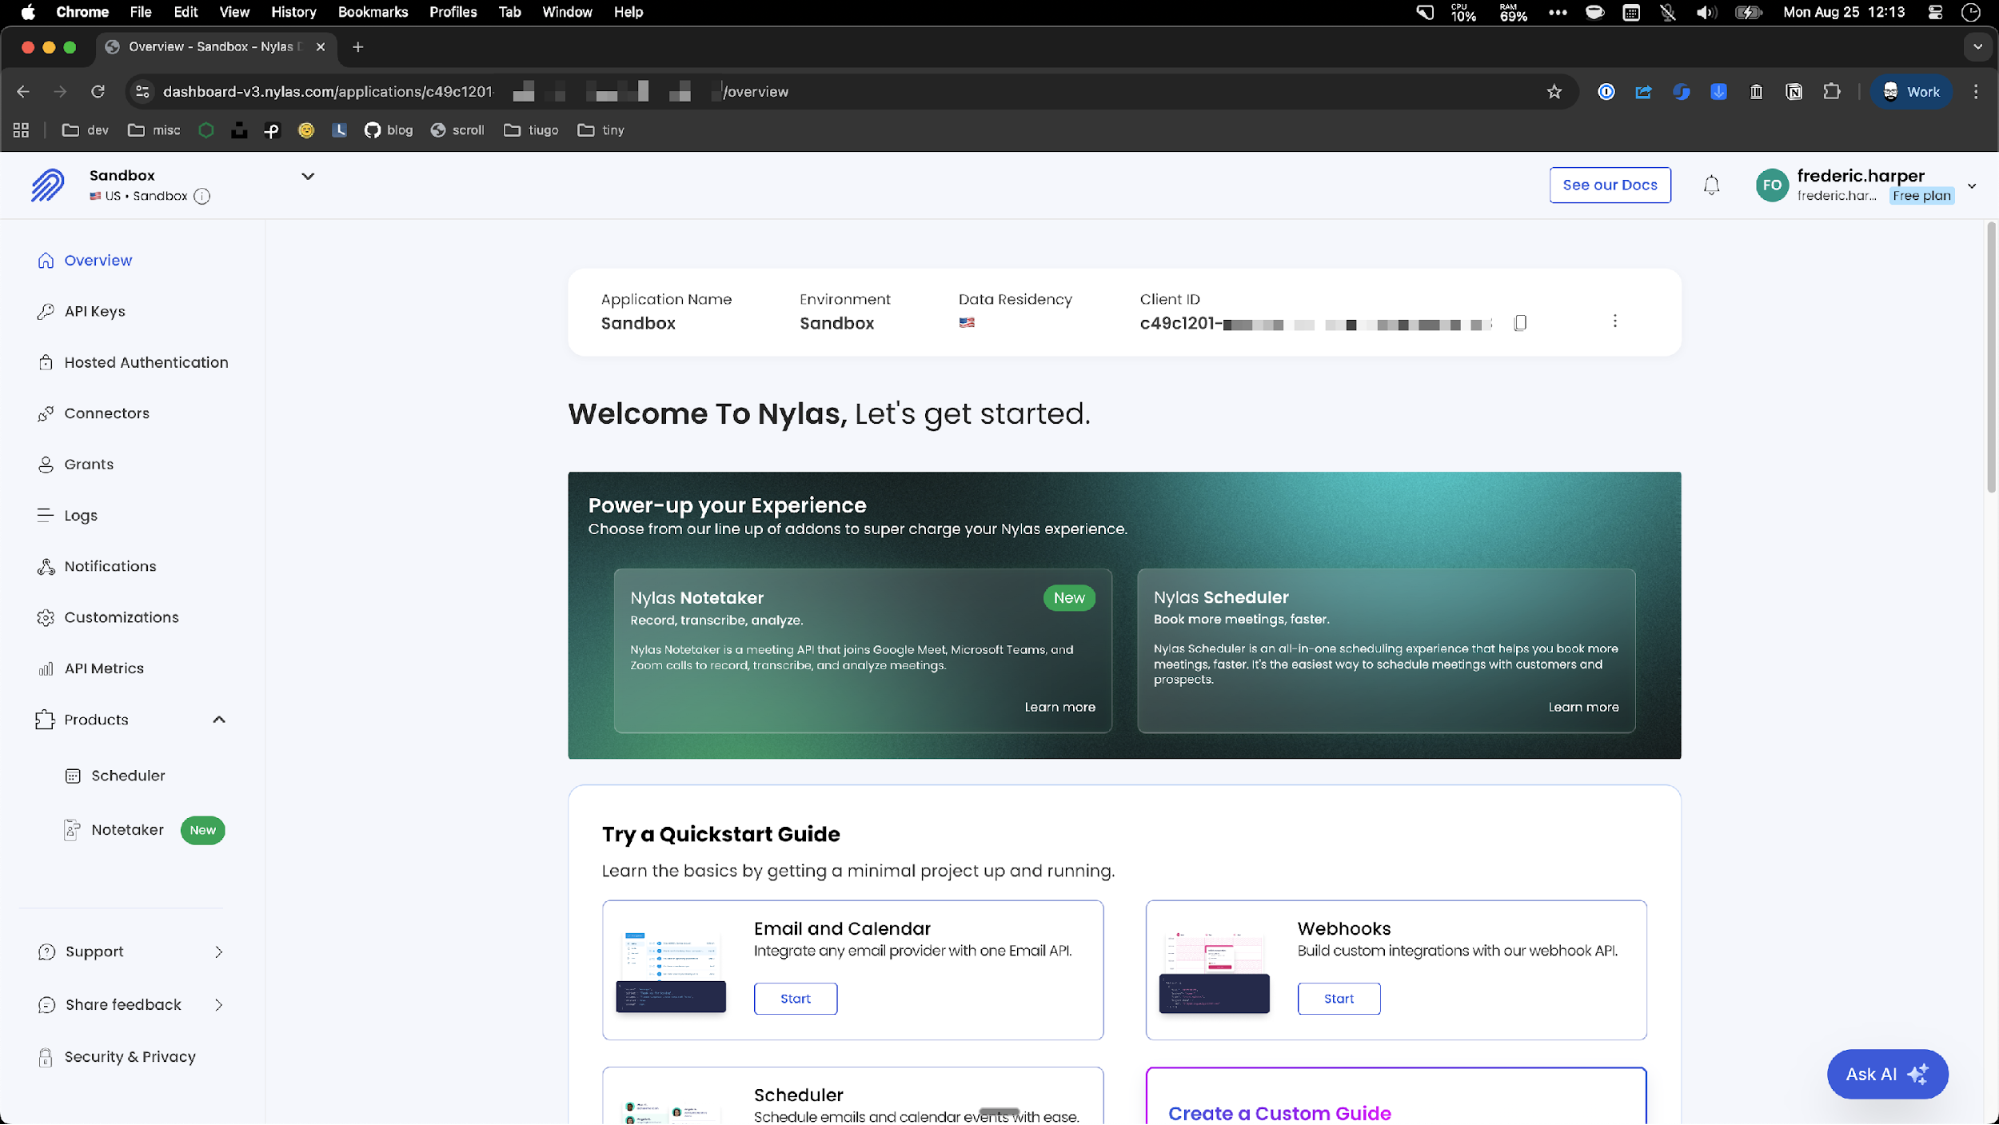
First, log in to the Nylas account you created in the prerequisites section. In the Nylas dashboard, choose the Sandbox project and retrieve the Client ID in the Overview section.
This is the value of NYLAS_CLIENT_ID, which you can now add to the .env file.
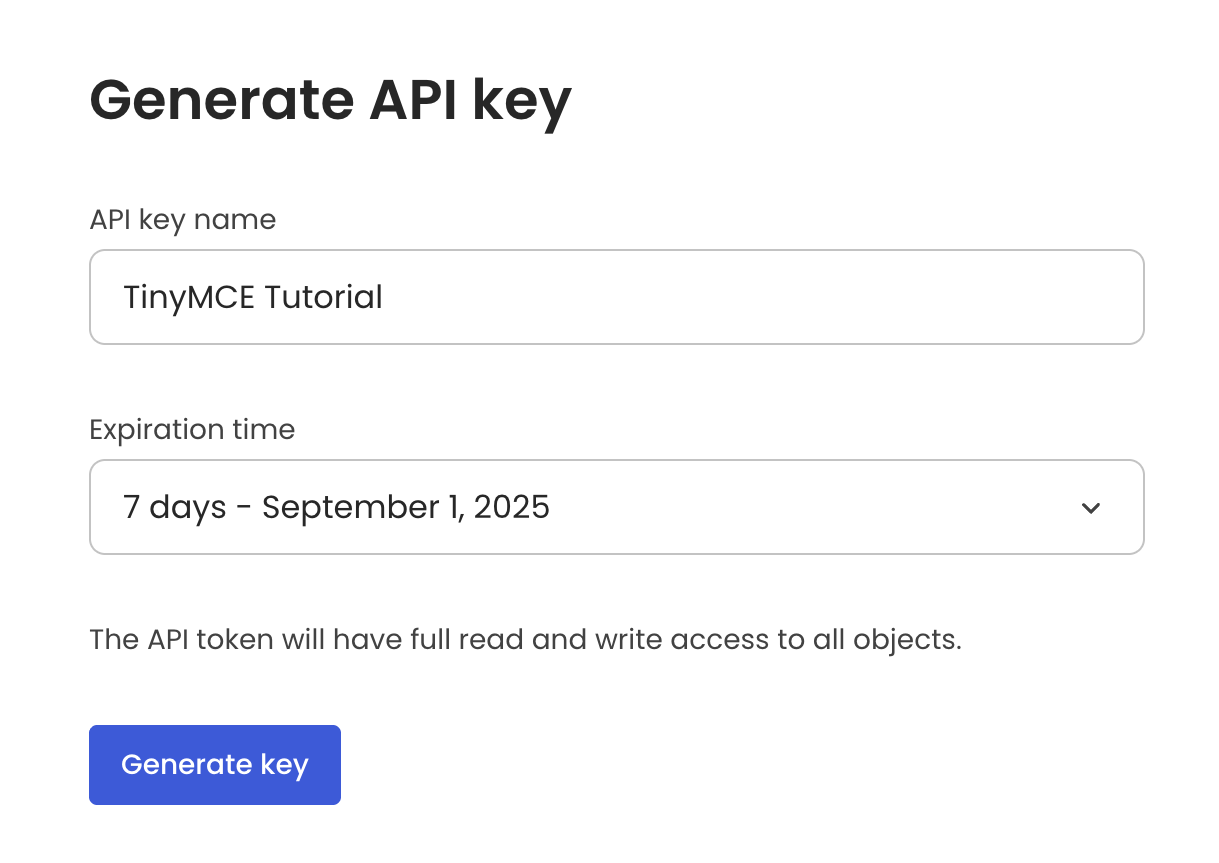
The next step is to create an API key in the Nylas dashboard. Click the API Keys left menu item and then click Generate new key. Give the new key a name like "TinyMCE Tutorial". Once you’re done naming the key, press Generate key.
⚠️ Note: If you want to be safe, change the expiration time to something less than the default one.
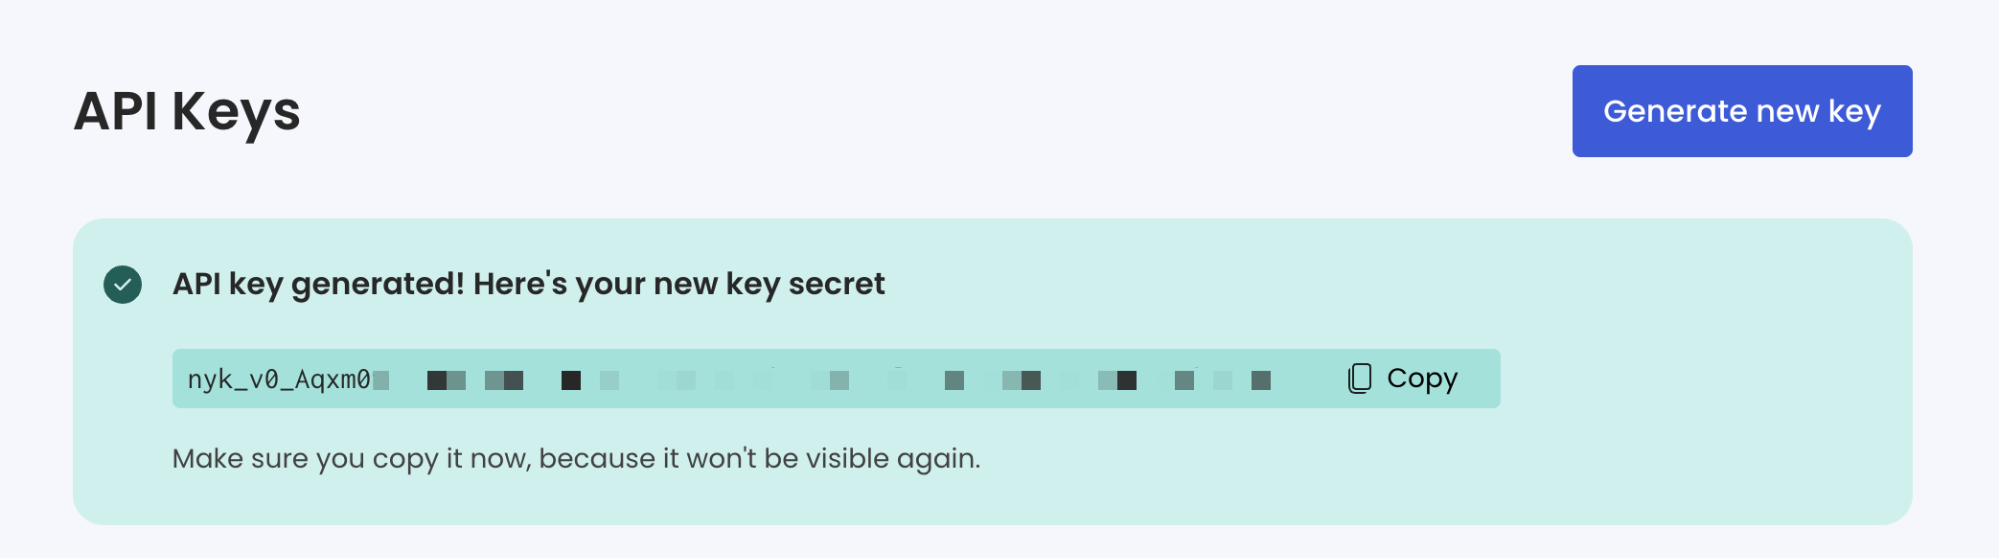
Once you generate the key, it will bring you back to the API Keys page automatically, and you'll see your new API key. Make sure to copy it right away and add it to the .env file as the value for NYLAS_API_KEY. If you leave the page before doing so, you won't be able to see the key anymore. If it happens, do not panic, just delete it and create a new one.
The value of the NYLAS_API_URI variable should stay https://api.us.nylas.com, but you can change it for their European region by updating the us part to eu.
At that point, even if the environment variables are all set, the backend won't run without errors until you add the missing pieces.
Step three: Install the Nylas React SDK
To make installing their API easier, Nylas also created a React SDK. The first step before you jump into the code is to install the SDK with the following command:
npm install @nylas/nylas-reactStep four: Import and initialize the SDK
Before even thinking about reading all the emails, be sure to initialize the Nylas SDK, which will also make the application compile and run.
Let's start by importing the SDK at the top in the server.js file.
import Nylas from "nylas";
Once done, let's retrieve the environment variables you set earlier, initialize the SDK with those, and initialize your application.
const NylasConfig = {
  apiKey: process.env.NYLAS_API_KEY,
  apiUri: process.env.NYLAS_API_REGION_URI,
};

const nylas = new Nylas(NylasConfig);

const CLIENT_URI =
  process.env.CLIENT_URI || `http://localhost:${process.env.PORT || 3000}`;

nylas.applications
  .getDetails({
    redirectUris: [CLIENT_URI],
  })
  .then((applicationDetails) => {
    console.log(
      "Application registered. Application Details: ",
      JSON.stringify(applicationDetails)
    );
  });
Step five: Register your authentication callback URI
To be sure that the code you just added to your application works, you need to register an authentication callback URI (Uniform Resource Identifier) into your Nylas account. This will ensure that once you authenticate with your Gmail account, Nylas will know which URL to call back. In your case, it will be http://localhost:3000 since you will run the application locally, but if you decide to deploy it somewhere else, feel free to add additional URIs.
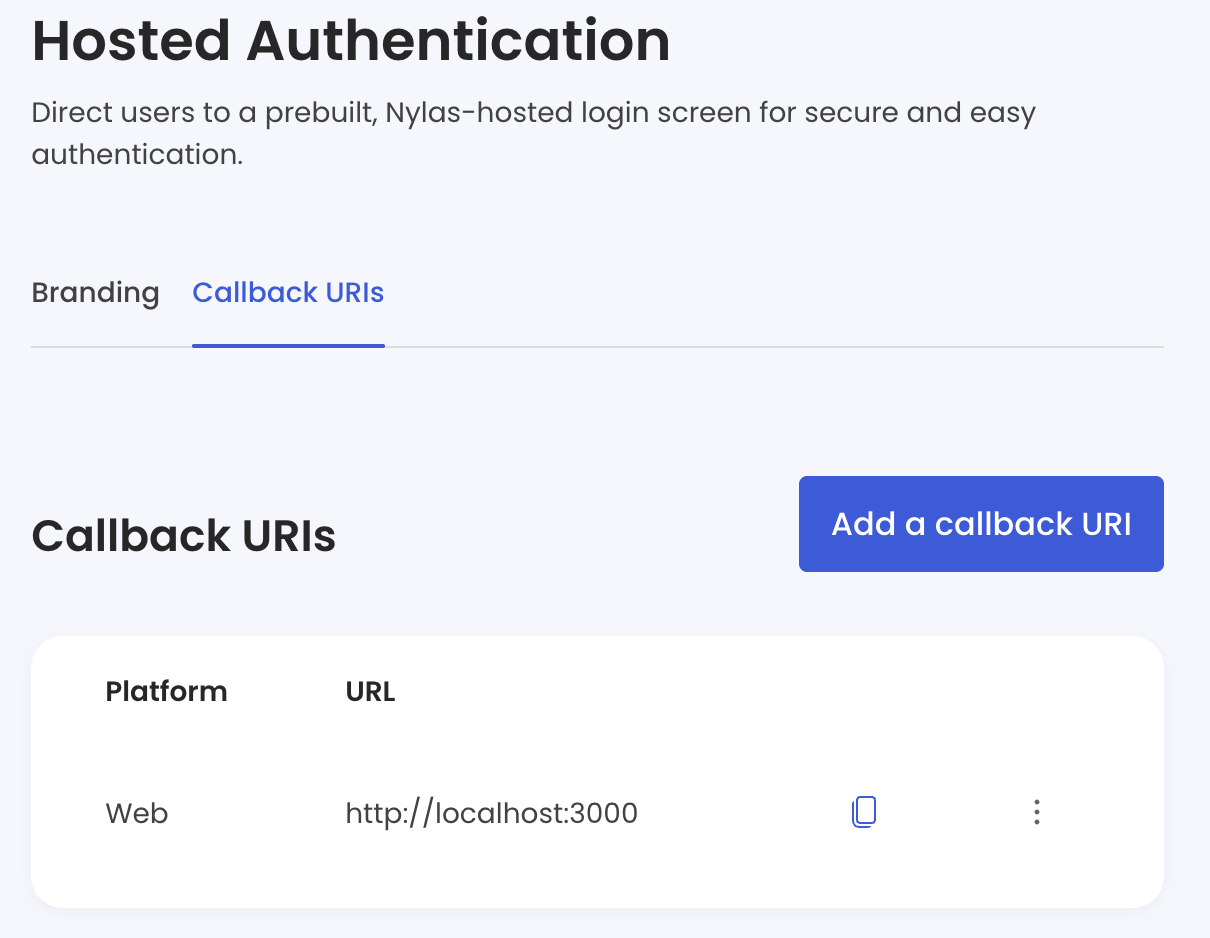
First, go to your Nylas dashboard in your sandbox application. It allows you to connect up to five accounts for free without the need to set up provider authentication. Select the Hosted Authentication from the sidebar, and then Callback URIs. Click on Add a callback URI, leave the platform as Web, and add "http://localhost:3000" in the URL textbox. Once you’re done, click Add callback URI.
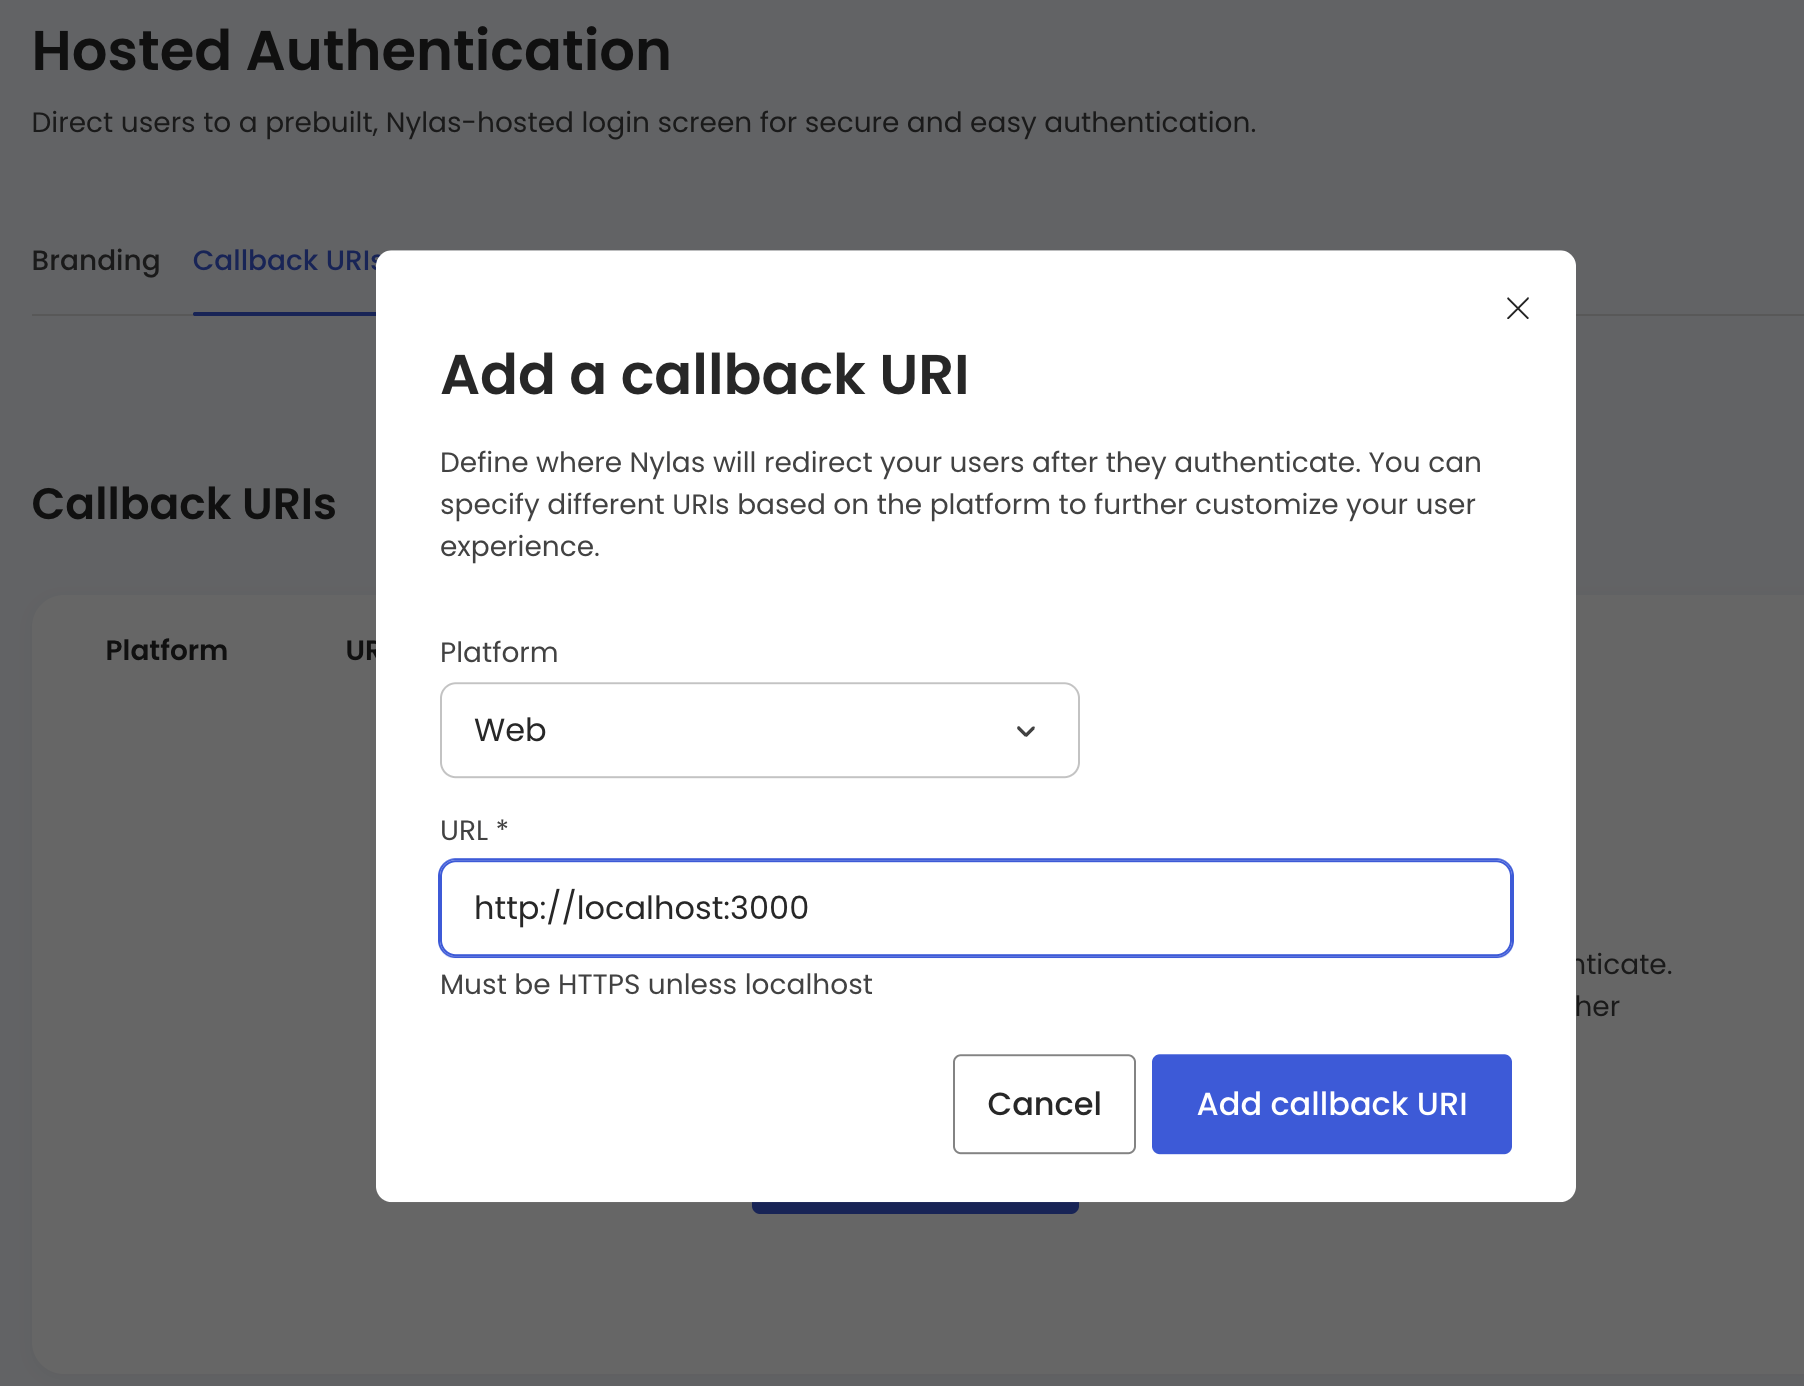
Once this is done, you'll see your URL added to the Callback URIs list like below.
Step six: Authenticate the user
To create a functional application for your users, authenticate your application with the Nylas server and their Gmail account. Gmail is the email provider you’ll use for this guide.
Creating grants with OAuth and an access token is a two-step process. First, build the URL for authenticating users to your Nylas application. Second, get the grant ID, which you’ll use for any future calls to their APIs.
// This route builds the URL for authenticating users to your Nylas application via Hosted Authentication
app.post("/nylas/generate-auth-url", express.json(), async (req, res) => {
  const { body } = req;

  const authUrl = nylas.auth.urlForOAuth2({
    clientId: process.env.NYLAS_CLIENT_ID,
    redirectUri: CLIENT_URI,
    loginHint: body.email_address,
    scopes: [
      "openid",
      "https://www.googleapis.com/auth/userinfo.email",
      "https://www.googleapis.com/auth/gmail.modify",
      "https://www.googleapis.com/auth/gmail.send",
    ],
  });

  return res.send(authUrl);
});

// This route exchanges an authorization code for an grant Id and sends the details of the authenticated user to the client
app.post("/nylas/exchange-mailbox-token", express.json(), async (req, res) => {
  const body = req.body;

  const { grantId, email } = await nylas.auth.exchangeCodeForToken({
    clientSecret: process.env.NYLAS_API_KEY,
    clientId: process.env.NYLAS_CLIENT_ID,
    code: body.token,
    redirectUri: CLIENT_URI,
  });

  // Replace this mock code with your actual database operations
  const user = await mockDb.createOrUpdateUser(email, {
    emailAddress: email,
    grantId,
  });

  // Return an authorization object to the user
  return res.json({
    id: user.id,
    emailAddress: user.emailAddress,
  });
});
Step seven: Read the emails
To read the emails from the user's account, you’ll use the /nylas/read-emails API route. Still in the server.js file, add these lines:
app.get("/nylas/read-emails", isAuthenticated, (req, res) =>
  route.readEmails(req, res)
);
This code uses the isAuthenticated function, which was already created. Now that you’ve called the Nylas API to obtain a list of emails, the readEmails function in the route.js file will manage the server response. Your interface will be able to list the emails.
Step eight: See it in action
Now that you’ve added the missing pieces to properly run the backend application and retrieve emails, let's see your application in action.
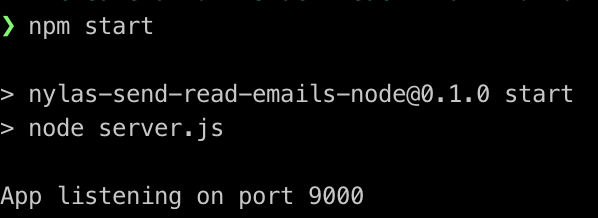
First, start the server from the backend folder:
npm startIf you’ve followed every step so far, you should see this output.
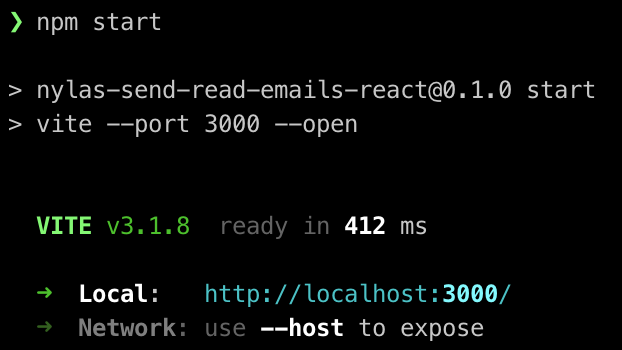
Second, start the frontend by running the same command, but this time from the frontend folder. You should see the frontend running in your terminal, but your browser should also have opened automatically to http://localhost:3000.
The first page you see in the application is the login page.
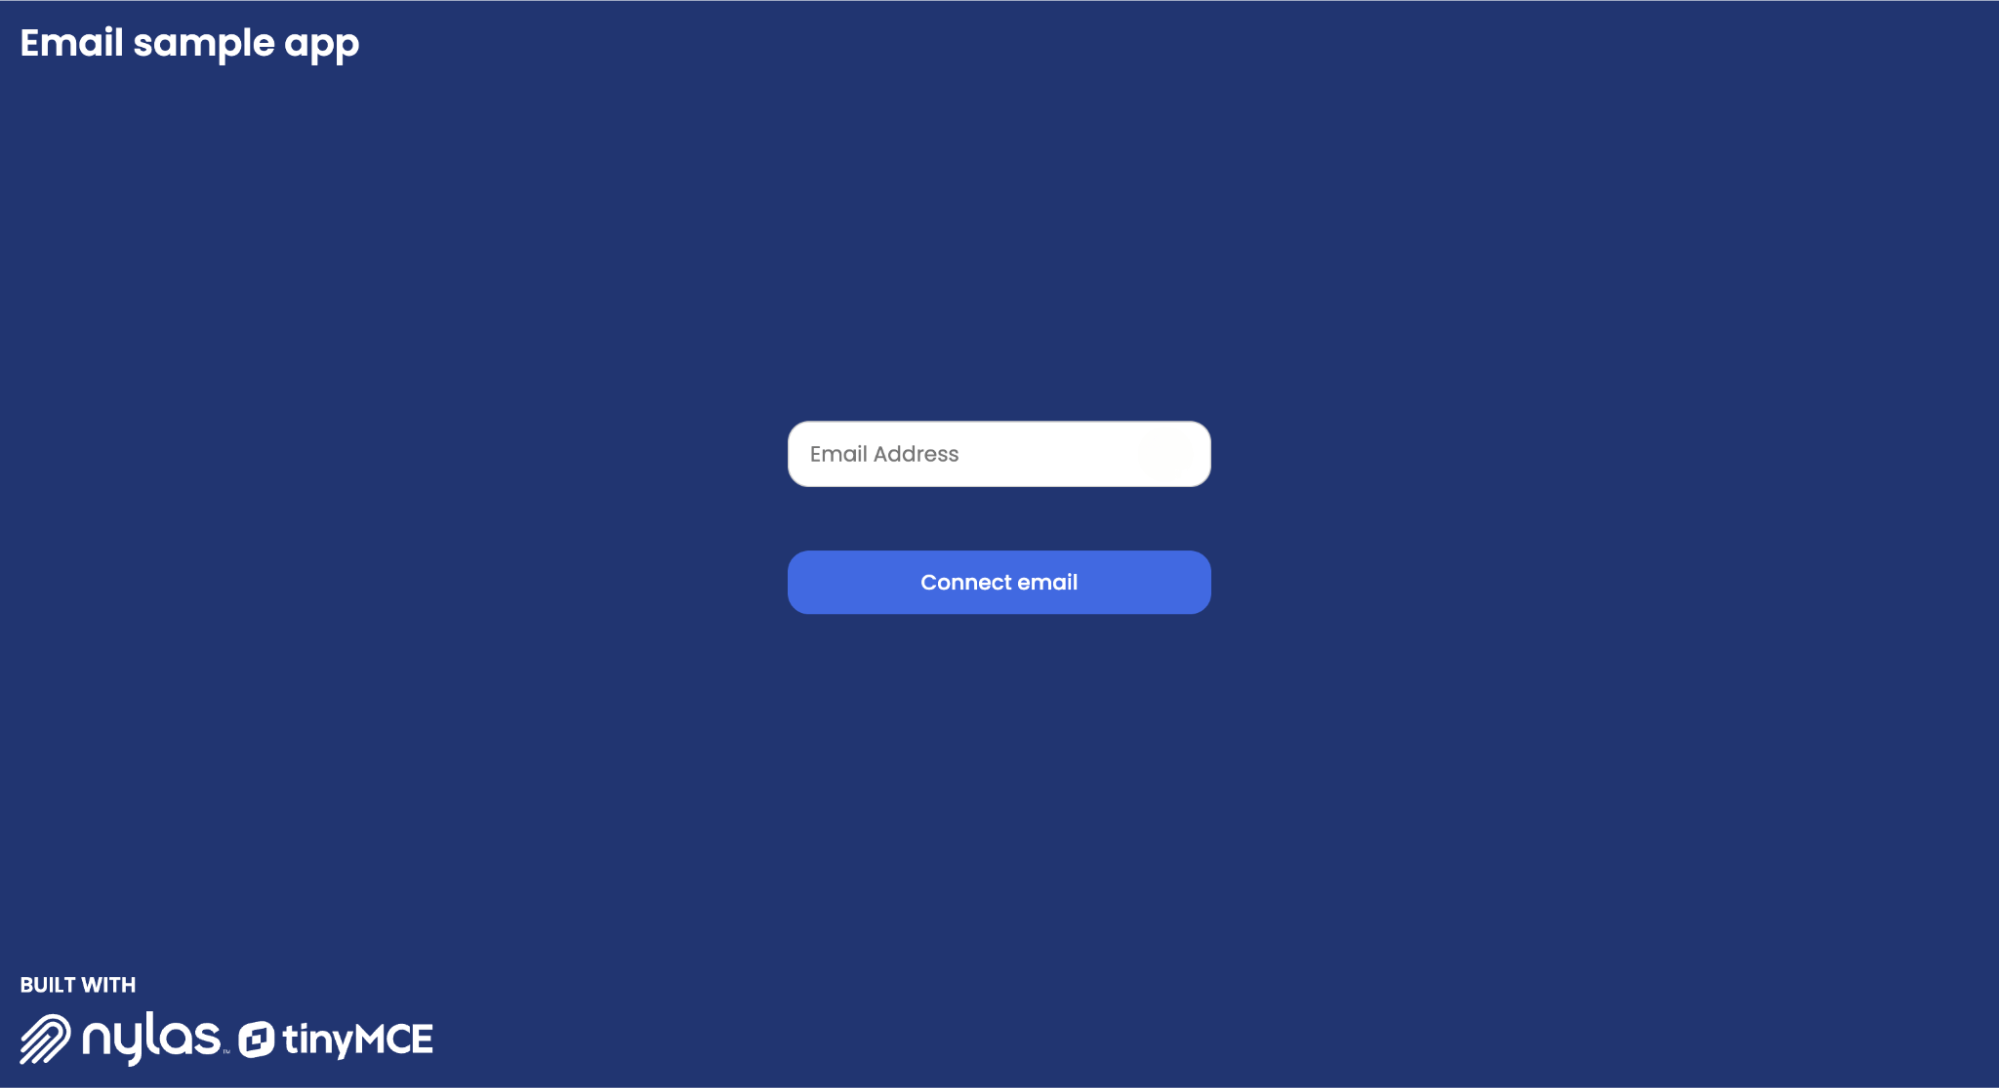
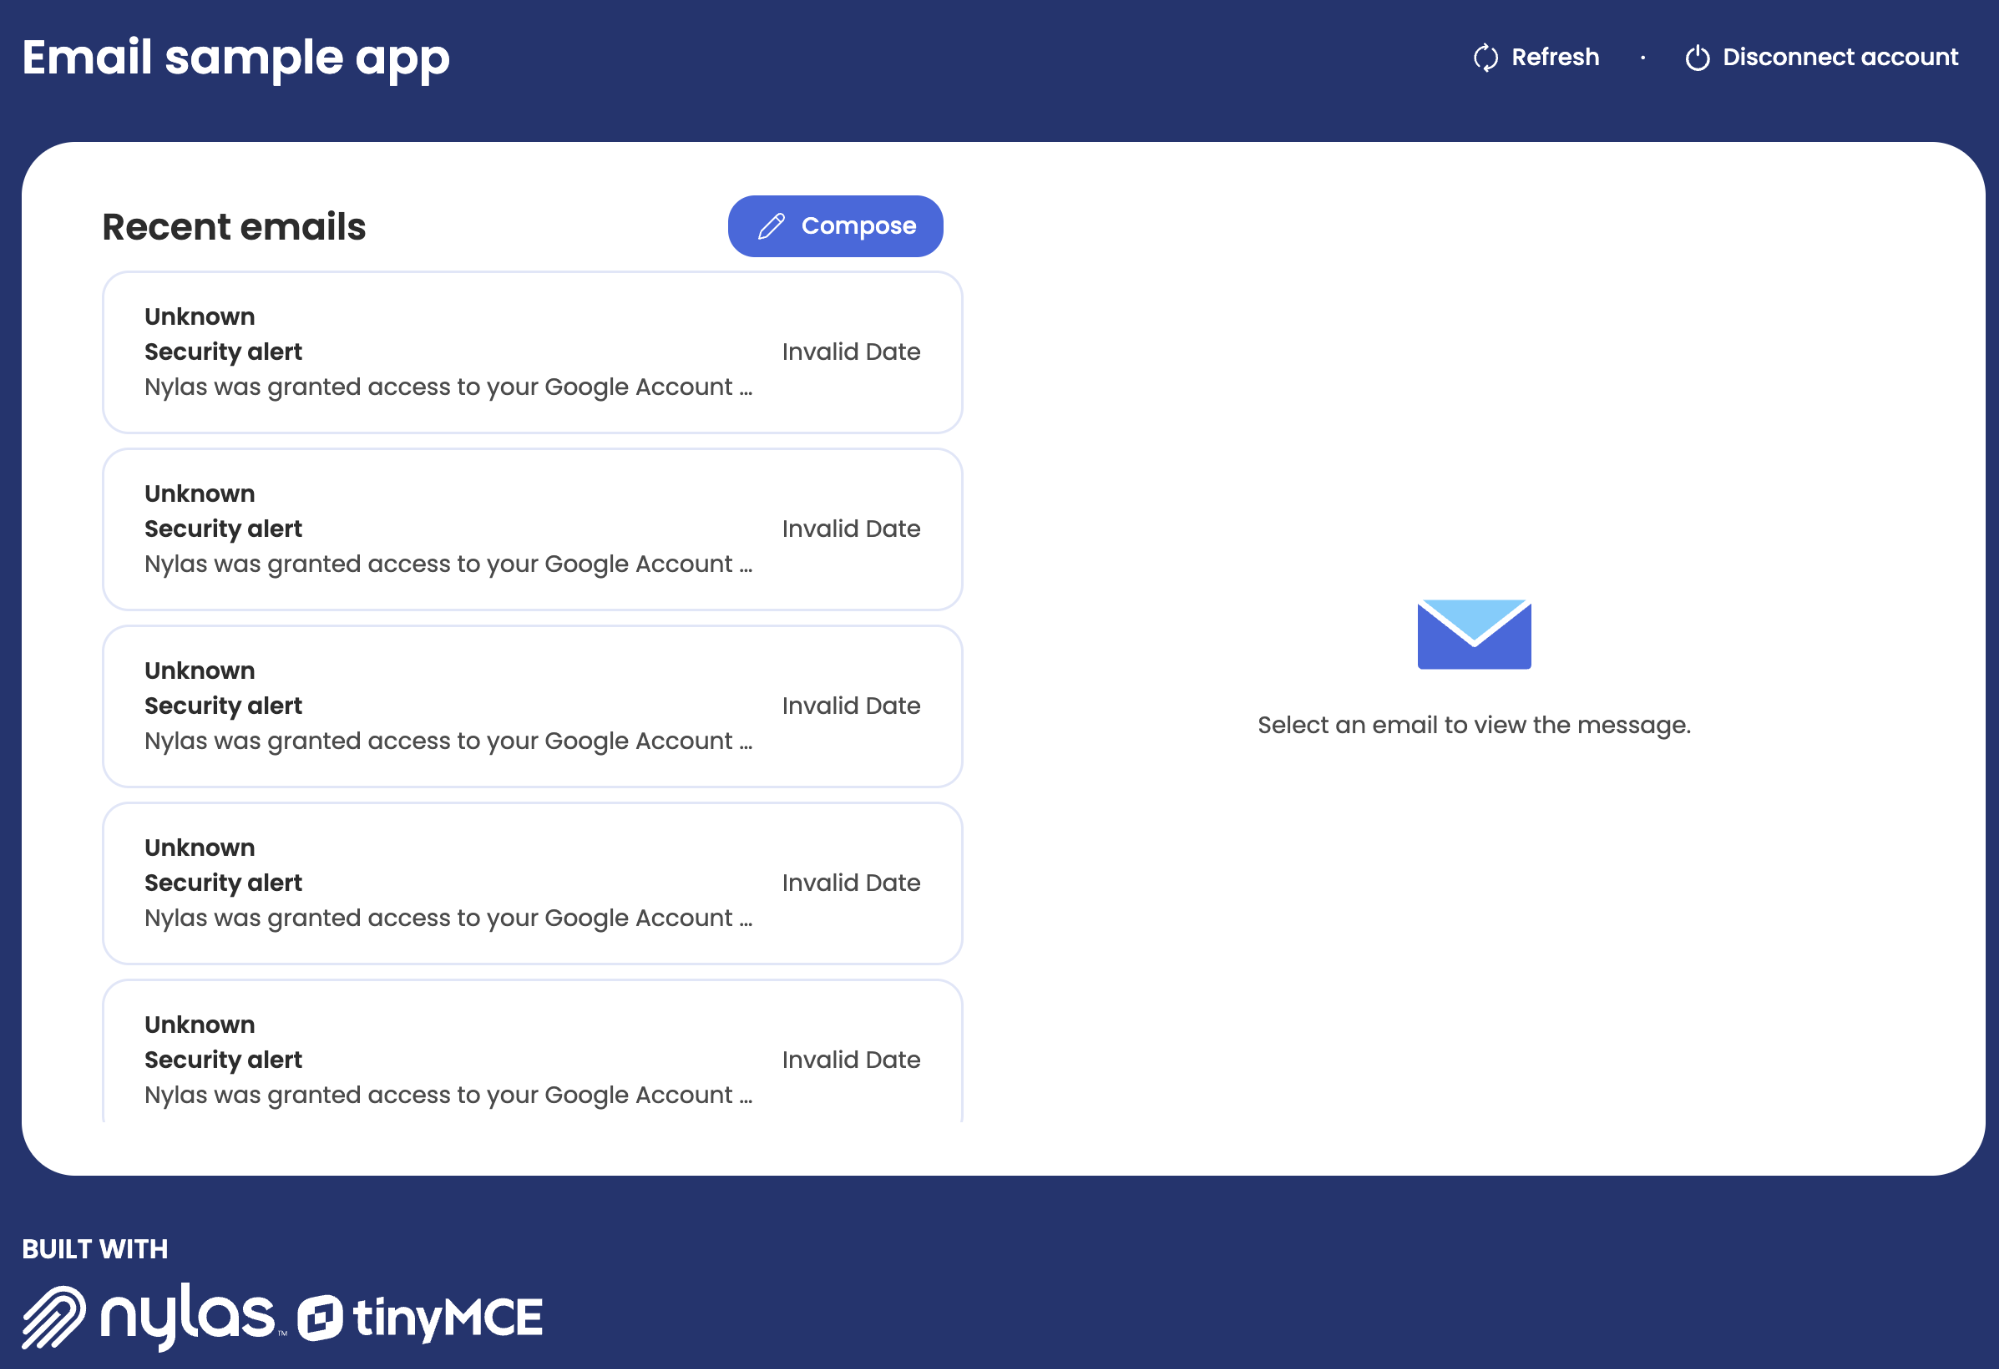
At that point, add a Gmail account email address in the Email Address field, click Connect email, and authenticate with Google by giving the proper permission to your application. You will see a list of the emails in your inbox.
Next steps
Now that you know how easy it is to use the Nylas API, feel free to continue to learn about the code from your email messaging application with TinyMCE and Nylas, or add extra features to it. If you haven't explored the first part of this series, read How to build an advanced email editor with React using TinyMCE and Nylas email API: Part 1. It's a great opportunity to modify the React email editor sample application and implement some advanced email editor features using TinyMCE.
Lastly, let me know (X or LinkedIn) how it goes, and what your favorite TinyMCE features are.


