


It’s always good to keep learning. Which is why, in a web developer’s skill set, it can be useful to have knowledge of several programming languages. Doing so teaches you different problem solving approaches.
One completely different approach to problem solving can be found in the Ruby programming language. It’s a less well known language compared to Python, JavaScript, and C++. However, a less walked path may have more perspectives to discover.
The Rails web application framework lets you create web applications, using the Ruby programming language. When you’re building a web application that integrates lots of small components from other sources, (rather than build everything from scratch) the Ruby on Rails approach to bundling sources into ‘gems’ offers a unique perspective and problem solving capacity.
With TinyMCE, the world’s most trusted rich text editor, you can integrate a powerful WYSIWYG into your app’s pages.
This article explores how to integrate TinyMCE into a Ruby on Rails project using the TinyMCE Ruby on Rails integration.
What is Ruby?
A general purpose programming language, Ruby is an object oriented language. Its main design feature is that Ruby is easy to read and understand, but despite only having been created in 1993, the language has aged. Despite that and some CPU processing questions, the language’s simplicity has helped to create lasting support for Ruby.
The Rails project is a web app development framework. It’s written in Ruby, and the design is set up to make programming web applications easier.
Action text vs TinyMCE Rails editor integration
Another option exists for adding a text editor component to your Ruby on Rails application. Action text has some comparable points to the TinyMCE ruby editor integration. They both provide:
- A component that you integrate and customize with Ruby
- Style for the editor
- Custom upload behavior
When using TinyMCE, the customization is easier – you can go directly to config/tinymce.yml file, and set up style and upload abilities. The action text solution requires changes to different files within the Rails app/ directory to configure different features. This means more maintenance when using action text.
Rails editor – TinyMCE integration
The integration is maintained by a third party on GitHub, and isn’t maintained directly by TinyMCE developers (ie. Tiny Technologies, Inc. is not responsible for this integration). Please also be aware that the integration is not covered by the Tiny Self-Hosted Software License Agreement. We suggest you contact the third-party project directly, if you run into any issues.
How to integrate TinyMCE into a Ruby on Rails app
The Rails framework makes assumptions about how web applications should be configured. You can find further information about the integration in the TinyMCE documentation.
Prerequisites:
- Ruby – make sure that you install ruby version 2.7 or higher to connect with the Rails framework. Use install ruby@2.7 on your development workstation.
- SQLite3
- A TinyMCE API key (Which you can get for free, and comes with 14 days free access to TinyMCE Premium plugins
Setting up the Ruby on Rails demo
-
On your development workstation, install rails by running the following command on the command line:
gem install railsNote: You may need to close the terminal and reopen it to make sure that the pathways to the newly installed Rails gem work.
-
Create a new project using the rails new command:
rails new blog-
Change into the new blog project directory, and run the Rails command to generate a new controller:
cd blog

rails generate controller Welcome indexYou should see the following output if it has worked:
      create  app/controllers/welcome_controller.rb
       route  get 'welcome/index'
      invoke  erb
      create    app/views/welcome
      create    app/views/welcome/index.html.erb
      invoke  test_unit
      create    test/controllers/welcome_controller_test.rb
      invoke  helper
      create    app/helpers/welcome_helper.rb
invoke test_unitIntegrating TinyMCE as a Ruby text editor
-
Open the config/routes.rb file in a text editor, and set up the Welcome controller, with index set as the project home page. Uncomment the root part, no '#', and set the root to 'welcome#index':
Rails.application.routes.draw do
  get 'welcome/index'
  # Define your application routes per the DSL in https://guides.rubyonrails.org/routing.html

  # Defines the root path route ("/")
  root "weclome#index"
end-
Open the project’s Gemfile in a text editor. You might see objects within the Gemfile that have Group and end syntax:
group :development, :test do
  # See https://guides.rubyonrails.org/debugging_rails_applications.html#debugging-with-the-debug-gem
  gem "debug", platforms: %i[ mri mingw x64_mingw ]
end

group :development do
  # Use console on exceptions pages [https://github.com/rails/web-console]
  gem "web-console"

  # Add speed badges [https://github.com/MiniProfiler/rack-mini-profiler]
  # gem "rack-mini-profiler"

  # Speed up commands on slow machines / big apps [https://github.com/rails/spring]
  # gem "spring"
endDon't place the Tinymce gem into these groups.
Here's an example of placing the gem:
# Build JSON APIs with ease [https://github.com/rails/jbuilder]
gem "jbuilder"

# Insert the TinyMCE WYSIWYG into the blog
gem 'tinymce-rails'

# Use Redis adapter to run Action Cable in production
# gem "redis", "~> 4.0"-
Create a file called tinymce.yml inside the config/ directory.
-
Configure TinyMCE within the file using the YAML format:
height: 500
menubar: false
toolbar:
  - undo redo | blocks | bold italic | alignleft aligncenter alignright | bullist numlist outdent indent | removeformat | help
plugins:
  - insertdatetime lists media table code help wordcount
   - undo redo | blocks | bold italic | alignleft aligncenter alignright | bullist numlist outdent indent | removeformat | help | code
plugins:
   - insertdatetime lists media table code help wordcount powerpaste media
powerpaste_allow_local_images: true
powerpaste_word_import: 'clean'
powerpaste_html_import: 'clean'
powerpaste_googledocs_import: 'prompt'This configuration incorporates the PowerPaste plugin, which is a Premium plugin, available with a TinyMCE paid plan.
When you sign up for a FREE API key, you receive 14 days free access to TinyMCE’s Premium plugins.
-
Open the app/views/layouts/application.html.erb file, and add TinyMCE configuration content to completed the integration:
-
Configure the TinyMCE reference content in the head section:
-
<head>
...
 <%= tinymce_assets %>
    <script type="text/javascript" src="/assets/tinymce.js"></script>
    <script src="https://cdn.tiny.cloud/1/no-api-key" referrerpolicy="origin"></script>

</head>-
Add the TinyMCE editor content to the body section:
<body>
    <%= yield %>
    <h1>TinyMCE rich text editor Ruby integration</h1>
    <%= text_area_tag :content, "TinyMCE rich text editor integrated with Ruby on Rails.", :class => "tinymce", :rows => 40, :cols => 120 %>
    <%= tinymce %>

    <h2>A second editor with Ruby integration</h2>
    <%= text_area_tag :content, "TinyMCE rich text editor integrated with Ruby on Rails, with a different ID", :class => "tinymce", :id => "tinymceCustom", :rows => 40, :cols => 120 %>
<%= tinymce %>-
Save the changes, and then run the bundle install command to make sure the TinyMCE integration is available:
bundle install
...
Using actionmailbox 7.0.3.1
Using web-console 4.2.0
Fetching tinymce-rails 6.1.2
Using stimulus-rails 1.1.0
Using turbo-rails 1.1.1
Using rails 7.0.3.1
Using importmap-rails 1.1.5
Installing tinymce-rails 6.1.2
Bundle complete! 16 Gemfile dependencies, 75 gems now installed.
Use `bundle info [gemname]` to see where a bundled gem is installed.-
Run the rails command to test run the Ruby editor on Rails integration:
rails server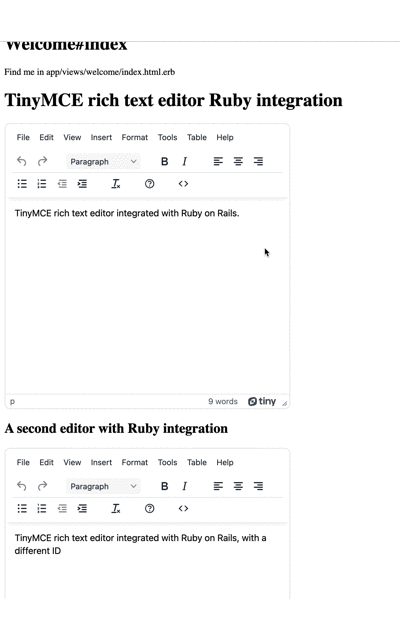
This is a test run to make sure the TinyMCE integration works. To create something in production you would need to set up some more components (route, a controller with an action, and a view).
Further steps for the Rails rich text editor integration
There is a lot more you can do now that the TinyMCE rich text editor integration is working. You can follow along the Rails Getting started guide and build out a content management system (CMS) using TinyMCE as the main component in this use-case. TinyMCE works well as a reliable CMS component, and you can find out more on the dedicated CMS solution page.
You can also experiment with some of the other options available for configuring TinyMCE with Ruby described in the integration docs like:
- Setting a default editor, and an alternative
- Configuring the alternative editor
- Manually adding TinyMCE to the app within the application.html.erb file
- Customizing TinyMCE as it loads
And remember, update the tinymce-rails gem to the latest version when new TinyMCE versions release!


