


Many apps that already haveTinyMCE embedded, use the self-hosted option. But what about when you want to try out our premium features? Unless you’re on a sales-managed plan, you’ll need to load TinyMCE premium features from the Cloud.
This is where the hybrid cloud and self-hosted setup comes in.
When you want to use Premium Plugins with your self-hosted instance of TinyMCE, a combination of Self-hosted and Cloud-based is the best way to go.
This guide explains how to set up the combined Self-host and Cloud-based TinyMCE. It covers the steps to Self-host TinyMCE, and how to extend the core features with Cloud-based premium features.
Looking for more TinyMCE information? |
|
What you need
Getting started shouldn’t be hard. That’s why getting started with TinyMCE self-hosted and our cloud-based premium plugins and features, only needs:
-
The TinyMCE package for Self-hosting – you can find this through the Get TinyMCE TinyMCE download page. Note: this may already be installed within your app if you’re using TinyMCE.
-
Your FREE TinyMCE API key – signing up for a free key gives you access to exclusive features and plugins
Step 1: Retrieve your API key and register your domain
-
Navigate to the TinyMCE login screen, and log in to your account. Note: if you don’t yet have a Tiny Cloud account, head on over to the pricing page to choose a plan with the premium features you want. Note: all plans come with a FREE 14-day trial!
-
Locate your API key, which will be available on your dashboard

-
Register your applications’ URL under the Approved Domains > Domain Name heading. Paste in your domain name into the text entry box under the Domain Name heading, and then click the Add button
If you have an app URL, and it’s unregistered, then you’ll receive warning messages concerning the domain registration when you start the app with TinyMCE configured:
This domain is not registered with Tiny Cloud. Please see the quick start guide or create an accountStep 2: Set up TinyMCE Self-host and hybrid configuration
-
If you don’t already have the latest version of TinyMCE installed, unzip your downloaded TinyMCE package into your project directory. Make sure you know the pathway through your app directory to reach it
-
In your TinyMCE account, scroll down to the TinyMCE Installation heading
-
Copy the HTML - this is some starter code, and you can edit the JavaScript as needed, but make sure you hold onto the selector option as this is important
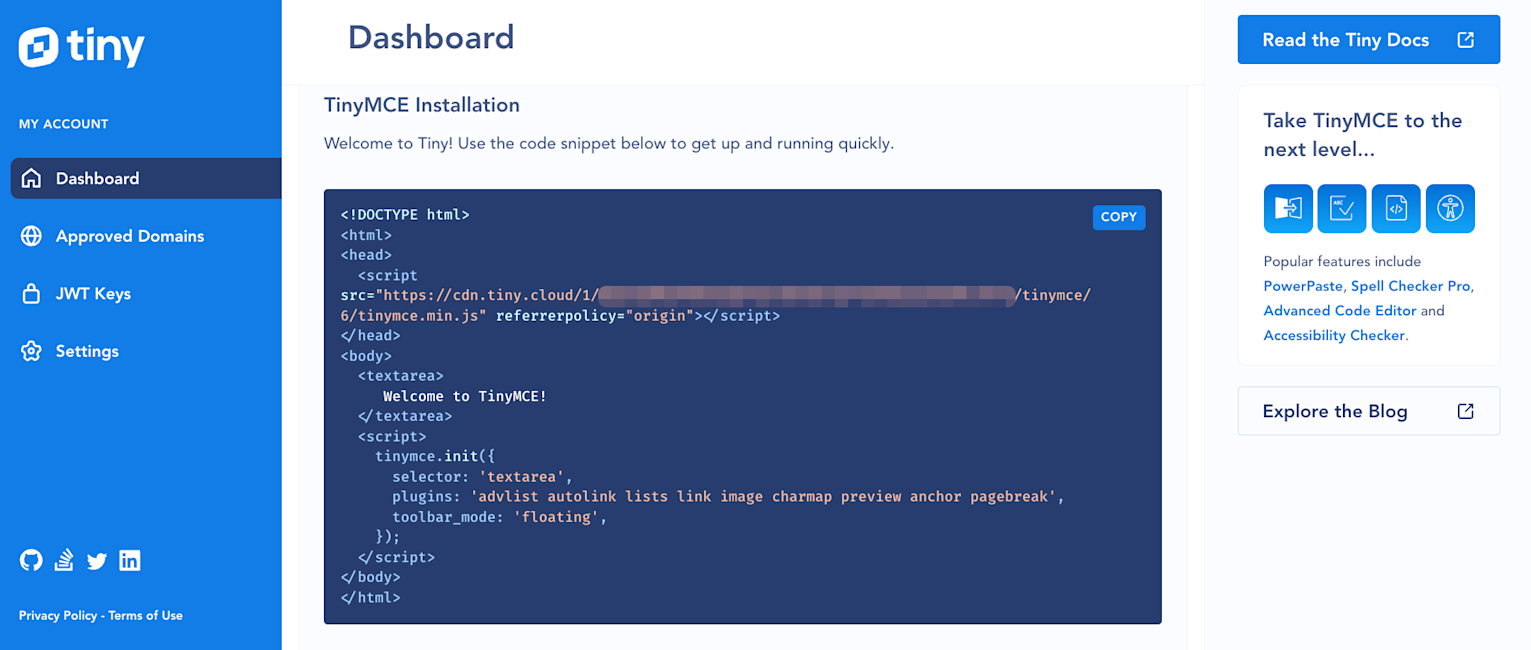
-
Paste this content into a new index.html file, or directly into your app HTML. You may need to remove the
<!DOCTYPE html>tags, or other markup, if you already have a project index.html file ready with boilerplate -
Adjust the selector value as needed – change it to any CSS selector that fits your app:
 <script>
    tinymce.init({
      selector: '#mytextarea', //Configured for an id, however, change it to <selector: 'textarea'> to target textarea tags
      plugins: 'advlist autolink lists link image charmap preview anchor pagebreak',
      toolbar_mode: 'floating',
    });
  </script>
<body>

  <textarea id=”mytextarea”>
    Welcome to TinyMCE!
  </textarea>

</body>-
Next to the default script tag add a second script tag. A Self-hosted configuration needs two scripts to connect with TinyMCE:
-
One script for a connection through the TinyMCE CDN to load Premium Plugins from the cloud
-
One script for loading the Self-hosted TinyMCE package
-
-
Adjust the default configuration of the second script tag to load TinyMCE not from the cloud CDN, but from your local TinyMCE package. This involves changing the script source and taking out the referrer policy:
<script src=" https://cdn.tiny.cloud/1/your-api-key/tinymce/6/tinymce.min.js " referrerpolicy="origin"></script>
Change the default script to the following:
<script src="yourapp/js/tinymce/tinymce.min.js"></script> Your new, Self-hosted hybrid configuration should look like this:
<script src="yourapp/js/tinymce/tinymce.min.js"></script>

<script src="https://cdn.tiny.cloud/1/your-api-key/tinymce/6/plugins.min.js" referrerpolicy="origin"></script>

 <script>

    tinymce.init({
      selector: '#mytextarea', //Configured for an id, however, change it to <selector: 'textarea'> to target textarea tags
      plugins: 'advlist autolink lists link image charmap preview anchor pagebreak',
      toolbar_mode: 'floating',
    });
  </script>

<body>

  <textarea id=”mytextarea”>
    Welcome to TinyMCE!
  </textarea>

</body>Step 3: Access premium plugins through the TinyMCE Cloud
Now that you have completed setting up TinyMCE, you can check on the plugins option in your tinymce.init script, and add any Premium Plugins that fit your needs.
-
As an example, the following is a complete list of Premium Plugins you can include it in your plugin list:
plugins: 'preview powerpaste casechange importcss searchreplace autolink autosave save directionality advcode visualblocks visualchars fullscreen image link media mediaembed template codesample table charmap pagebreak nonbreaking anchor tableofcontents insertdatetime advlist lists checklist wordcount tinymcespellchecker a11ychecker editimage help formatpainter permanentpen pageembed charmap tinycomments mentions quickbars linkchecker emoticons advtable export',Check on our Documentation to see a fully featured demo.
-
Save your changes
-
Load your project in a browser, and test out the premium plugin running from the Cloud as you self-host TinyMCE
What’s next?
With a Self-hosted hybrid configuration complete, the next steps involve reconfiguring or reviewing the plugins you have installed, and checking on the pricing plans available. Accessing premium features on an ongoing basis requires a subscription.
If you have any questions on our Premium Plugins, reach out to our support team. You can also post on Stack Overflow with the TinyMCE tag to answer a question from the TinyMCE community. Remember your FREE API key includes 14 days of free Premium Plugin capabilities, so you can test and try out different plugins, and decide what works best for your app.


