


Whether you’re building the next Gmail, cutting-edge email marketing software, or just want to program notifications into your Node.js app, it’s easy to send emails using readily-made tools and services.
Node.js is one of the most popular (if not the most popular) server-side runtime environment for web applications. It can handle data manipulation, authentication, database queries and more.
One of the main advantages of Node.js is the huge number of open-source packages available, which you can usually add to your project with a single command. These packages add pre-built functionality to your project, such as the ability to send emails or add rich text editing capabilities.
|
Building email into your app? Check out TinyMCE’s email editor starter config, with all the functionality you need to add WYSIWYG email editing capabilities. |
How to send email with JavaScript: two options
The two main ways to send email through your app are:
- Nodemailer + SMTP
- A third party email API service like SendGrid.
Here’s a high level comparison:
|
Nodemailer + SMTP |
Third-party email API service (SendGrid as an example) |
|
|
Node package available |
✅ nodemailer |
✅ @sendgrid/mail |
|
Email server required |
Yes |
No |
|
Cost |
Pay for server setup and maintenance/upgrades |
Monthly subscription based on number of sends. Free “starter” tiers available. |
|
Email expertise required |
High |
Low |
|
Effort to manage sender reputation |
High |
Low |
|
Scalability |
Can be challenging |
Easy |
|
Uptime |
Depends on your infrastructure/team |
~99.95% |
|
Built in analytics, unsubscribe, and more |
❌ |
✅ |
|
APIs to integrate with other parts of your app |
❌ |
✅ |
Sending Option 1: Nodemailer + SMTP
Before we get into the pros and cons of using Nodemailer and SMTP, it’s important to understand what SMTP is. SMTP, or Simple Mail Transfer Protocol, is the method by which emails are sent over the internet. It was established back in the 1980’s and is still in use today.
When you send an email, SMTP is used to relay the email to the recipient’s email server. Nodemailer creates an SMTP connection within your app, so the emails can be sent from your SMTP server.
Pros of sending through Nodemail + SMTP
There are two main cases when someone would use SMTP to send email from within their app.
- To leverage existing infrastructure
- If you already have your own SMTP server that’s fully operational, why reinvent the wheel by adding another third party vendor to the mix?
- You’re in an industry that’s heavily regulated (such as healthcare or government).
- SMTP offers more fine-tuning and control over every aspect of how your emails are sent, including how data is stored and transferred.
Cons of sending through Nodemail + SMTP
Using SMTP also comes with some drawbacks, like:
- Needing to maintain, upgrade and troubleshoot your own SMTP server
- Needing to constantly monitor your sender reputation
- The scalability challenges that come with managing your own servers.
Sending Option 2: Third party transactional email API service
With the explosion of SaaS platforms in the past decade, there was a need to “outsource” the transactional act of sending emails, in order to free up development resources for more high-value activities. This is when services like Amazon SES (Simple Email Service), SendGrid and others came onto the scene.
These services remove the need for inhouse expertise and time taken to set up and maintain an SMTP server. Instead, by using APIs, they take care of all the nitty gritty details so you don’t have to. And like any Cloud service, you pay based on usage, rather than fixed hardware costs.
Pros of sending through a transactional email API service
The main advantages of these services are:
- Cost savings
- The ability to scale as you grow without investing additional capital
- Don’t need an inhouse email expert – most backend developers can pick up the basics with little effort.
Lastly, these services have many value-add features that help you manage your sender score, troubleshoot issues, generate reports and manage subscriptions. They’re all things that you’d otherwise have to manage, if running your own SMTP server.
Cons of sending through a transactional email API service
The main drawback to this approach is:
- You’re tied to another third party
- Switching can be a pain if you’ve already built API calls for one service into your app and you need to switch to another provider.
And if you work in a highly sensitive area (e.g. the secret service), a transactional email service may not be for you. Instead, you’ll likely want full control of your data and not have it pass it through third parties.
Lastly, if you’re already running your own SMTP server and have the team to support it, why incur another cost and set up yet another dependency?
Now, on to the tutorials. Both tutorials assume you’re using Node.js and have some JavaScript experience.
Option 1 Tutorial: How to send email using Node.js, Nodemailer and SMTP
Nodemailer is an open source NPM package that helps simplify sending email via SMTP in your Node.js application.
If you’re using this option, chances are you already have your own SMTP server, but for the sake of this tutorial we’ll use a service called Ethereal Email, which acts as a dummy SMTP server and lets you send test emails. We’ll start this app from scratch, but you can adapt these instructions to your existing app.
-
Start off by making an account with Ethereal Email. Follow this link to create an account, download the CSV file for reference.
-
Leave the Account created page open in a tab. It should look something like this:
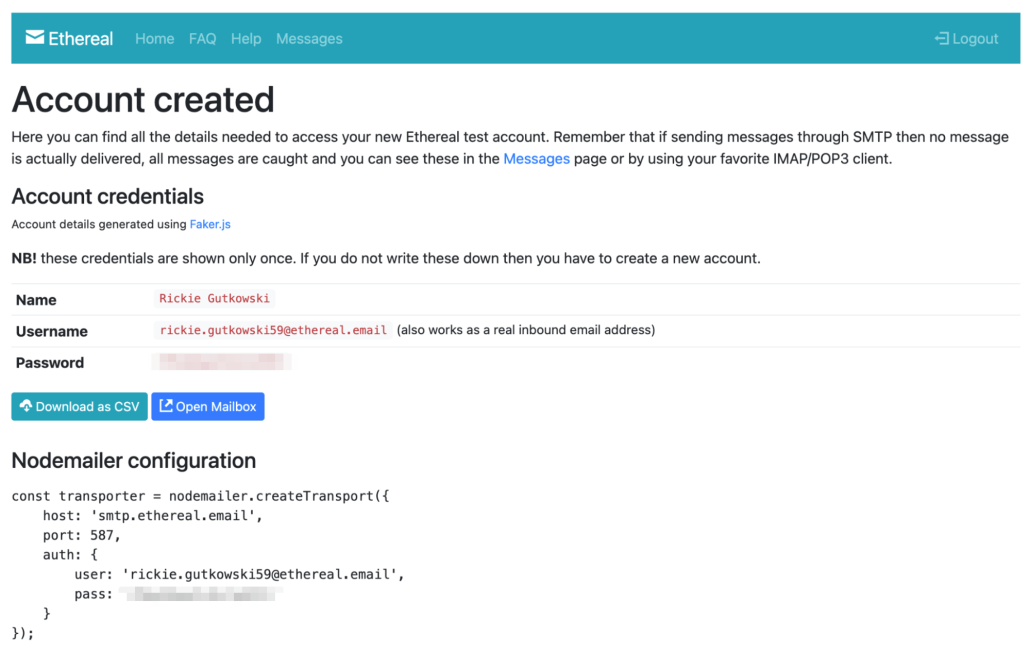
-
Create your Node.js app in the terminal. If you already have an app, skip this step.
mkdir nodemail-smtp
cd nodemail-smtp
npm init -y-
Install Nodemailer using NPM, the package manager for Node.js. The following command downloads the latest stable version of Nodemailer and installs it to your project:
npm install nodemailerYou should see something like this to confirm the package was installed:
added 1 package, and audited 2 packages in 2s

found 0 vulnerabilitiesGreat. Now it’s time to start coding the app.
-
Create a file called nodemailer-smtp.js and add the following code:
const nodemailer = require("nodemailer"); // Require the Nodemailer package
async function main() {
  // Send the email
  let info = await transporter.sendMail({
    from: '"James Swanson" <foo@example.com>',
    to: "", // Test email address
    subject: "I love SMTP!",
    text: "Here's a text version of the email.",
    html: "Here's an <b>HTML version</b> of the email.",
  });
  console.log("Message sent: %s", info.messageId); // Output message ID
  console.log("View email: %s", nodemailer.getTestMessageUrl(info)); // URL to preview email
}
// Catch any errors and output them to the console
main().catch(console.error);
Before being able to send the email, you’ll need to copy your Ethereal Email test account credentials into your app. In a real-life scenario, this is where you’d input the SMTP connection details – the server address, port, and credentials for your own SMTP server.
-
Switch back to the Ethereal Email tab, and copy the code under “Nodemailer configuration” heading.
-
Paste it into your app, inside the async function main() {} object
-
Add the Ethereal Email address into the “to” value field in the config. It should look something like this:
const nodemailer = require("nodemailer"); // Require the Nodemailer package
async function main() {
  // SMTP config
  const transporter = nodemailer.createTransport({
    host: "smtp.ethereal.email", //
    port: 587,
    auth: {
      user: "rickie.gutkowski59@ethereal.email", // Your Ethereal Email address
      pass: "YOUR_PASS", // Your Ethereal Email password
    },
  }); // Send the email
  let info = await transporter.sendMail({
    from: '"James Swanson" <foo@example.com>',
    to: "rickie.gutkowski59@ethereal.email", // Test email address
    subject: "I love SMTP!",
    text: "Here's a text version of the email.",
    html: "Here's an <strong>HTML version</strong> of the email.",
  });
  console.log("Message sent: %s", info.messageId); // Output message ID
  console.log("View email: %s", nodemailer.getTestMessageUrl(info)); // URL to preview email
}
// Catch any errors and output them to the console
main().catch(console.error);
-
Go back into the terminal and run the app:
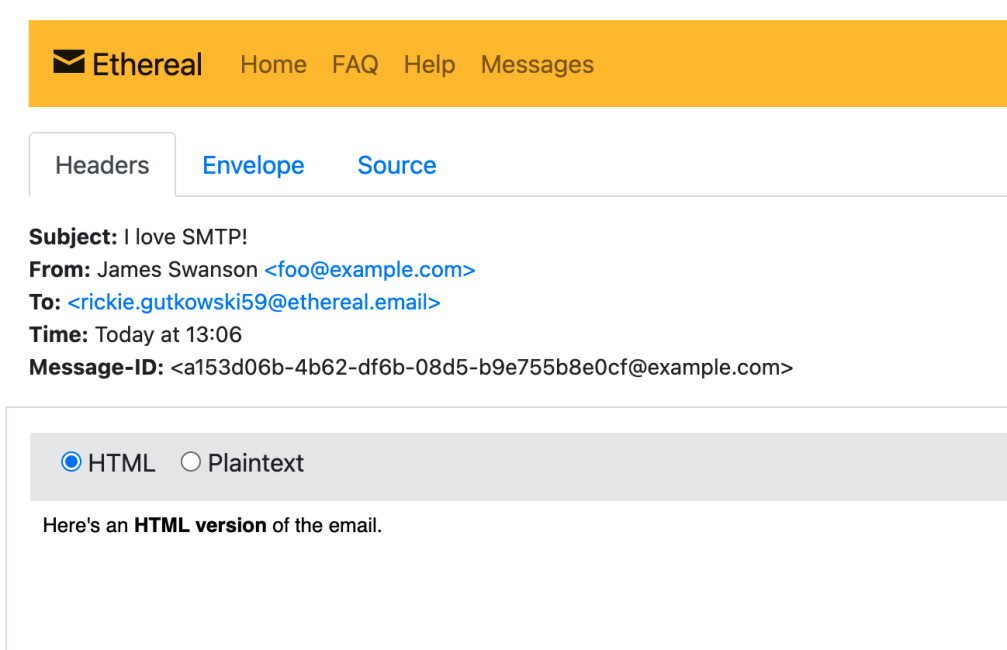
node nodemailer-smtp.jsIf all goes well, you should see something like this:
Message sent: <a153d06b-4b62-df6b-08d5-b9e755b8e0cf@example.com>
View email: https://ethereal.email/message/Yn08JBjWtKQFtVIQYn0-fjRYXoiZYQBGAAAAA.ty0T2jOGponZjUaXLFoWUThe first line is confirmation the message was sent, along with the message ID from Ethereal Email. The second line contains a link to view your message. If you click on the link, you’ll see a preview of your email:
You’re all set with Nodemailer and SMTP – Once you're comfortable with the test, link up Nodemailer to your own SMTP server to send real emails!
Option 2 Tutorial: How to send email without a server using Node.js and a transactional email API service
With this second option, you don’t need an SMTP server to get started, so naturally it’s easier to set up. For this example, we’ll use SendGrid as our email service, but there are lots of other great options available.
-
Start off by setting up your Node.js app. If you already have an app, skip this step.
mkdir sendgrid-api
cd sendgrid-api
npm init -y-
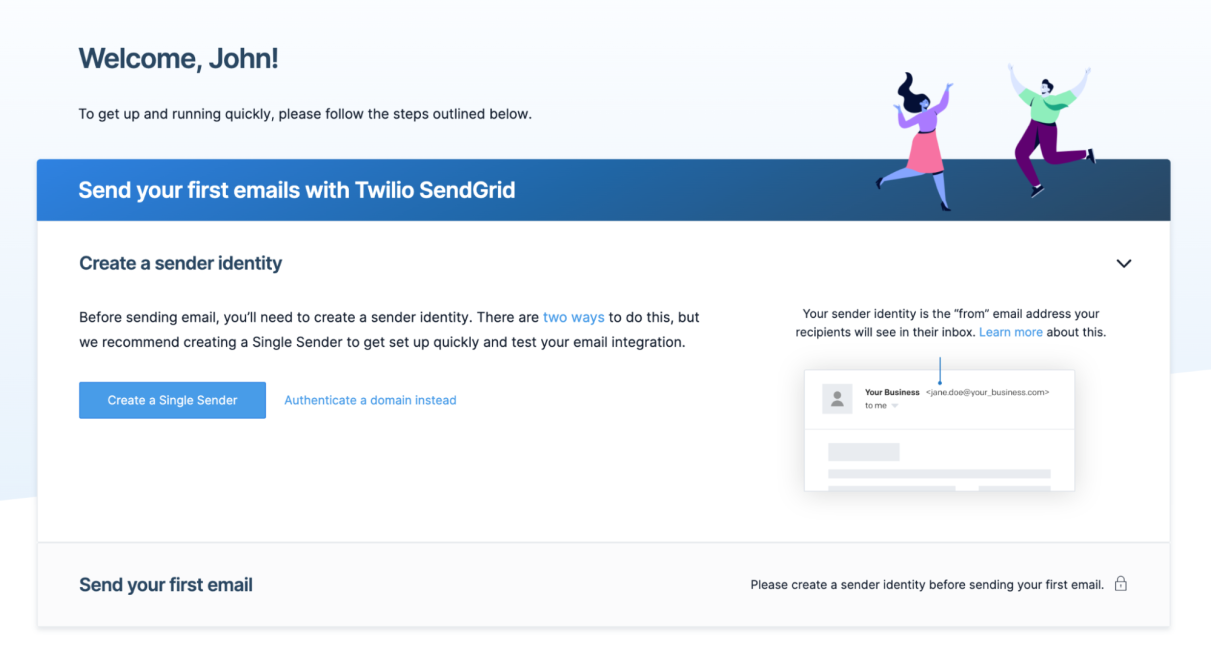
Next, sign up for a free SendGrid account. Their free plan lets you send up to 100 emails per day, which is perfect for testing. You’ll be asked to provide some contact information, then eventually be presented with this screen. Click Create a single sender to set up an email address to send emails from
-
Enter your contact information, hit save and then check your email for the verification link.
-
Go back to your SendGrid account, and click Email API Integration Guide in the left sidebar
-
Select Web API, and then Node.js
-
Type in an API key name, and click Create key
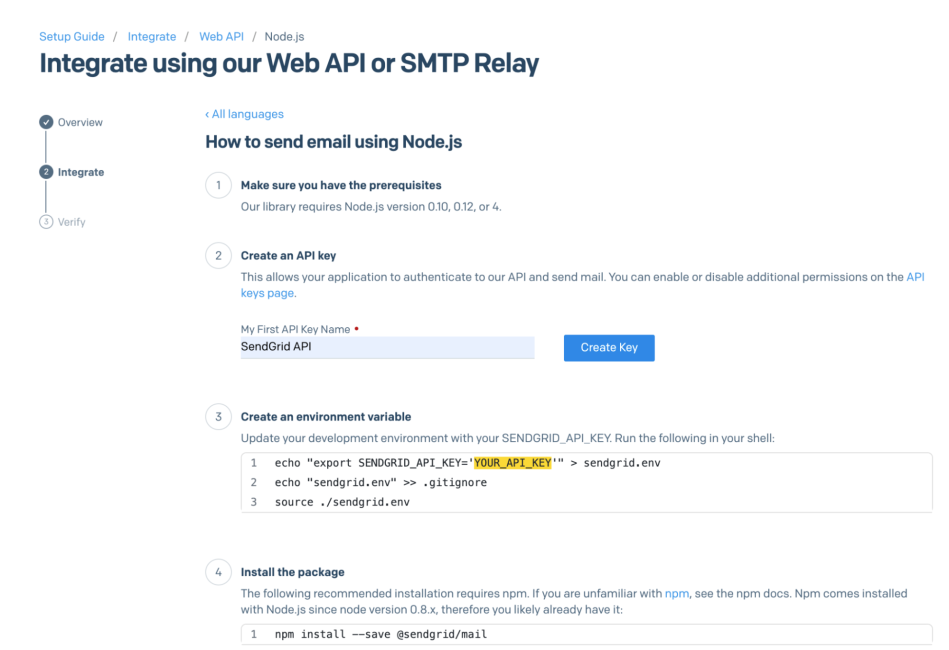
-
Copy the code under Create an environment variable,paste it into your terminal, and press the enter key to run it. This adds your SendGrid API key to your environment so that it can be retrieved by your app at runtime.
echo "export SENDGRID_API_KEY='YOUR-SENDGRID-API-KEY'" > sendgrid.env
echo "sendgrid.env" >> .gitignore
source ./sendgrid.env-
Install the SendGrid mail NPM package:
npm install --save @sendgrid/mailYou should see something like this to confirm the package was installed:
added 6 packages, and audited 7 packages in 2s
found 0 vulnerabilities-
Create a file called sendgrid-api.js and copy the code from the SendGrid integration page found under the send your first email heading. Paste this code from the SendGrid integration page into the sendgrid-api.js file. Update the ‘to’ setting to the email address you want to receive the test email (for example, your email address), and the ‘from’ setting to the email address you just set and verified as the sender.
const sgMail = require('@sendgrid/mail')
sgMail.setApiKey(process.env.SENDGRID_API_KEY)
const msg = {
  to: 'your@email.com', // Change to your recipient
  from: 'your.verified@sender.com', // Change to your verified sender
  subject: 'Look! I’m sending from SendGrid',
  text: 'Here’s the text version',
  html: 'And here’s the <strong>HTML</strong> version',
sgMail
  .send(msg)
  .then(() => {
    console.log('Email sent')
  })
  .catch((error) => {
    console.error(error)
})-
Check the "I've integrated the code above" checkbox, and click Next: Verify Integration.
-
In terminal, run your app.
node sendgrid-api.jsIf all goes well, the following message will appear:
Email sentGo back to SendGrid and click Verify Integration.
Once you’ve verified, you’re ready to start sending emails through SendGrid.

Something to note: With both sending options, you may need to take additional steps to ensure your emails get past spam filters, such as giving your email service explicit permission to send from your domain. This is out of the scope of this article, but there’s lots of information available on this topic on Google.
Bonus: Add rich text editing to your email project
Now that you’re ready to start sending emails, have you considered how you can help your users to create those emails?
TinyMCE lets users create clean and compliant emails, in an easy-to-use WYSIWYG editor.
Best of all, it integrates seamlessly with 12+ frameworks, including Node.js + Express, React, Angular and Vue.
Check out our email editor starter config and demo or sign up for your FREE 14-day trial to test out TinyMCE’s premium features.


