


In an era where there's more and more content created each day, any tool or method that gives content creators an advantage, when presenting information, is a big selling point. Why? Because the more advantages you can build into your content creation experience, the more satisfied your customers. And the more satisfied your customers, the more growth your business experiences.
For instance, an older but useful way to show data is the table. HTML tables are still useful, and still helpful to show data clearly.
There are many different kinds of tables you can use to show data clearly. Static tables are entry level; dynamic tables are far more useful. The ability to create dynamic tables, specifically sortable HTML tables, is a major selling point. And thanks to using the right text editor component, configuring sortable HTML tables doesn’t need to become difficult or consume your sprint.
When you include the TinyMCE rich text editor into your content creation app, you open the door for a range of useful plugins and features to give your customers numerous advantages (and opportunities) in content creation.
For example, the Advanced Tables (Premium) plugin extends the functions provided in the Tables plugin, taking it from a static HTML table, to a dynamic and sortable HTML table. This article gives you a guide on everything you need to know to get the Advanced Tables (Premium) plugin working.
What is table sorting?
Table sorting is the functionality where table columns can automatically sort numerical data, in either ascending or descending order, and can sort alphanumeric data in alphabetical order. In other words, the reader can reorder rows based on the column contents.
Creating sortable HTML tables with JavaScript requires a function and switch statements at least. The TinyMCE Advanced Tables (Premium) plugin handles this functionality for you when configured.
How to configure sortable HTML tables with TinyMCE
The Advanced Tables (Premium) plugin’s feature range includes:
- A sort function
- The ability to add row numbering.
This enables ascending to descending sorting on a specific column. Sorting also works on a specific, highlighted selection of the table. And with a button press from either the TinyMCE toolbar or the menu, you can add a column that labels each row with a number starting from 1 – or even with the letters of the alphabet, starting from A.
The following steps explain how to configure the TinyMCE Advanced Tables (Premium) plugin to enable it for your customers.
Step 1 – Getting the Advanced Table (Premium) plugin
-
Create a demo index.html file in your development environment, and paste the following HTML into it, which contains a demo, sortable html table:
<textarea name="content">
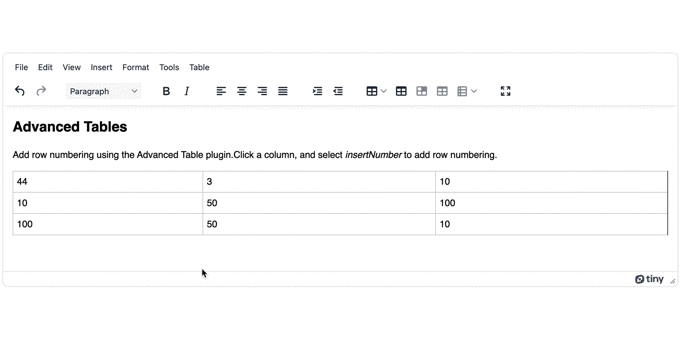
<h2>Advanced Tables</h2>
<p>Add row numbering using the Advanced Table plugin.Click a column, and select
<i>insertNumber</i>
to add row numbering.</p>
<table style="border-collapse: collapse; width: 100%;" border="1">
<tbody>
<tr>
<td style="width: 32.3504%;">44</td>
<td style="width: 32.3504%;">3</td>
<td style="width: 32.3525%;">10</td>
</tr>
<tr>
<td style="width: 32.3504%;">10</td>
<td style="width: 32.3504%;">50</td>
<td style="width: 32.3525%;">100</td>
</tr>
<tr>
<td style="width: 32.3504%;">100</td>
<td style="width: 32.3504%;">50</td>
<td style="width: 32.3525%;">10</td>
</tr>
</tbody>
</table>
</textarea>-
Set up a pair of script tags in an index.html file inside the tags.
<script src="https://cdn.tiny.cloud/1/no-api-key/tinymce/6-dev/tinymce.min.js" referrerpolicy="origin"></script>
NOTE: The Advanced Tables plugin is a Premium plugin. You can sign up for a free API key and unlock the ability to create sortable html tables as part of the 14-day free trial, which includes all our Premium plugins. Replace "no-api-key" with your TinyMCE API key to start your free trial.
-
Set up another pair of script tags, and place the tinymce.init script inside it.
 <script>
     tinymce.init({
       selector: "textarea",
       plugins: "table code advtable lists fullscreen",
       toolbar: "undo redo | blocks | bold italic | " +
                "alignleft aligncenter alignright alignjustify | indent outdent | " +
                "table tableinsertdialog tablecellprops tableprops advtablerownumbering | fullscreen",
       content_style: 'body { font-family:Helvetica,Arial,sans-serif; font-size:16px }'
     });
</script>-
Save the changes
Step 2 – Configuring options for the sortable HTML tables and testing
-
Include the insertNumber and insertAlpha toolbar options into the toolbar. These options will be important later on:
       toolbar: "undo redo | blocks | bold italic | " +
                "alignleft aligncenter alignright alignjustify | indent outdent | " +
"table tableinsertdialog tablecellprops tableprops advtablerownumbering insertNumber insertAlpha | fullscreen",-
Save the change
-
Open the HTML file in a browser (or check the TinyMCE fiddle), or use a local host command to test out the demo (the Python command and PHP command are both useful options).
Step 3 – Adding row numbering
You can configure row numbering by using the TinyMCE setup option, and including Advanced Table (Premium) Plugin options:
-
Add the setup option to your TinyMCE init call back:
setup: function (editor) {
}-
Include two buttons with the text option ‘Row Lettering’ and ‘Row Numbering’ respectively:
setup: function (editor) {
		editor.ui.registry.addButton('insertAlpha', {
		  text: 'Row Lettering',
		  }
		});
		editor.ui.registry.addButton('insertNumber', {
		  text: 'Row Numbering',
		  }
		});
	}
});-
Add an onAction function, and include the mceTableToggleSeries command. Ensure the Row Lettering button name is set to alpha, and the Row Numbering button name is set to numeric:
setup: function (editor) {
		editor.ui.registry.addButton('insertAlpha', {
		  text: 'Row Lettering',
		  onAction: function (_) {
			editor.execCommand('mceTableToggleSeries', false, { name: 'alpha' });
		  }
		});
		editor.ui.registry.addButton('insertNumber', {
		  text: 'Row Numbering',
		  onAction: function (_) {
			editor.execCommand('mceTableToggleSeries', false, { name: 'numeric' });
		  }
		});
}-
Save and reload the TinyMCE project. You should now be able to add row lettering and numbering by clicking the new buttons.
Testing the sortable HTML table
With a table configured, you can now add some data, and try out the sort capability.
-
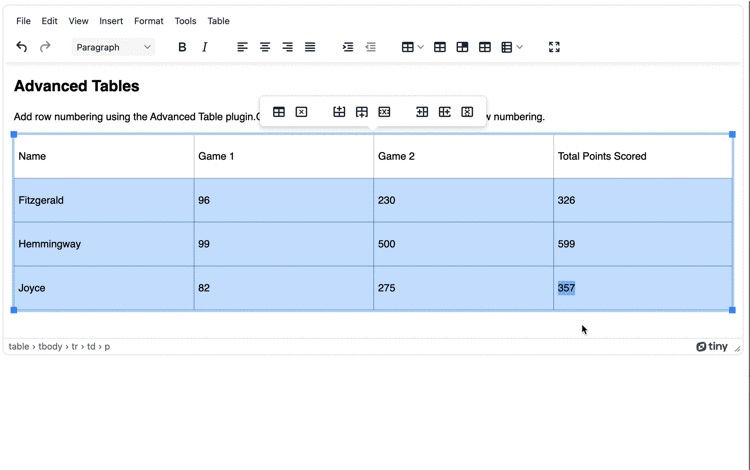
Copy and paste the following numbered information into a new table (4 rows, 4 columns) using your TinyMCE project, or with the fiddle:
|
Name |
Game 1 |
Game 2 |
Total Points Scored |
|
Fitzgerald |
96 |
230 |
326 |
|
Hemmingway |
99 |
500 |
599 |
|
Joyce |
82 |
275 |
357 |
NOTE: The table has a row of headings. The HTML sort capability for the TinyMCE Advanced Table (Premium) plugin works best when the heading information is placed in a column, and not as a heading row. It’s recommended that you highlight the selection you want to sort first, and then sort by selection in the Advanced Sort options (see below).
-
Place your cursor inside the second row, first column, and highlight all the cells underneath the header row.
-
Right click, and select the Sort > Advanced Sort.
-
In the Advanced Sort window, set the Sort by to Column, and the Column selection to Column D (the Total Points Scored column).
-
Set the Sort option to Selection, and set the Order to Descending, and click Confirm.
What’s next for generating HTML tables?
There are several other commands and options documented that you can try out, to customize your app's sortable HTML table feature:
-
Running different commands to change the table behavior dynamically
Contact us if you have questions on how the Advanced Tables (Premium) plugin, or other TinyMCE plugins, can better improve your app.


