


For all the PHP lovers out there who need to add a rich text editor (RTE) features into their Laravel application, I have one word for you: TinyMCE. No matter the type of application you are building, it’s easy to add this RTE into your project with a couple of lines of code, leaving you time and brain power to focus on the development of your main business logic.
This tutorial will guide you through the steps required to create a Laravel demo application, integrate the TinyMCE editor, and bring it to the next level with some customization. By the end of this article, you will have a functional WYSIWYG (What You See Is What You Get) editor that took you minutes to implement.
Step one: Create the Laravel project
Before we get started, be sure you have PHP and Composer installed on your computer. You will also need a free TinyMCE API key.
To create a basic Laravel application, run the following command in your terminal of choice:
composer create-project laravel/laravel tinymce-laravel-demo
cd tinymce-laravel-demoIf you want to see the fruits of your hard labor, use the Artisan CLI provided with the Laravel framework:
php artisan serveYou can now see the Laravel welcome page in your browser by opening http://127.0.0.1:8000/. Nothing fancy so far, but this command creates a demo application by following best practices and ensuring all dependencies are properly installed.
Step two: Add TinyMCE to your Laravel application
For the next steps, you will create two reusable components using Blade, the templating engine that is included with Laravel.
Create the Configurations file
The first file to create is the one storing the TinyMCE configurations:
php artisan make:component Head/tinymceConfigThis command will create two files, but we will only need to update tinymce-config.blade.php in resources/views/components/head. Open it in your editor, and replace the div inside with the following code:
@php
    $apiKey = env('VITE_TINYMCE_API_KEY');
@endphp
<script src="https://cdn.tiny.cloud/1/{{ $apiKey }}/tinymce/8/tinymce.min.js" referrerpolicy="origin" crossorigin="anonymous"></script>
<script>
  tinymce.init({
    selector: 'textarea#myeditorinstance',
    plugins: 'code table lists',
    toolbar: 'undo redo | blocks | bold italic | alignleft aligncenter alignright | indent outdent | bullist numlist | code | table'
  });
</script>The JavaScript code we just added defines a default TinyMCE instance with some useful toolbar items and some free plugins like code, table, and lists. There is also a bit of PHP retrieving the API key. To be sure it works, we need to add a variable with your TinyMCE API key inside the .env file at the root of your project:
...
VITE_TINYMCE_API_KEY=your-tinymce-api-keyCreate the editor file
At this point, we are still missing the component TinyMCE will use to render itself. We will create a second PHP file that will contain a textarea:
php artisan make:component Forms/tinymceEditorOnce again, two files were created, but we will only edit the tinymce-editor.blade.php file in the resources/views/components/forms/ folder within your project. Replace the code with the following form:
<form method="post">
  <textarea id="myeditorinstance">Hello, World!</textarea>
</form>;
Load TinyMCE into your Laravel application
We now have TinyMCE in our PHP application. The only thing left is to load the editor somewhere. As much as I love the welcome page from the demo Laravel application, we will replace its content to load our newly added WYSIWYG editor. Go to resources/views/ and replace the code in welcome.blade.php with the following:
<!DOCTYPE html>
<html lang="{{ str_replace('_', '-', app()->getLocale()) }}">
  <head>
    <meta charset="UTF-8">
    <meta name="viewport" content="width=device-width, initial-scale=1">
    <title>TinyMCE in Laravel</title>
    <x-head.tinymce-config/>
  </head>
  <body>
    <h1>TinyMCE in Laravel</h1>
    <x-forms.tinymce-editor/>
  </body>
</html>Two things you want to understand here.
- The
<x-head.tinymce-config/>line will use the content of tinymce-config.blade.php where it loads the TinyMCE JavaScript file from the CDN and controls the editor instance. - As for the
<x-forms.tinymce-editor/>one, it is the editor itself being added to the page from the code we replaced in the tinymce-editor.blade.php.
We could have added everything directly in this file, but we are making our example production-ready by using reusable components. Doing so will give you the opportunity to avoid code duplication if you need to load TinyMCE with the same configurations more than once within your application. For example, in a support ticket system that has a textarea for the ticket description and one for comments.
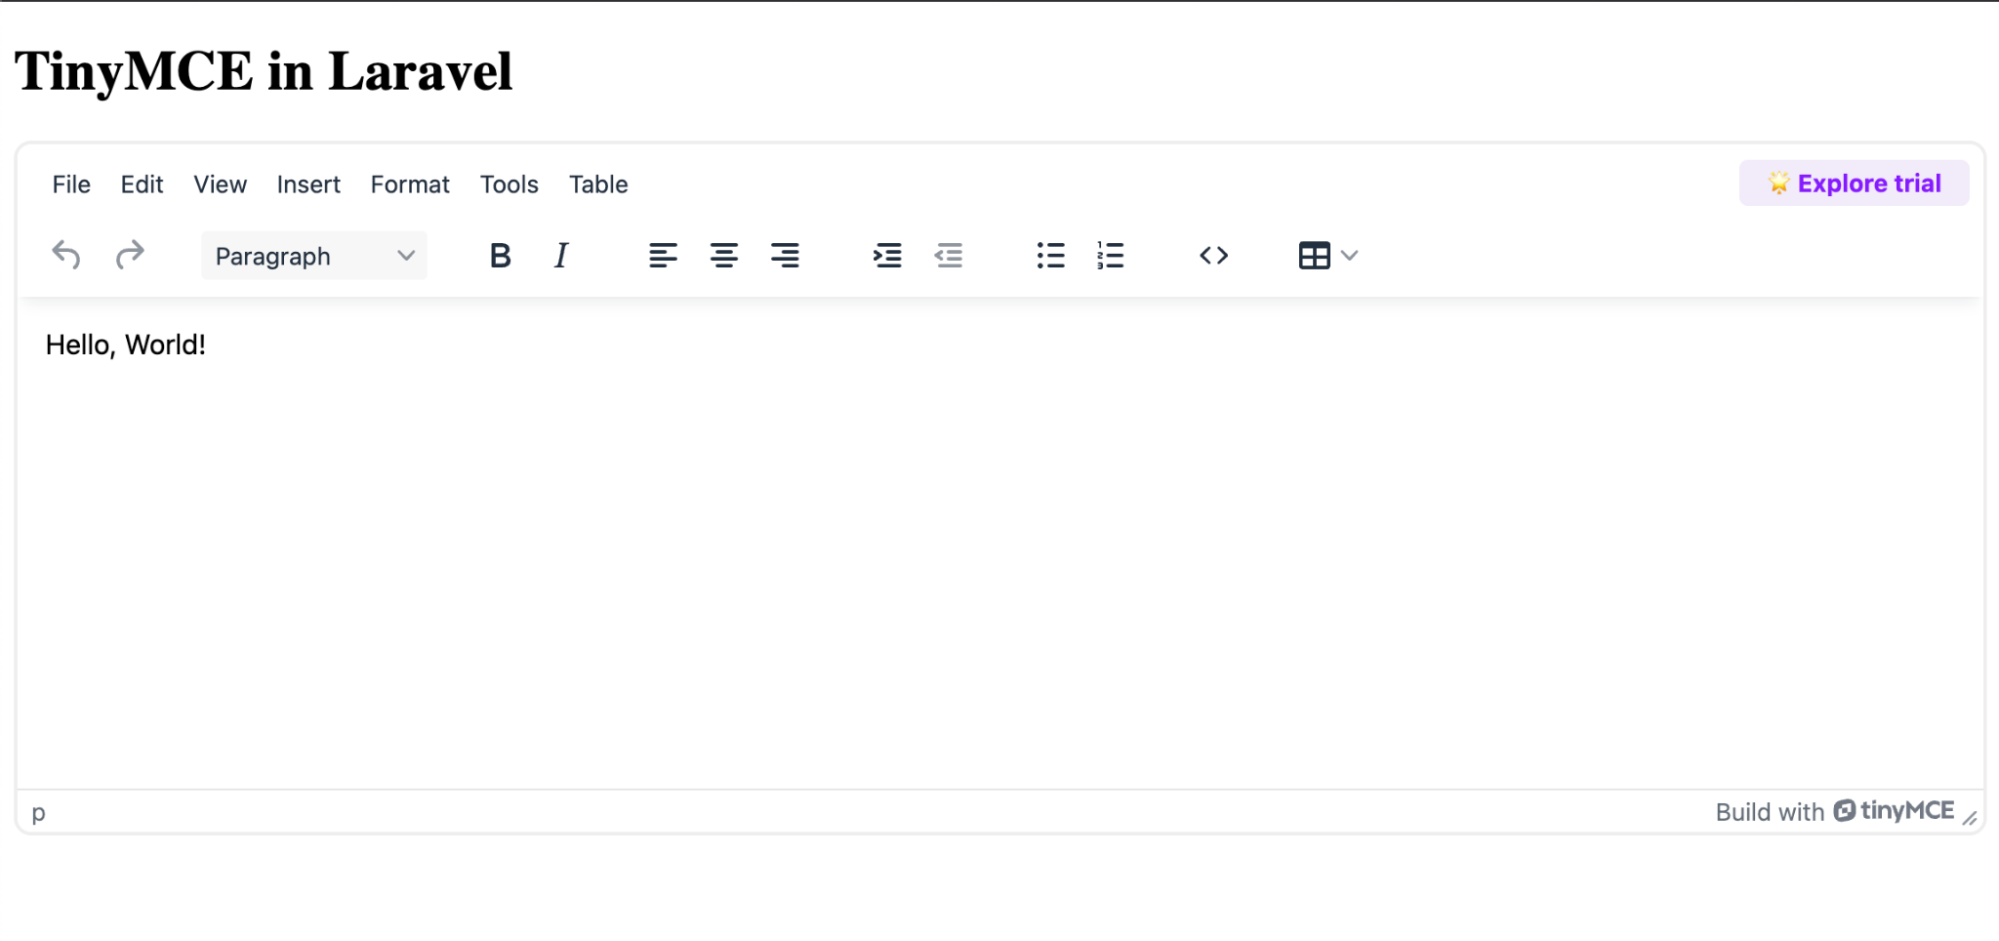
If your local development server is still running, just refresh the browser and you’ll see TinyMCE in all its glory. If not, run the following command again:
php artisan serveCongratulations! With only four commands and three file updates, you now have a fully functional rich text editor in your Laravel application 🎉
(Optional) Step two alternative: Self-hosting TinyMCE
If you are building in a high-security environment, develop for air-gapped systems, or simply prefer to self-host TinyMCE, there are some minimal changes to the previous step.
To be able to use TinyMCE without any cloud dependencies, you will need to use a license key instead of an API key. To keep this tutorial accessible for everyone, you will use the GPL for open-source projects.
Note that if your project isn’t under GPLv2+, you will need a commercial license. You will also need to have the licensekeymanager plugin added, which is available using another installation process. If it’s your case, contact your Customer Success Manager (CSM) to get a license key.
Add TinyMCE dependencies to your project
Since you won’t load TinyMCE from the cloud, you will add it to your project using NPM:
composer require tinymce/tinymceThis will add TinyMCE assets in the vendor/tinymce/tinymce/ folder. Since Laravel doesn’t expose the vendor to the web by default, you need to have it in the public folder.
You could simply copy the content manually, but a more bulletproof approach is to use Vite, the default frontend build tool for Laravel. It automates the build process and simplifies build pipeline integration and deployment.
You will use the vite plugin static copy plugin to ensure your files are copied properly. To install it, run:
npm install vite-plugin-static-copy --save-devNext step is to edit vite.config.js at the root of the project, and add instructions to copy the whole vendor/tinymce/tinymce/ content. You will add a new import statement at the top, and your plugin configuration as follows:
import { defineConfig } from "vite";
import laravel from "laravel-vite-plugin";
import tailwindcss from "@tailwindcss/vite";
import { viteStaticCopy } from "vite-plugin-static-copy";

export default defineConfig({
  plugins: [
    laravel({
      input: ["resources/css/app.css", "resources/js/app.js"],
      refresh: true,
    }),
    tailwindcss(),
    viteStaticCopy({
      targets: [
        {
          src: "vendor/tinymce/tinymce/*",
          dest: "tinymce",
        },
      ],
    }),
  ],
  server: {
    watch: {
      ignored: ["**/storage/framework/views/**"],
    },
  },
});
Now everything is in place to use Vite to copy TinyMCE files in the public/build folder by running:
npm run buildThe files are now in the public/build folder. Next, you need to update the code to use TinyMCE locally instead of using the CDN.
Update how you load TinyMCE
In resources/views/components/head/tinymce-config.blade.php replace the script tag src with {{ asset('build/tinymce/tinymce.min.js') }}. Your PHP file content should now look like this:
@php
    $apiKey = env('VITE_TINYMCE_API_KEY');
@endphp
<script src="{{ asset('build/tinymce/tinymce.min.js') }}" referrerpolicy="origin" crossorigin="anonymous"></script>
<script>
  tinymce.init({
    selector: 'textarea#myeditorinstance', // Replace this CSS selector to match the placeholder element for TinyMCE
    plugins: 'code table lists',
    toolbar: 'undo redo | blocks | bold italic | alignleft aligncenter alignright | indent outdent | bullist numlist | code | table'
  });
</script>Refresh your site, and TinyMCE is still loading, but this time with the following error.
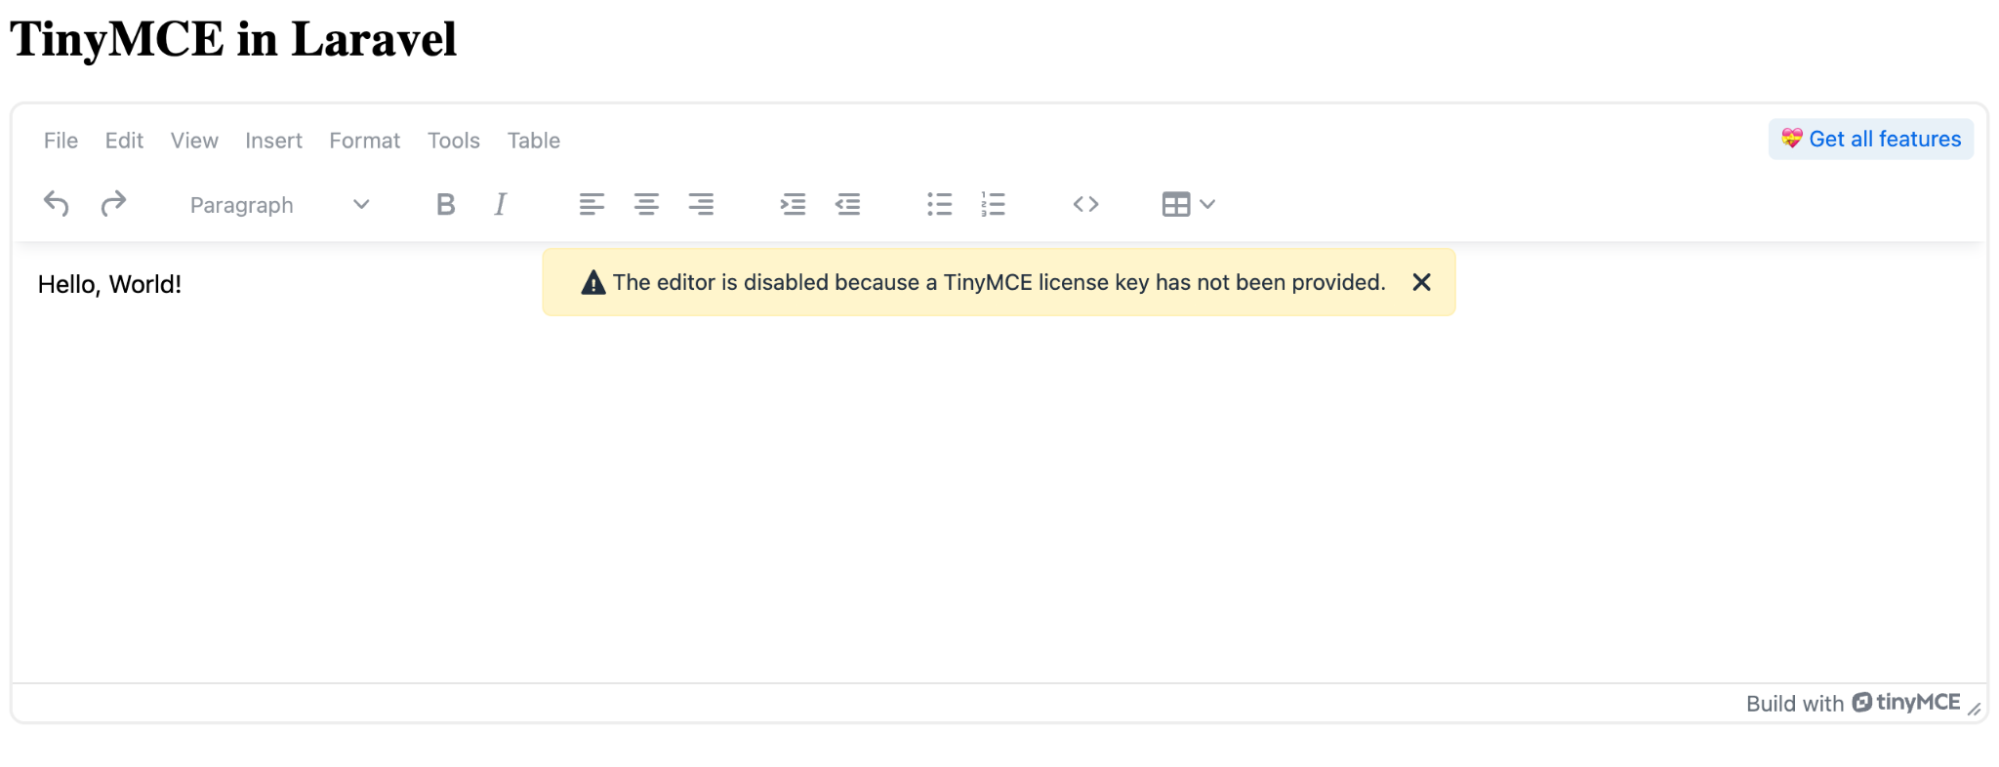
Replace the API key with a license key for self-hosting
To remove the previous error and ensure that the self-hosted TinyMCE is fully functional within your Laravel application, you will need to replace the API key with a license key.
In the resources/views/components/head/tinymce-config.blade.php file, you will need to do two things:
- Remove the code at the top to retrieve the
VITE_TINYMCE_API_KEYvalue, as it’s not needed anymore. - Add a new
license_keyoption to the TinyMCE configuration.
<script src="{{ asset('build/tinymce/tinymce.min.js') }}" referrerpolicy="origin" crossorigin="anonymous"></script>
<script>
tinymce.init({
selector: 'textarea#myeditorinstance', // Replace this CSS selector to match the placeholder element for TinyMCE
plugins: 'code table lists',
toolbar: 'undo redo | blocks | bold italic | alignleft aligncenter alignright | indent outdent | bullist numlist | code | table',
license_key: 'gpl'
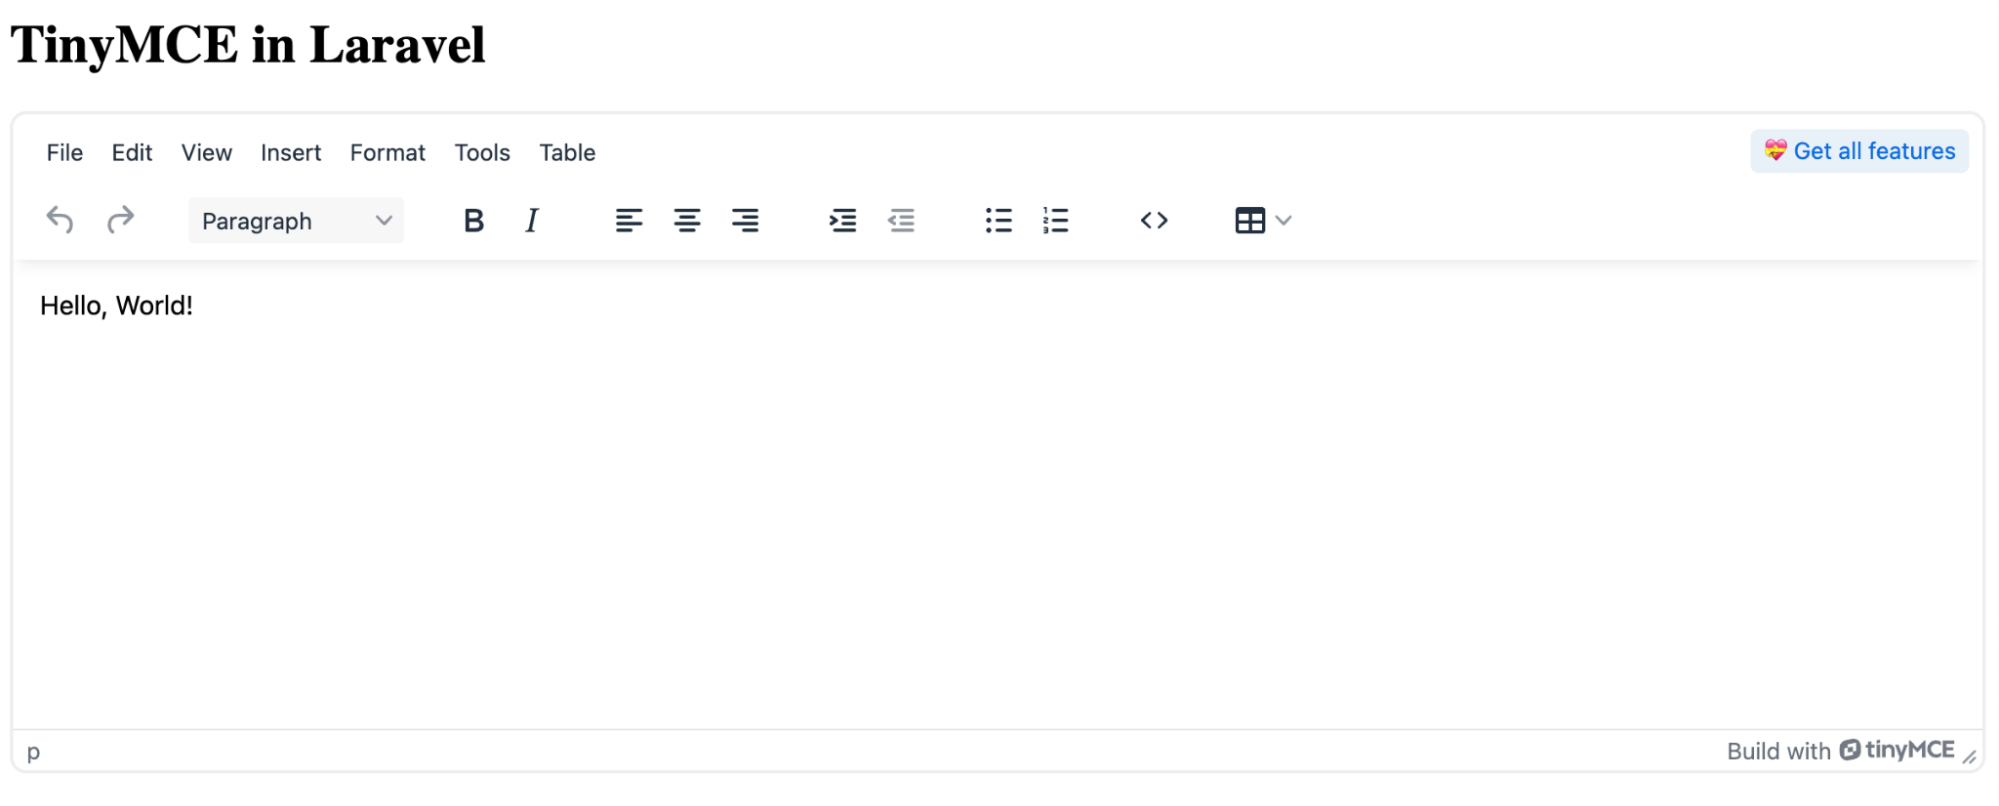
});
</script>Congratulations! You now have a fully functional self-hosted TinyMCE instance in your Laravel application. 🎉
Step three: Make it yours
To maximize your TinyMCE 14 Day Free Trial, try different configurations and customize it as you need. Add more functionality with premium plugins like the Accessibility Checker to ensure that the content created by your users is accessible, Media Optimizer to add comprehensive media management capabilities, or Suggested Edits to add collaboration superpowers to your application.
No matter the path you choose, Tiny Cloud or self-hosted, you end up with a rich text editor right into your Laravel application in minutes. Let me know how it went!


