


TinyMCE’s AI Quick Actions let you ship purposeful, workflow-specific AI inside a rich text editor (RTE) without building or maintaining your own AI backend, model connections, or API updates. Instead of another generic “improve writing” button, you can encode your team’s tone, compliance rules, and vocabulary directly into the editor’s config.
This guide walks through how to customize those Quick Actions in a React app:
- Adding custom Quick Actions with specific, pre-written prompts.
- Renaming defaults to match your team’s language.
- Trimming the menu down to what your users actually need.
Adding AI to a rich text editor is simple; the real challenge is configuring it to support your app requirements and users’ workflows. The examples here are built around a regulated-industry scenario, a small legal firm, because regulated industries are where the cost of generic AI output gets expensive fast.
Why customize default AI Quick Actions
TinyMCE AI’s default Quick Actions are useful, but they apply generic transformations that work for any use case or type of writing. The default Quick Actions are in the table below.
Table of TinyMCE AI’s default Quick Actions
|
Quick Action |
Menu code |
System |
Action |
|
Explain |
|
|
Opens Chat with the selected text and a pre-filled prompt. Uses the Conversations API, not the system actions path. |
|
Summarize |
|
|
Opens Chat with a summarize prompt. Uses the Conversations API, not the system actions path. |
|
Highlight key points |
|
|
Opens Chat with a key-points prompt. Uses the Conversations API, not the system actions path. |
|
Improve Writing |
|
|
Enhance clarity, word choice, and sentence structure. |
|
Continue Writing |
|
|
Complete unfinished sentences, paragraphs, or entire documents. |
|
Fix Grammar |
|
|
Correct grammar, spelling, and punctuation errors. |
|
Change length |
|
|
Shorten or lengthen the selection. Each option is its own system action. |
|
Adjust Tone |
|
|
Change writing style; each menu option maps to its own system action. |
|
Translate |
|
|
Convert content between languages. Request body uses |
Where custom AI Quick Actions come in
To begin customizing Quick Actions, you can configure the default actions to match your app’s specific requirements. For example: You’re building a document editor for a legal firm. A paralegal selects a clause and clicks “Change tone to professional.” The AI model rewrites it into something that reads well, but means something different than the user intended. The generic action did its job, but it wasn’t as specific as you needed.
The good news is that closing the gap and creating more specific AI Quick Actions to support your users’ workflow doesn’t mean building your own AI backend and maintaining model API updates, connections, and configurations.
Choose the intention of your Quick Actions
Before looking through integration code, it’s good to get clear on what you need from AI Quick Actions. Here are three things to consider:
- Quick Actions can be phrased in your product’s language, so users recognize what a button does without a training session.
- Prompts can encode your tone and compliance rules once in config, so that every user inherits the same standards instead of having to reinvent or remember them.
- You can remove actions that don’t fit, so the menu reflects the work your users do rather than a default feature checklist.
All three live in one place: the tinymce.init() configuration. You’re filling in fields, not writing request handlers or managing model routing, making integration for quick actions faster than coding them from scratch.
Prerequisites
You’ll need a few things in place before you start.
- A TinyMCE API key. If you don’t have one, the 14-day trial covers the full AI suite, and during a Tiny Cloud trial the demo identity service can supply auth tokens so you don’t have to stand up a token endpoint just to experiment.
- Familiarity with React, Vite, and Node.js.
⚠️ Note: AI Quick Actions are part of the TinyMCE AI suite, a paid add-on that’s available from the Essential tier up.
Step 1: Create a React app
To create a basic React app and see TinyMCE working inside it, start with this command:
npm create vite@latest tinymce-react-app -- --template reactYou’ll start by configuring the project. React will ask you if you want to “Install with npm and start now?” Using your keyboard, simply hit Enter since Yes is the default choice. This will install your dependencies for the React app.
And that’s it! You’ll be able to visit http://localhost:5173/ and see your React app in action:
Step 2: Add TinyMCE and TinyMCE AI Quick Actions to your React app
The goal of this step is a working editor with the AI Quick Actions button on the toolbar and nothing custom yet. You want to confirm the plugin loads and authenticates before you start changing its behavior. Debugging a custom prompt is much easier when you already know the base integration works.
Add TinyMCE to your project
The first thing you’ll do is install the TinyMCE React wrapper with another NPM command:
npm install --save @tinymce/tinymce-reactThis adds TinyMCE to your React project.
⚙️ A React-specific note: Pass everything through the init prop on the Editor component rather than calling tinymce.init() yourself. The React wrapper manages the editor’s lifecycle so it mounts and unmounts cleanly with your component, which keeps you out of stale-instance trouble during re-renders.
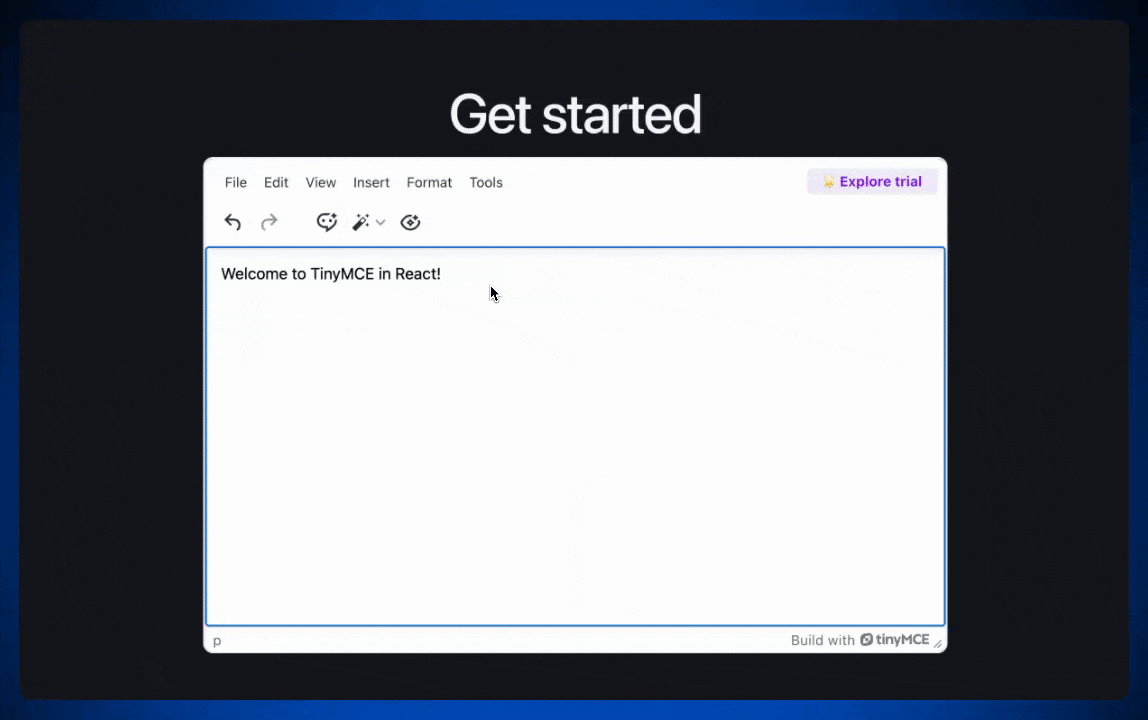
Now you’ll create a minimal Editor component as a custom file called Editor.jsx under the src/ folder. Use this code to create a basic TinyMCE instance with TinyMCE AI.
import { Editor } from "@tinymce/tinymce-react";

export default function LegalDocEditor() {
  return (
    <Editor
      apiKey="your-api-key"
      init={{
        height: 500,
        width: 750,
        plugins: "tinymceai",
        toolbar:
          "undo redo | tinymceai-chat tinymceai-quickactions tinymceai-review",
      }}
    />
  );
}
What’s this code doing? Adding tinymceai to plugins pulls in the whole AI suite. The toolbar string puts the three AI buttons where users can find them. The important one for this guide is tinymceai-quickactions, which opens the Quick Actions menu.
Configure the tinymceai_token_provider
The tinymceai_token_provider is the only required piece of plumbing left: It fetches a JWT from your backend and hands it back as { token }. This example reads a plain-text token; if your endpoint returns JSON, swap .text() for .json() and drop the wrapping object.
To get your custom tinymceai_token_provider JWT authentication function available with your 14-day free trial of TinyMCE, visit the Install TinyMCE AI page on your TinyMCE Account. On that page you’ll see a code snippet you can copy and paste into your TinyMCE instance.
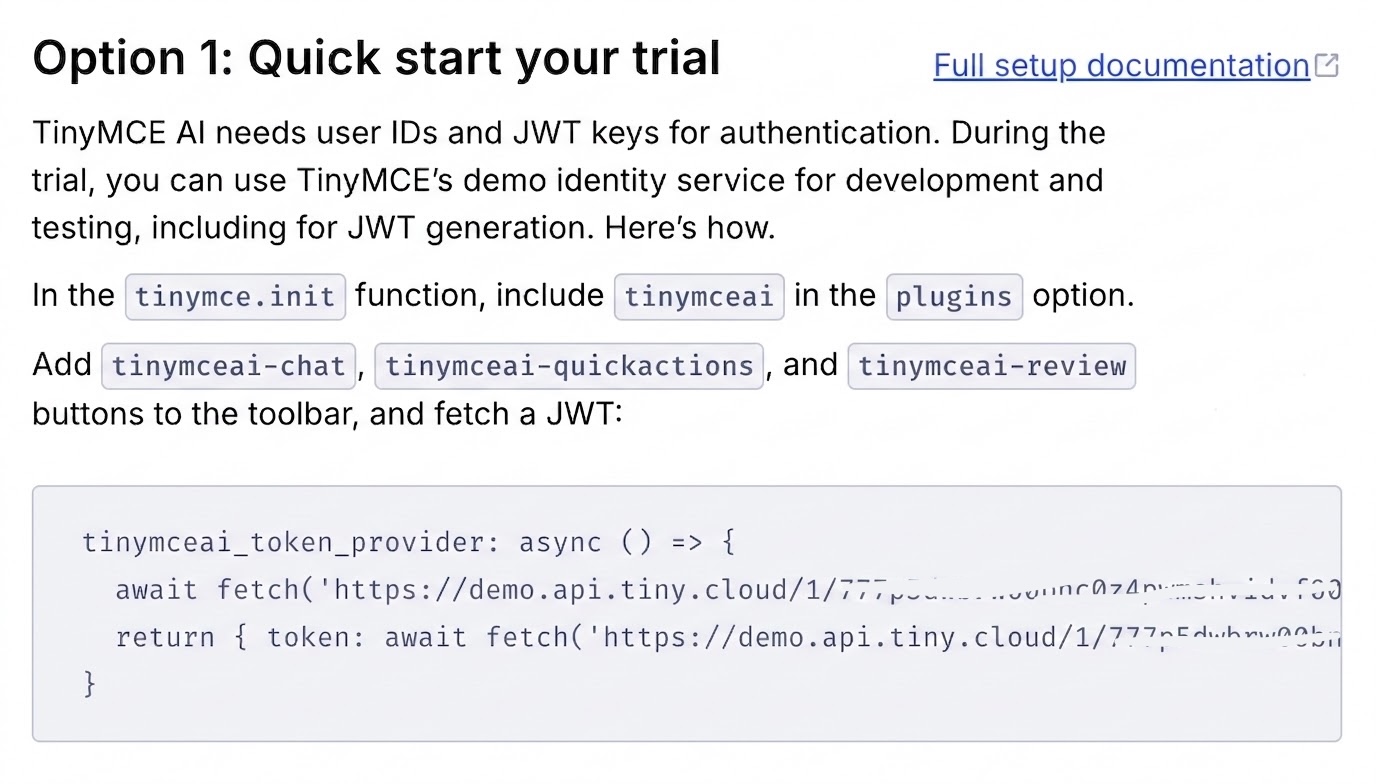
Copy this code and paste into your TinyMCE instance, like this (but replace no-api-key and no-JWT with the real values):
<Editor
  apiKey="no-api-key"
  init={{
    height: 500,
    width: 750,
    plugins: "tinymceai",
    toolbar:
      "undo redo | tinymceai-chat tinymceai-quickactions tinymceai-review",
    tinymceai_token_provider: async () => {
      await fetch("https://demo.api.tiny.cloud/1/no-JWT/auth/random", {
        method: "POST",
        credentials: "include",
      });
      return {
        token: await fetch(
          "https://demo.api.tiny.cloud/1/no-JWT/jwt/tinymceai",
          { credentials: "include" }
        ).then((r) => r.text()),
      };
    },
  }}
/>;
Save Editor.jsx. It’s time to add the editor to App.jsx.
Add the Editor to App.jsx
To add the RTE from Editor.jsx to your React app, you’ll replace everything in the App.jsx file with this code:
import "./App.css";
import LegalDocEditor from "./Editor";

function App() {
  return (
    <>
      <section id="center">
        <div>
          <h1>Get started</h1>
          <LegalDocEditor></LegalDocEditor>
        </div>
      </section>
      <section id="spacer"></section>
    </>
  );
}

export default App;
This loads the RTE into the front page of the React app. Now you should see the default AI Quick Actions menu: Improve writing, fix grammar, change tone, translate, and so on. It’s time to make it yours.
Step 3: Add a custom Quick Action with tinymceai_quickactions_custom
Custom Quick Actions let you ship a button that runs a specific, pre-written prompt every time, so the quality of the output is standardized.
You can define Quick Actions as an array of objects in tinymceai_quickactions_custom. Each object takes a title (what the user sees in the menu), a prompt (what actually gets sent to the model), and a type.
The type is important to understand: 'action' runs the transformation and shows an inline preview the user accepts or rejects before anything changes in the document, while 'chat' opens the result in the chat sidebar for back-and-forth. For an 'action' type, you also specify a model.
For the example legal firm, here are two actions that map directly to repetitive work. The first action is a type: 'action', so when a paralegal selects a dense clause and runs it, they get an inline preview of the plain-English version and decide whether to accept it. The prompt does the heavy lifting: it tells the model explicitly what it must not touch, which is how you encode a compliance rule once and hand it to everyone on the team.
The second action is a type: 'chat', because a client-email summary is something the user will likely want to read, tweak, and copy out rather than insert into the legal document itself. The result lands in the chat sidebar where the user can refine it.
...
  toolbar: 'undo redo | tinymceai-chat tinymceai-quickactions tinymceai-review',
  tinymceai_quickactions_custom: [
    {
      title: 'Rewrite in plain English (preserve legal meaning)',
      prompt:
        'Rewrite the selected text in plain, client-readable English. ' +
        'Do not change the legal meaning, obligations, dates, party names, ' +
        'or defined terms. If a term cannot be simplified without altering ' +
        'its meaning, leave it unchanged.',
      type: 'action',
      model: 'gemini-2-5-flash',
    },
    {
      title: 'Summarize for client email',
      prompt:
        'Summarize the selected clause in 3 short bullet points a non-lawyer ' +
        'client would understand. Flag anything that requires their decision.',
      type: 'chat',
    },
  ],
...Your custom actions show up in the Other submenu inside the Quick Actions menu by default. That keeps them grouped and out of the way of the built-ins until you decide otherwise, which is what the next two steps are about.
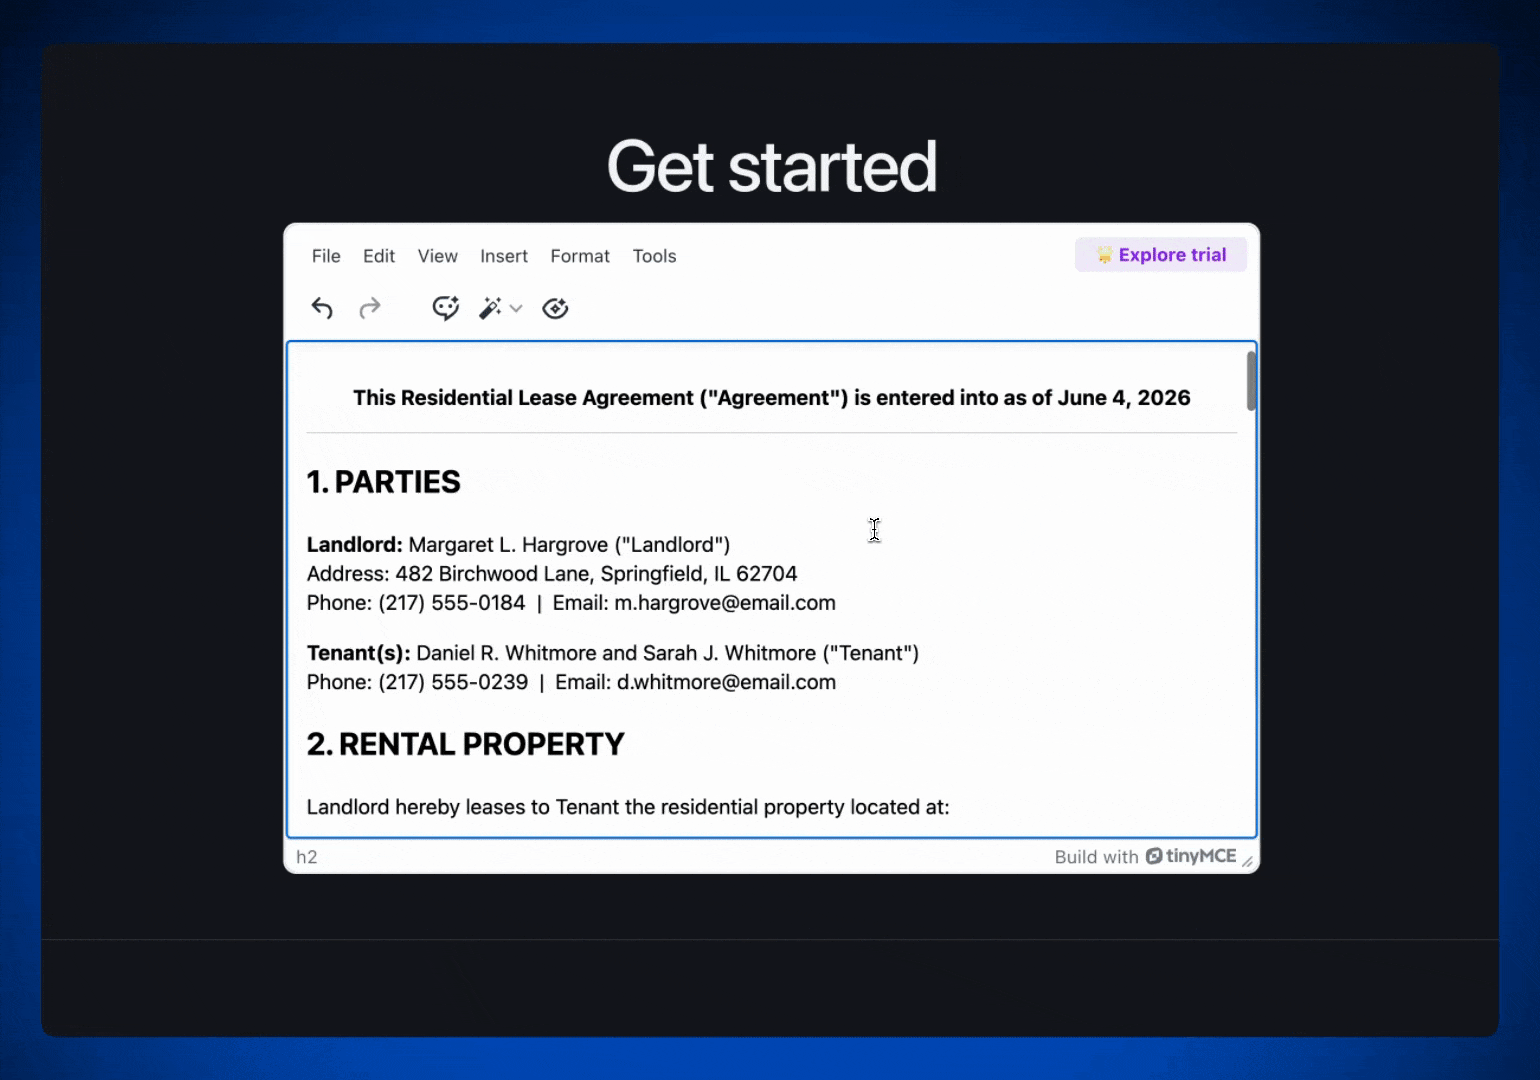
▶️ Test it out: The best way to test your custom Quick Actions is to ask the AI chat to generate a fake lease agreement for example purposes. This will give you a legal document to test your custom Quick Actions on.

Step 4: Remove actions that don’t fit
A menu full of options your users will never touch can be distracting instead of helpful. For a legal firm, “Translate” might not be necessary if the practice operates in a single language, and “Change length” could be a liability if shortening a clause risks dropping important legal terms.
Trimming the menu means trimming the tinymceai_quickactions_menu array. The default looks like this:
[
  "ai-quickactions-chat-prompts",
  "ai-quickactions-improve-writing",
  "ai-quickactions-continue-writing",
  "ai-quickactions-check-grammar",
  "ai-quickactions-change-length",
  "ai-quickactions-change-tone",
  "ai-quickactions-translate",
  "ai-quickactions-custom",
];
To trim the menu, just leave actions out of the array like this:
...
  toolbar: 'undo redo | tinymceai-chat tinymceai-quickactions tinymceai-review',
  tinymceai_quickactions_menu: [
    'ai-quickactions-improve-writing',
    'ai-quickactions-check-grammar',
    'ai-quickactions-custom'
  ],
...The menu now shows what this example firm actually does with AI and nothing else. A shorter list can focus the AI’s edits on exactly what your users need.
Optional: Rename defaults to match your internal language
Some of the default actions are genuinely useful. The labels just don’t always speak your team’s language. Matching the menu to the words your team already uses lowers the friction of adoption, because nobody has to translate the editor’s vocabulary into their own. You control which actions appear and in what order in the tinymceai_quickactions_menu.
The action IDs are fixed, but the labels users see are driven by TinyMCE’s localization layer, so the clean way to relabel an action is to override its translation string. You register a small language pack entry that maps the default English label to yours, then point the editor at it:
...
  toolbar: 'undo redo | tinymceai-chat tinymceai-quickactions tinymceai-review',
  language: 'en_custom',
  setup: (editor) => {
    editor.on('init', () => {
      editor.editorManager.addI18n('en_custom', {
        'Improve writing': 'Edit for review',
        'Check grammar': 'Proofread',
      });
    });
  },
...This keeps the underlying action exactly as it is, same prompt, same behavior, while changing only the words on the button. “Improve writing” becomes “Polish for review.” The action still does the work TinyMCE built; it just reads in your team’s language, not ours.
Note: If you want a renamed action to also behave differently, that’s not a rename anymore. That’s a custom action, which means you’re back in Step 2 defining your own prompt. Renaming is for when the default behavior is right and only the label is off.
Workflow consistency is now inherited from your configuration, applied identically in the law firm example, whether the user is a senior partner or someone in their first week. You moved the standard out of people’s heads and into the workflow, so they can approve changes instead of taking the time to manually create compliant content.
Note: If you’re looking for more TinyMCE tutorials for React apps, check out the React section of the TinyMCE Developer Center.
Wrapping up
Customizing Quick Actions is how the AI stops doing generic work and starts doing yours. The defaults give you a starting point. The four levers—adding custom actions, renaming the ones worth keeping, removing the ones that don’t fit, and stitching them into a coherent menu—are how you turn a generic AI feature into one that fits the specific shape of your users’ work and your content standards.
Ready to build it? Get a free TinyMCE API key and start customizing Quick Actions in your own configuration.
FAQ
Do custom Quick Actions cost extra?
No. Custom actions are part of the TinyMCE AI plugin, which is a paid add-on available from the Essential tier up. Defining your own actions in tinymceai_quickactions_custom doesn’t add a separate charge on top of that. You’re configuring a feature you already have, not buying a new one.
Which AI models back Quick Actions?
TinyMCE AI is a managed service that routes across leading models, including OpenAI, Anthropic’s Claude, and Google Gemini. You can set a default with tinymceai_default_model, control whether users can switch models with tinymceai_allow_model_selection, and for a type: 'action' custom action you specify the model directly. If you leave the model unset, the service picks based on speed, quality, and cost.
Is my content used to train AI models?
No. TinyMCE AI does not use your users’ content to train models.
Can I do this self-hosted yet?
Yes, it’s possible to self-host the TinyMCE AI suite. For more information, contact the TinyMCE team.


