


It's difficult to choose the right framework when there’s missing information. Frameworks have different functions, and can integrate with different components like text editors and emoji pickers. And it’s often unclear if you should build these capabilities yourself, or select an existing library or component. That means there’s a possible risk involved when making this choice. Here’s some help with your choice
Selecting the right framework, one you can trust, becomes less stressful when you can see what it can do, and put it to the test. In terms of en emoji picker, and the Vue framework (to focus on one important example) it’s possible to save time using a reliable component to set up a Vue emoji picker.
That’s the purpose of this article. It provides a demo of using TinyMCE as your app’s rich text editor making use of emoji picker capability.
TL;DR
- There's a risk of recreating features that you don't have to when developing your app, but seeing a demo can save time and reduce risk
- There’s a demo of building an app with TinyMCE, with Vue for an emoji picker, and Tailwind for easier CSS styling.
Vue emoji picker: definitions
To further reduce risk, here’s definitions behind the concepts in the following demo:
1. Vue: Specifically Vue version 3. Version 2 is rapidly reaching end of life at the time of writing. Vue is a JavaScript based framework, and several enterprise-level businesses rely on Vue for constructing different parts of their services.
2. TinyMCE: Is a rich text editor component that’s designed for effortless customization. It specifically includes the Emoticons plugin, as well as a dedicated Vue integration. These combine to provide a Vue emoji picker solution without needing to build one yourself.
3. Tailwind: Described as a framework, Tailwind scans different files, and applies styling where it detects specific classes are applied.
With these core definitions out of the way, the following sections explain how to put together the TinyMCE Vue integration, and set up a Vue emoji picker example with Tailwind.
Setting up Vue emoji picker with TinyMCE
-
Create a new project with Vue using the Vue command line:
vue create social-content-0a-
Change into the new application, and install the TinyMCE Vue integration:
npm install --save "@tinymce/tinymce-vue@^5"-
Change into the src/components/ directory, and create a TinyMCE vue file:
cd src/components/ touch TinyMCE.vue-
Add the following JavaScript to your new TinyMCE.vue file:
<script setup>

import Editor from '@tinymce/tinymce-vue'

</script>

<template>
<h2 class="mb-3 text-lg lg:text-2xl">Social Demo with emoji picker</h2>
  <div class="px-8 py-6 rounded-md bg-white shadow">
    <Editor
      api-key="add-your-api-key"
      :init="{
        plugins: 'lists advcode code emoticons typography',
        toolbar: 'undo redo | styles | bold italic | alignleft aligncenter alignright alignjustify | outdent indent | numlist bullist | emoticons | code typography',
        menubar: false,
        emoticons_append: {
        custom_mind_explode: {
          keywords: ['brain', 'mind', 'explode', 'blown'],
        char: '🤯'
        }
       },
      }"
    />
  </div>
</template>

<script>
export default {
  name: 'TinyMCE',
  props: {
  }
}
</script>💡NOTE: Change the "no-api-key" string to your TinyMCE API key. You can sign up for a FREE TinyMCE API key with your Google or GitHub accounts, and your key comes with a 14-day free trial of TinyMCE’s Premium plugins – for you to trial different features such as Spell Checker Pro and PowerPaste.
-
Save the new TinyMCE configuration.
-
Create a file for setting up a navigation bar:
touch Navigation.vue-
Copy the following content into the Navigation file:
<template>
 <nav class="bg-white border-gray-200 dark:bg-gray-900">
    <div class="hidden w-full md:block md:w-auto" id="navbar-default">
      <ul class="font-medium flex flex-col p-4 md:p-0 mt-4 border border-gray-100 rounded-lg bg-gray-50 md:flex-row md:space-x-8 rtl:space-x-reverse md:mt-0 md:border-0 md:bg-white dark:bg-gray-800 md:dark:bg-gray-900 dark:border-gray-700">
        <li>
          <a class="block py-2 px-3 text-white bg-blue-700 rounded md:bg-transparent md:text-blue-700 md:p-0 dark:text-white md:dark:text-blue-500" aria-current="page">Home</a>
        </li>
        <li>
          <a class="block py-2 px-3 text-gray-900 rounded hover:bg-gray-100 md:hover:bg-transparent md:border-0 md:hover:text-blue-700 md:p-0 dark:text-white md:dark:hover:text-blue-500 dark:hover:bg-gray-700 dark:hover:text-white md:dark:hover:bg-transparent">Feed</a>
        </li>
        <li>
          <a class="block py-2 px-3 text-gray-900 rounded hover:bg-gray-100 md:hover:bg-transparent md:border-0 md:hover:text-blue-700 md:p-0 dark:text-white md:dark:hover:text-blue-500 dark:hover:bg-gray-700 dark:hover:text-white md:dark:hover:bg-transparent">Stories</a>
        </li>
        <li>
          <a class="block py-2 px-3 text-gray-900 rounded hover:bg-gray-100 md:hover:bg-transparent md:border-0 md:hover:text-blue-700 md:p-0 dark:text-white md:dark:hover:text-blue-500 dark:hover:bg-gray-700 dark:hover:text-white md:dark:hover:bg-transparent">Messages</a>
        </li>
      </ul>
    </div>
 </nav>
</template>

<script>
export default {
  name: 'NavBar',
  props: {
  }
}
</script>✏️NOTE: Tailwind makes use of the md: and lg: prefixes here. For a Vue emoji picker that needs to facilitate communication, they’re a useful and effective way for applications to shift their design depending on the device.
-
Save the changes.
-
Change back into the src/ directory, and configure TinyMCE as the text editor in the App.vue file, along with the NavBar component:
<template>
  <NavBar />
  <TinyMCE />
</template>

<script>
import NavBar from './components/Navigation.vue'
import TinyMCE from './components/TinyMCE.vue'

export default {
  name: 'App',
  components: {
    NavBar,
    TinyMCE
  }
}
</script>

<style>
#app {
  /* font-family: Avenir, Helvetica, Arial, sans-serif; */
  -webkit-font-smoothing: antialiased;
  -moz-osx-font-smoothing: grayscale;
  text-align: center;
  color: #2c3e50;
  margin-top: 60px;
}
</style>✏️NOTE: The style section has the font family commented out for the purpose of this demo.
-
Save the change.
Configuring Tailwind to style the Vue emoji picker
-
Change back into the top level of the demo, and install Tailwind:
npm install -D tailwindcss postcss autoprefixer-
Run the command to initialize Tailwind, and create the needed configuration files:
npx tailwindcss init -p-
Adjust the tailwind.config.js file so Tailwind can scan specific directories in the Vue demo app, and apply styles:
export default {
  content: ["./index.html", ".src/**/*.{vue,js,ts,jsx,tsx}"],
};
-
In the src/style.css file, Add the tailwind directives:
@tailwind base;
@tailwind components;
@tailwind utilities;-
Add the style.css file to the main.js file:
import { createApp } from "vue";
import App from "./App.vue";
import "./style.css";

createApp(App).mount("#app");
-
Save the changes.
-
You can now test run the Vue emoji picker demo with the npm run serve command:
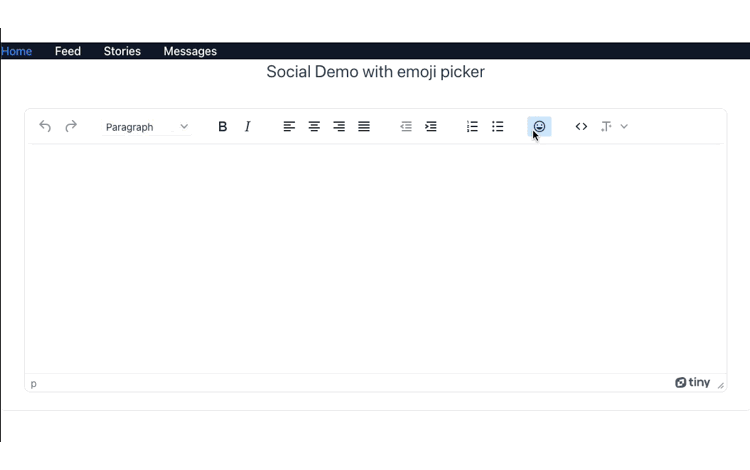
Vue emoji picker and more Vue capabilities
To help reduce any possible risk even further, there are other guides you can check on that explain different aspects of using Vue with TinyMCE:
- Configuring image upload with TinyMCE and Vue
- How to enrich your Vue application with TinyMCE for rich text editing
- Documentation on integrating TinyMCE and Vue
You can also contact us for more information on how TinyMCE’s range of available plugins can help you to build your projects more effectively.


