


Who uses React? Stack overflow survey results show that 25.12% of professional software developers want to use React for their projects.
That’s one in four.
Not a bad level of impact for a front end development framework.
So when you want to create a Document Management System (DMS) editor using TinyMCE as your Rich Text Editor, it’s helpful to have an existing wrapper or library to quickly integrate with React.
That’s why the TinyMCE official React WYSIWYG editor is available. It’s a fast and reliable method for integration.
And that’s what this article is about: getting started with tinymce-react to develop a document editor application. This demo matches what could be seen in a production ready app in some respects. It mimics document save functionality, including some controls for efficiency.
What is a WYSIWYG document editor?
This kind of editor is distinct from a text or document editor. The acronym WYSIWYG means “What you see is what you get”. So, a document editor that is a WYSIWYG editor shows the writer what the final, published result will look like as they write the document.
Think of MS Word. Or Google Docs. Both of these online document editors are WYSIYWG document editors – they show you the final look of the text.
How it looks in the editor (font, layout, color) is how it looks when printed or published online.
For the React framework, there are several options for adding a text area that’s a WYSIWYG document editor. The TinyMCE React integration delivers a fast and reliable WYSIWYG solution.
Prerequisites
There are some prior knowledge needed here:
- React app basics
- JavaScript Library knowledge
- Experience with using npm or yarn for package installation
- CSS design for layouts
How to build a React document editor
Step 1. Import and configure tinymce-react
To get started, we’ll need to install the tinymce-react component with our package manager of choice.
-
Make a new directory for your project in your workstation with the create-react-app command:
npx create-react-app tinymce-document-editorThe set-up and package installation may take a couple of minutes.
-
Change into that directory, and then install the TinyMCE react integration:
cd tinymce-document-editor

npm install --save @tinymce/tinymce-reactOr if you use yarn:
yarn add @tinymce/tinymce-react-
After the package fetching has finished, take a look at the newly built directory.
.
..
.git
.gitignore
README.md
node_modules
package-lock.json
package.json
public
src
yarn.lock-
Change into the src/ directory, and then open the App.js file. Modifying this file sets up the TinyMCE react integration.
Overwrite the file contents with the following JavaScript:
import React from "react";
import { Editor } from "@tinymce/tinymce-react"; // tinymce-react is imported as an ES module
import "./Styles.css";
export default function App() {
const editorRef = useRef(null);
const log = () => {
if (editorRef.current) {
console.log(editorRef.current.getContent());
}
};
return (
<>
<Editor
apiKey="your-api-key"
onInit={(evt, editor) => (editorRef.current = editor)}
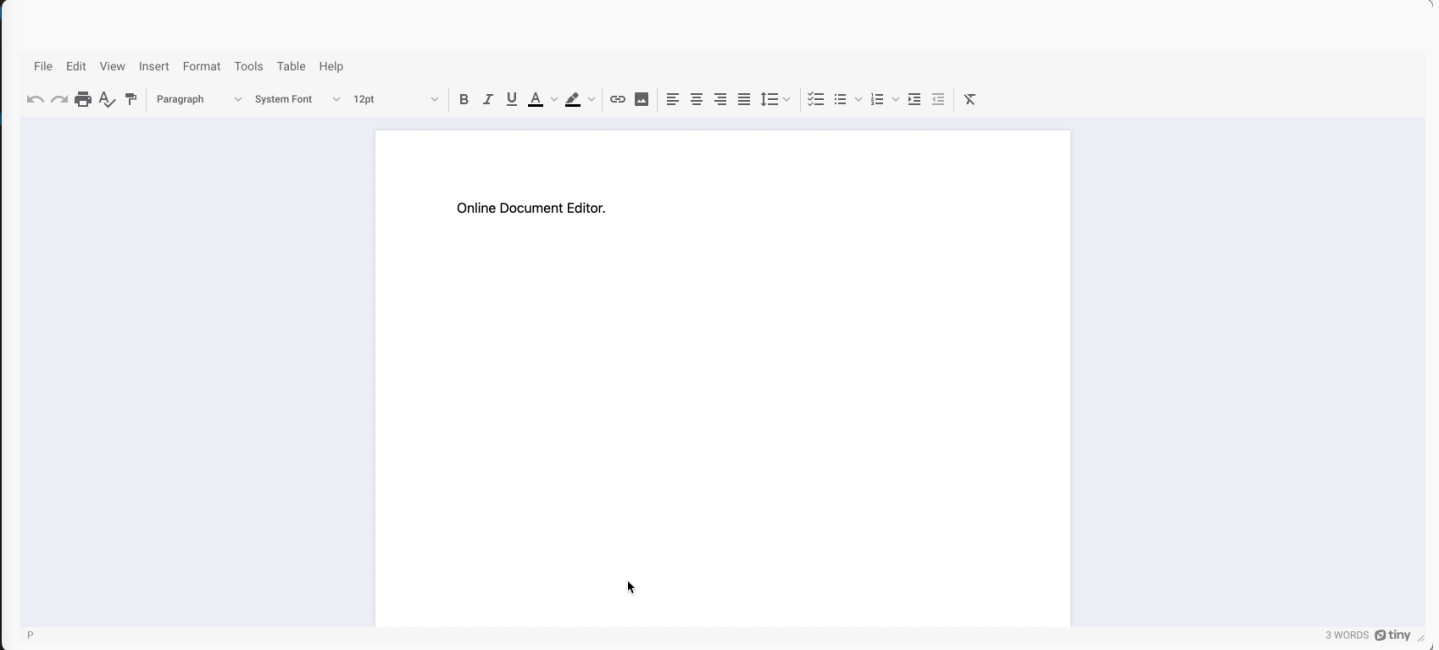
initialValue="<p>Online Document Editor.</p>"
init={{
height: 500,
menubar: false,
plugins:
"powerpaste casechange searchreplace autolink directionality advcode visualblocks visualchars image link media mediaembed codesample table charmap pagebreak nonbreaking anchor tableofcontents insertdatetime advlist lists checklist wordcount tinymcespellchecker editimage help formatpainter permanentpen charmap tinycomments linkchecker emoticons advtable export print autosave",
toolbar:
"undo redo print spellcheckdialog formatpainter | blocks fontfamily fontsize | bold italic underline forecolor backcolor | link image addcomment showcomments | alignleft aligncenter alignright alignjustify lineheight | checklist bullist numlist indent outdent | removeformat",
height: "700px",
toolbar_sticky: true,
icons: "thin",
skin: "material-classic",
icons: "material",
content_style: "material-classic",
}}
/>
<button onClick={log}>Log editor content</button>
</>
);
}
By default, the component will load TinyMCE from Tiny Cloud, which is the quickest way to get going.
Configure your API key
In the App.js content, there is a string next to the apiKey option that says ‘your-api-key’. Add your API key here to access TinyMCE Premium Plugins for your document editor.
When you sign up for your FREE TinyMCE API key you also get a 14 day trial of TinyMCE Premium plugins!
Step 2. Online document editor design
With TinyMCE working in React, the next step is to apply style to the document editor.
The following document editor style comes from the TinyMCE DMS solution. Here’s how to set this one up:
-
Create a file inside the /src directory called Styles.css
-
Add the following CSS to the Styles.css file
        body {
            margin: 4rem auto;
            padding: 0 2rem;
            background-color: #f9f9fb;
        }
        main {
            width: 100%;
}-
Reference the Styles.css file in the App.js:
import React from "react";
import { Editor } from "@tinymce/tinymce-react"; // tinymce-react is imported as an ES module
import "./Styles.css";
-
Modify the appearance of the text editor by changing the ‘content_styles’ option for the TinyMCE editor in the App.js file:
          content_style: `
          body {
              background: #fff;
          }

          @media (min-width: 840px) {
              html {
                  background: #eceef4;
                  min-height: 100%;
                  padding: 0 .5rem
               }

              body {
                  background-color: #fff;
                  box-shadow: 0 0 4px rgba(0, 0, 0, .15);
                  box-sizing: border-box;
                  margin: 1rem auto 0;
                  max-width: 820px;
                  min-height: calc(100vh - 1rem);
                  padding:4rem 6rem 6rem 6rem
               }
           }
`, -
Save the changes, and load the React app:
npm run start
Step 3. Implementing the status bar component
The status bar…why have this in the app?
It’s useful for keeping your customers informed.
The information it can provide can tell the writer their document name, as well as if the changes they just made have saved, or are still saving.
Whether their work is saved or not, is useful to know.
To emulate document editor behavior, the TinyMCE react demo needs a status bar that can do the following:
- Allow for changing the name of the document
- Show the writer when the document is currently saving
- And show when it is saved
Note: This functionality does not actually save the document contents. It displays “saved”, but this is only a notification without actual save functionality.
Adding a status bar means handling state management.
React components have a state – that is, the key and value pairs that make up the component.
When the component changes, React usually re-renders the change.
To create a status bar that can tell the writer whether the document is saved, or is in the processing of saving, the functional components of the document editor need to receive the state change, and needs event handlers.
Starting with the App.js file:
-
Create an import for a status bar component, as well as a reference for a status bar JavaScript file:
import React from "react";
import * as _ from "lodash";
import { Editor } from "@tinymce/tinymce-react"; // tinymce-react is imported as an ES module
import { StatusBar } from "./StatusBar"; //Add status bar reference
-
Create a new JavaScript file named ‘StatusBar.js’ in the src/ directory.
-
Open the newly created StatusBar.js file, and add the following contents to shape the status bar in the app:
import React from "react";
export const StatusBar = (props) => {
  const handleBlur = (e) => {
    if (e.target.value !== props.documentName) {
      props.onNameChange(e.target.value);
    }
  };
  return (
    <header className="status-bar">
      <input
        className="font"
        defaultValue={props.documentName}
        onBlur={handleBlur}
      />
      <span className="font">
         - {props.displayIsSaving ? "Saving" : "Saved"}
      </span>
    </header>
  );
};
-
Save the changes to the new file.
-
In the Styles.css file, add additional class CSS styles to change the status bar appearance:
.status-bar {
  height: 40px;
  display: flex;
  justify-content: center;
  font-family: Roboto, Oxygen, Ubuntu, Cantarell, sans-serif;
  font-weight: 300;
  font-size: 15px;
  color: #ffff;
  background-color: #335dff;
}

.status-bar input {
  flex: 1;
  background: none;
  border: none;
  outline: none;
  text-align: right;
  font-family: Roboto, Oxygen, Ubuntu, Cantarell, sans-serif;
  font-weight: 300;
  font-size: 15px;
  color: #ffff;
}

.status-bar span {
  flex: 1;
  display: flex;
  align-items: center;
  color: #ffff;
}-
Save the changes.
If at this stage the status bar does not load, don’t worry. The StatusBar component needs some more configuration in the App.js file to start working properly.
The StatusBar JavaScript at step 3 in the previous steps has several functions and other methods such as the necessary props, target.value, and onNameChange.
The next steps create this functionality that the React document editor needs to start working.
Note: a value prop sets the editor’s content, and together with onEditorChange, the props interact with the react components, and turn tinymce-react into a Controlled Component.
Step 4. Setting up status bar event handlers
To implement the save method, the demo needs a method that takes the state, and then updates the state in the form of an object. Whenever the state update method runs, an event listener flags the update. The words in the status bar then change to indicate that saving is in progress.
Since React might batch multiple setState calls into a single update for performance, any actions to perform with the state may be asynchronous. This is why the callback given by the setState method performs the actual save action.
Here’s how to implement the status bar event handlers:
-
In the App.js file, replace the JavaScript content under the import section with the following sections.
First, add an export class:
export class App extends React.Component {
  constructor(props) {
    super(props);
    this.handleNameChange = this.handleNameChange.bind(this);
    this.handleEditorChange = this.handleEditorChange.bind(this);
-
Remove the default function content referring to console logging.
-
Add the following JavaScript to build the StatusBar component above the editor. Entirely replace the export default function contents with the following:
render() { //Adjust the default React content
  return ( // Include a div element with a document-editor class
    <div className='document-editor'>
      <StatusBar // Add the status bar component
        documentName={this.state.documentName}
        onNameChange={this.handleNameChange}
        displayIsSaving={this.state.displayIsSaving}
      />
      <Editor
        apiKey='your-api-key'
        onEditorChange={this.handleEditorChange} //Change the OnInit values to the EditorChange
        value={this.state.editorContent} //Add the new initial value content
        init={{
          height: 500,
          plugins: "powerpaste casechange searchreplace autolink directionality advcode visualblocks visualchars image link media mediaembed codesample table charmap pagebreak nonbreaking anchor tableofcontents insertdatetime advlist lists checklist wordcount tinymcespellchecker editimage help formatpainter permanentpen charmap linkchecker emoticons advtable export print autosave",
          toolbar: "undo redo print spellcheckdialog formatpainter | blocks fontfamily fontsize | bold italic underline forecolor backcolor | link image addcomment showcomments  | alignleft aligncenter alignright alignjustify lineheight | checklist bullist numlist indent outdent | removeformat",
          height: '700px',
          toolbar_sticky: true,
          icons: 'thin',
          skin: 'material-classic',
          icons: 'material',
          content_style: `
          body {
              background: #fff;
          }

          @media (min-width: 840px) {
              html {
                  background: #eceef4;
                  min-height: 100%;
                  padding: 0 .5rem
               }
              body {
                  background-color: #fff;
                  box-shadow: 0 0 4px rgba(0, 0, 0, .15);
                  box-sizing: border-box;
                  margin: 1rem auto 0;
                  max-width: 820px;
                  min-height: calc(100vh - 1rem);
                  padding:4rem 6rem 6rem 6rem
               }
           }
         `,
        }}
      />
      </div>
  );
 }
}The status bar needs further configuration to work, which can be found in the following steps.
Step 5. Add initial state for the online document editor
In a real-world online editor, this value would be populated with a document loaded from a server. The demo sets the name of the initial state manually.
-
Add the following state configuration to the App.js file after the export class content:
this.state = {
  documentName: "Document 1",
  editorContent:
    '<h2 style="text-align: center;">Online Document Editor with TinyMCE and React</h2>',
  displayIsSaving: false,
};
Step 6. Add save configuration for the status bar
To time and limit the amount of requests the demo makes, use two functions from a popular library called lodash (this is optional functionality, but if you’re curious, read more about the throttle and debounce functions).
In production, these features help make for a more efficient and fast loading application
Add a componentWillUnmount lifecycle hook to cancel any delayed invocations by the save methods if there are any dormant save operations still around when the component gets unmounted.
-
Import the lodash library at the top of the App.js file:
import React from "react";
import { Editor } from "@tinymce/tinymce-react"; // tinymce-react is imported as an ES module
import "./Styles.css";
import { StatusBar } from "./StatusBar"; //Add status bar reference
import * as _ from "lodash";
-
Set up the save control with a function that uses throttle, and a function that uses debounce. Add the following content after the configuration to set the initial document state:
this.throttledSaveToServer = _.throttle(() => { // Include Save control
      setTimeout(() => {
        this.debouncedEndSaving();
        console.log("Saved to server", this.state.documentName, this.state.editorContent);
      }, 500);
    }, 500);

    this.debouncedEndSaving = _.debounce(() => {
      this.setState({ displayIsSaving: false });
    }, 1000);
}Next, add the event handlers, and the lifecycle hook:
  handleEditorChange(editorContent) { // Add the ability to handle changes in the editor
    this.save({ editorContent });
  }

  handleNameChange(documentName) {
    this.save({ documentName });
  }

  save(newPartialState) { //How to set up a save component section
    this.setState({ // Action performed with the callback given to the setState method
      ...newPartialState,
      displayIsSaving: true
    }, () => {
      this.throttledSaveToServer();
    });
  }

  componentWillUnmount() {
    this.debouncedEndSaving.cancel();
    this.throttledSaveToServer.cancel();
}-
Save the changes in the App.js file.
-
Finally, open the index.js file, and update it to match the following imports and ReactDom contents:
import React from "react";
import ReactDOM from "react-dom/";
import { App } from "./App";
import "./Styles.css";
ReactDOM.render(<App />, document.getElementById("root"));
-
Save these changes, and check the React document editor works:
You can test out the save functions: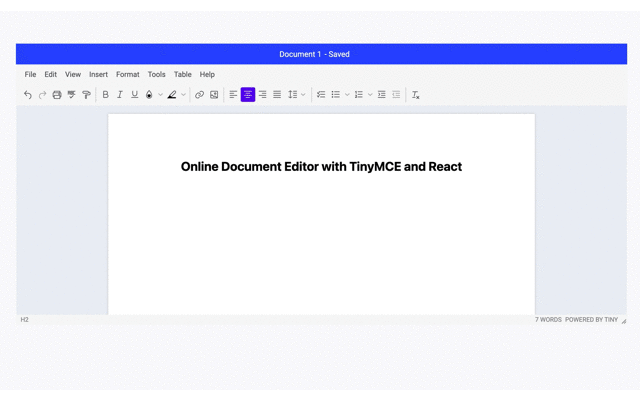
And the document naming function:
Wrapping up
That’s it!
You can find the complete example in the following codepen:
This project started with the following demo. It has a classic design, and provides a base project to build from:
From here, you can further adjust the React components to fit the project out for production.
In the React Document editor, you can try out several of the TinyMCE Premium Plugins.
- Power Paste to clean content pasted from other document editors
- Accessibility checker to ensure accessible content quickly
- And Advanced Table functionality, like sorting and adding numbered rows
Signing up for a FREE API key gives you access to these features, and many more for 14 days.


